---
title: In-store purchase workflow
sidebar:
order: 2
---
Follow this page beside the console from intake at the counter through payment in cash or by bank transfer. The console calls this intake method **In store**. Staff operate the console; the customer reviews and signs on their smartphone or a shop tablet.
## The order of work
For cash, follow steps 1–8. For a transfer, follow steps 1–6, then [Pay by bank transfer](#pay-by-bank-transfer). If the customer keeps cards or asks for help, use the relevant section below.
:::note[Before you start]
- If your shop uses cash management, start a register in **現金管理** (Cash management) when you open. Otherwise step 7 shows 「営業中のレジがありません」 (No register is open) while the customer waits ([Opening, counts and closing](/en/guides/purchase/cash)).
- To load market prices for ungraded cards in step 2, set the **単品カードの既定グレード** (Default grade for single cards) under **Settings** → **買取掛け率** (Buy rates). Without it, you can still enter the reference price by hand.
:::
1. [Add the purchase request and add the
cards](#1-add-the-purchase-request-and-add-the-cards)
2. [Appraise the cards and save](#2-appraise-the-cards-and-save)
3. [Check the quote PDF](#3-check-the-quote-pdf)
4. [Show it on the customer's screen](#4-show-it-on-the-customers-screen)
5. [The customer reviews, agrees, and
signs](#5-the-customer-reviews-agrees-and-signs)
6. [Check the customer's ID in person](#6-check-the-customers-id-in-person)
7. [Register stock and payment](#7-register-stock-and-payment)
8. [Check completion and put the cards
away](#8-check-completion-and-put-the-cards-away)
The status stays at **Final quote presented** even after the customer signs. **Next step** at the top of the deal page always shows what to do next.
## 1. Add the purchase request and add the cards
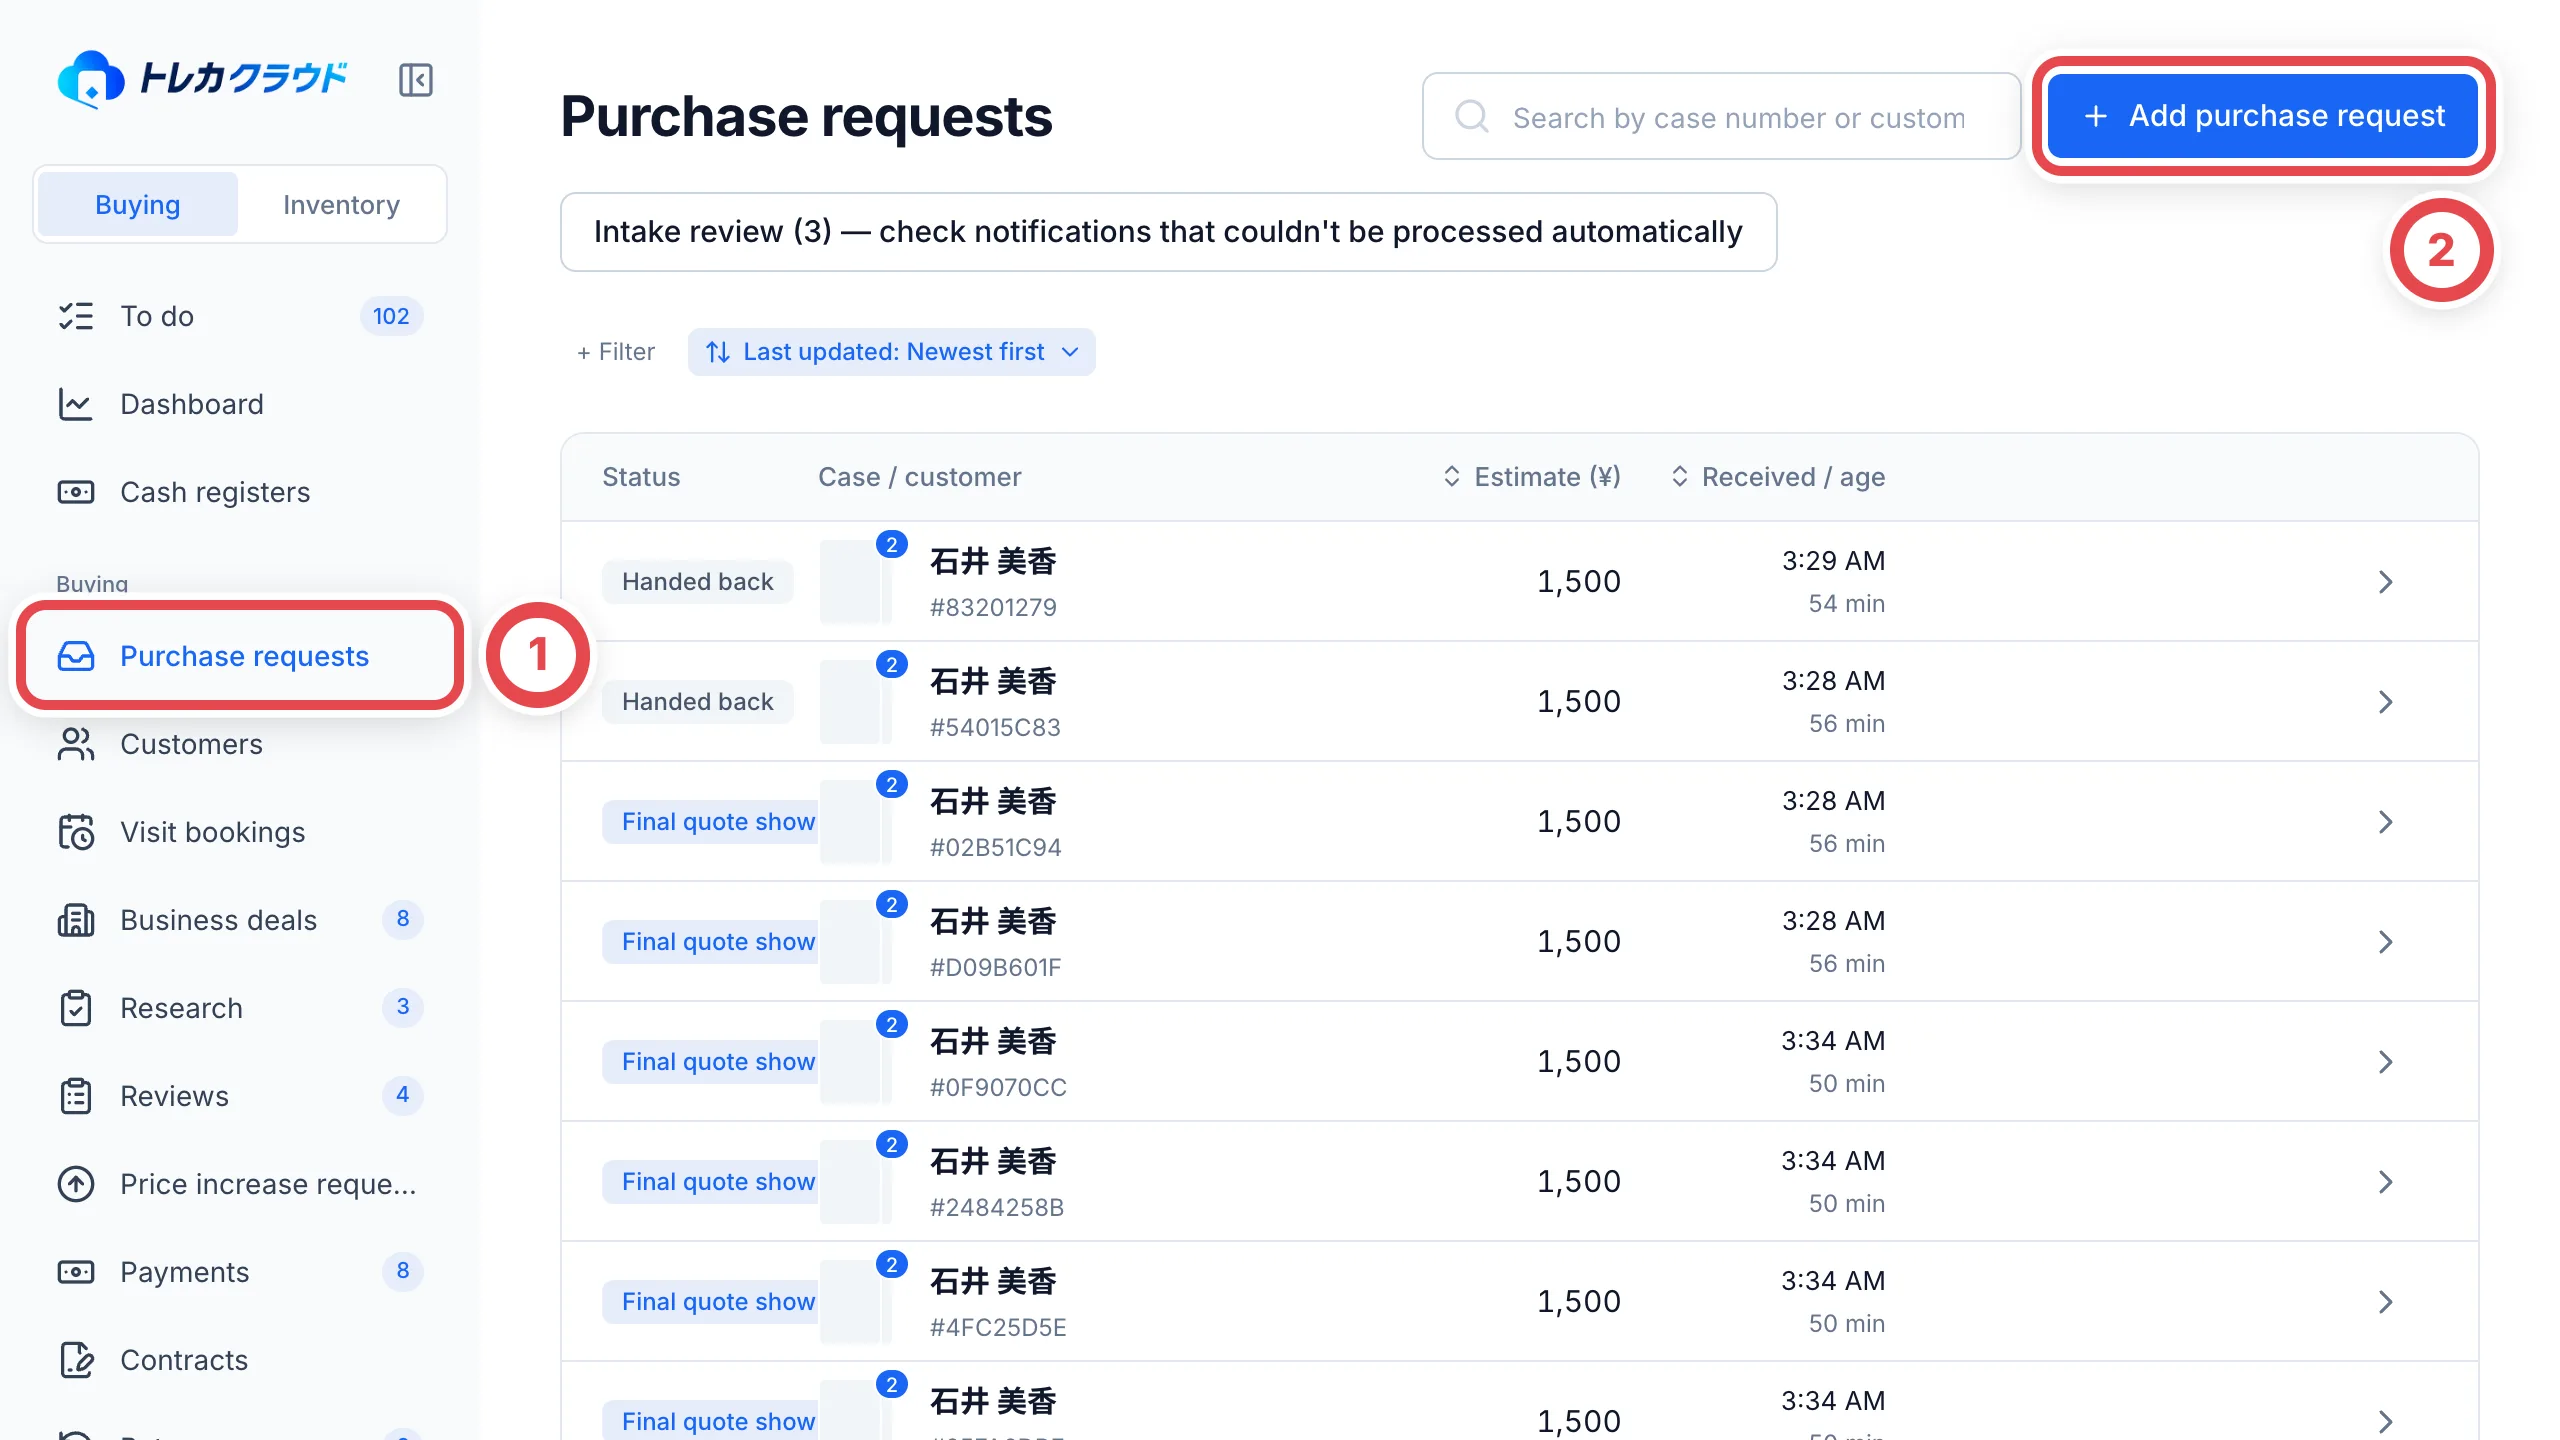
Open **Purchase requests** at ① in the sidebar, then click **Add purchase request** at ② at the top right.
 In the dialog, select **In store** at ③. Shops that do not use online purchases do not see ③; the request is registered as in store. For a first-time customer, keep **New customer** and enter their name at ④. For a returning customer, select **Existing customer** and search. Click **Add purchase request** at ⑤ to create the deal. The deal page opens.
For a customer who booked a visit, the deal already exists from the booking. Checking them in under **Visit bookings** opens the deal, so start from adding the cards (see [Visit bookings](/en/guides/purchase/reservations)).
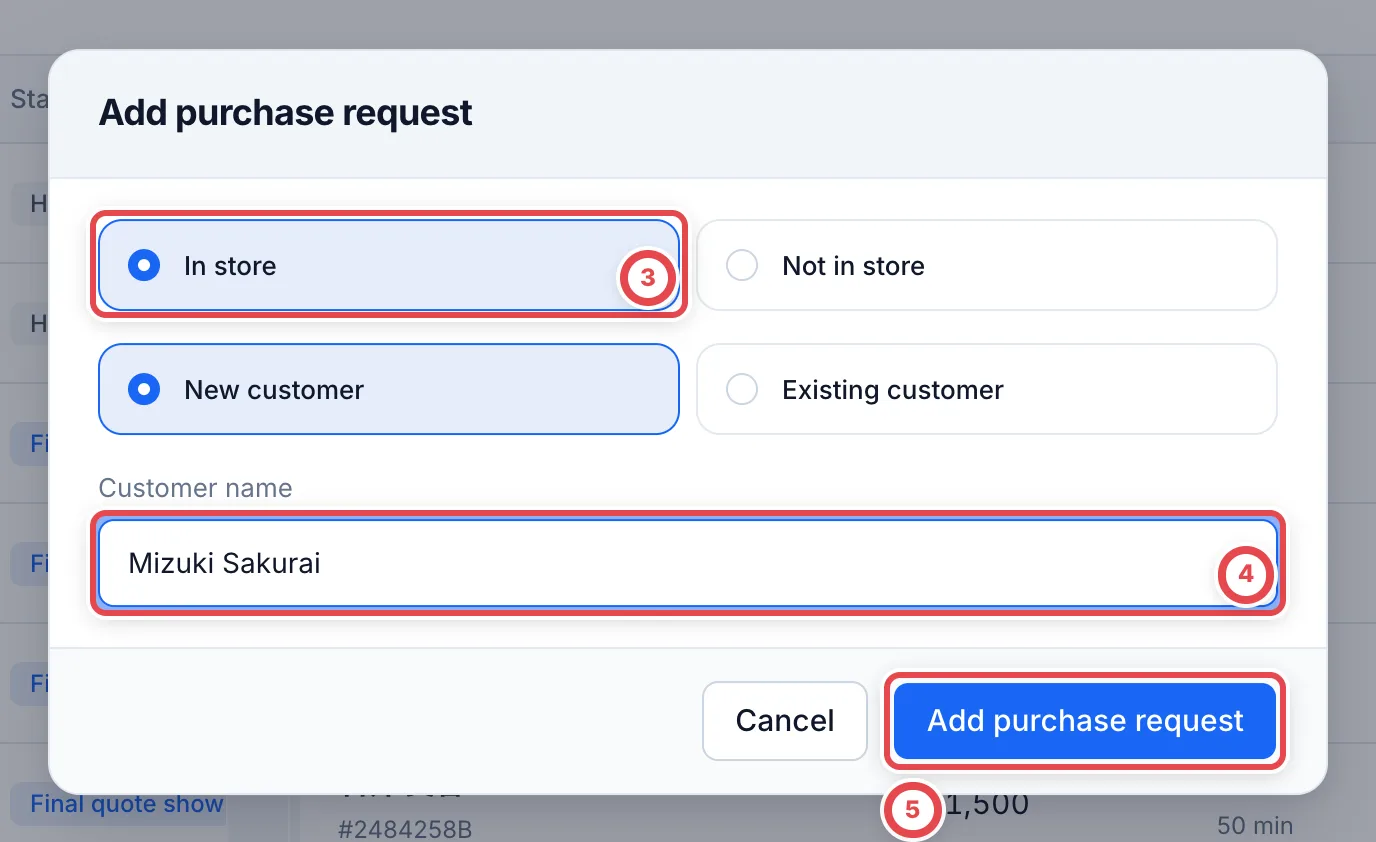 If your shop only buys in store, the intake channel field does not appear and the deal is set to in store automatically.
### Open the item dialog
At the top of the deal page, ① shows the current task. Click **Add cards** at ② to open **Add item**. Continue to [Search for and select the card](#search-for-and-select-the-card).
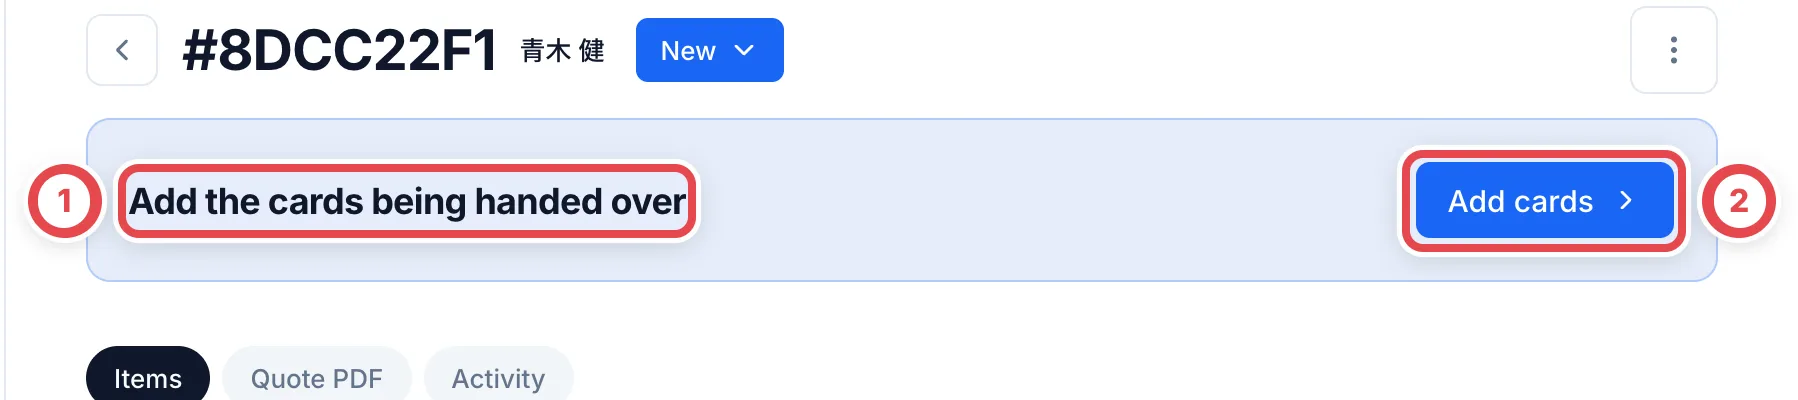 To register another card, click **Add item** at ① at the top right of the appraisal details.
 In **Add item**, use **Search by photo** at ① on the left to choose a photo on your device. On a smartphone or similar device, you can also take a photo. To search by name or card number, click **Search by keyword** at ② on the right.
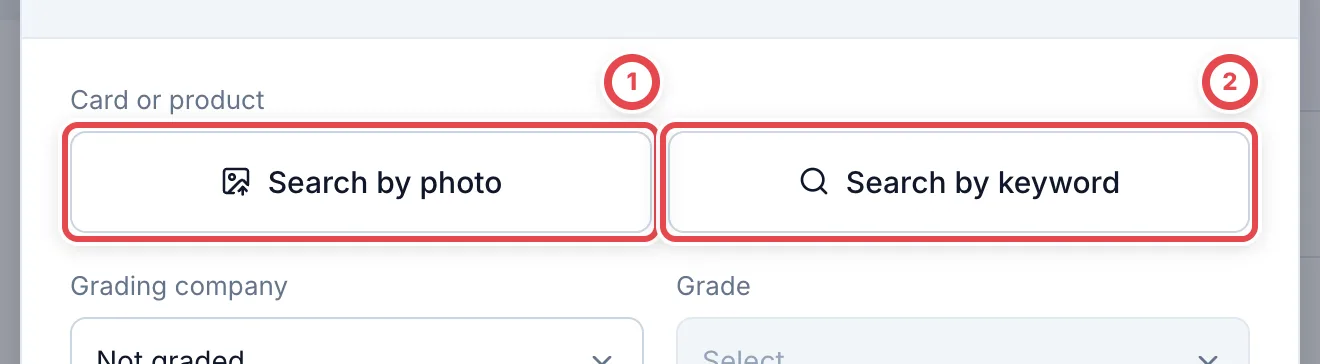 ### Search for and select the card
Enter the card name or number at ③ in the card and product picker. Compare each result's name, number and set with the physical card, then click the matching card at ④. You return to **Add item**, with the selected card shown.
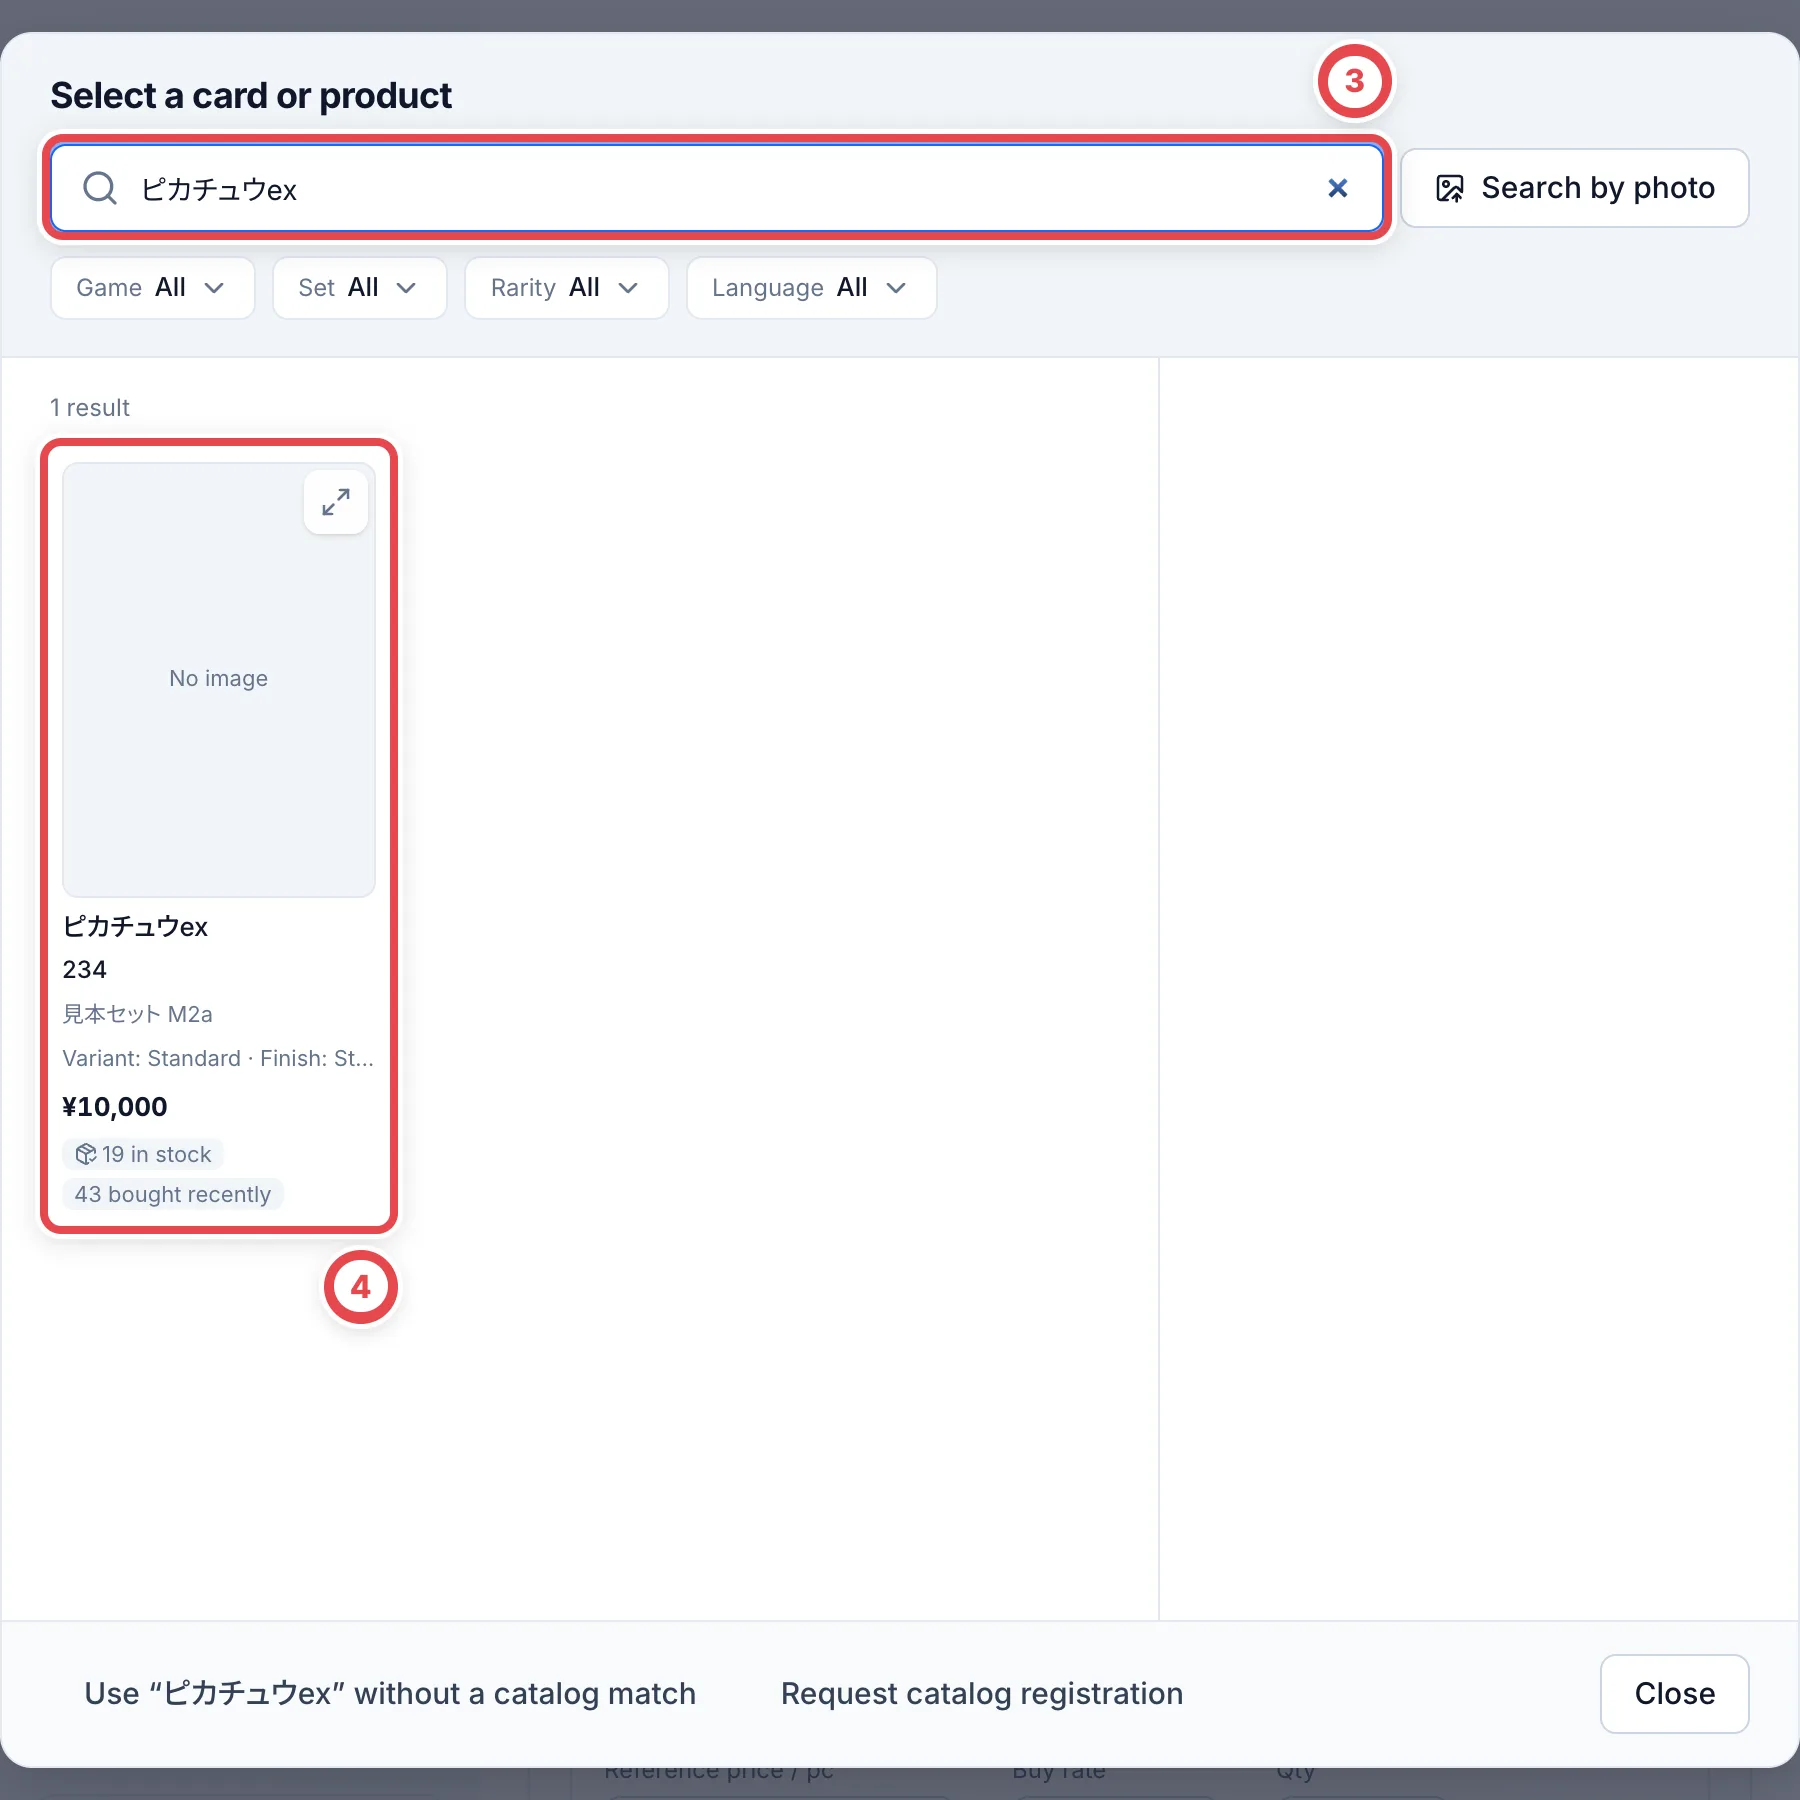 For photo search, check the suggested matches against the physical cards before selecting them. If the photo contains several cards, check which ones to include and click **Add N cards** (the button shows the count). If the photo cannot be read, search by name or number instead. Check any grading details read from the photo against the slab label too.
If you cannot find a match, shorten the search term or search by card number. For a card missing from the catalog, click **Use “…” without a catalog match** (the button shows the entered name). To keep only a photo and identify the card later, close the search dialog and add a photo under **Photos of the item (optional)**.
### Enter the quantity and add the item
Check the selected card. For a graded card, match **Grading company** at ① and **Grade** at ② to the slab label. For one item, you can optionally enter the certification number. Otherwise, leave **Not graded** selected. Enter the quantity and any notes or photos, then click **Add to items**. Check and save the PSA number against the item before payment.
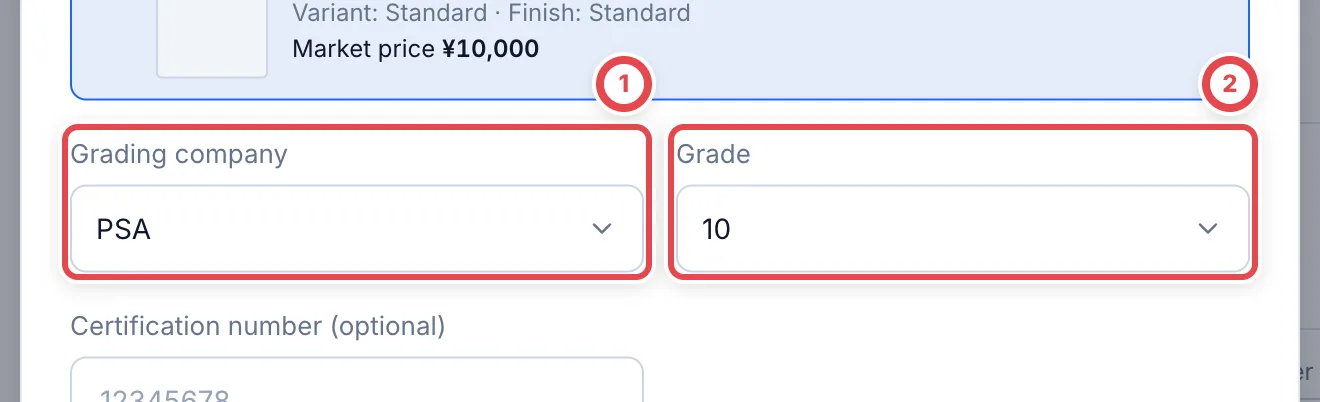 For multiple copies, enter each number in the final appraisal. If a number is missing or incorrect before payment, use **Check / correct PSA numbers** on the Payment card.
Back in the appraisal details, check the card and quantity. Repeat from **Add item** for another card. Cards and quantities added while editing an appraisal are committed when you save the appraisal in the next step.
### Register multiple copies of the same card
While editing an appraisal, adding the **same card with the same condition rank or grading company and grade** through **Add item** increases the existing line's quantity. Adding two copies to a line with one copy produces one line with quantity three. You can also edit **Quantity** directly on the existing line.
Different ranks, condition notes or certification numbers remain separate. Items added with photos, and lines with individual appraisal notes or splits, also stay separate to preserve their details. This does not automatically consolidate duplicate lines that were already saved.
## 2. Appraise the cards and save
If the appraisal editor is not already open, click **Enter appraisal** in **Next step**. Click **Check market prices** at ⑤ to load the latest prices. If an ungraded card shows 「グレードが決まっていないため相場を取り込めません」 (No grade is set, so the market price cannot be loaded), enter the verified amount as the reference price, or set the default grade for single cards under **Settings** → **買取掛け率** and load prices again. With **Store settings** selected at ⑥, the default buy rate appears before you enter a market price. Once all prices are entered, applicable conditions are calculated automatically. Select **Manual entry** to edit the rates directly. Adjust the amounts at ⑦ to match each card's condition, then save at ⑧.
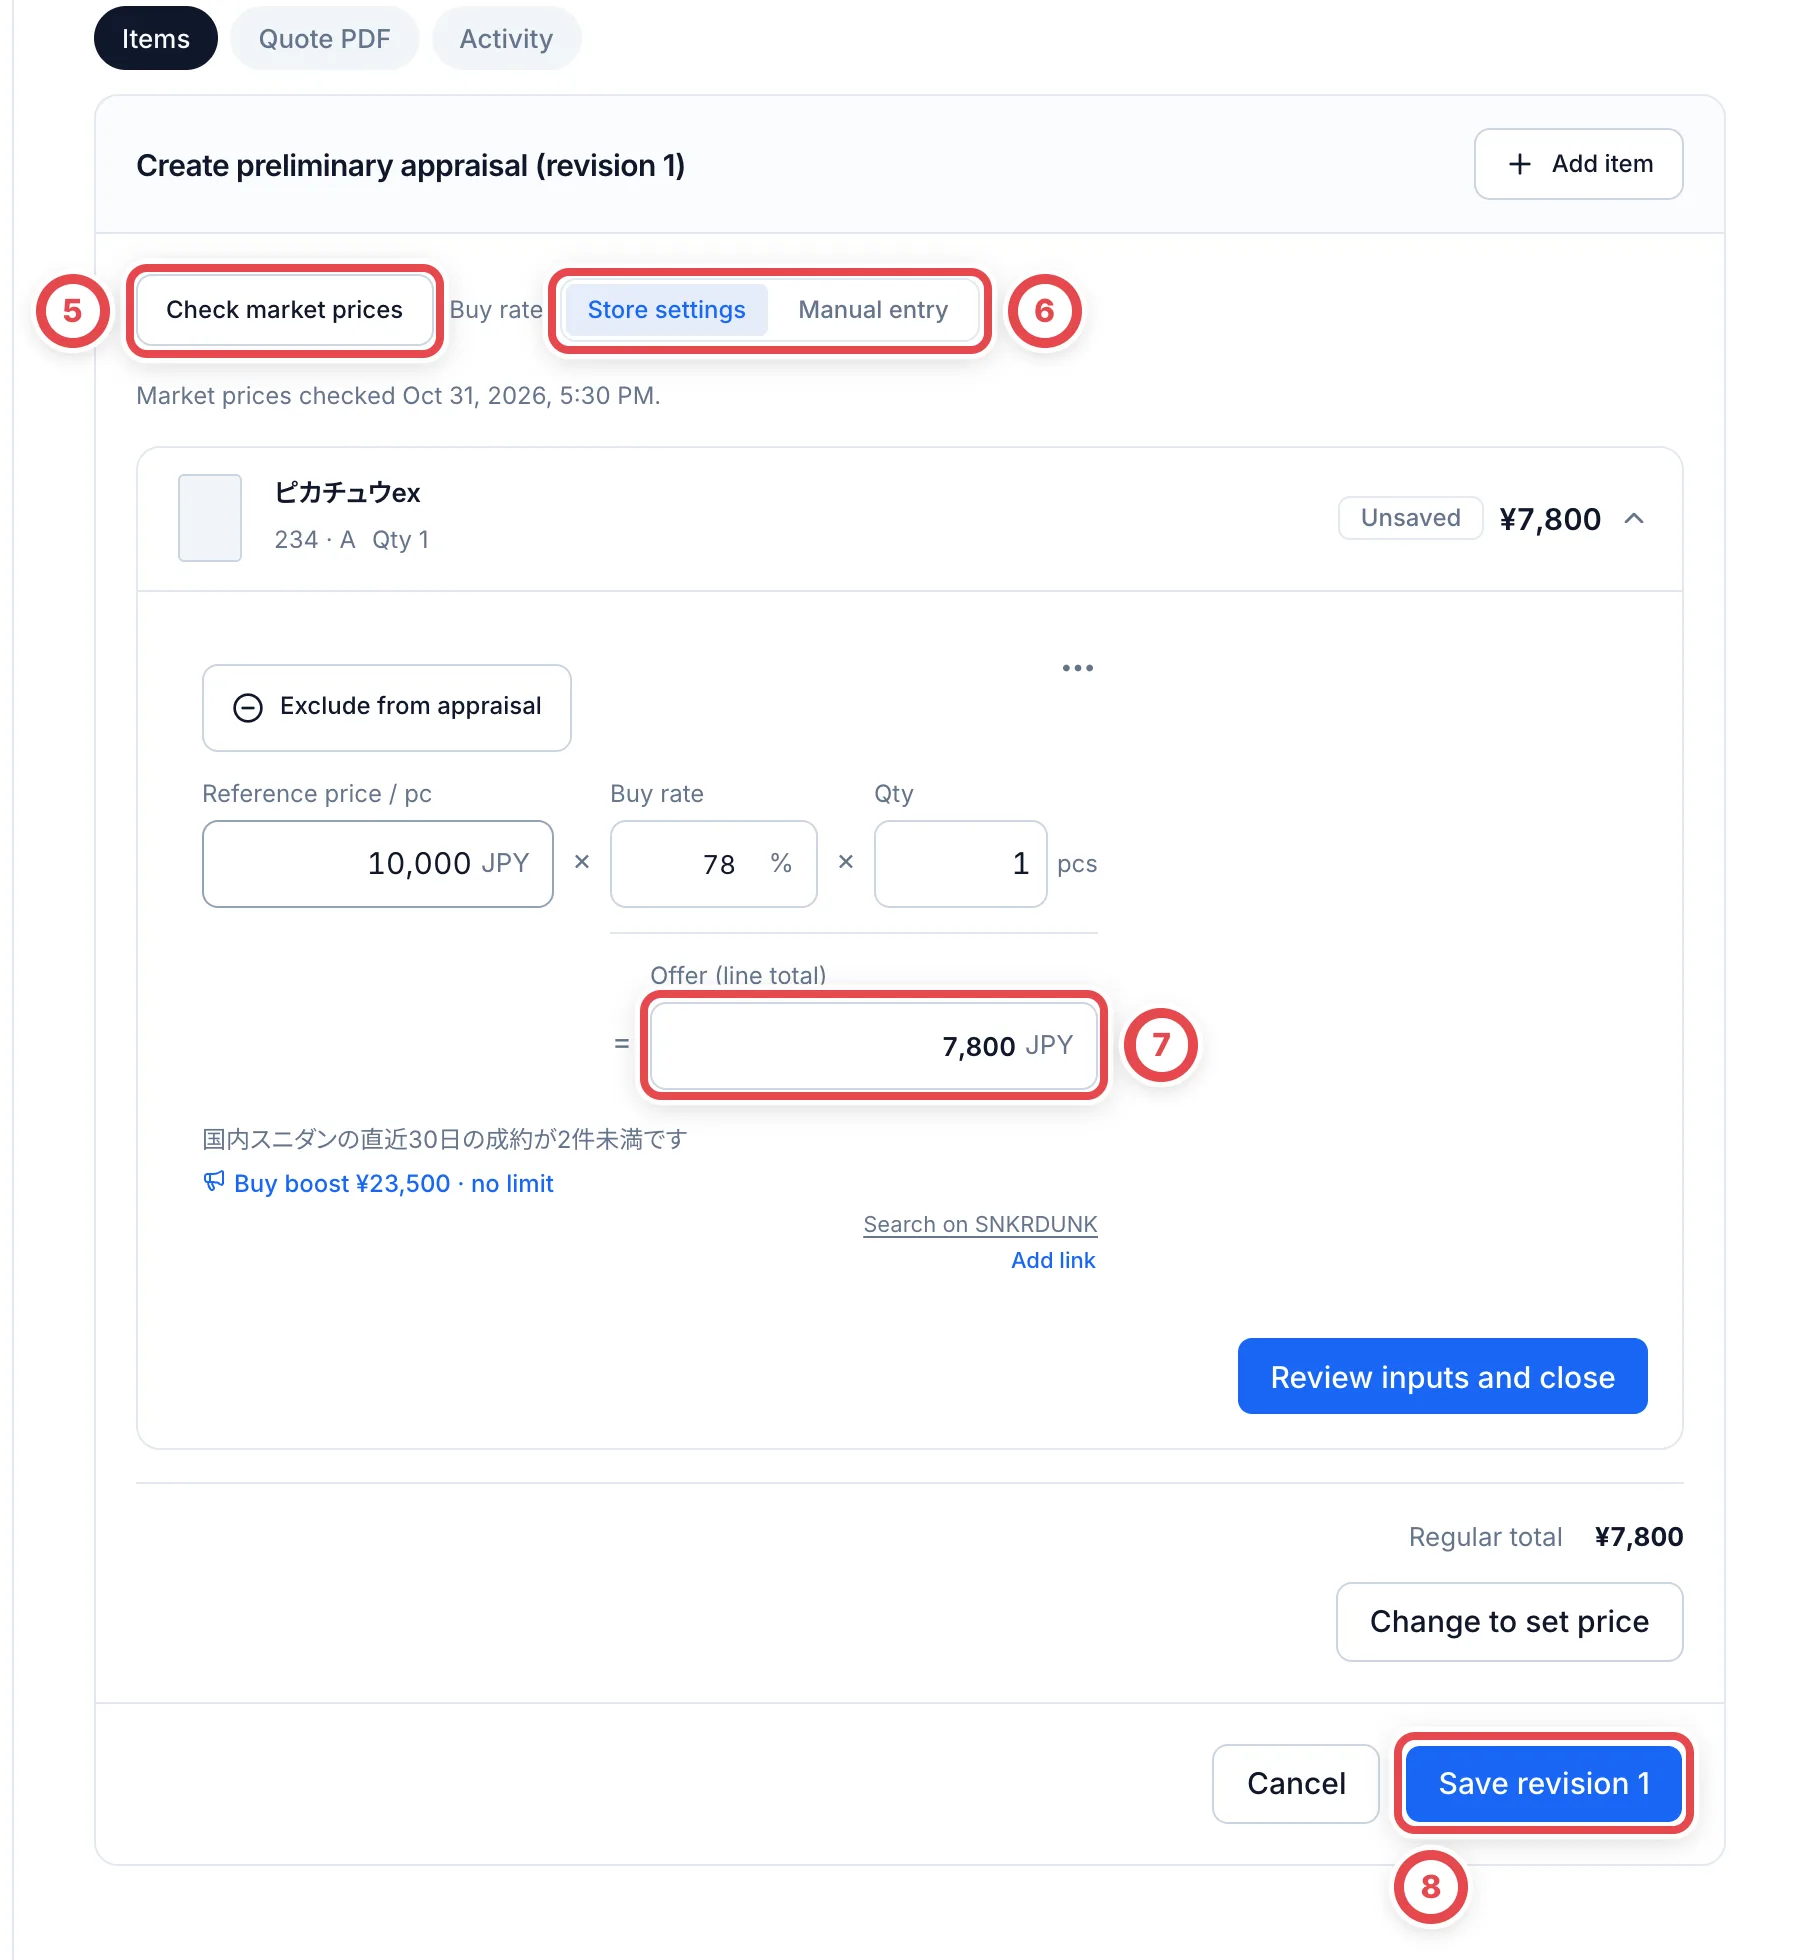 To offer one total while keeping each card's appraisal, use **Change to set price** below the lines before saving. See [Change to a set price](/en/guides/purchase/set-price) for the entry point, saving and restoring the regular total.
In-store purchases do not request a second review. Save the appraisal to open the final quote.
### Check quantities and line totals
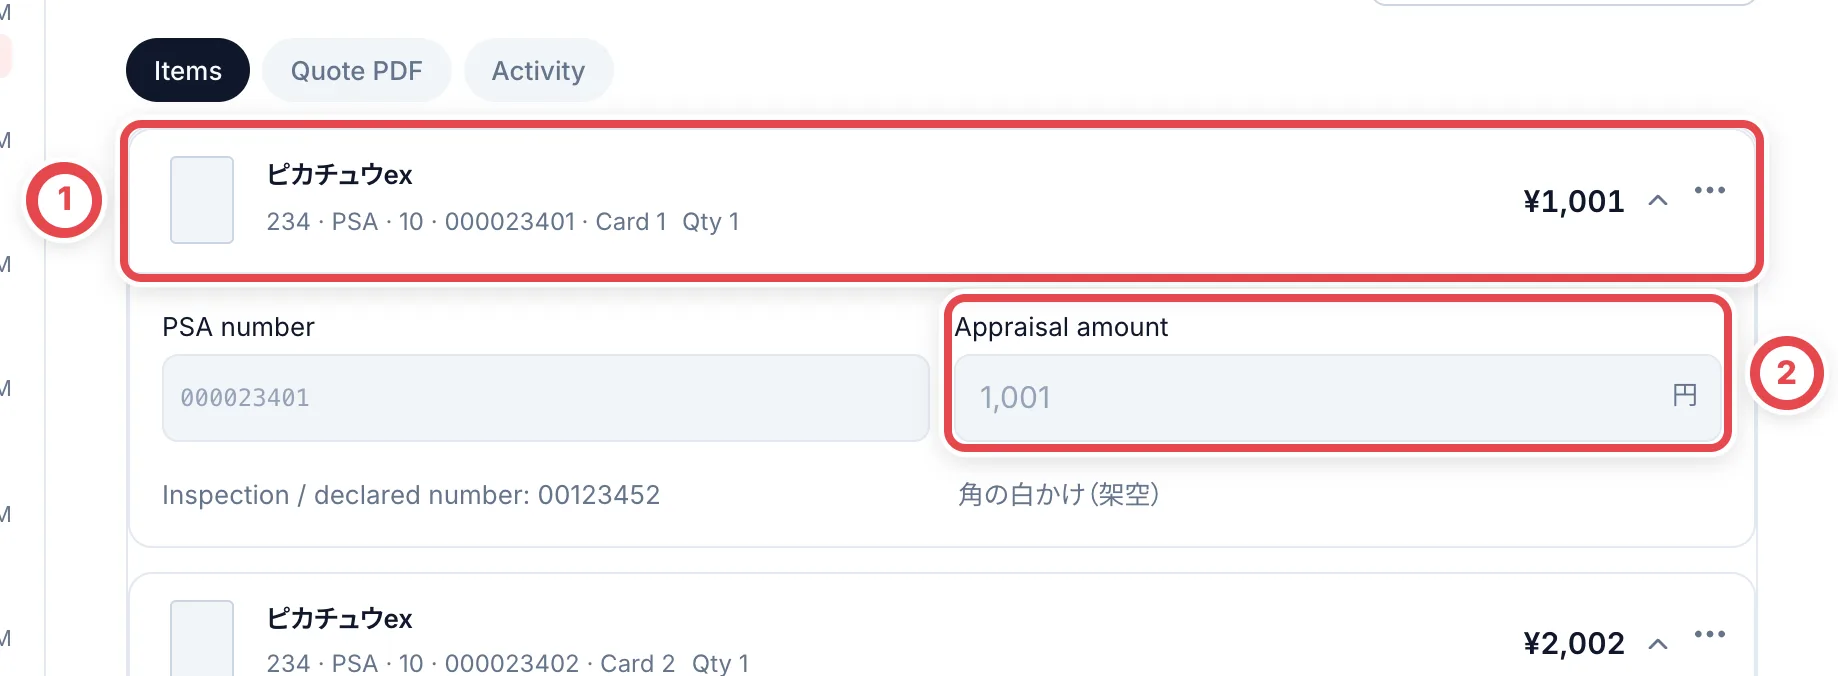
In-store purchases do not offer market research requests. If a price cannot be retrieved, enter the amount you have verified in **Reference market price**. The offer is the total for that line's quantity. After the first save, the final appraisal shows each physical card separately. Check the card, grade and copy at ① and its own amount at ②. Use **Edit appraisal** to change its amount, number or eligibility; see [Final appraisal card by card](/en/guides/purchase/final-appraisal).
 ### Exclude a card or undo before saving
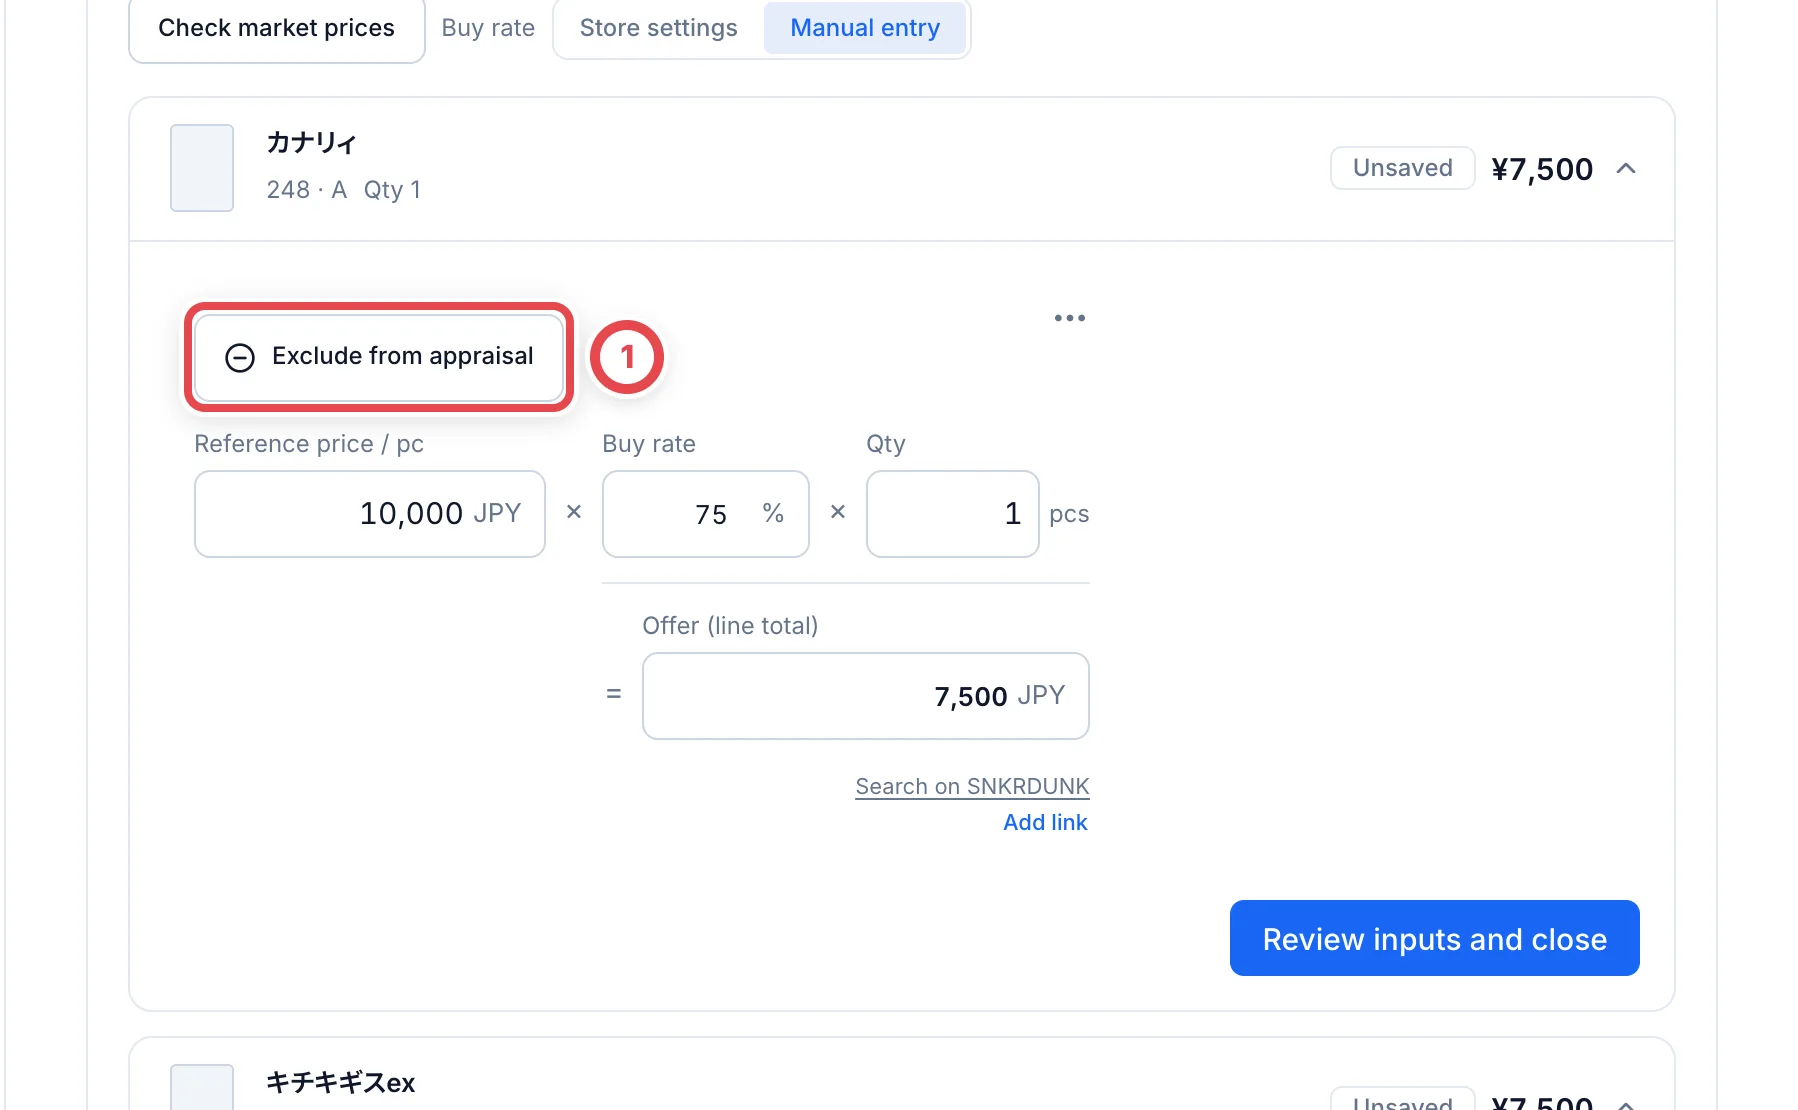
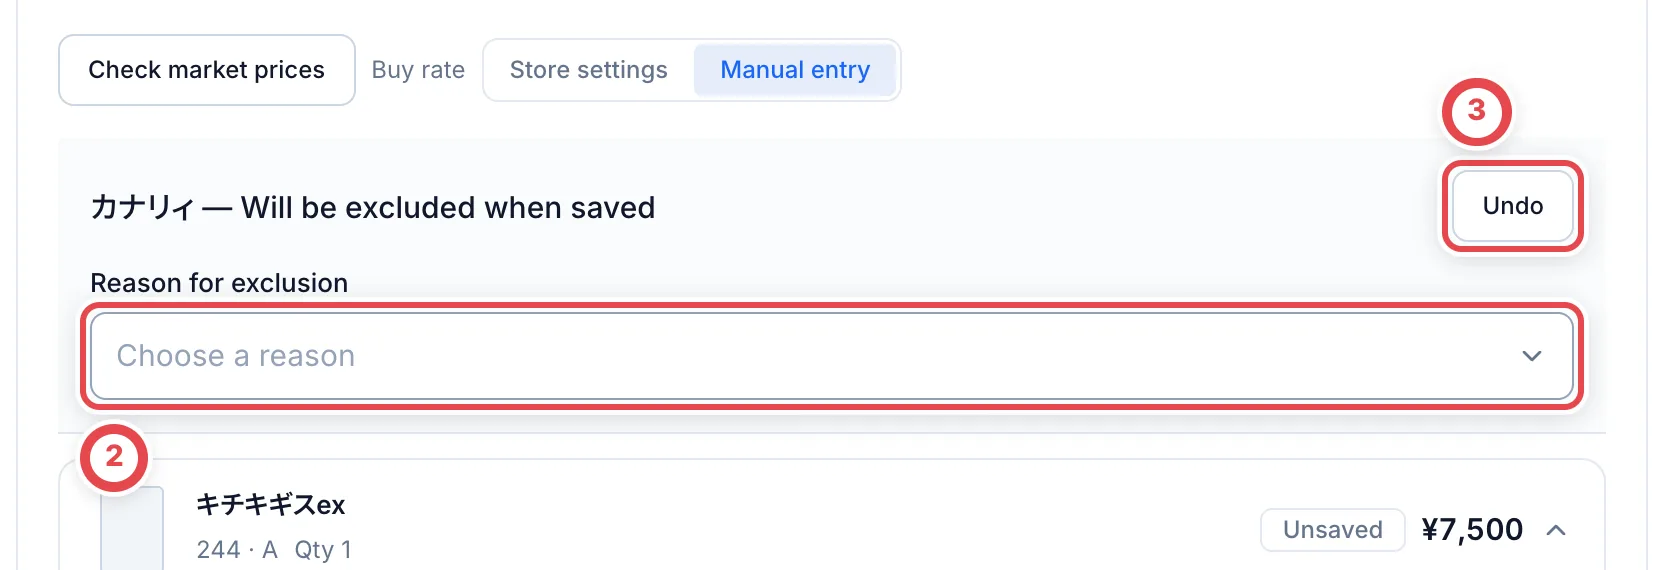
Before saving the first appraisal, use **Exclude from appraisal** at ①. In the final editor that shows each physical card, use **Mark not purchasable** in its three-dot menu instead; see [Final appraisal](/en/guides/purchase/final-appraisal).
 Choose the reason at ②. If you choose **Other**, enter the reason as well. Before saving, click **Undo** at ③ to restore the line. A newly added card instead shows **Cancel addition**.
 ### Internal appraisal photos
Where a line shows **Internal appraisal photos**, open it to add or review photos. Use the trash button beside a photo to delete it, and confirm the deletion. These photos are for staff and are not sent to the customer. Where the whole-quote photos section is shown, use **Add photos** above the lines. Click a saved photo thumbnail to review it. The current card-by-card final editor and saved view do not show photo controls. Ask your manager if the photo entry is missing.
## 3. Check the quote PDF
Saving the appraisal revision opens the final quote PDF. Custody of the appraised items is recorded at this point; there is no separate receipt confirmation.
Check the items, quantities and amounts in **Quote PDF** at ①. To continue from an already saved appraisal, click **Review quote** in **Next step**.
If a second review, sealed-product condition check or further appraisal is required, complete the work shown in **Next step** first. Saving does not record presentation to the customer or their acceptance.
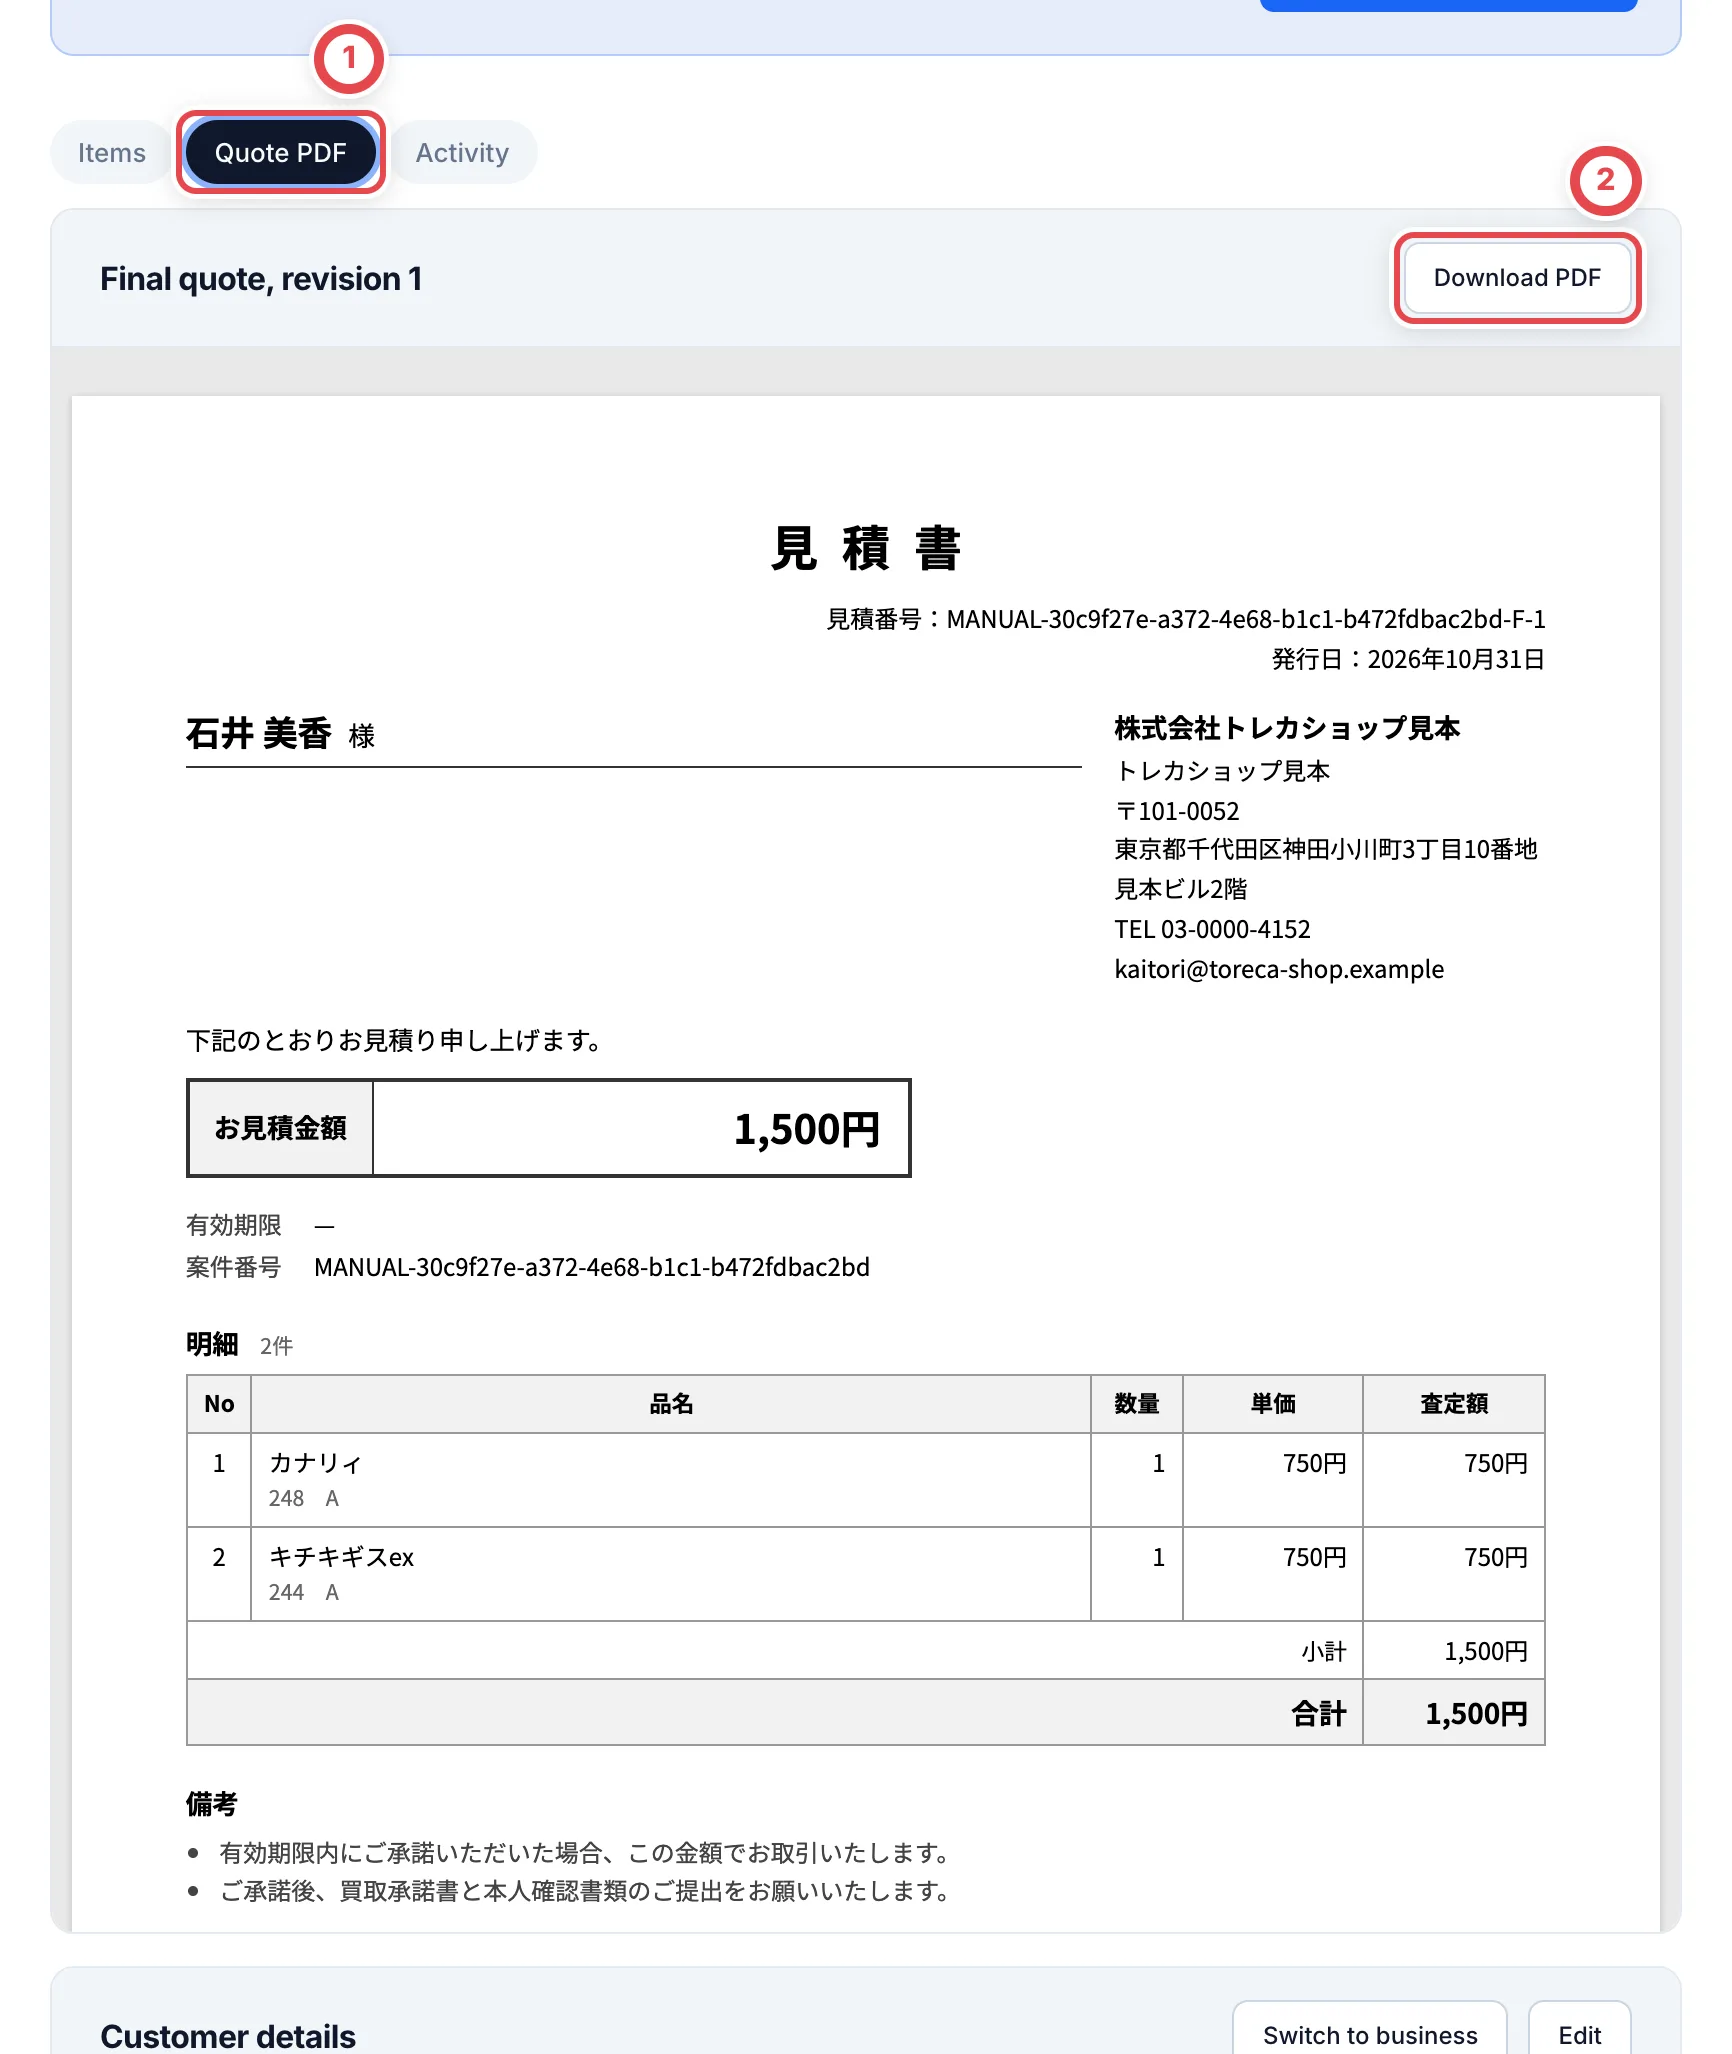 Open the final quote PDF at ①, check its contents, and save a copy with ② if needed.
Use **Download PDF** to save a copy. To correct an amount, switch to **Items** and click **Edit appraisal**. Save the changes and check the PDF again. **Condition note** is also visible to the customer.
The final appraisal's items view is read-only. Open **Edit appraisal** to change quantities, market prices, rates, or offers, add products or bulk appraisals, or set a package price. Save the revision to apply your changes. Cancel returns to the saved items.
## 4. Show it on the customer's screen
If the quote is correct, click **Show to the customer** at ②.
In the dialog, select **Customer's phone** or a registered shop tablet at ①, then click **Show** at ②.
The customer now reviews the quote, checks or enters their details, agrees and signs. If using a shop tablet, staff check that the quote is displayed before handing it to the customer. For device registration, see [Counter tablets](/en/guides/purchase/counter-tablets).
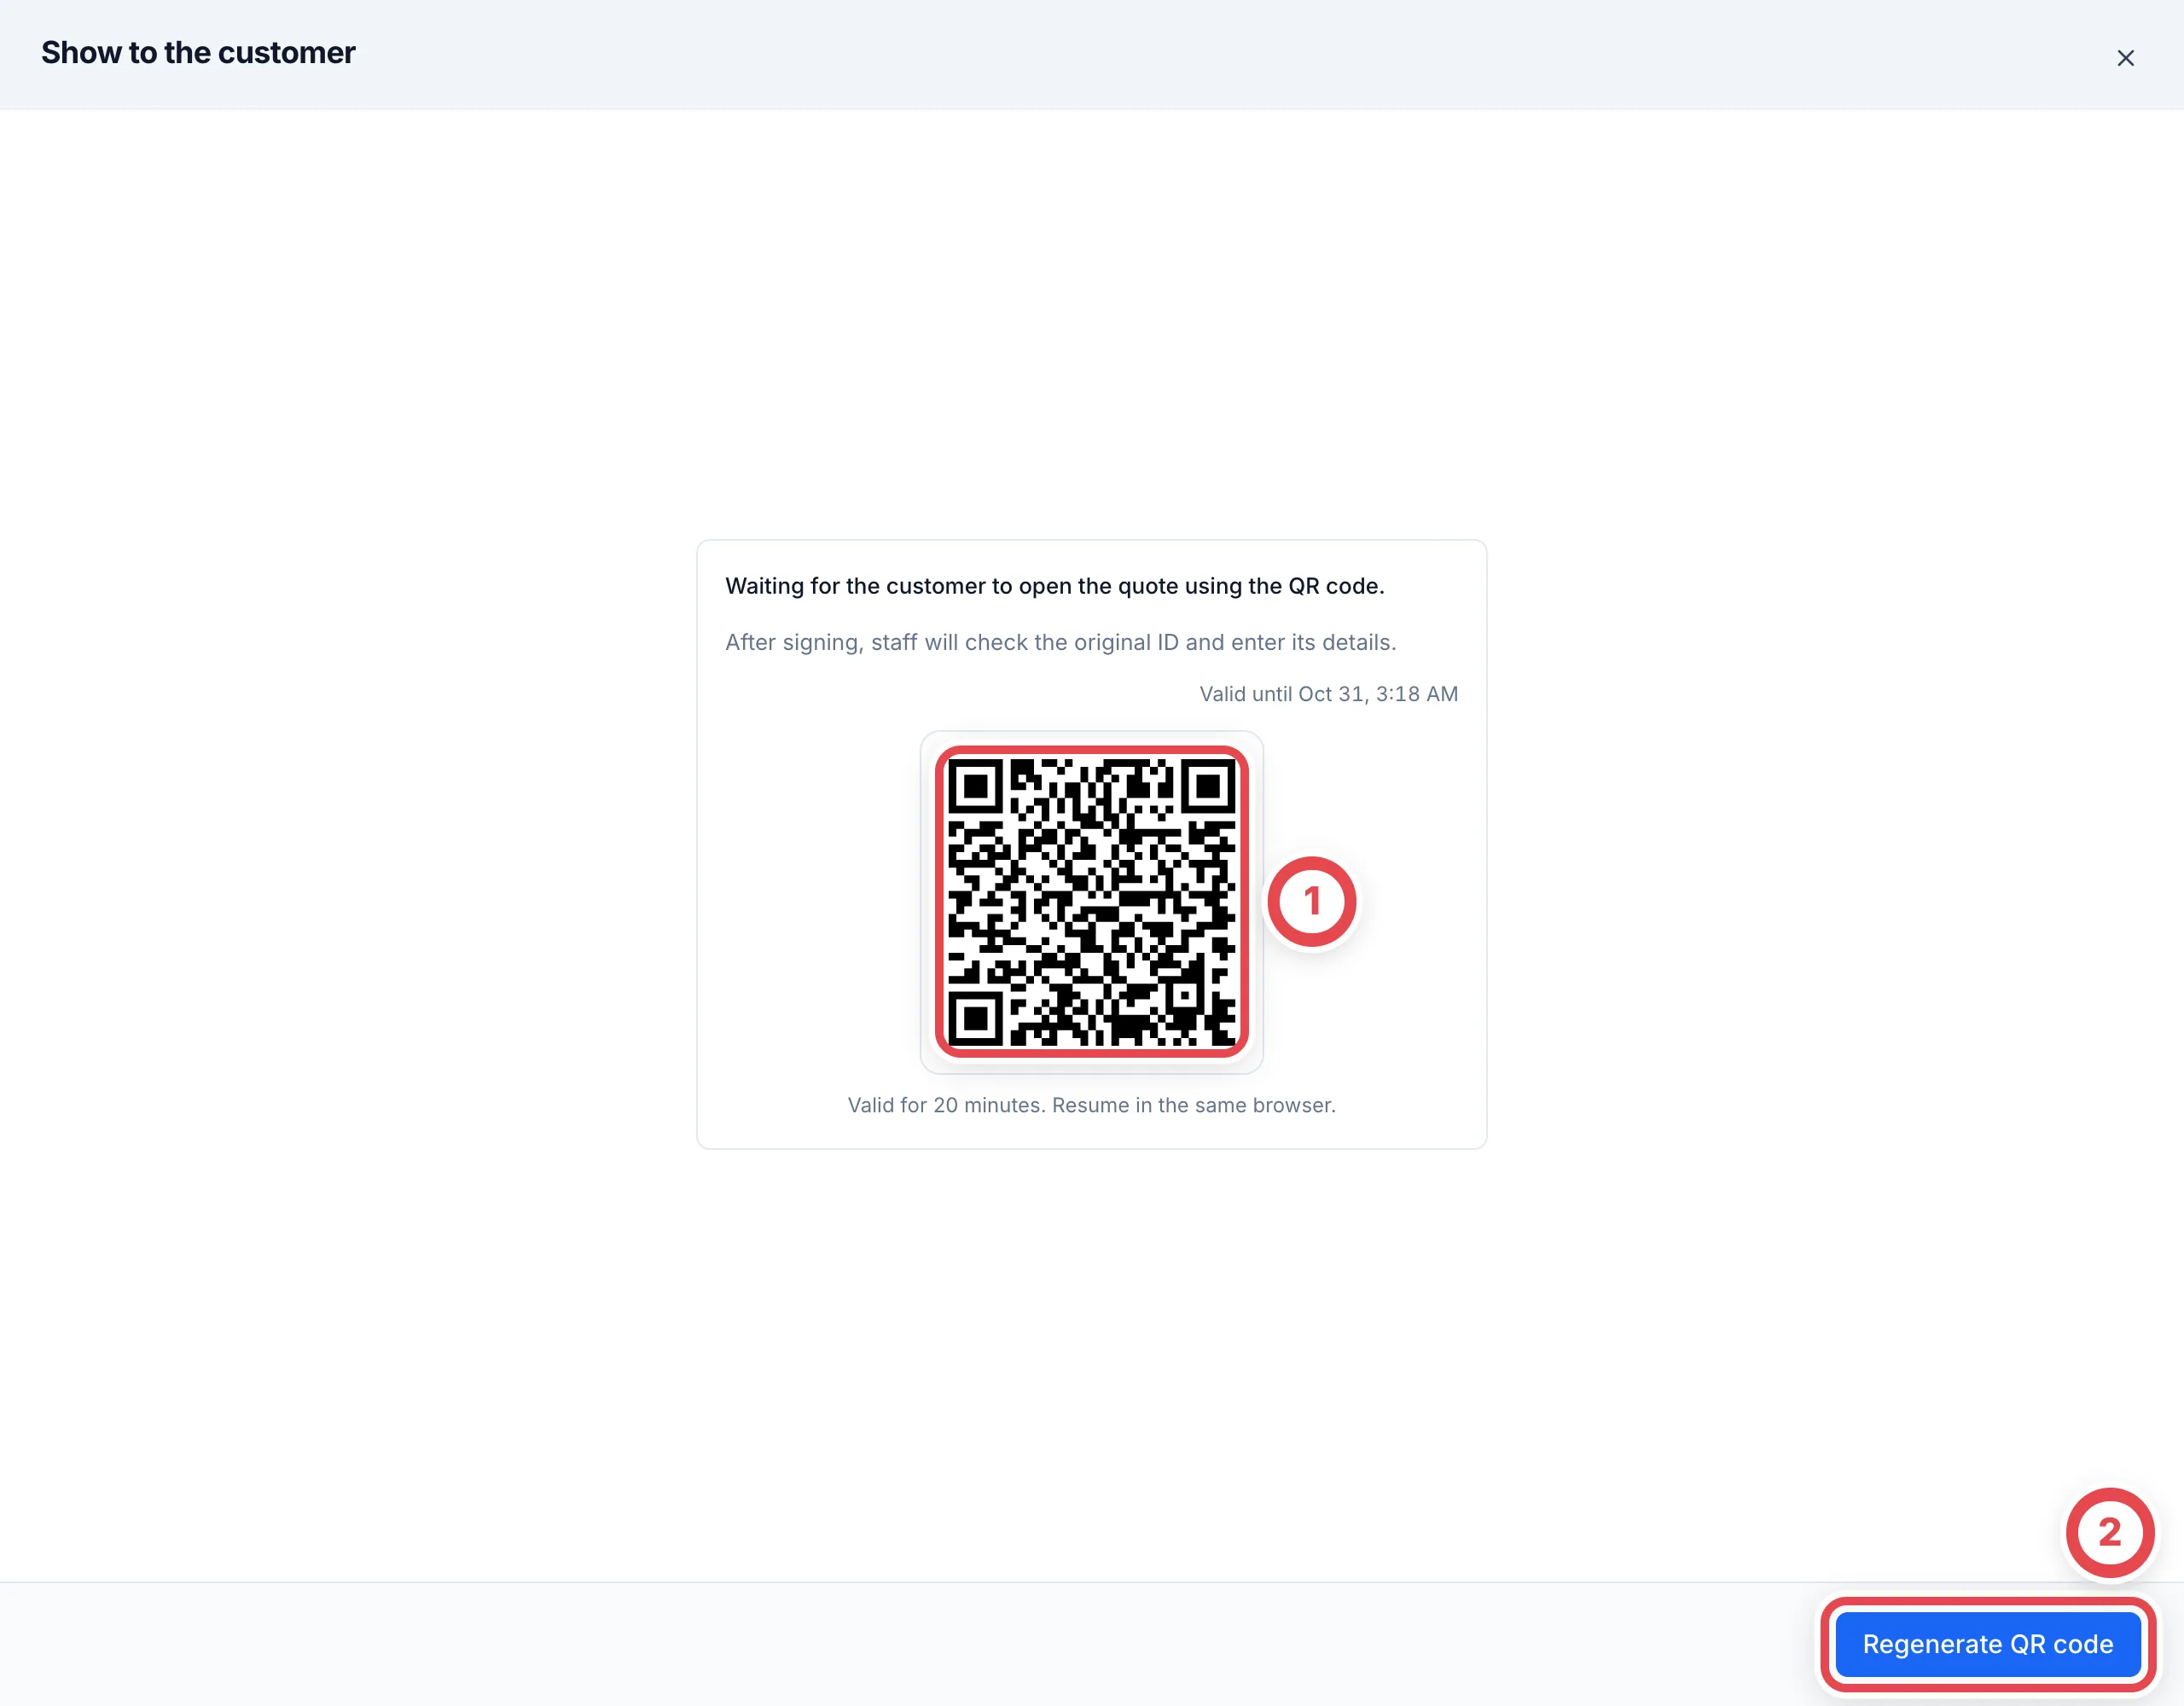
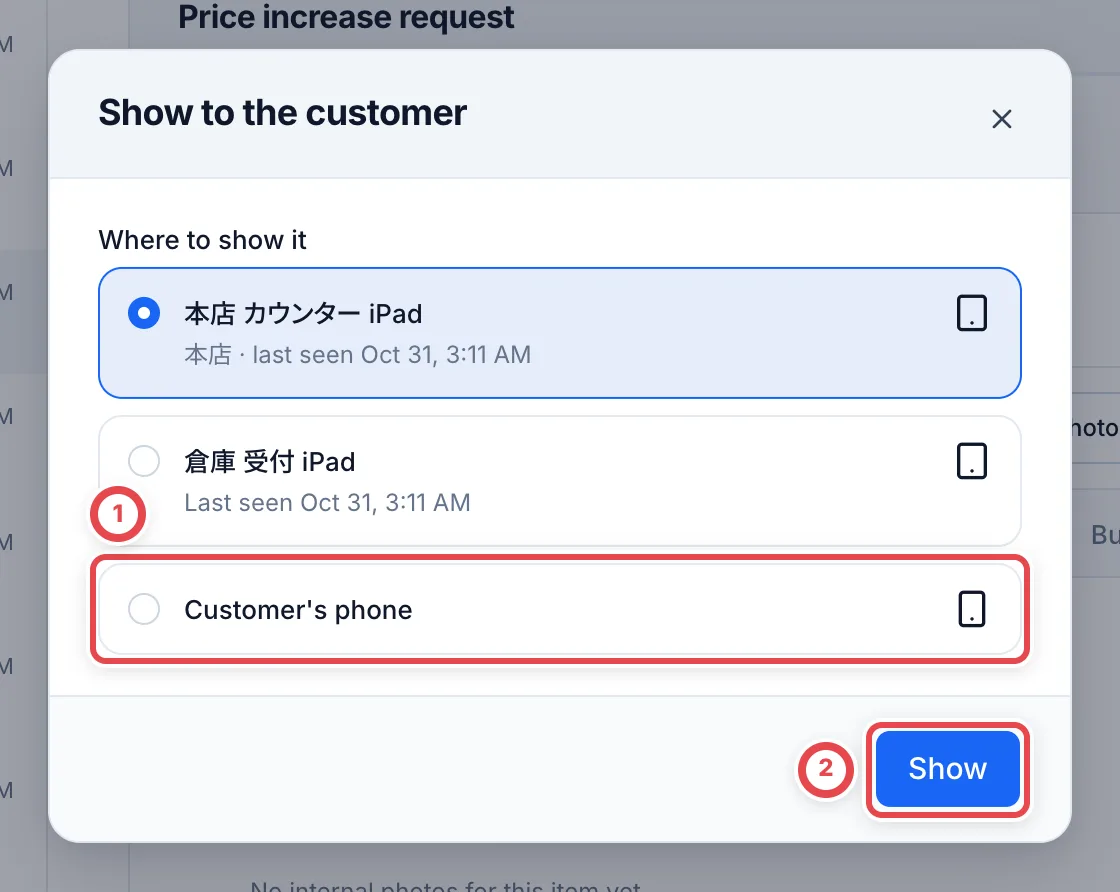 Clicking **Show** records presentation of the final quote. For a smartphone, ask the customer to scan the QR code now: it appears on the staff screen. The first phone’s browser can reopen the same URL or QR within 20 minutes of issue (30 minutes for a registered tablet). Reopening does not extend the expiry. The QR code remains visible after scanning. Reopening it in the same browser restores saved in-progress input. If browser storage is unavailable, enter the information again; signatures must also be entered again.
A different device or browser sees a used-QR error. Clearing browser data or blocking storage can also prevent reopening; issue a new QR in that case or after expiry.
Ask the customer to scan ①. Use ② **Regenerate QR code** when a new QR is needed, then confirm. The old QR and screen become invalid. Closing the dialog does not require regeneration: reopen it with **Show QR code** (**See progress** after scanning).
 ## 5. The customer reviews, agrees, and signs
Ask the customer to check the quote, enter their details, and sign. The customer screens are Japanese only. If the ID photography screen appears after their details, follow [the photography steps](#when-the-customer-is-asked-to-photograph-id), then continue to the signature.
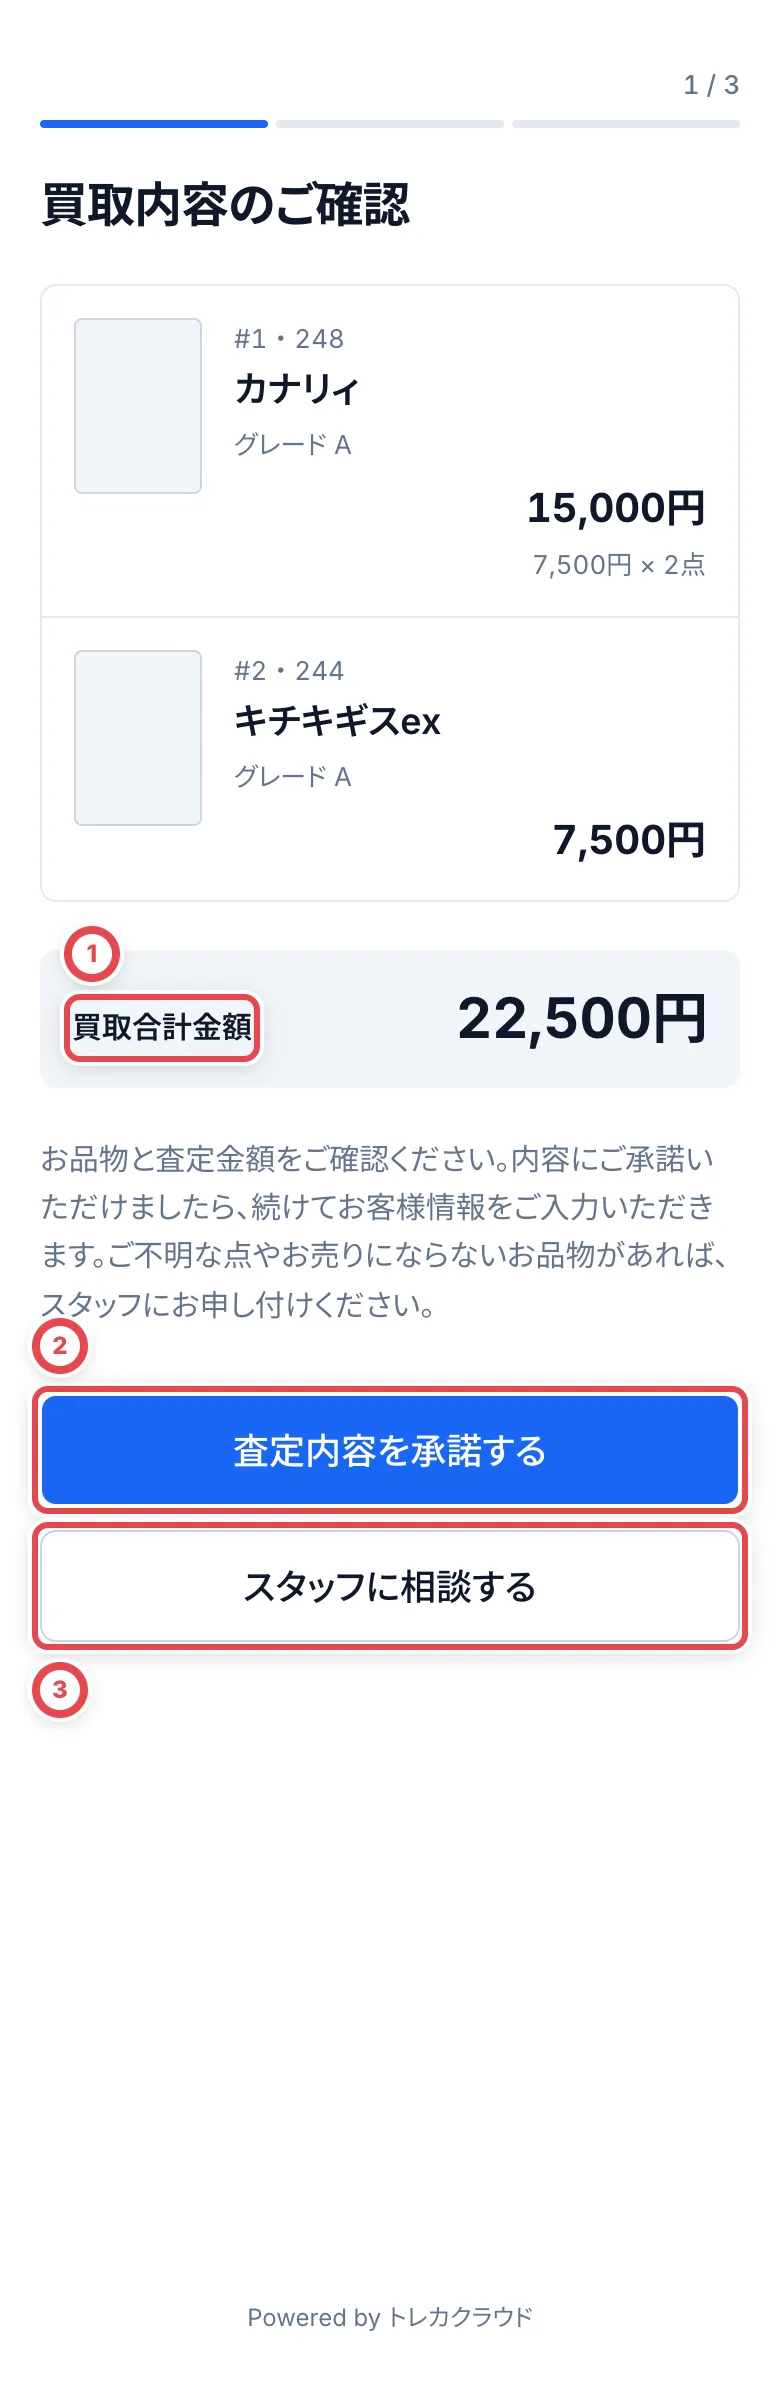
1. **「買取内容のご確認」 (Confirm the purchase details)**: The customer checks the total at ① and the cards. They also read the notice below the total. Lines with two or more copies show the unit price and quantity; a single-copy line shows only its amount. If something is wrong or there are cards they don't want to sell, they tap 「スタッフに相談する」 (Talk to staff) at ③. If it looks right, they tap 「査定内容を承諾する」 (Accept the appraisal) at ②.
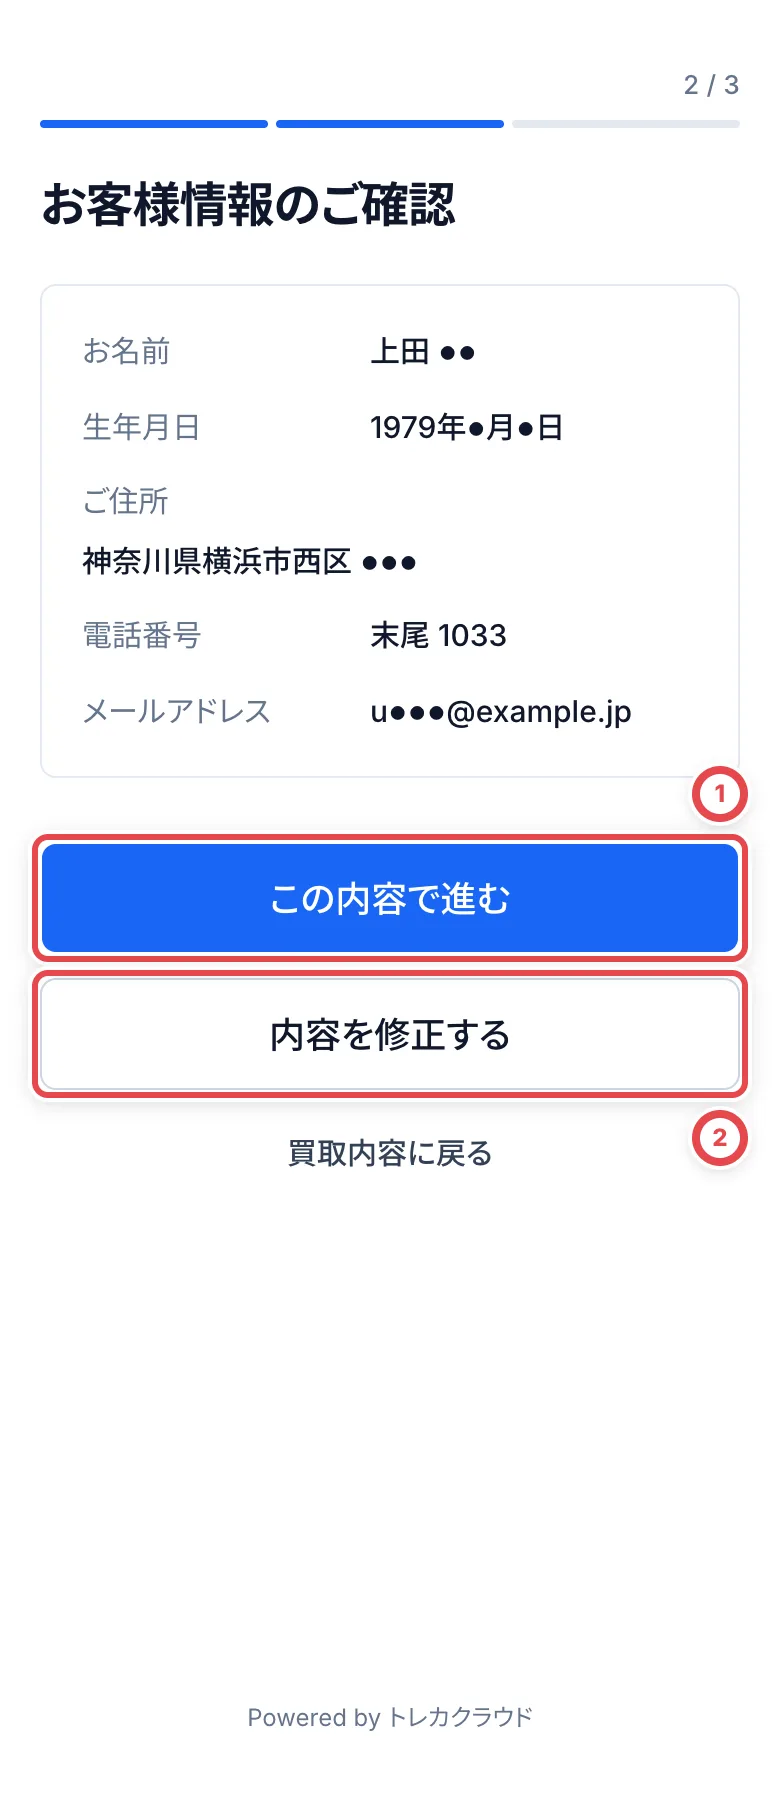
 2. **「お客様情報のご確認」 (Confirm your details)**: A returning customer sees their registered details, partly hidden. If nothing has changed, they tap 「この内容で進む」 (Continue with these details) at ①. To correct their address or other details, they tap 「内容を修正する」 (Edit details) at ② and enter them again. A first-time customer enters their name, date of birth, occupation, address, and other details here. The name entered at intake is already filled in; the customer corrects it if needed.
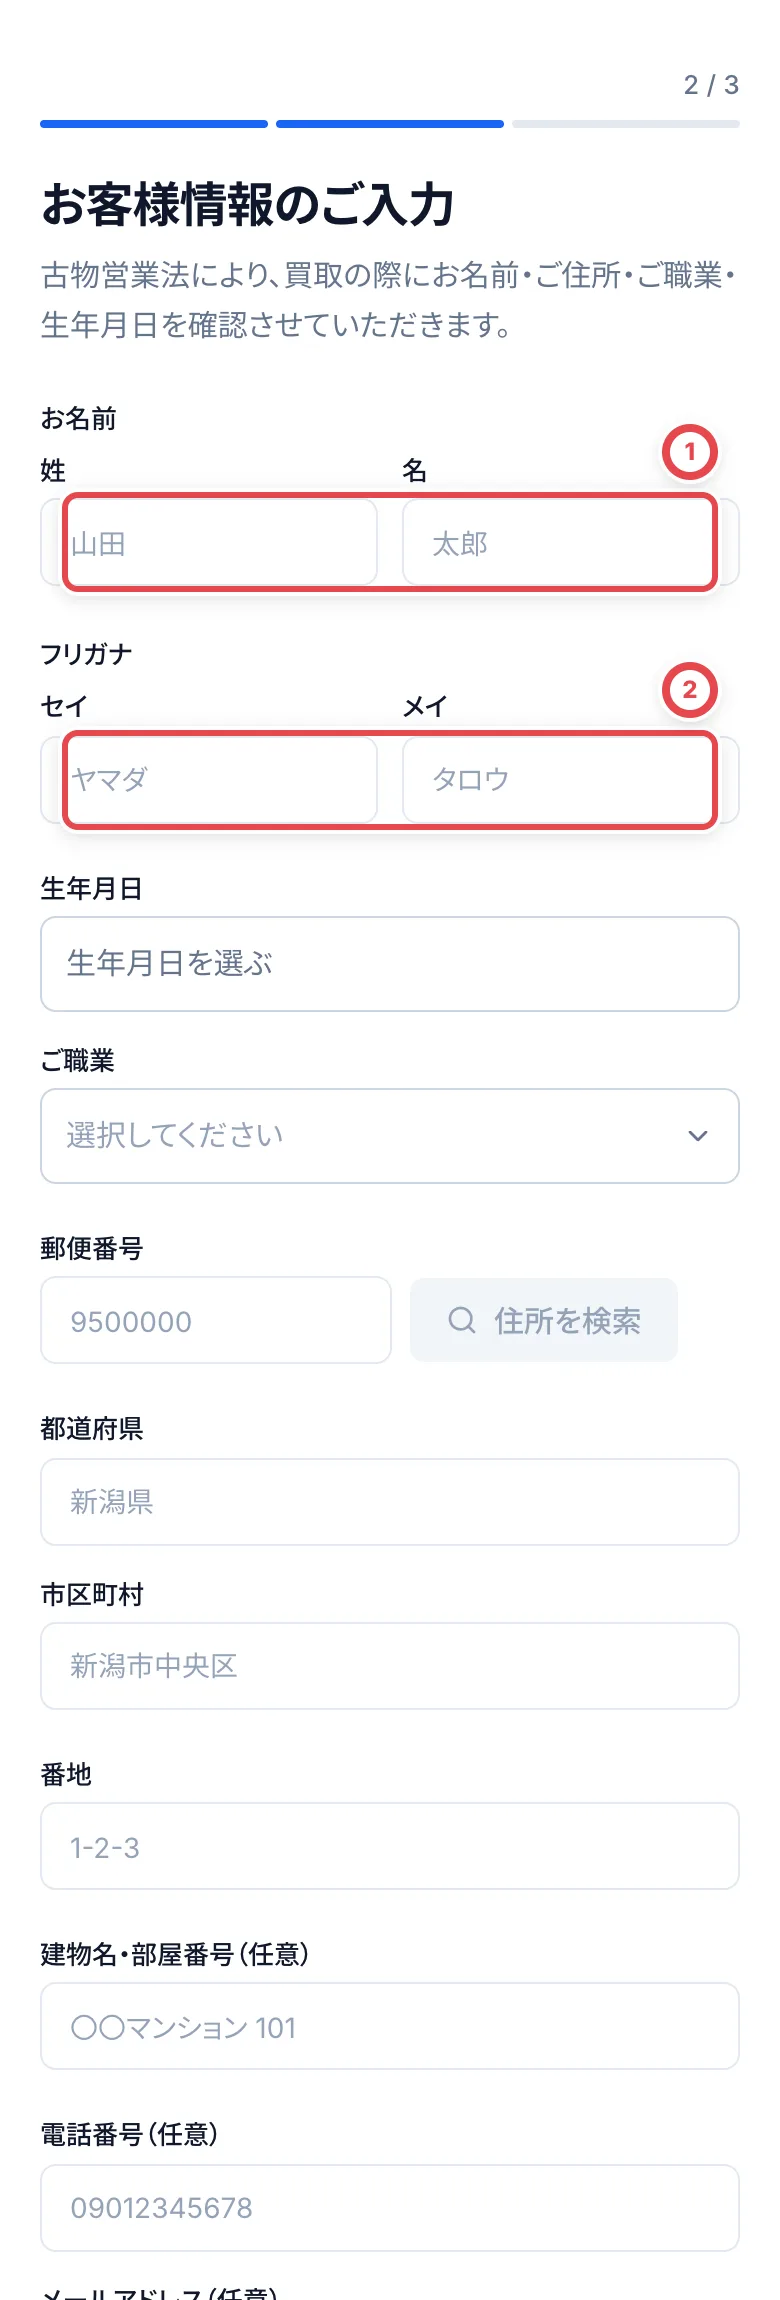
 Enter the family and given name separately at ①, and their full-width katakana readings at ②. Continue with date of birth, occupation and address. Phone and email are optional. Editing existing details also asks the customer to re-enter the required fields.
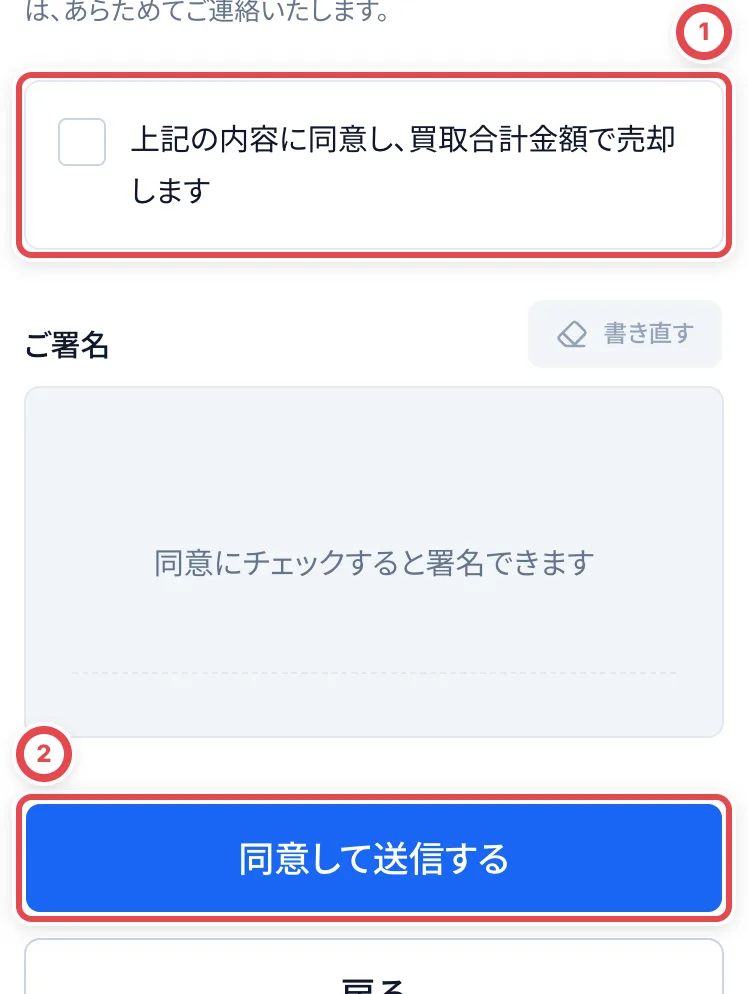
 3. **「ご同意とご署名」 (Agreement and signature)**: The customer reviews the purchase details, total, and terms, then selects the checkbox at ① to enable signing. Before selecting it, they can scroll over the signature area without drawing. After signing, they tap 「同意して送信する」 (Agree and send) at ② to send it to the staff screen.
 A customer under 18 stops at the details step and is told to ask staff.
For each document's capture, the staff photo review and the saved result, follow [Counter ID photos and the original-ID check](/en/guides/purchase/counter-photos).
## 6. Check the customer's ID in person
Once the signature arrives, **Next step** on the staff screen changes according to the identity check for this deal:
| Identity check | Next action |
| -------------------------------------- | -------------------------------------------------------------------------------------------------- |
| Not recorded; no customer photos | **Check in person**. Inspect the original and enter and record its details. |
| Not recorded; customer photos received | **Check in person**. Compare the photos with the original and the customer, then record the check. |
| Already recorded for this deal | **Register the purchase**. Open the registration dialog in step 7 directly. |
**Check in person** opens the identity form directly. Skipping photography does not skip this check. An active identity check recorded for this deal does not need to be repeated. A record from another deal or an unbound record alone does not count as checked.
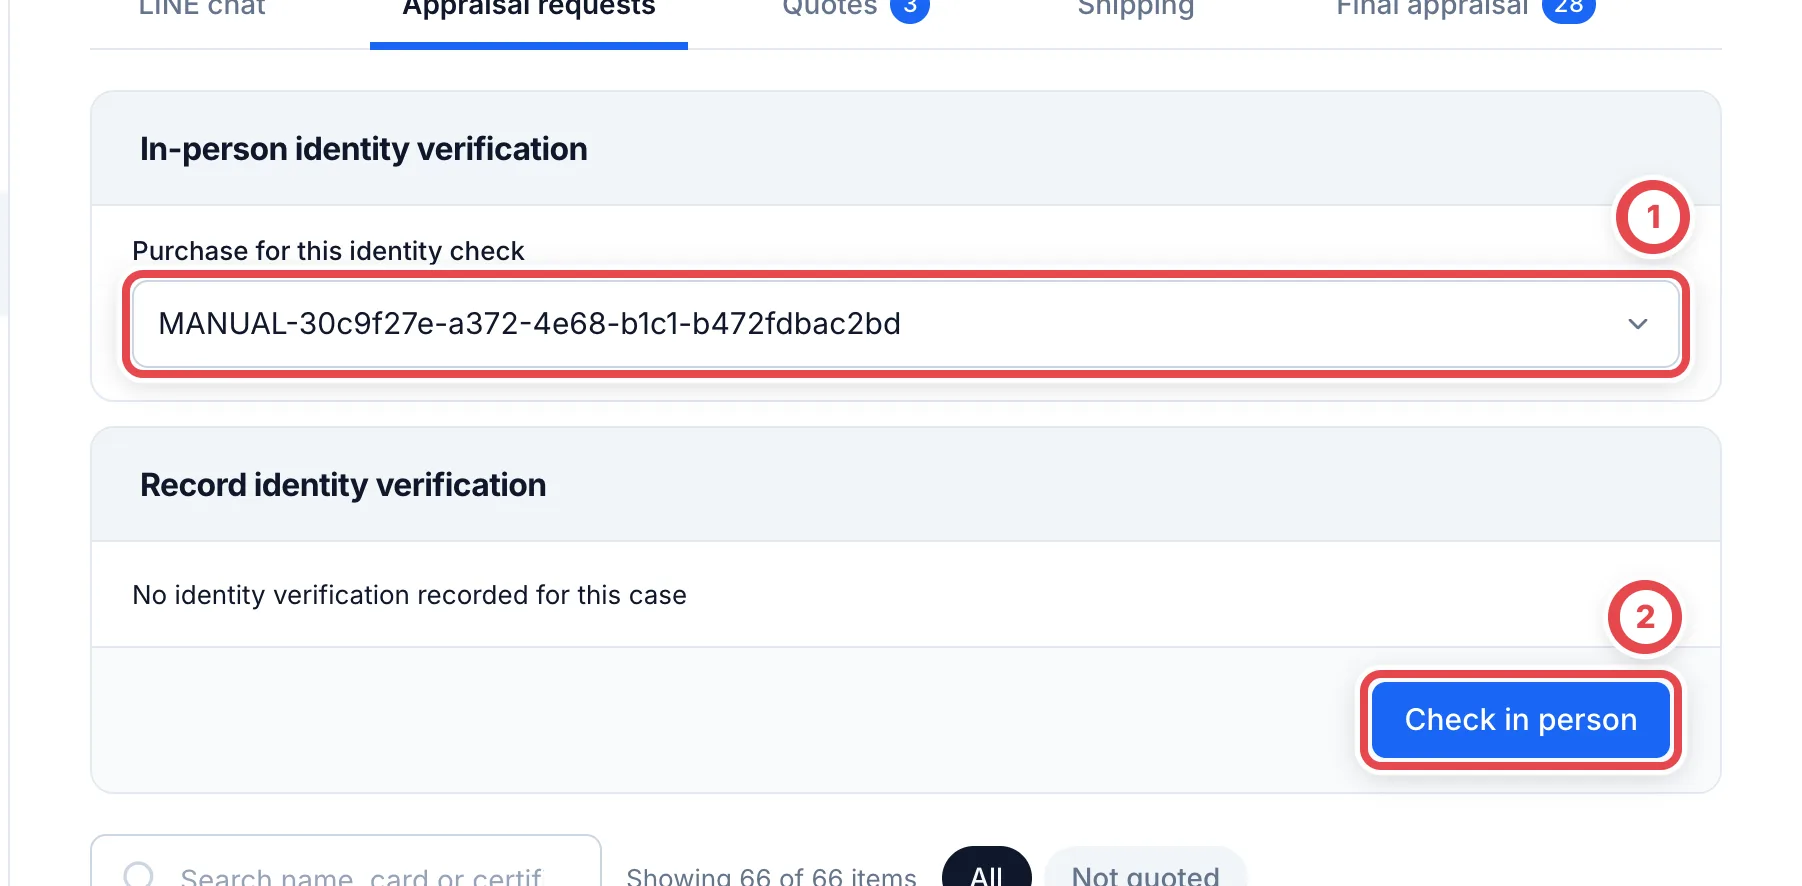
 You can also open **In-person identity verification** from the customer's **Appraisal requests** or **Customer details** tab. Check the target deal at ① and click **Check in person** at ②.
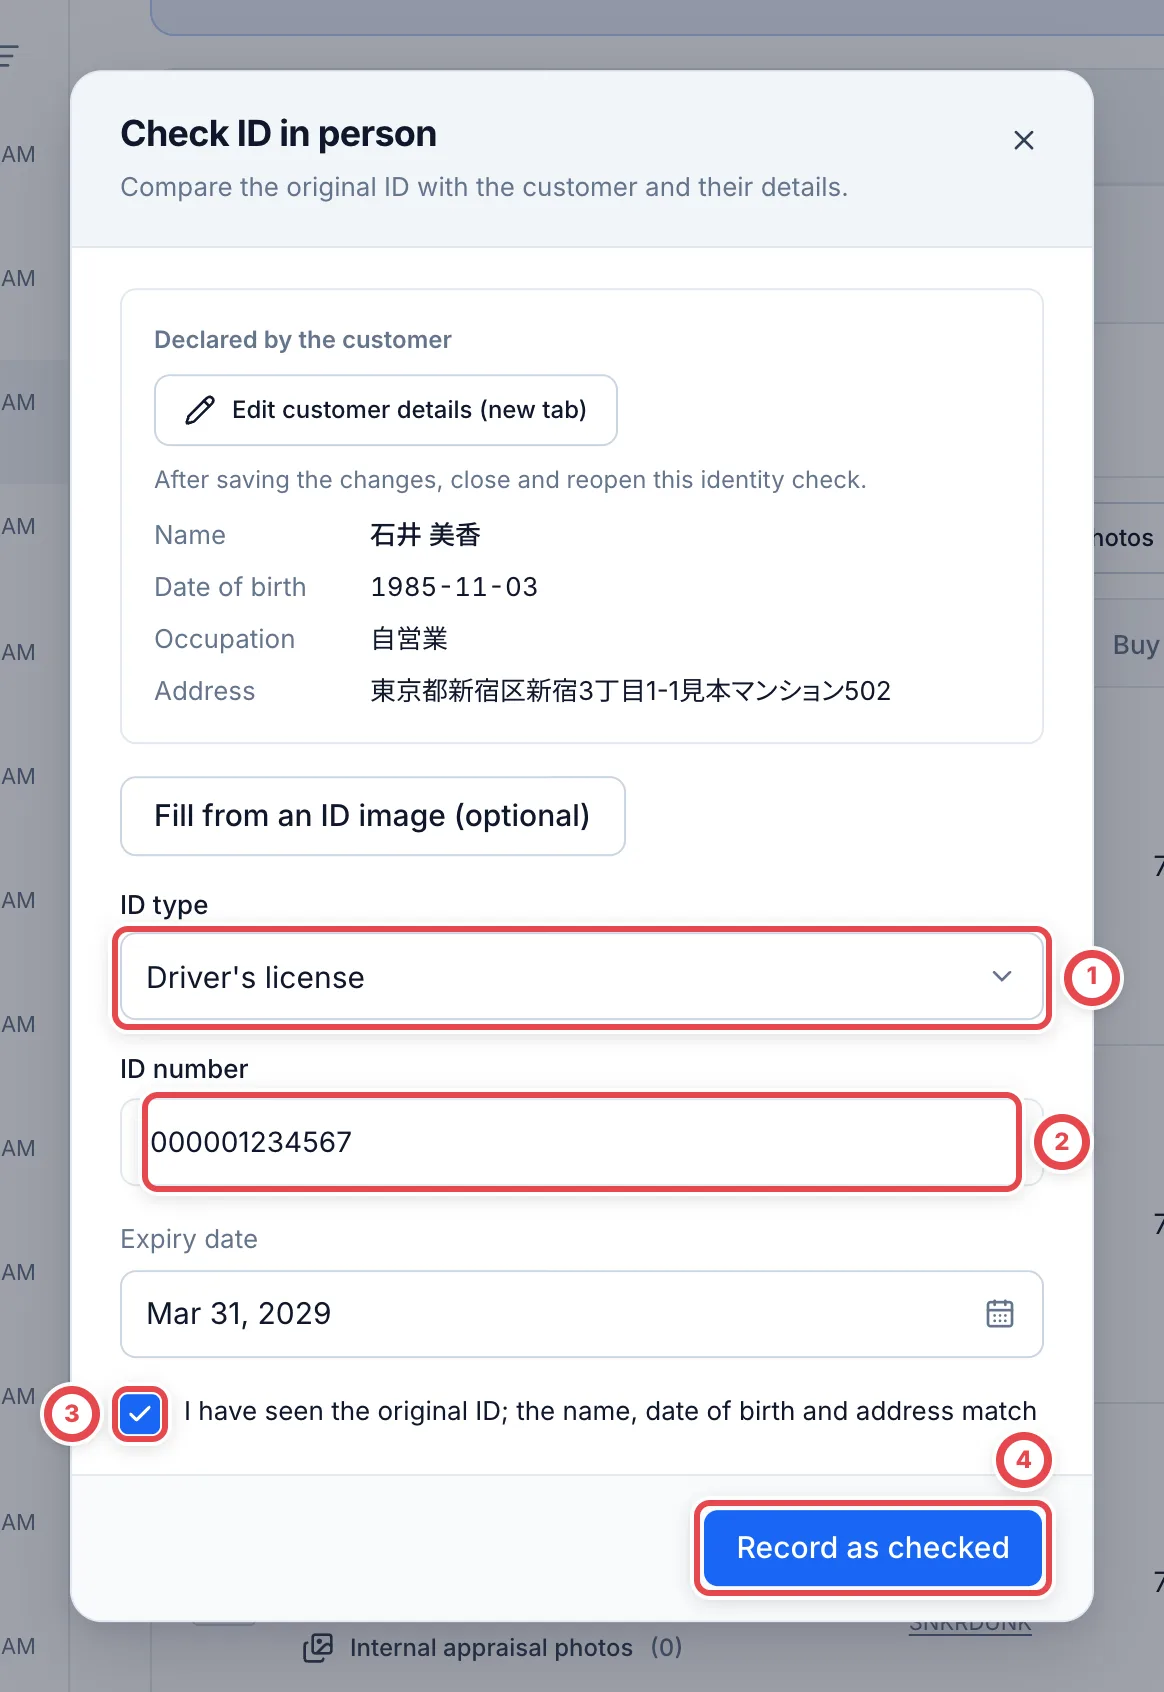
 Ask to see the original ID. In the next screen, choose the type at ①, enter the number at ② and the expiry date below it. Check that the original matches the customer's details, select ③, then click **Record as checked** at ④. Open **Fill from an ID image (optional)** only when using image-assisted entry.
 With customer photography, the dialog shows **ID photos submitted by the customer**. Compare them with the original, the person present, and the declared name, birth date and address. **Fill from the submitted photos** assists entry; check and correct the values before recording. A reading result alone is not verification.
Never enter a My Number card's personal number. If the document type is wrong, start a new session with the correct document instead of changing the type alone. If the photos no longer open, close and reopen the dialog. Record the ID check before registering stock and payment.
The ID number is stored encrypted, and only the last four digits appear on screen. You can't record the check until the customer's name, date of birth, occupation, and address are all filled in.
If the save result cannot be confirmed, wait for the automatic retry, then click **Retry with the same details** if it appears. Your input is retained. See [When the save result cannot be confirmed](/en/guides/purchase/counter-identity#when-the-save-result-cannot-be-confirmed).
## 7. Register stock and payment
:::warning
**Buy N pieces and hand over cash** records the cash handover as well as the purchase. Click it only when you are ready to give the customer the cash.
:::
**Next step** becomes **Register stock and payout**. Click **Register the purchase** to open the purchase amount, cards and payment method directly. Staff do not need to record the customer's signed acceptance a second time. Under **Payment method**, select **Pay in cash** at ①. If your shop uses cash management, choose the register the cash comes from at ②. That field is 「現金を扱うレジ」 (Register that handles cash). The cash-management screens are Japanese only, so their labels appear here in Japanese with an English gloss. Check the details and click ③.
The choices under **Payment method** depend on your shop's setting (**Settings** › **Payments** › **In-store payment methods**). A shop that pays only in cash sees only **Pay in cash**. To pay by bank transfer, go to [Pay by bank transfer](#pay-by-bank-transfer).
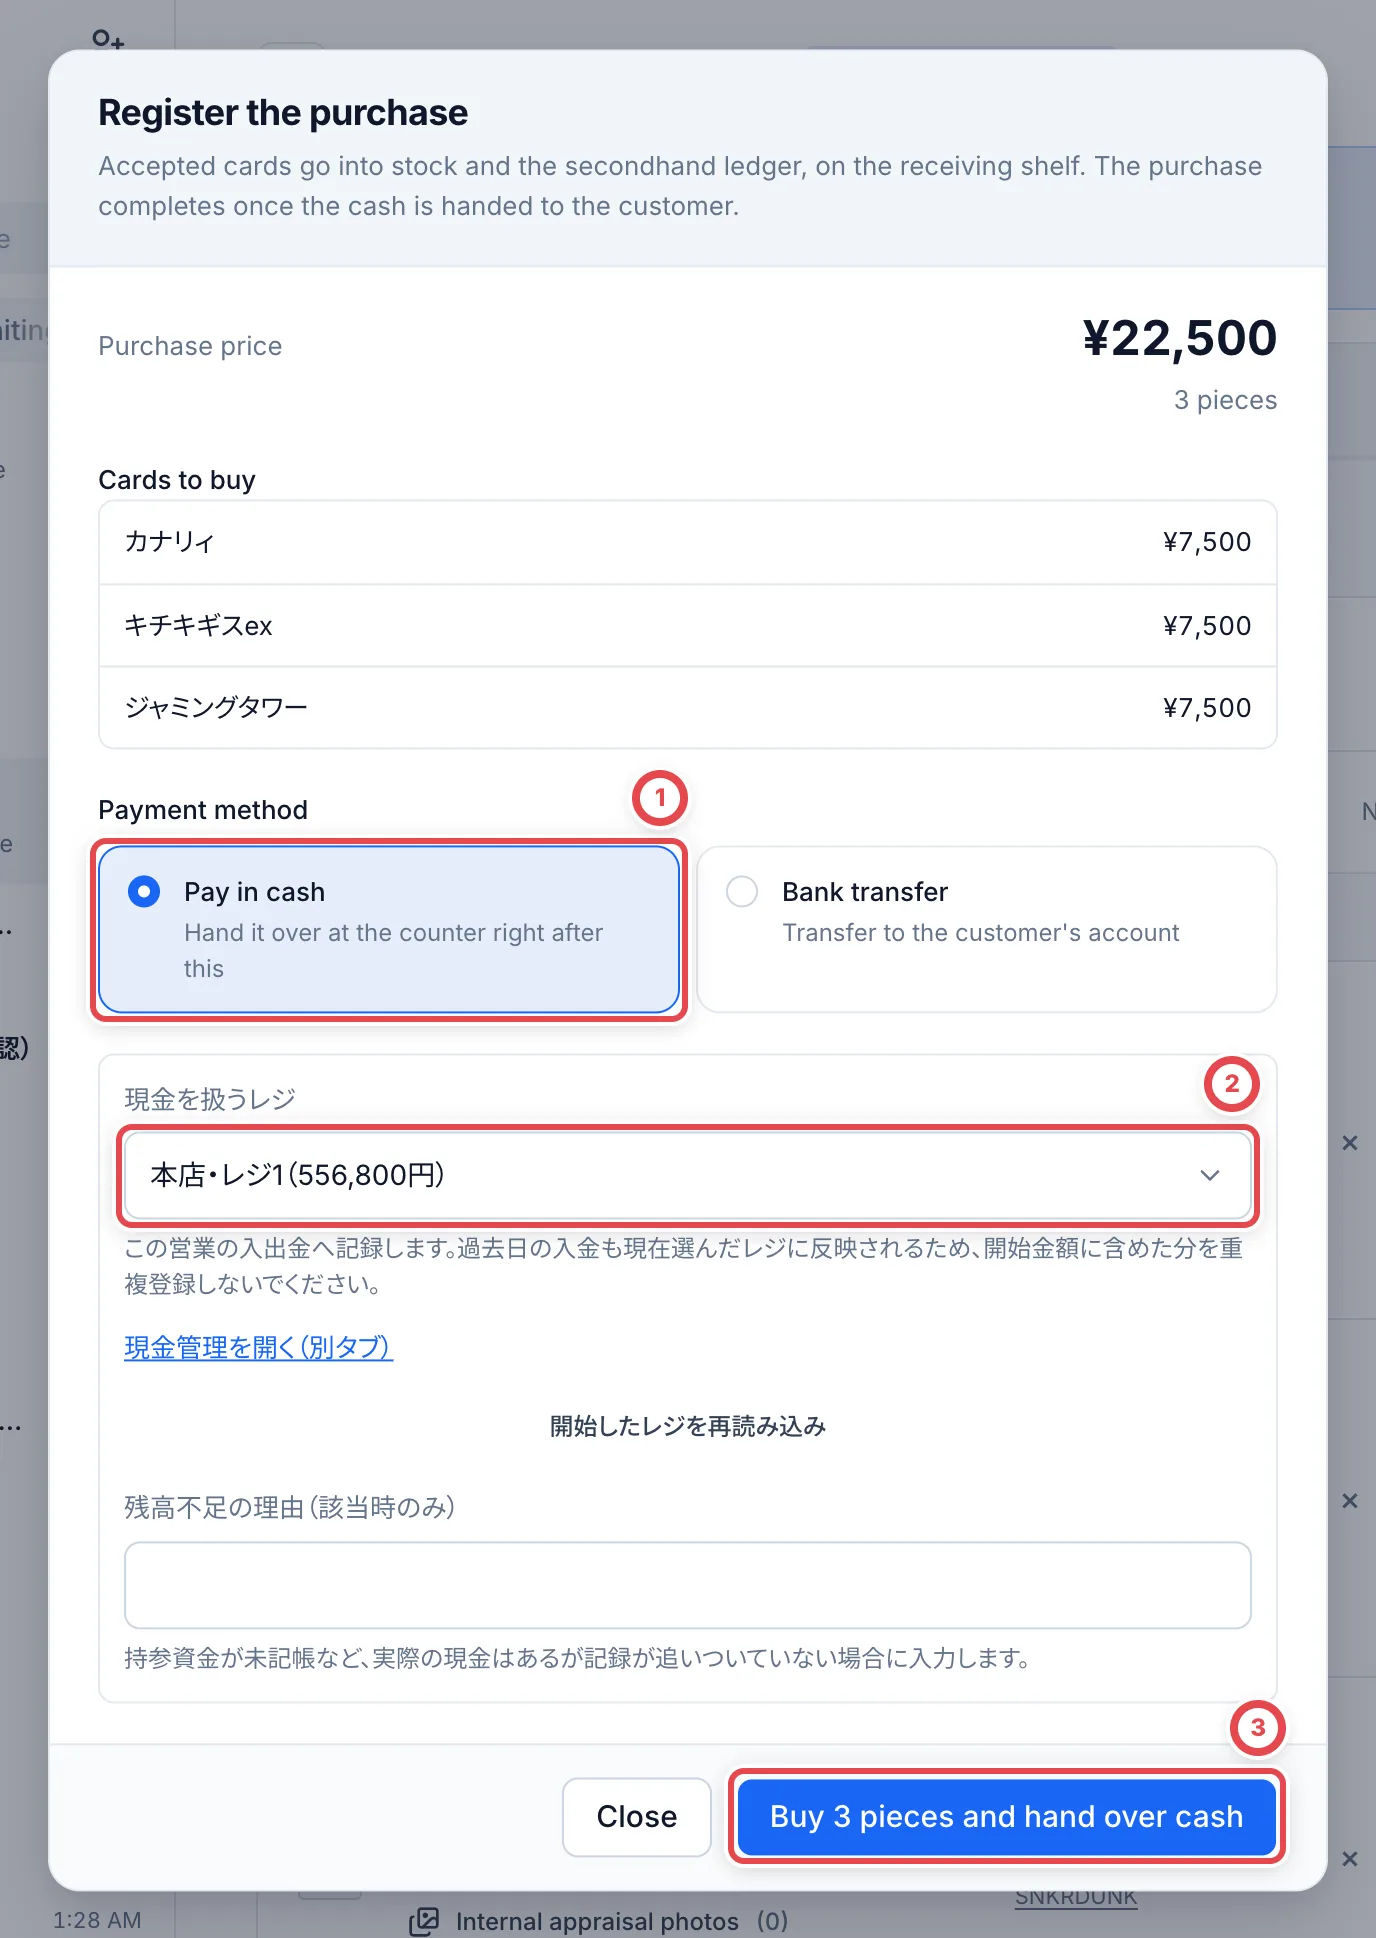 After ③, stock is registered, followed by the cash handover, and the deal becomes **Purchased**. Confirm the handover was recorded before step 8. No approval from another member is needed for an in-store cash payment.
If missing PSA numbers or another issue prevents recording the handover, stock is already registered and the Payment page opens. Do not register the purchase again. Complete the missing numbers, then use **Record cash handover**. If cash was already handed over, finish the record without paying a second time.
### Enter or correct PSA numbers
Before payment, open **Check / correct PSA numbers** if numbers are missing. Match each card’s name, grade and image to the physical card, then enter its slab number. Use ① **Edit** to correct a saved number. Enter the correct number in the input at ② and click **Save this number**. Images identify the card design and are not necessarily photos of the purchased copy.
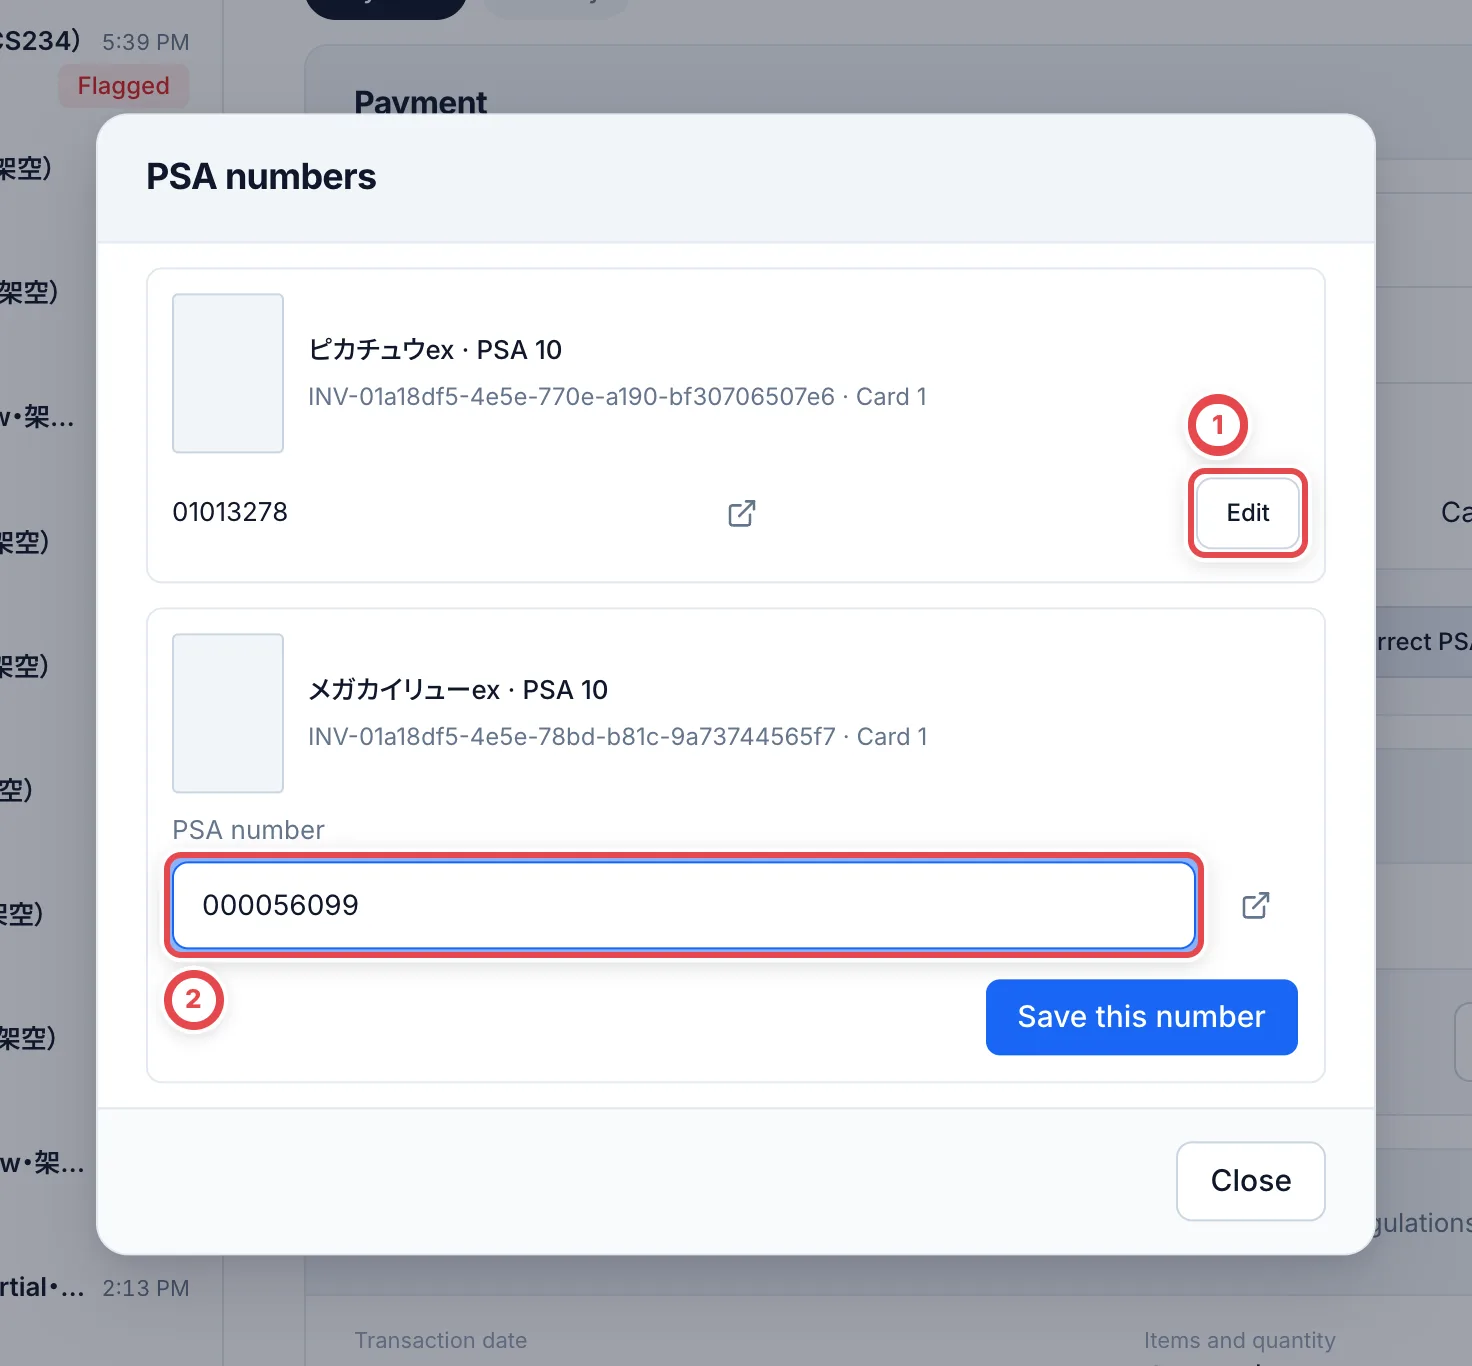 The entry remains in the Payment card after saving. Numbers cannot be edited here during or after payment processing, or when linked to a grading certificate.
## 8. Check completion and put the cards away
After you record the cash handover, **Purchase completed** appears with the amount handed over. Check the amount, customer and deal number, then click **View deal details** to see the payment result and purchase statement. To label the purchased cards and put them on the shelf, click **入庫・ラベル作業へ** (Go to receiving and labels) next to it. Receiving opens with only this deal's cards; click **すべての取引を表示** (Show all deals) to see the others.
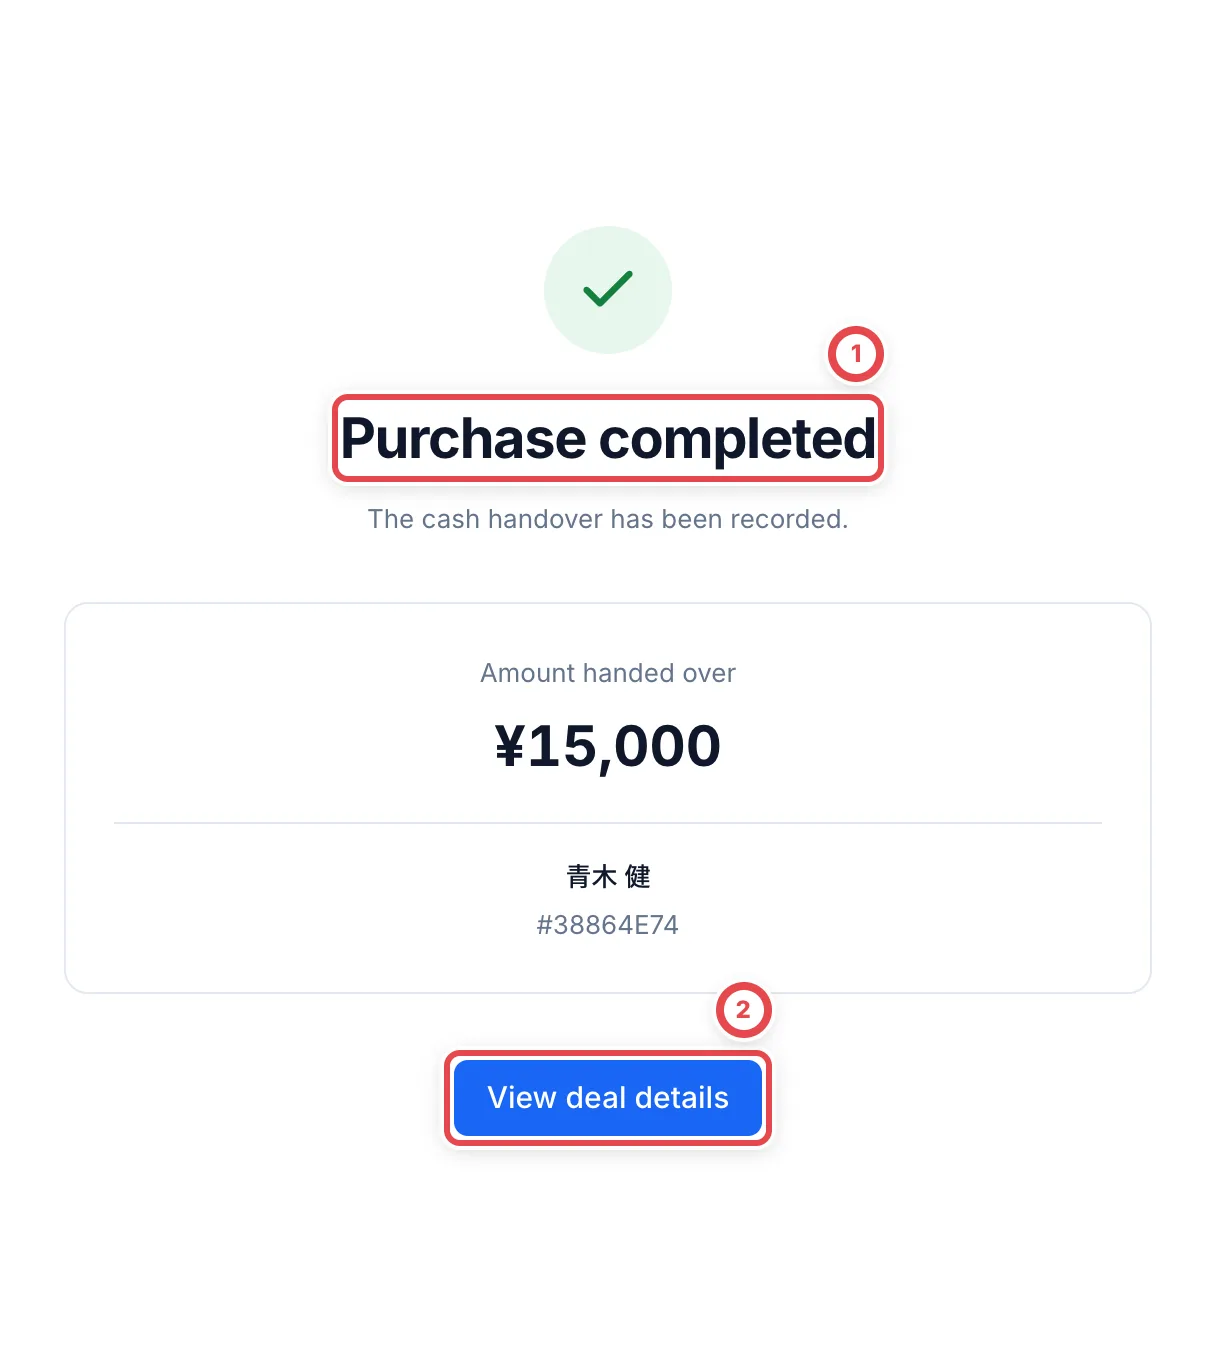 Check the completion and amount at ①; use ② for payment details and the statement.
**Checks before finishing with the customer**
Staff should check each item below. If anything is still outstanding, return to the relevant step and complete it.
- The customer agreed and signed the latest quote.
- Staff inspected the original and recorded the ID check; photos alone were not treated as verification.
- The customer confirmed the cards, quantities, amount and any cards being returned.
- Stock and payment are registered, and recorded cash/transfer status matches what actually happened.
- The statement recipient and email history were checked, using the shop's automatic-email setting.
- The shared tablet returned to its waiting screen without the previous customer's inputs.
Once cash is handed over and recorded, check that the deal is **Purchased**. Continue to [QR labels and putaway](/en/guides/inventory/putaway) to label the purchased cards and store them on the shelf. If cash handover is still pending, follow [When you record the cash handover later](#when-you-record-the-cash-handover-later).
## When the customer is asked to photograph ID
Photography is skipped in staff-entry mode and when this deal already has a recorded identity check. The same rules apply to QR links and shop tablets. After sending the photos, continue to [agreement and signature](#5-the-customer-reviews-agrees-and-signs).
**「本人確認書類の撮影」 (Photograph your ID, customer-photo mode only)**: Choose the document at ① and photograph the required sides. Confirm that no personal My Number appears, tick the checkbox, and tap 「写真を送信して次へ」 (Send photos and continue). Wait while the photos are checked.
| Document | Required photos | What to check |
| ---------------- | --------------- | ------------------------------------------------------------------ |
| Driver's license | Front and back | Both sides, even when there are no changes on the back |
| My Number card | Front only | **Never send the back, notification card, personal number or PIN** |
| Passport | Photo page | All corners and text must be readable |
| Residence card | Front and back | Use a different photo for each side |
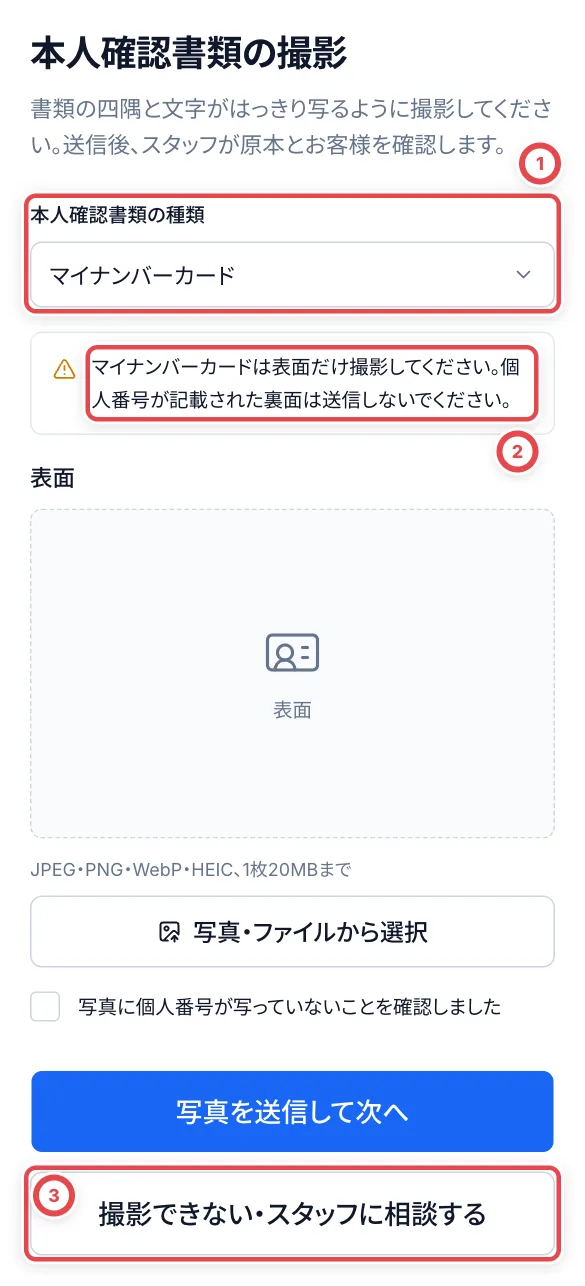 Choose the document at ①. Read ②: send only the front of a My Number card. Ask staff for help with ③.
Use JPEG, PNG or WebP, up to 20 MB in total. The screen attempts to convert HEIC; if conversion fails, take a JPEG instead. Photos whose type, side or contents cannot be checked are refused. Do not use the same photo for both sides.
If sending fails, follow the inline message and retry with the same photos. When photos are already submitted, continue without resending or choose the document again to replace them. Photos cannot be replaced after signing; ask staff to start a new session.
## Choose how to check identity
**Staff can check the original ID in person without changing settings first.** Open **In-person identity verification** from the customer's **Appraisal requests** or **Customer details** tab, including immediately after reception. See [Record an in-store ID check and add documents](/en/guides/purchase/counter-identity).
To ask the customer to photograph their ID on their own device, configure the collection method below.
Open **Settings → Payments → Change**, choose **In-store ID check** at ①, then save. You need permission to manage settings.
| Setting | Customer steps | Staff steps |
| ------------------------------------------------------- | -------------------------------------------------------------- | -------------------------------------------------------------------------------- |
| Staff receive the ID in person and record it | Quote → Customer details → Agreement and signature | Inspect the original, enter the type, number and expiry, and record the check |
| Customer photographs their ID on a tablet or smartphone | Quote → Customer details → ID photos → Agreement and signature | Compare the submitted photos, original and person present, then record the check |
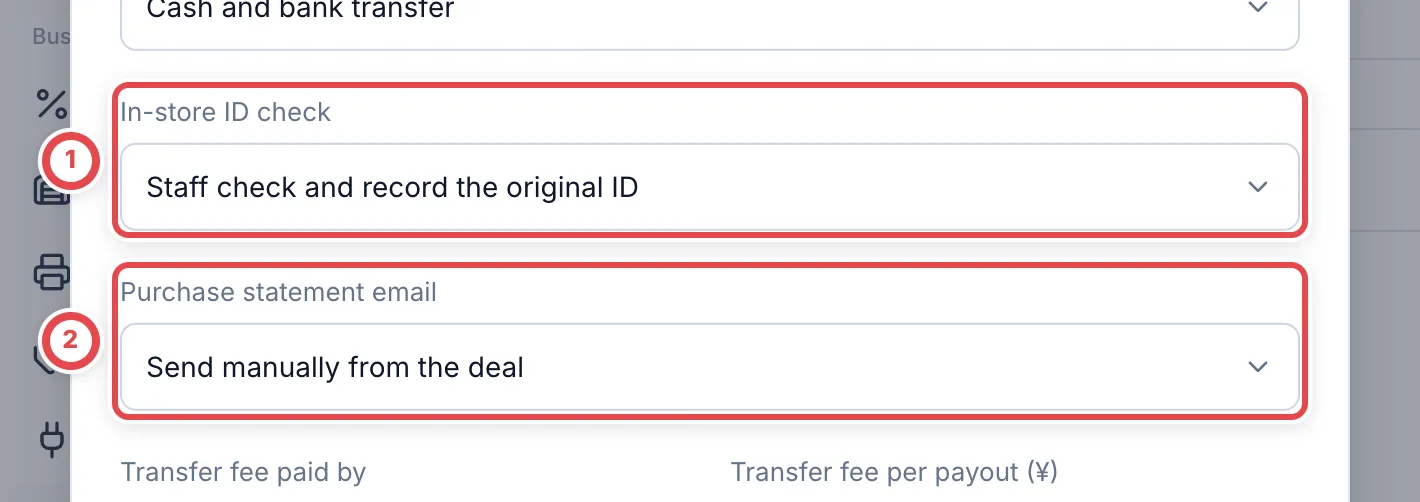 ① selects how to collect ID. ② selects whether to email the statement after payment completes.
Changes apply to sessions started afterward with **Show**. A customer already reviewing a quote keeps the previous setting. If this deal already has a recorded ID check, the customer is not asked for another set of photos. This does not automatically carry a check over to a different deal.
**Neither photos nor a signature completes identity verification.** Staff must inspect the original and the person, then record the check. Viewing photos requires identity-read permission. Recording the check or switching to staff entry also requires identity-write permission.
## Switch to staff entry when photography is unavailable
1. Ask the customer to tap 「撮影できない・スタッフに相談する」 (Unable to photograph; ask staff).
2. Open **See progress → Unable to photograph the ID?** on the staff screen.
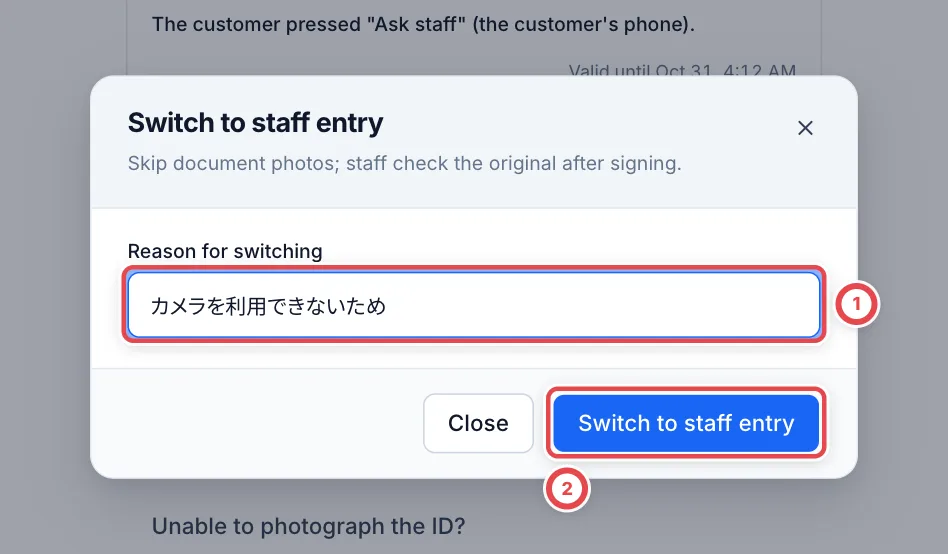
3. Enter a **Reason for switching** at ①, such as a camera that cannot be used.
4. Click **Switch to staff entry** at ②. This changes only this session and keeps the shop setting unchanged. The reason is recorded in the deal history.
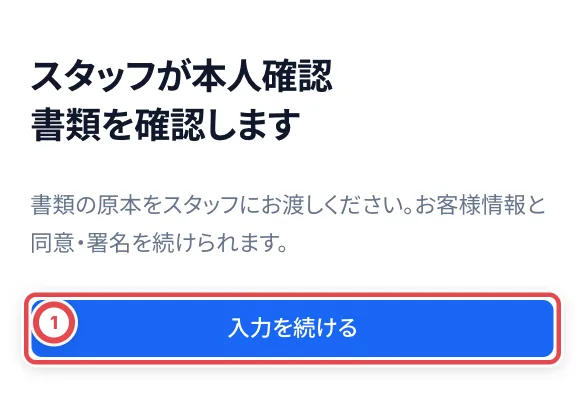
5. Once the customer's screen updates, they tap 「入力を続ける」 (Continue) and proceed to agreement and signature. Staff inspect and record the original afterward.
 Switch while the session is active and unsigned. For an expired or cancelled session, start a new one from **Show to the customer**. After signing, inspect the original ID and record verification. To restart an active phone session, use **Regenerate QR code**; for a registered tablet, use **Show again**.
 ## When you record the cash handover later
If the handover could not be recorded with the purchase (for example while PSA numbers are missing), or a payment is still waiting for approval from the old setting, continue from the payment page. Move a payment waiting for approval on with 「受渡し待ちに進める」 (Move to handover). No other member's approval is needed.
Hand the cash to the customer and click 「お金を渡した」 (Cash handed over) on the payment page. Choose the register the cash came from at ①, and click 「手渡しを記録」 (Record handover) at ②. The deal becomes **Purchased**, and the register records the purchase payment as an outflow.
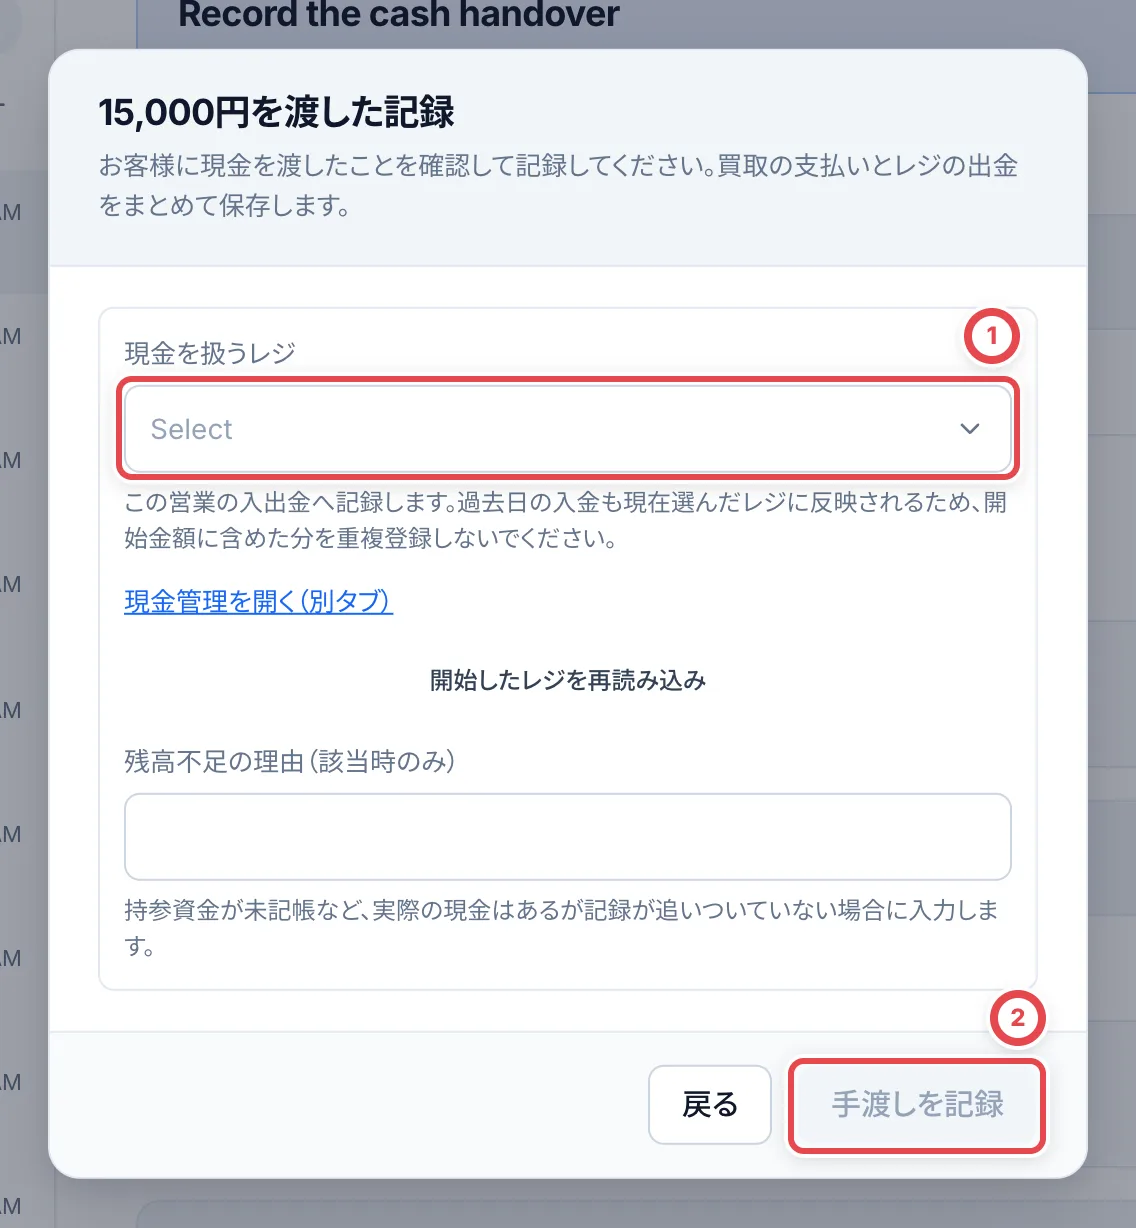 If your shop doesn't use cash management, the button is **Record cash handover** and the confirm button is **Record handover**. You don't choose a register.
:::warning
Don't enter the same purchase payment again under 「入出金を記録」 (Record cash in or out) in cash management. That records the outflow twice.
:::
## Pay by bank transfer
If your shop's setting allows bank transfer, you can choose it instead of cash in step 7. Steps 1–6 (up to the ID check) are the same. For a transfer, you attach the contract the customer signed on the counter screen as the customer consent evidence.
### 1. Choose bank transfer and add the payout account
Under **Stock and payout**, click **Register the purchase**. Under **Payment method**, choose **Bank transfer** at ①. If **Payout account** at ② shows **Not added**, click **Add payout account** and add the customer's account.
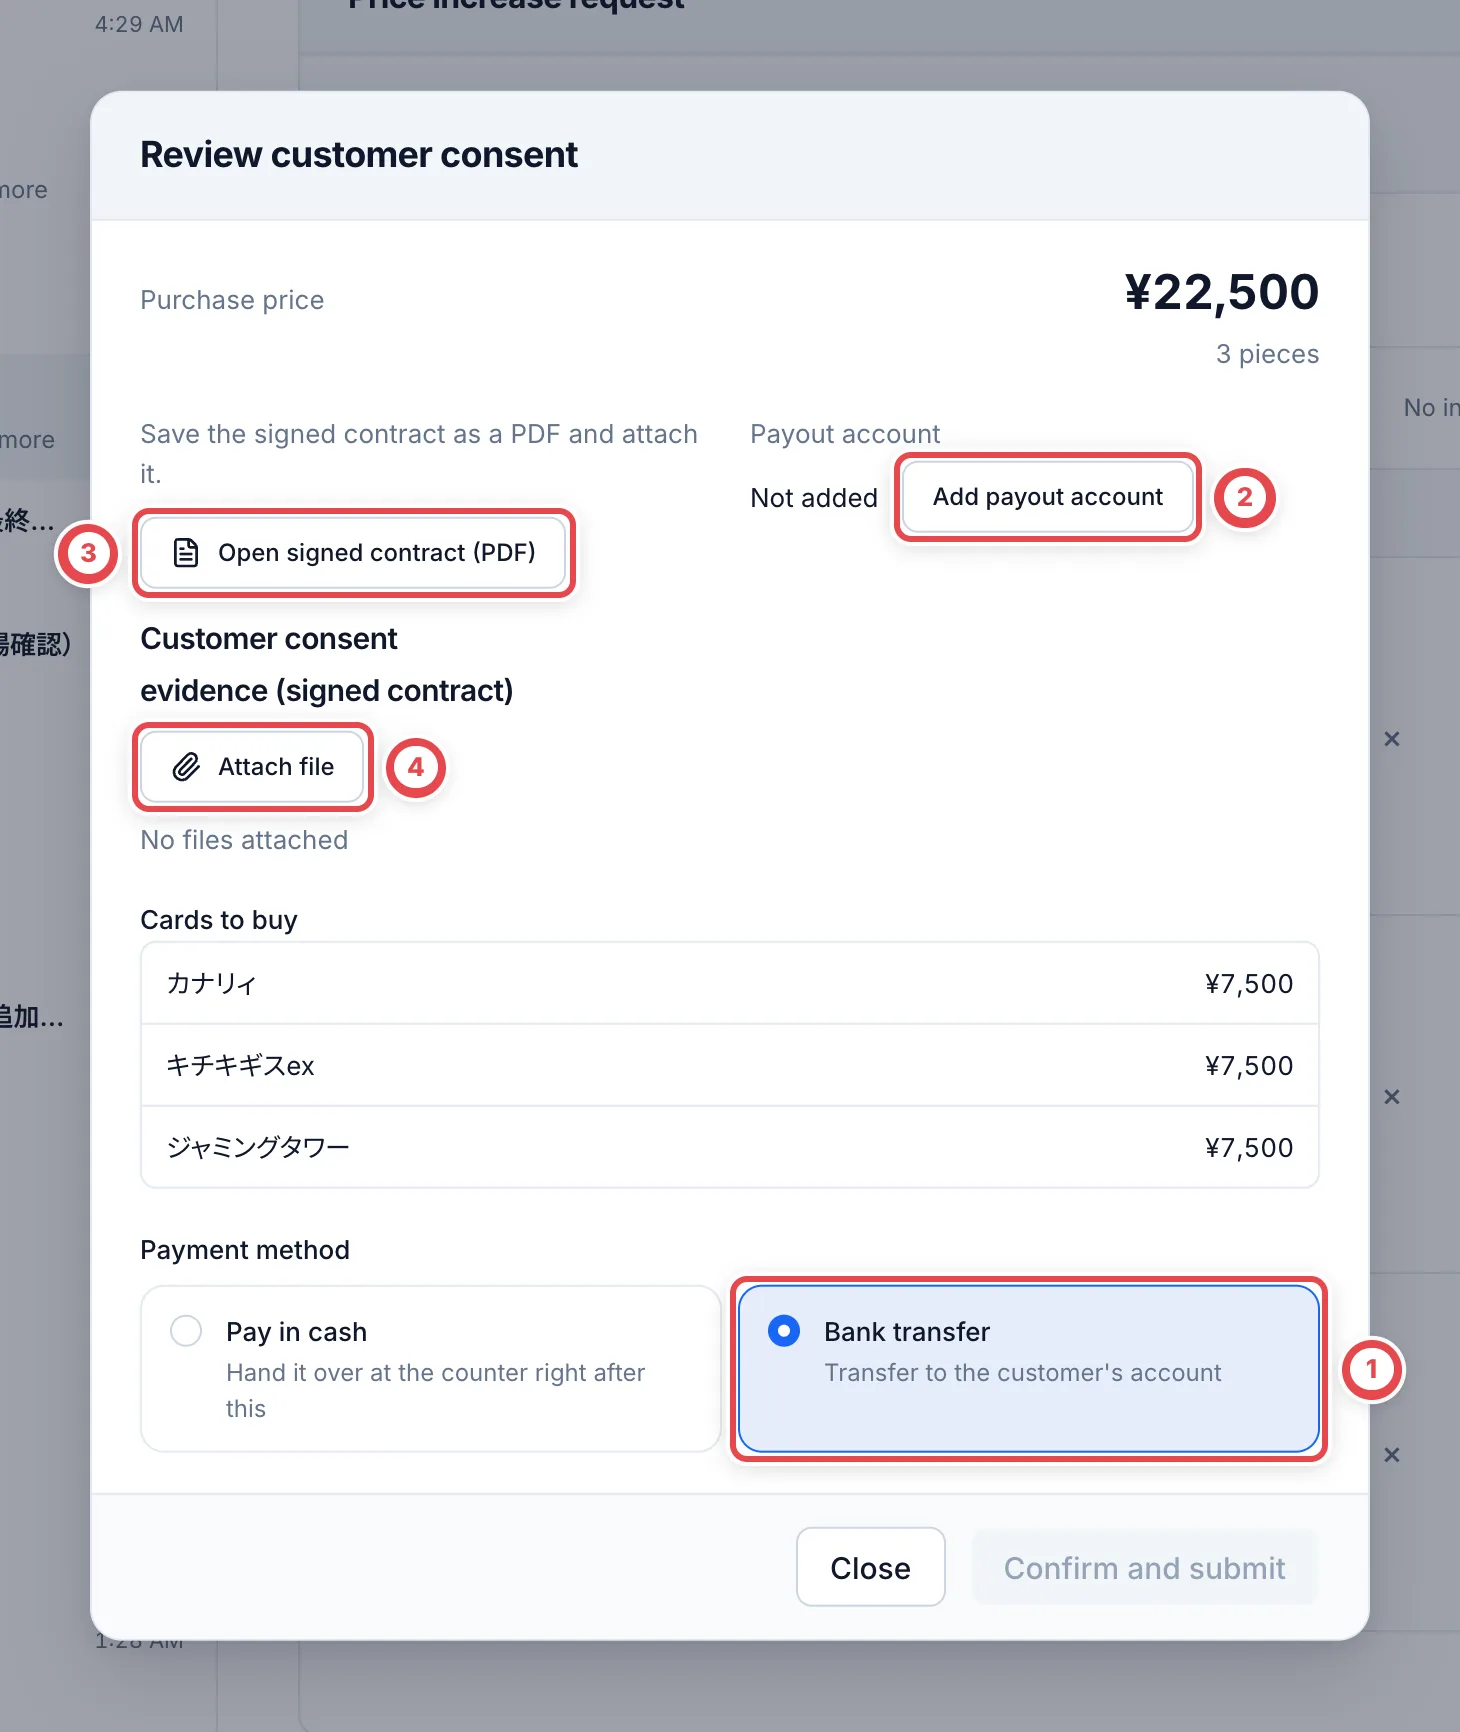 Choose Bank transfer at ① and add the account at ②. Open and save the contract at ③ and attach it at ④.
When **Add payout account** opens, copy **銀行名** (bank name), **支店** (branch), **口座番号** (account number), **口座種別** (account type: 普通 / Ordinary, 当座 / Current, 貯蓄 / Savings), and **口座名義(カナ)** (holder in katakana) at ① from the customer's passbook or bank card. These fields currently appear in Japanese. For Japan Post Bank, choose **ゆうちょ銀行** at the top first, then enter the symbol and number. Click **Add account** at ② to go back to the previous dialog, where **Payout account** now shows the account.
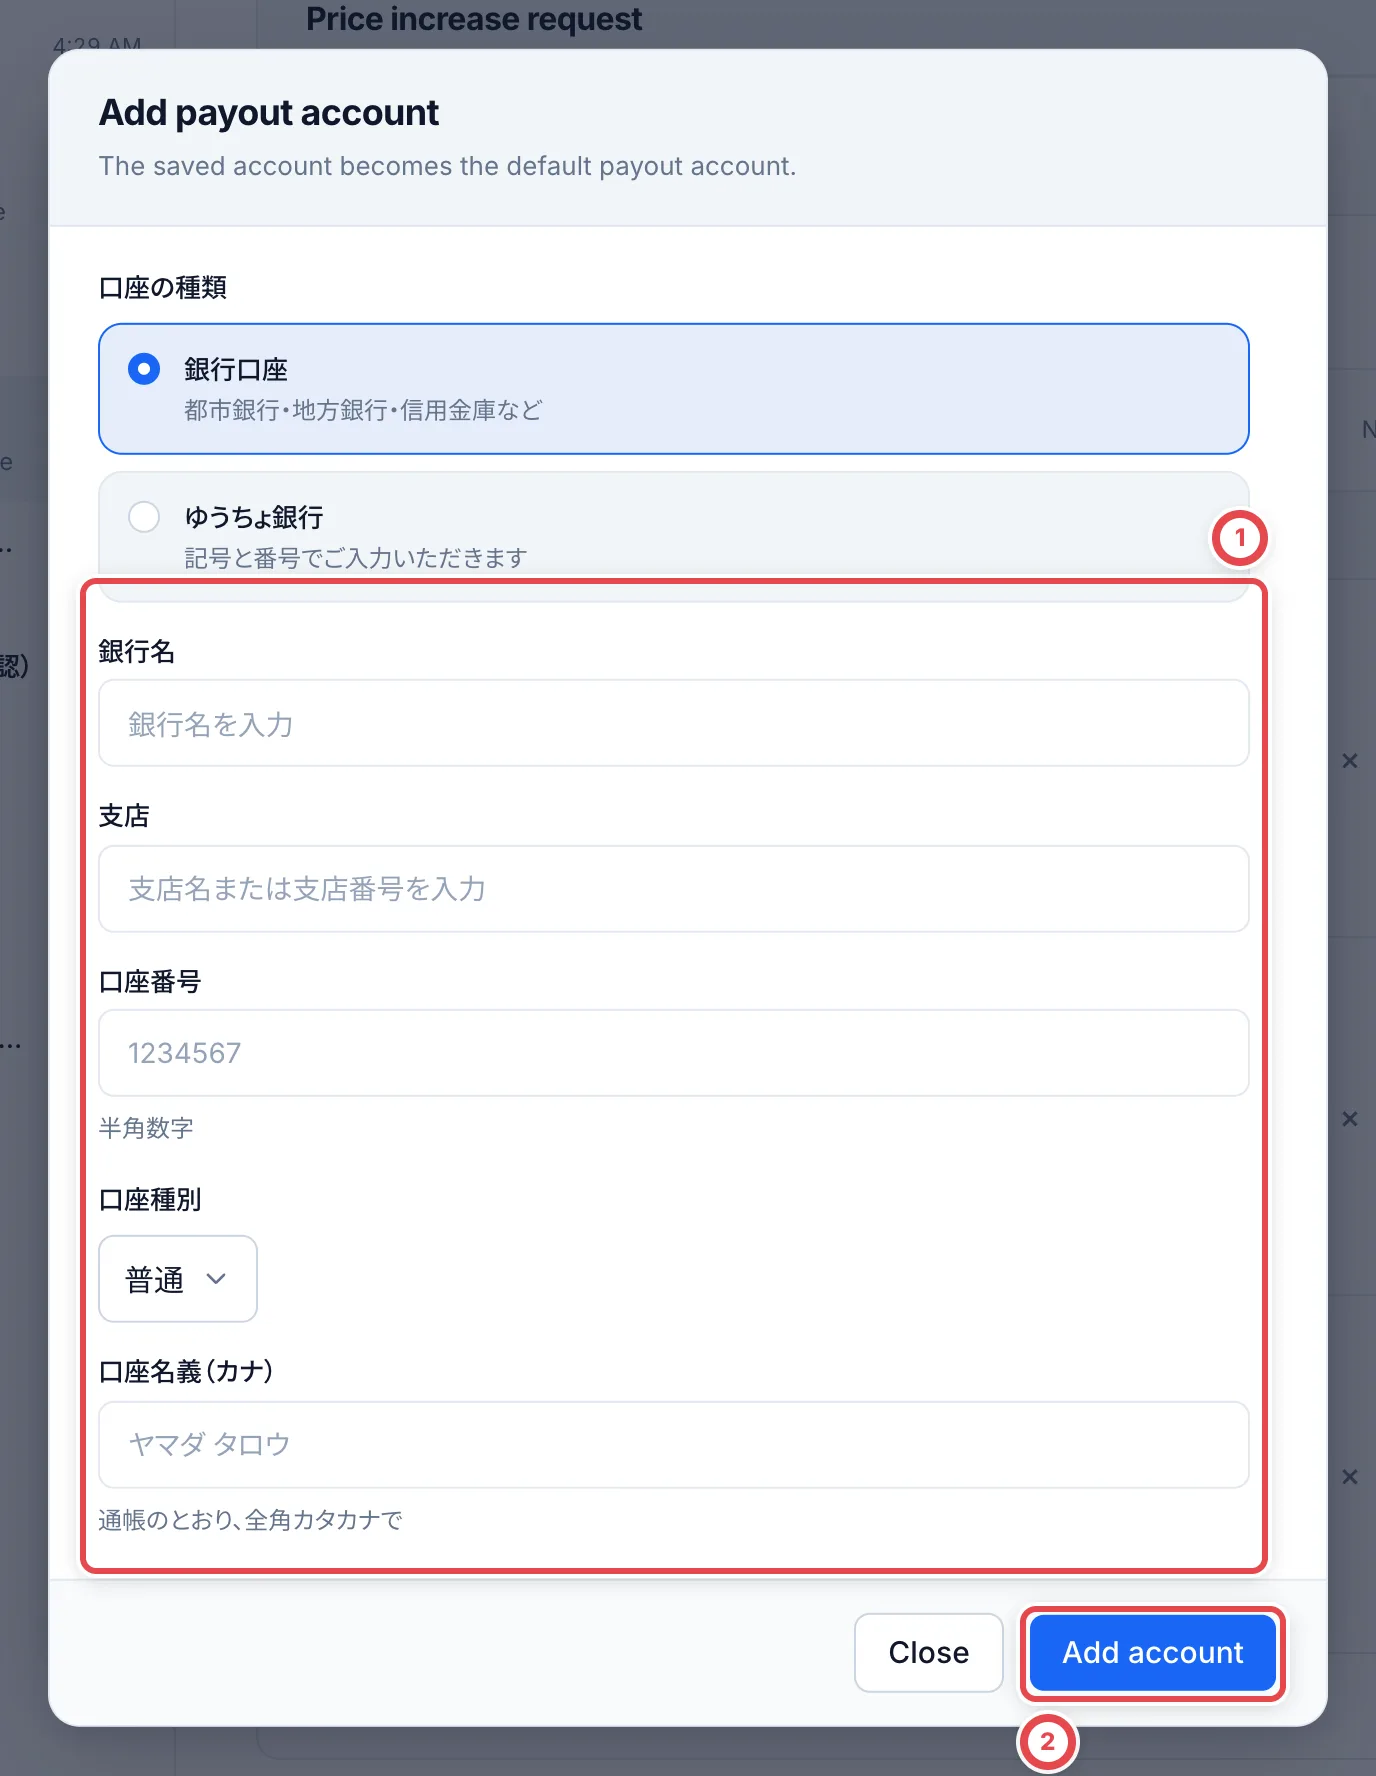 If the account holder's name differs from the customer's, you need a power of attorney before the transfer (see "When a power of attorney is needed" in [Identity verification](/en/guides/purchase/identity)).
### 2. Check the contract and account, then submit
In the same dialog, click **Open signed contract (PDF)** at ③. The contract opens in a new tab; save it to your computer. Then click **Attach file** at ④ and choose the saved contract. When "No files attached" changes to the contract's file name, it is attached.
Members who can submit payouts see the account check and **Confirm and submit**. Click **Show account number and holder**, then compare the bank, branch, account type, full number and holder with the identity document or passbook. Check the items and amount in the attached signed contract, then click **Confirm and submit**. **This records the purchase and submits the payout together.** Once submitted, do not submit the same payment again.
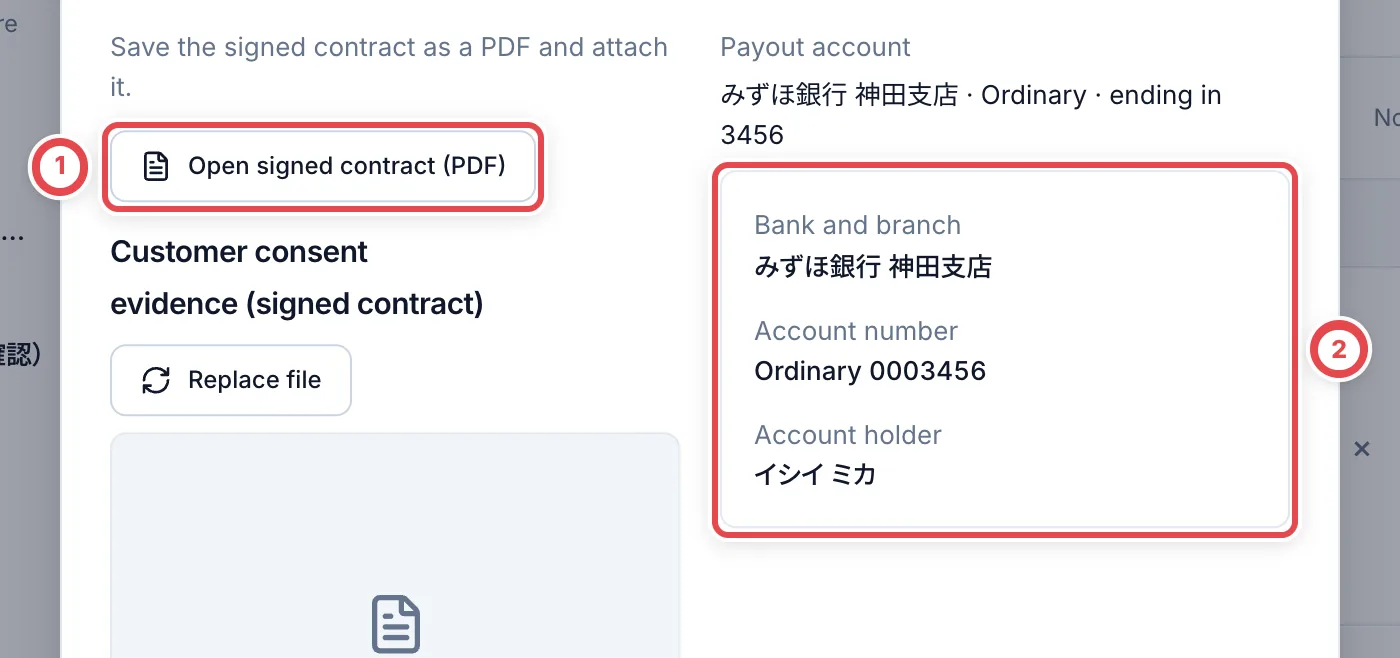 Open the signed contract at ① and check the account at ②.
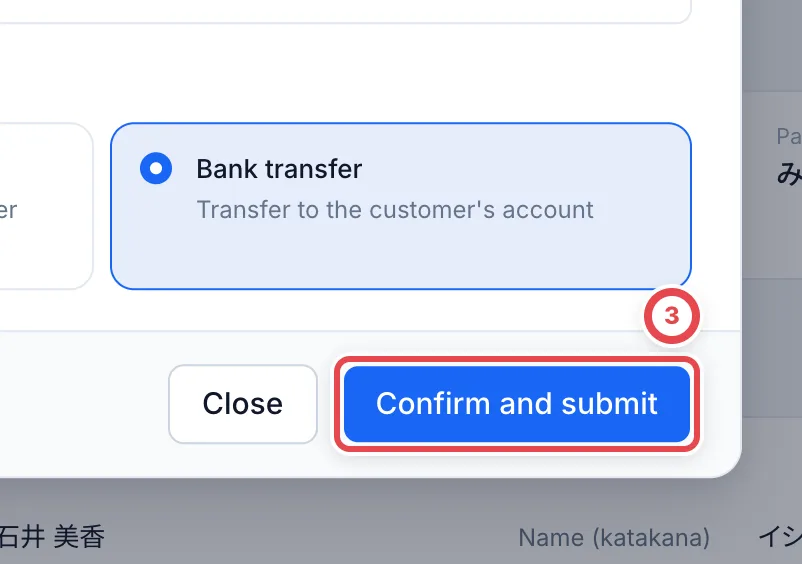 If the button instead records only the purchase, such as **Record acceptance of N pieces**, the payout member submits it in the next step. Attaching the contract alone does not submit a payout. If you change the account, show its details again and check the current account.
### 3. Continue the payment
If the payout is not submitted, **Next step** shows ① **Submit the payout request**. Open submission with ②, check the signed contract, amount and account, and submit. If **Confirm and submit** already submitted it, follow the payment's current status. When approval is required, another member approves it; then come the bank transfer, recording the result and recording receipt. See steps 2–5 of [Payouts](/en/guides/purchase/payouts).
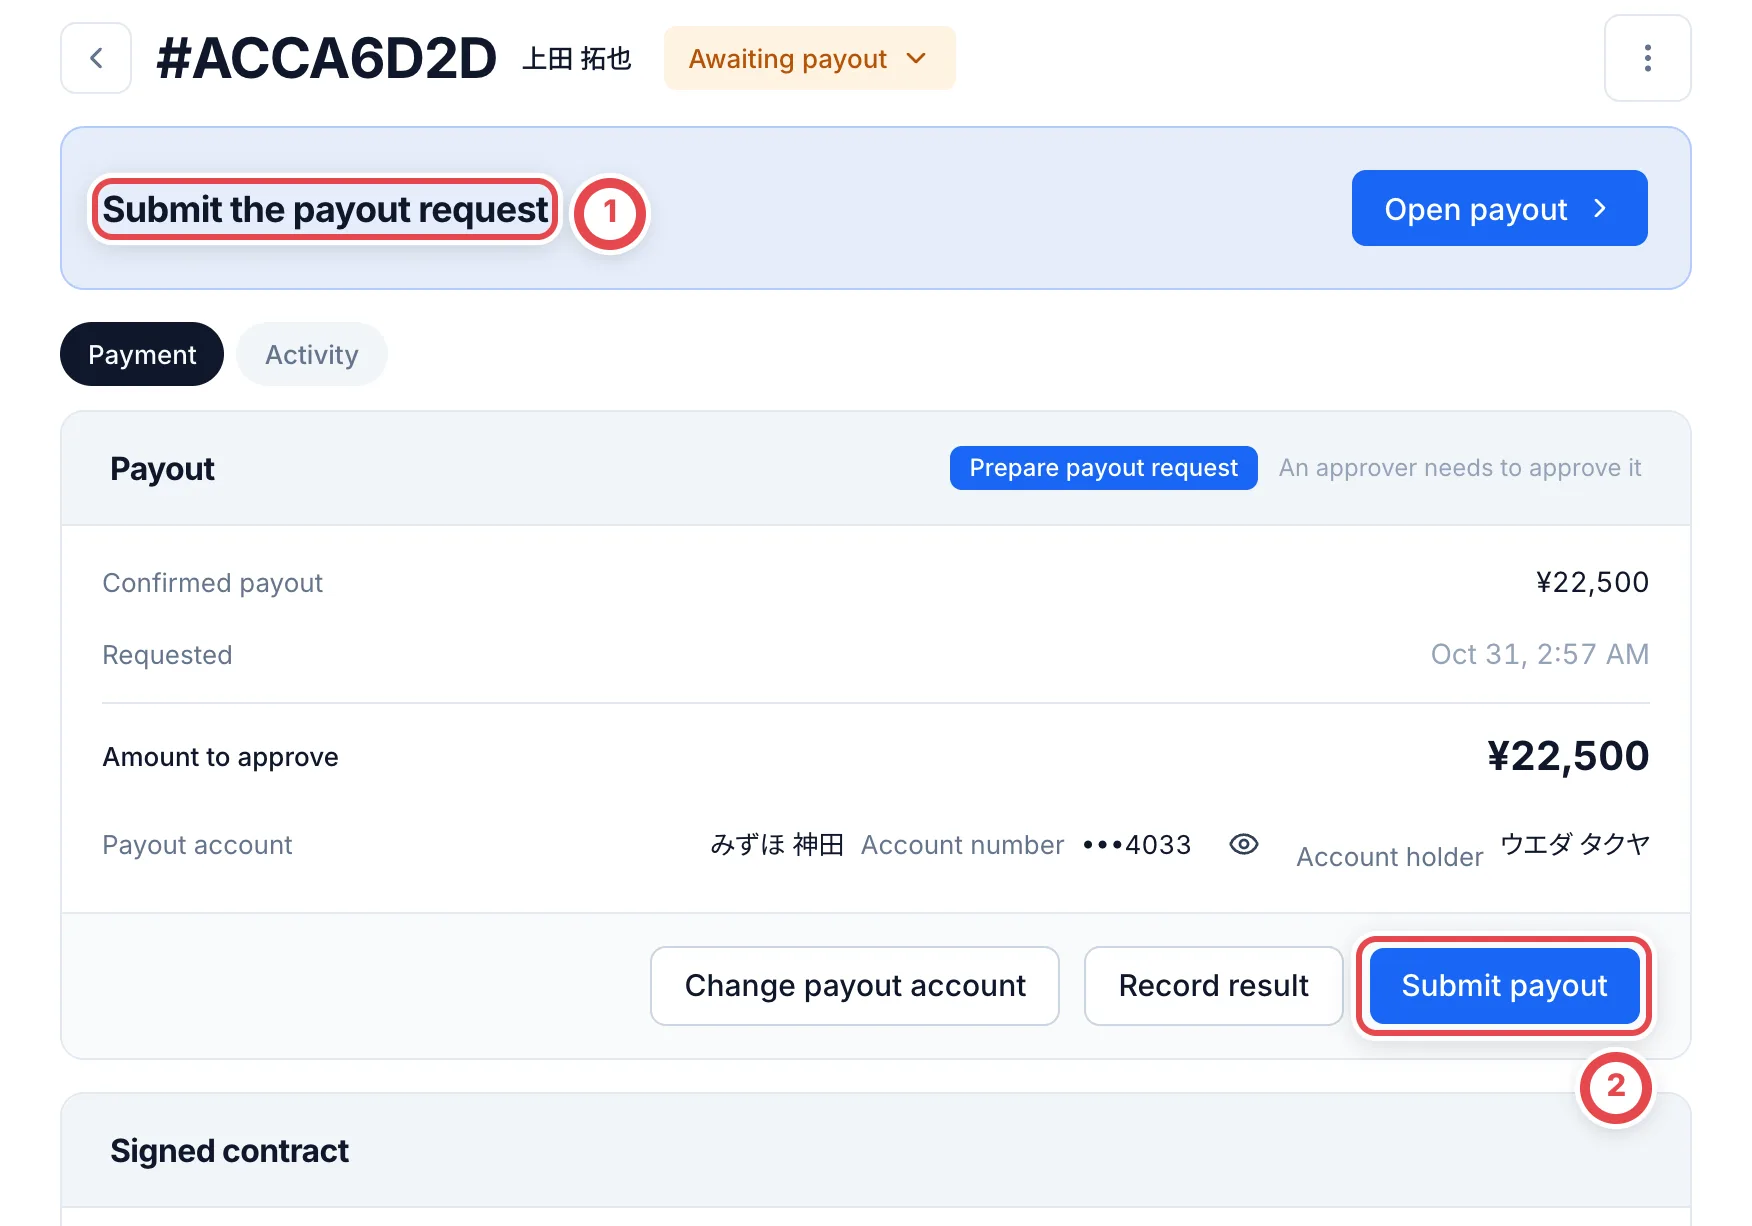 A deal paid by bank transfer becomes **Purchased** when you record the transfer result as successful. Tell the customer at the counter when to expect the transfer.
## When the customer calls for staff
When the customer taps 「スタッフに相談する」 (Talk to staff) on their screen, their screen stops at 「スタッフがまいります」 (Staff will be with you shortly) and they can't go further. On the staff screen, **Next step** becomes **The customer is asking for staff**. Go to the customer and hear what they need.
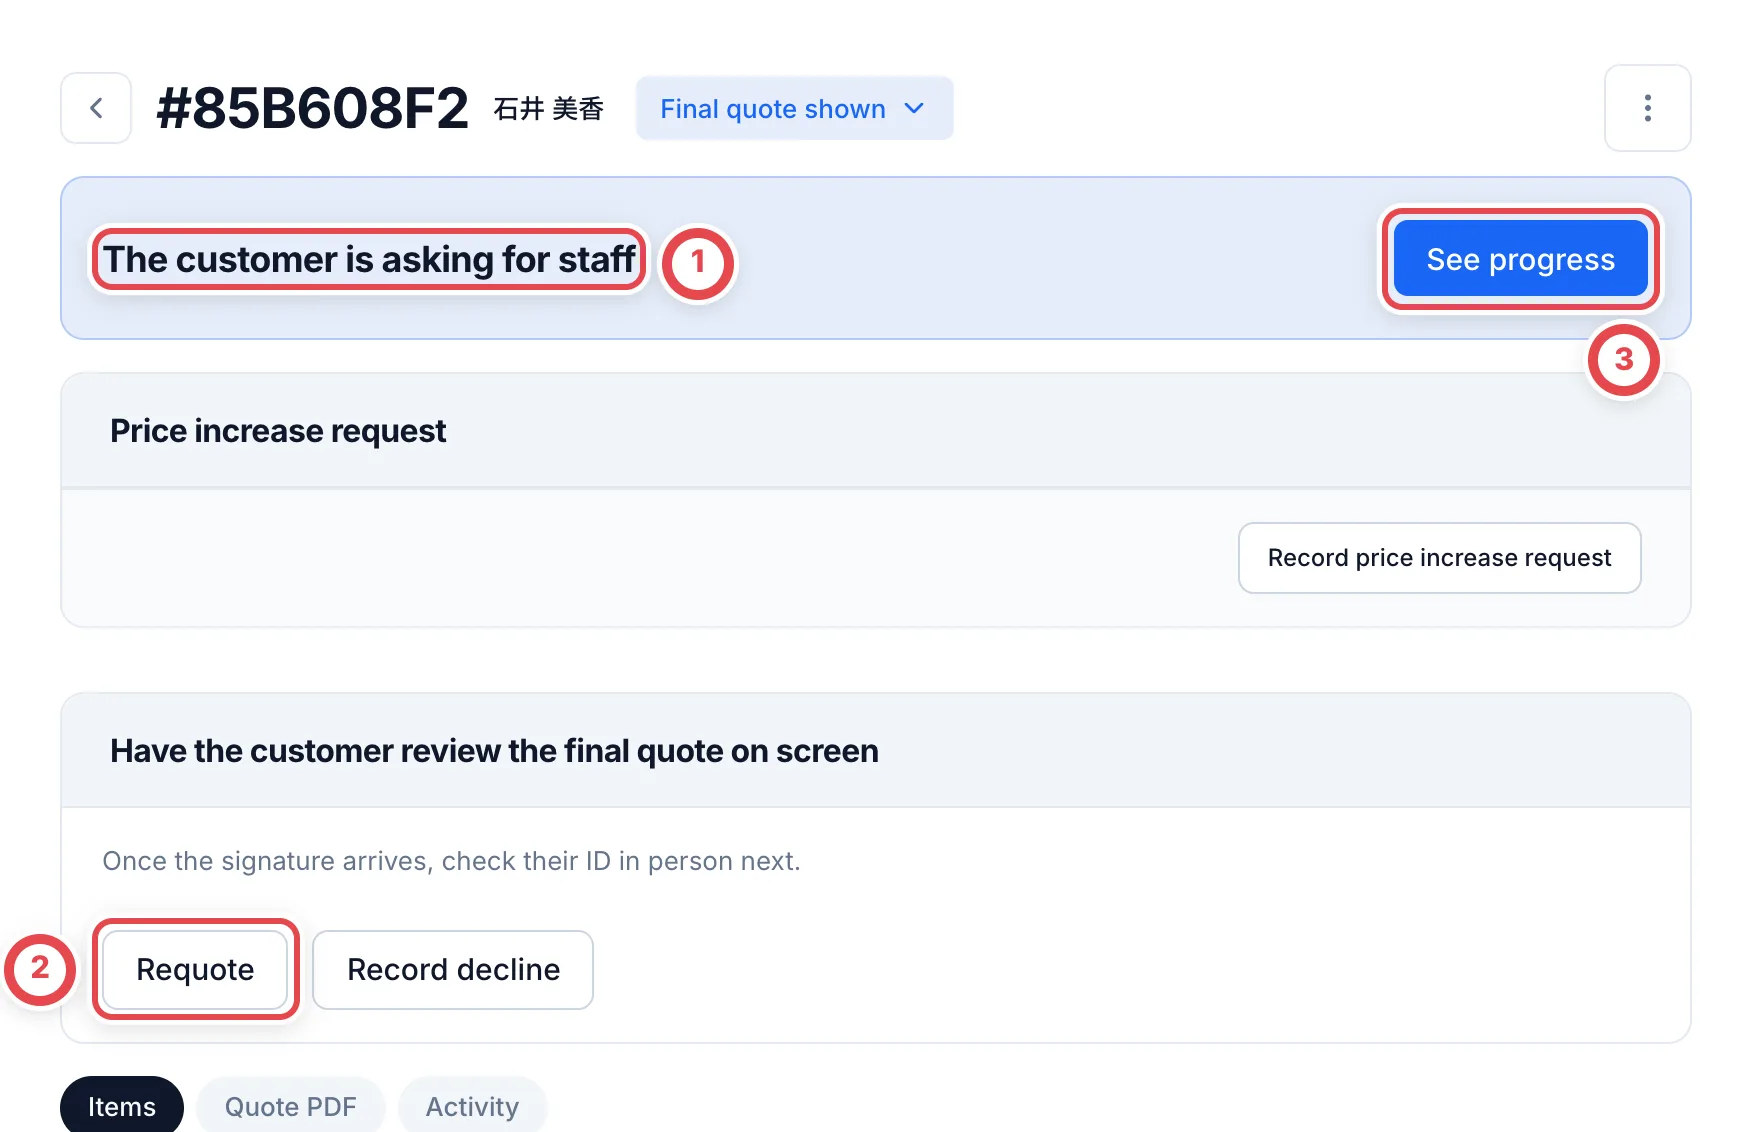 When ① appears, speak to the customer. Use Requote at ② to change the quote or ③ to see progress.
| What the customer says | What to do |
| ----------------------------------------------- | ----------------------------------------------------------------------------------------------------------------------------------------------------- |
| They don’t accept an amount or a condition note | Use **Requote** to change the final appraisal and present a new quote (steps below). |
| They want to keep some of the cards | Exclude those cards in a requote, then obtain agreement and a signature for the revised quote. |
| They are fine after your explanation | A consulting session cannot continue as-is. Under **See progress**, use **Regenerate QR code** for a phone or **Show again** for a registered tablet. |
| They won’t sell today | Follow “When the customer keeps all the cards” below: return the items and record the decline. |
To change the amounts:
:::warning
**Requote** creates a draft of the final appraisal as soon as you click it. No confirmation appears. Click it only once you have decided to change the amounts.
:::
1. Ask the customer to pause. For a registered tablet, use **See progress → Cancel the screen** to return it to standby.
2. Click **Requote** and edit the final appraisal. Condition notes also appear on the customer’s screen.
3. Confirm the saved amounts and quantities and the final quote PDF.
4. Present the new quote with **Show to the customer**, as in step 4. For a phone, ask the customer to scan the new QR.
5. Have the customer check the new quote and agree and sign again.
## When the customer keeps cards
:::warning
Confirm item changes or a full decline before the customer agrees and signs. The signed in-store screen does not show **Requote** or **Record decline**. If a change or decline is needed after signing, stop before registering the purchase or payment and consult the shop manager.
:::
### When the customer keeps some of the cards
The registration dialog does not let you remove cards after the customer has signed. If the purchased items change, return to **Requote** before the customer agrees and signs.
In the final editor, use **Mark not purchasable** from each kept card’s three-dot menu, save, and present the revised items, quantities and amount. Obtain agreement and a signature for that quote before steps 6–7. Hand the kept cards back and check the items with the customer.
### When the customer keeps all the cards
When the customer decides not to sell today, hand all the cards back. Ask the customer to stop and close their screen. For a registered tablet, use **See progress → Cancel the screen** to return it to standby.
Click **Record decline**. If you use the **Record another response** menu, choose **Record a full decline and hand everything back**. Enter the reason at ①, confirm at ② that every item has been handed back, then click ③, **Record full decline**. This records both the full decline and the in-store hand-back and ends the deal. Shops that do not use online purchasing can also record it.
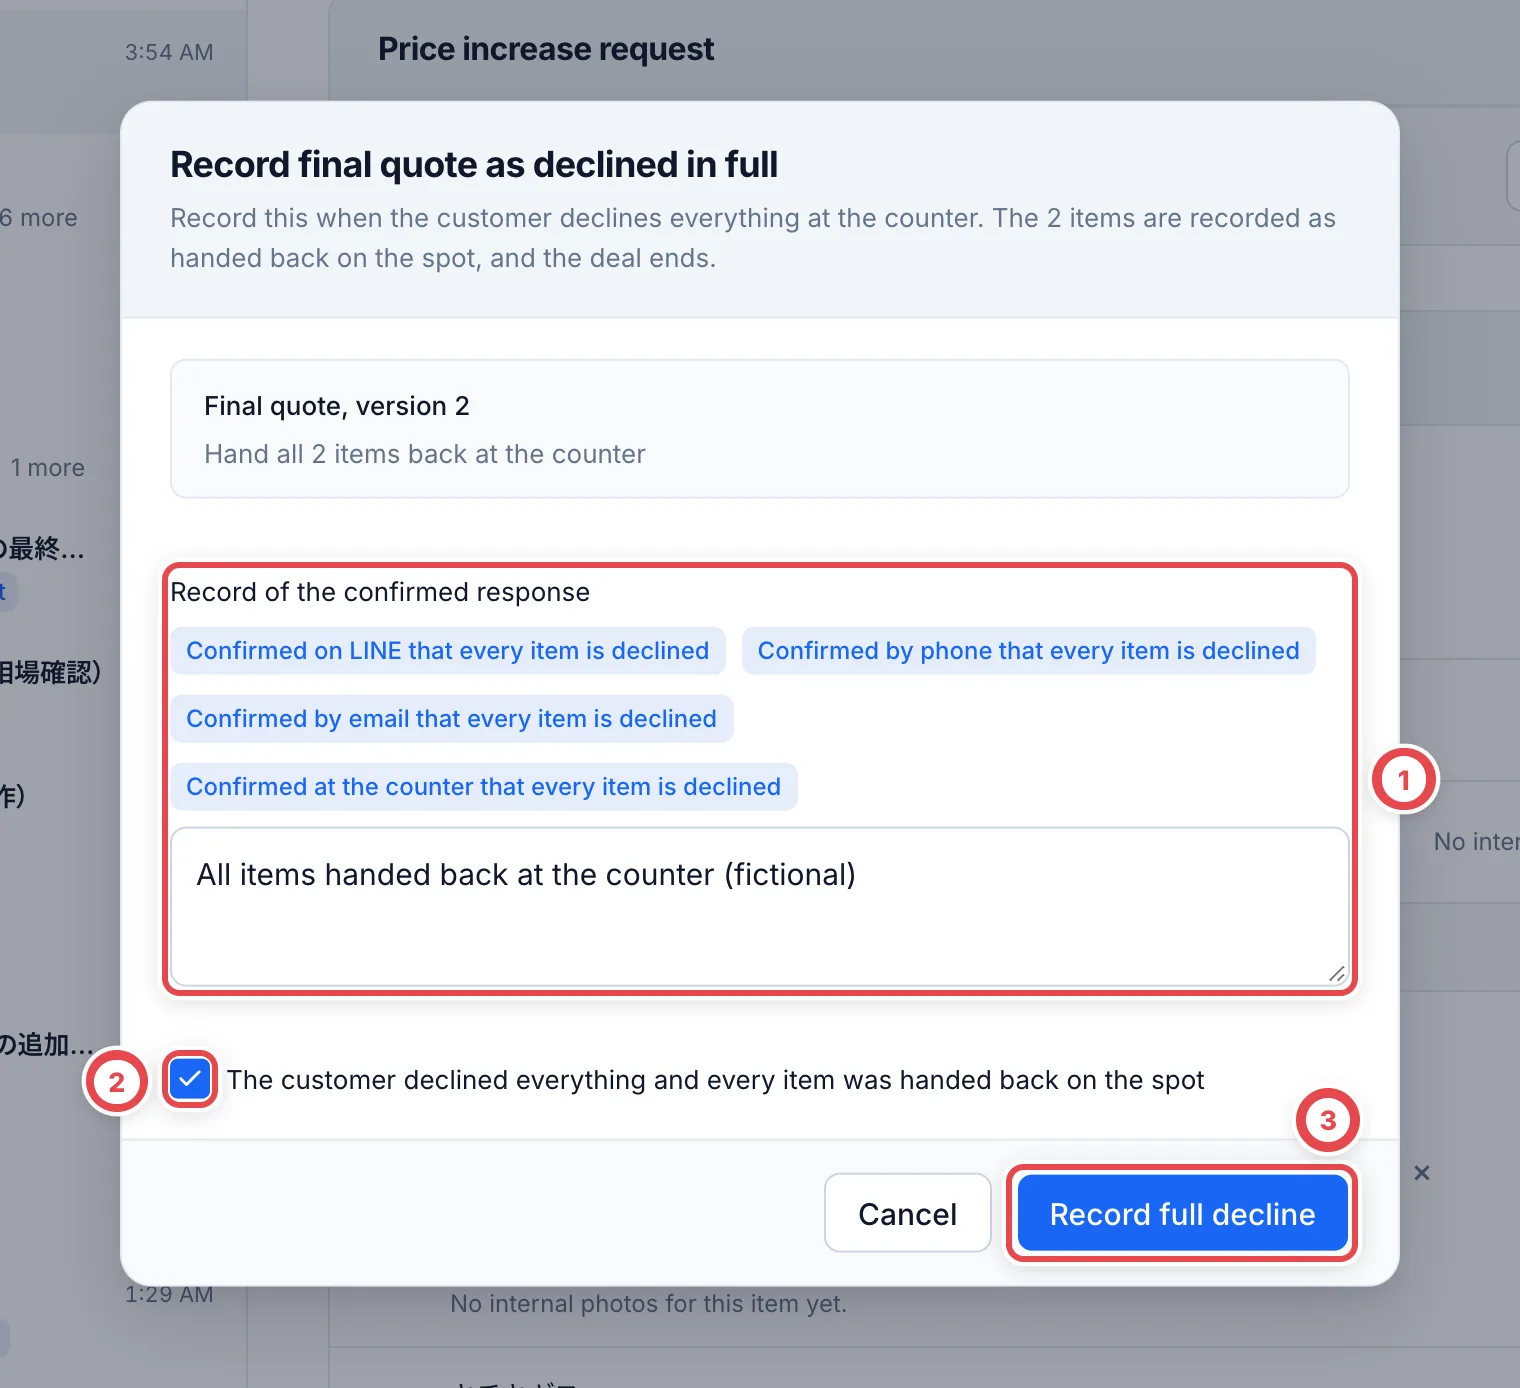 Reopen the deal and confirm it has ended with no next action. This operation creates no inventory or payout.
 ## Customers under 18
When a customer enters a date of birth under 18 on their screen, it stops at ① 「スタッフにお声がけください」 (Please speak to staff). On the staff screen, **Next step** becomes **The customer is asking for staff**.
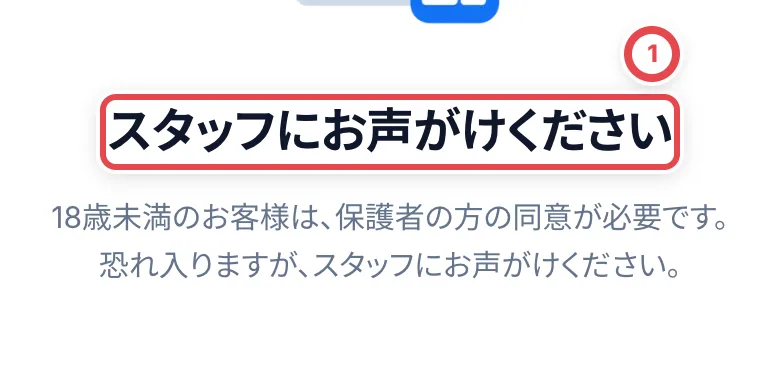 The counter screen in Toreca Cloud can't take a purchase from a customer under 18, and it has no steps for getting a guardian's consent. Hand the cards back and record the decline as described under [When the customer keeps all the cards](#when-the-customer-keeps-all-the-cards). Follow your shop's own rules for buying from customers under 18, and check with your admin.
## Business customers
When a company or shop brings cards in, you can't use the counter screen (the customer's smartphone or a shop tablet). If they try to send it, their screen shows 「法人のお取引は、この画面ではお受けできません。スタッフにお声がけください」 (Business deals can't be taken on this screen. Please speak to staff). The in-person ID check can't be used for business customers either.
Buy from business customers with the steps for buying with an invoice. See [Business deals and invoices](/en/guides/purchase/corporate-deals).
## When email is sent and how to check it
| Action or timing | Customer email | Staff check |
| ------------------------------------------------------------------ | --------------------------------------------------------------------------------------------------------------- | ------------------------------------------------------------------------------------- |
| Visit booking, change or cancellation | Booking notices follow the booking notification settings and recipient | Check the booking and address; see [Visit bookings](/en/guides/purchase/reservations) |
| Displaying a store quote, photographing ID, agreement or signature | These actions do not send email | Check progress and the signed contract on screen |
| Recording cash handover or a completed transfer payment | Issues a purchase statement; queues email if automatic sending is enabled and the customer has an email address | Check the recipient and history under **Purchase statement** |
| **Email → confirm recipient → Send** | Queues an email with the statement PDF to that recipient | Verify the address before sending |
| Reissuing with corrected records | Does not automatically resend it | Check the new statement, then email it explicitly |
In **Settings → Payments → Purchase statement email**, choose automatic sending after payment or manual sending from the deal. Customer email is optional. Entering an address does not send anything by itself, and the signed contract is not automatically attached to the email.
### If an email has not arrived
1. Confirm payment is complete and a statement exists. Signing alone does not trigger a statement email.
2. If there is no history, check the customer address and automatic-email setting. Adding an address or changing the setting later does not resend past statements automatically; send the required statement manually.
3. If pending or sending, avoid sending another copy. If it stays unchanged, give an admin the deal number, statement number and displayed status.
4. If failed, check the recipient. Temporary service failures are retried; an invalid address needs correction. Ask an admin about persistent failures.
5. **Sent** means the email service accepted it, not that it reached the inbox. Check the recipient, spam folder and receiving restrictions; confirm with the customer before resending.
Do not record payment again to fix a missing statement or email. Issue and send a missing statement from the paid deal's **Purchase statement** section.
### Applying corrections after a statement was issued
Reissuing is not part of the normal completion steps. If you correct a name or item details in the secondhand ledger, or a mistake in the shop information, open **More purchase statement actions** at the top right of **Purchase statement**, then choose **Reissue with corrected records**. Correct the source record first, then enter the reason for reissuing.
The previous statement is withdrawn and a new number is issued. The payment record stays unchanged. To give the customer another copy without changing its contents, use **Save PDF** or **Email** instead of reissuing.
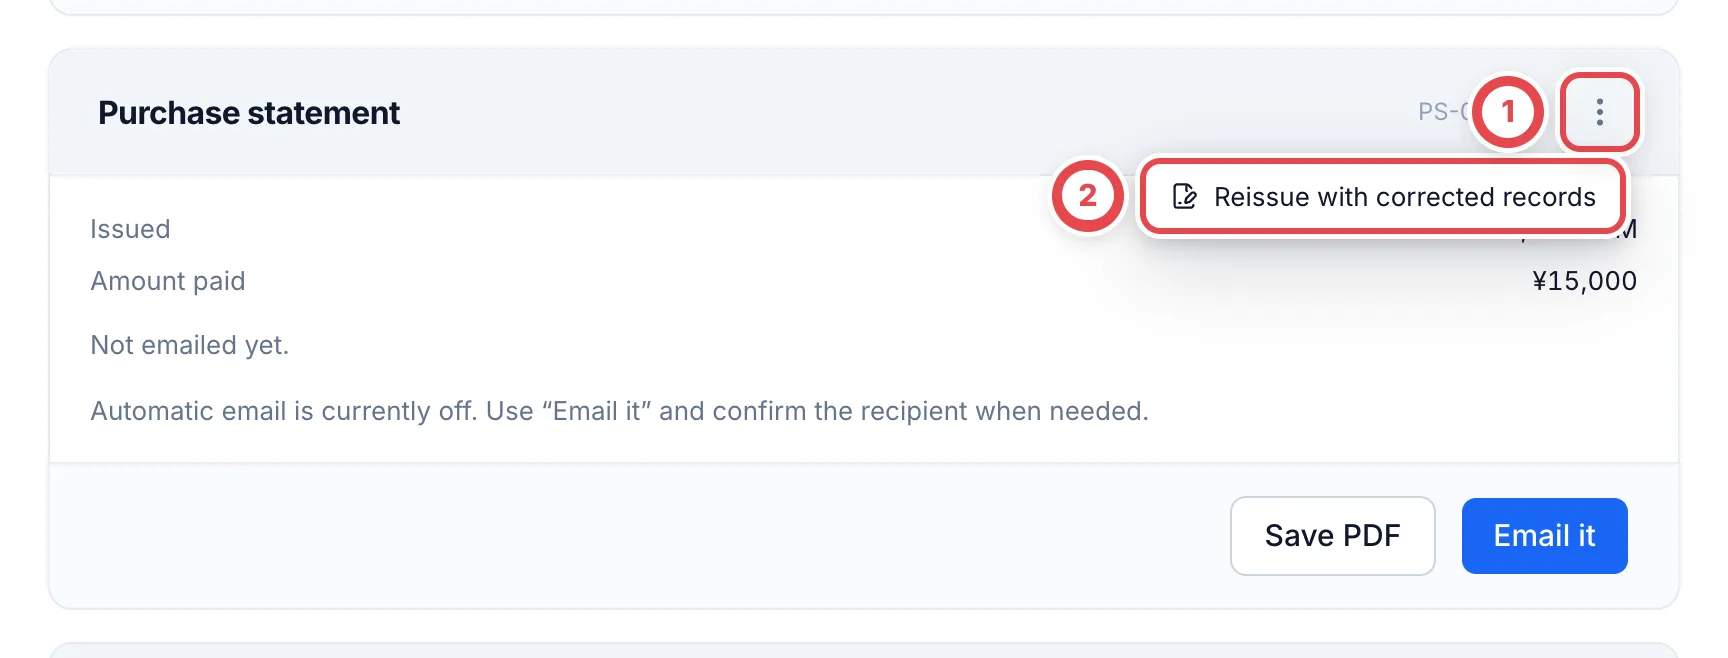 Use ① to open the menu; ② reissues after correcting the source records.
## If something goes wrong
| What is happening | What to check and how to fix it |
| ------------------------------------------------------------------------------------------------------------ | --------------------------------------------------------------------------------------------------------------------------------------------------------------------------------------------------------------------- |
| **In store** doesn't appear under **Intake channel** | Ask your admin whether counter purchasing is enabled for your shop. |
| You can't choose a tablet under **Show to the customer** | Register the tablet under **Settings** › **Counter tablets** (see [Counter tablets](/en/guides/purchase/counter-tablets)). You need the **Manage settings** permission. Until then, you can use **Customer's phone**. |
| The customer sees an invalid link or QR message | It has expired or been invalidated by regeneration or a deal/quote change. Check the current deal and start a new confirmation with **Show to the customer**. |
| The customer sees 「このQRコードは使用済みです」 (This QR code has already been used) | Open it in the first phone’s browser. To switch devices or browsers, ask staff to regenerate the QR. |
| 「この端末では別のお客様が確認中です」 (Another customer is reviewing on this device) | Wait until the previous customer finishes, then send it again. If it never finishes, click **Cancel the screen** on the previous deal. |
| The customer's screen shows 「見積の内容が更新されました」 (The quote was updated) | You edited the final appraisal after showing it. Show it again from the staff screen. |
| You can't record the ID check | You need the ID type, number, expiry date, and the confirmation checkbox. Also check that the customer's name, date of birth, occupation, and address are all filled in. |
| **Register the purchase** is missing | Check **Next step** at the top. Registration becomes available after the customer signs and staff complete the ID check in section 6. |
| 「営業中のレジがありません」 (No register is open) and you can't click | Start a register in cash management, then click 「開始したレジを再読み込み」 (Reload started registers). |
| 「グレードが決まっていないため相場を取り込めません」 (No grade is set, so the market price cannot be loaded) | The ungraded card has no grade. Enter the reference price by hand, or set the default grade for single cards under **Settings** → **買取掛け率** (Buy rates). |
| 「記録上の現金が不足しています」 (Recorded cash is short) | The register's recorded cash is less than the payment. Add cash and record the deposit, or ask an admin to record an exception. |
| The customer wants to sell only some of the cards | Follow [When the customer keeps cards](#when-the-customer-keeps-cards) and record only the cards you buy. |
| **Bank transfer** doesn't appear under **Payment method** | Your shop is set to cash only. Ask your admin to change **Settings** › **Payments** › **In-store payment methods** to **Cash and bank transfer** or **Bank transfer only**. |
| With bank transfer chosen, **Record acceptance of N pieces** can't be clicked | **Payout account** shows **Not added**. Add the customer's account with **Add payout account**. |
| **Open signed contract (PDF)** doesn't appear | The customer hasn't signed on the counter screen yet. Have them sign in steps 4 and 5. |
| **Submit payout** can't be clicked | The consent evidence (the signed contract) isn't attached. Attach it with step 2 of [Pay by bank transfer](#pay-by-bank-transfer). |
| The customer's screen stays at 「スタッフがまいります」 (Staff will be with you shortly) | The customer tapped 「スタッフに相談する」 (Talk to staff). Go to [When the customer calls for staff](#when-the-customer-calls-for-staff). |
| The photography step is missing | Check the ID collection setting when the session started. A later setting change does not alter an active session; the same deal with an existing ID check does not request more photos. |
| Photos cannot be sent | Check the document type, required sides, absence of a personal My Number, and the 20 MB total. Switch to staff entry if camera, connection or reading-service problems persist. |
| The ID-check button is unavailable after signing | Check identity read/write permissions, a signature for the latest quote, and missing customer details. |
| An unstable connection is reported | Wait for connectivity. If the link expires, show it again. Reloading the page can lose unsent input. |
| The back of a My Number card was selected | Do not send it. Choose the front only, and never copy the personal number into notes. |
## Before and after an in-store purchase
Before a visit, check [Reservations](/en/guides/purchase/reservations). Shops using cash management also follow [opening, checking and closing registers](/en/guides/purchase/cash). For transfers, complete [submission through confirmation of receipt](/en/guides/purchase/payouts) before checking completion.
Market research requests are not used for store purchases. If a market price cannot be fetched, enter a reference price you have checked. In-store purchases do not request second reviews either. Find documents and record corrections under [Shared purchase tasks](/en/guides/purchase/common-operations). For a separate deal whose goods arrive by post, use [Online purchases](/en/guides/purchase/overview).