---
title: Putting cards that arrive by post into stock
sidebar:
order: 3
---
Register stock for purchases received without LINE or goods that have already arrived.
Standard staff can collect customer details through forms and carry out the usual purchase workflow through transfer preparation and submission. An authorized colleague handles approval, execution and recording the result. Ask a manager to check access if your shop has customized its roles.
## Which method to use
| What you want | Method to use | What Toreca Cloud keeps |
| ---------------------------------------------------------------------------------------------------- | ----------------------------------------- | ------------------------------------------------------------------------- |
| Put the cards into stock and keep the cost. You manage the customer and payment outside Toreca Cloud | Method 1: Use a receipt slip | A receipt slip and stock with a cost |
| Keep the whole purchase, including the customer, amounts, identity verification and payout | Method 2: Record it as a purchase request | The deal, identity verification and payout records, and stock with a cost |
Method 2 requires customer details, a payout account and identity verification. Confirm which method to use with your shop admin.
## Method 1: Use a receipt slip
### 1. Open Receipt slips
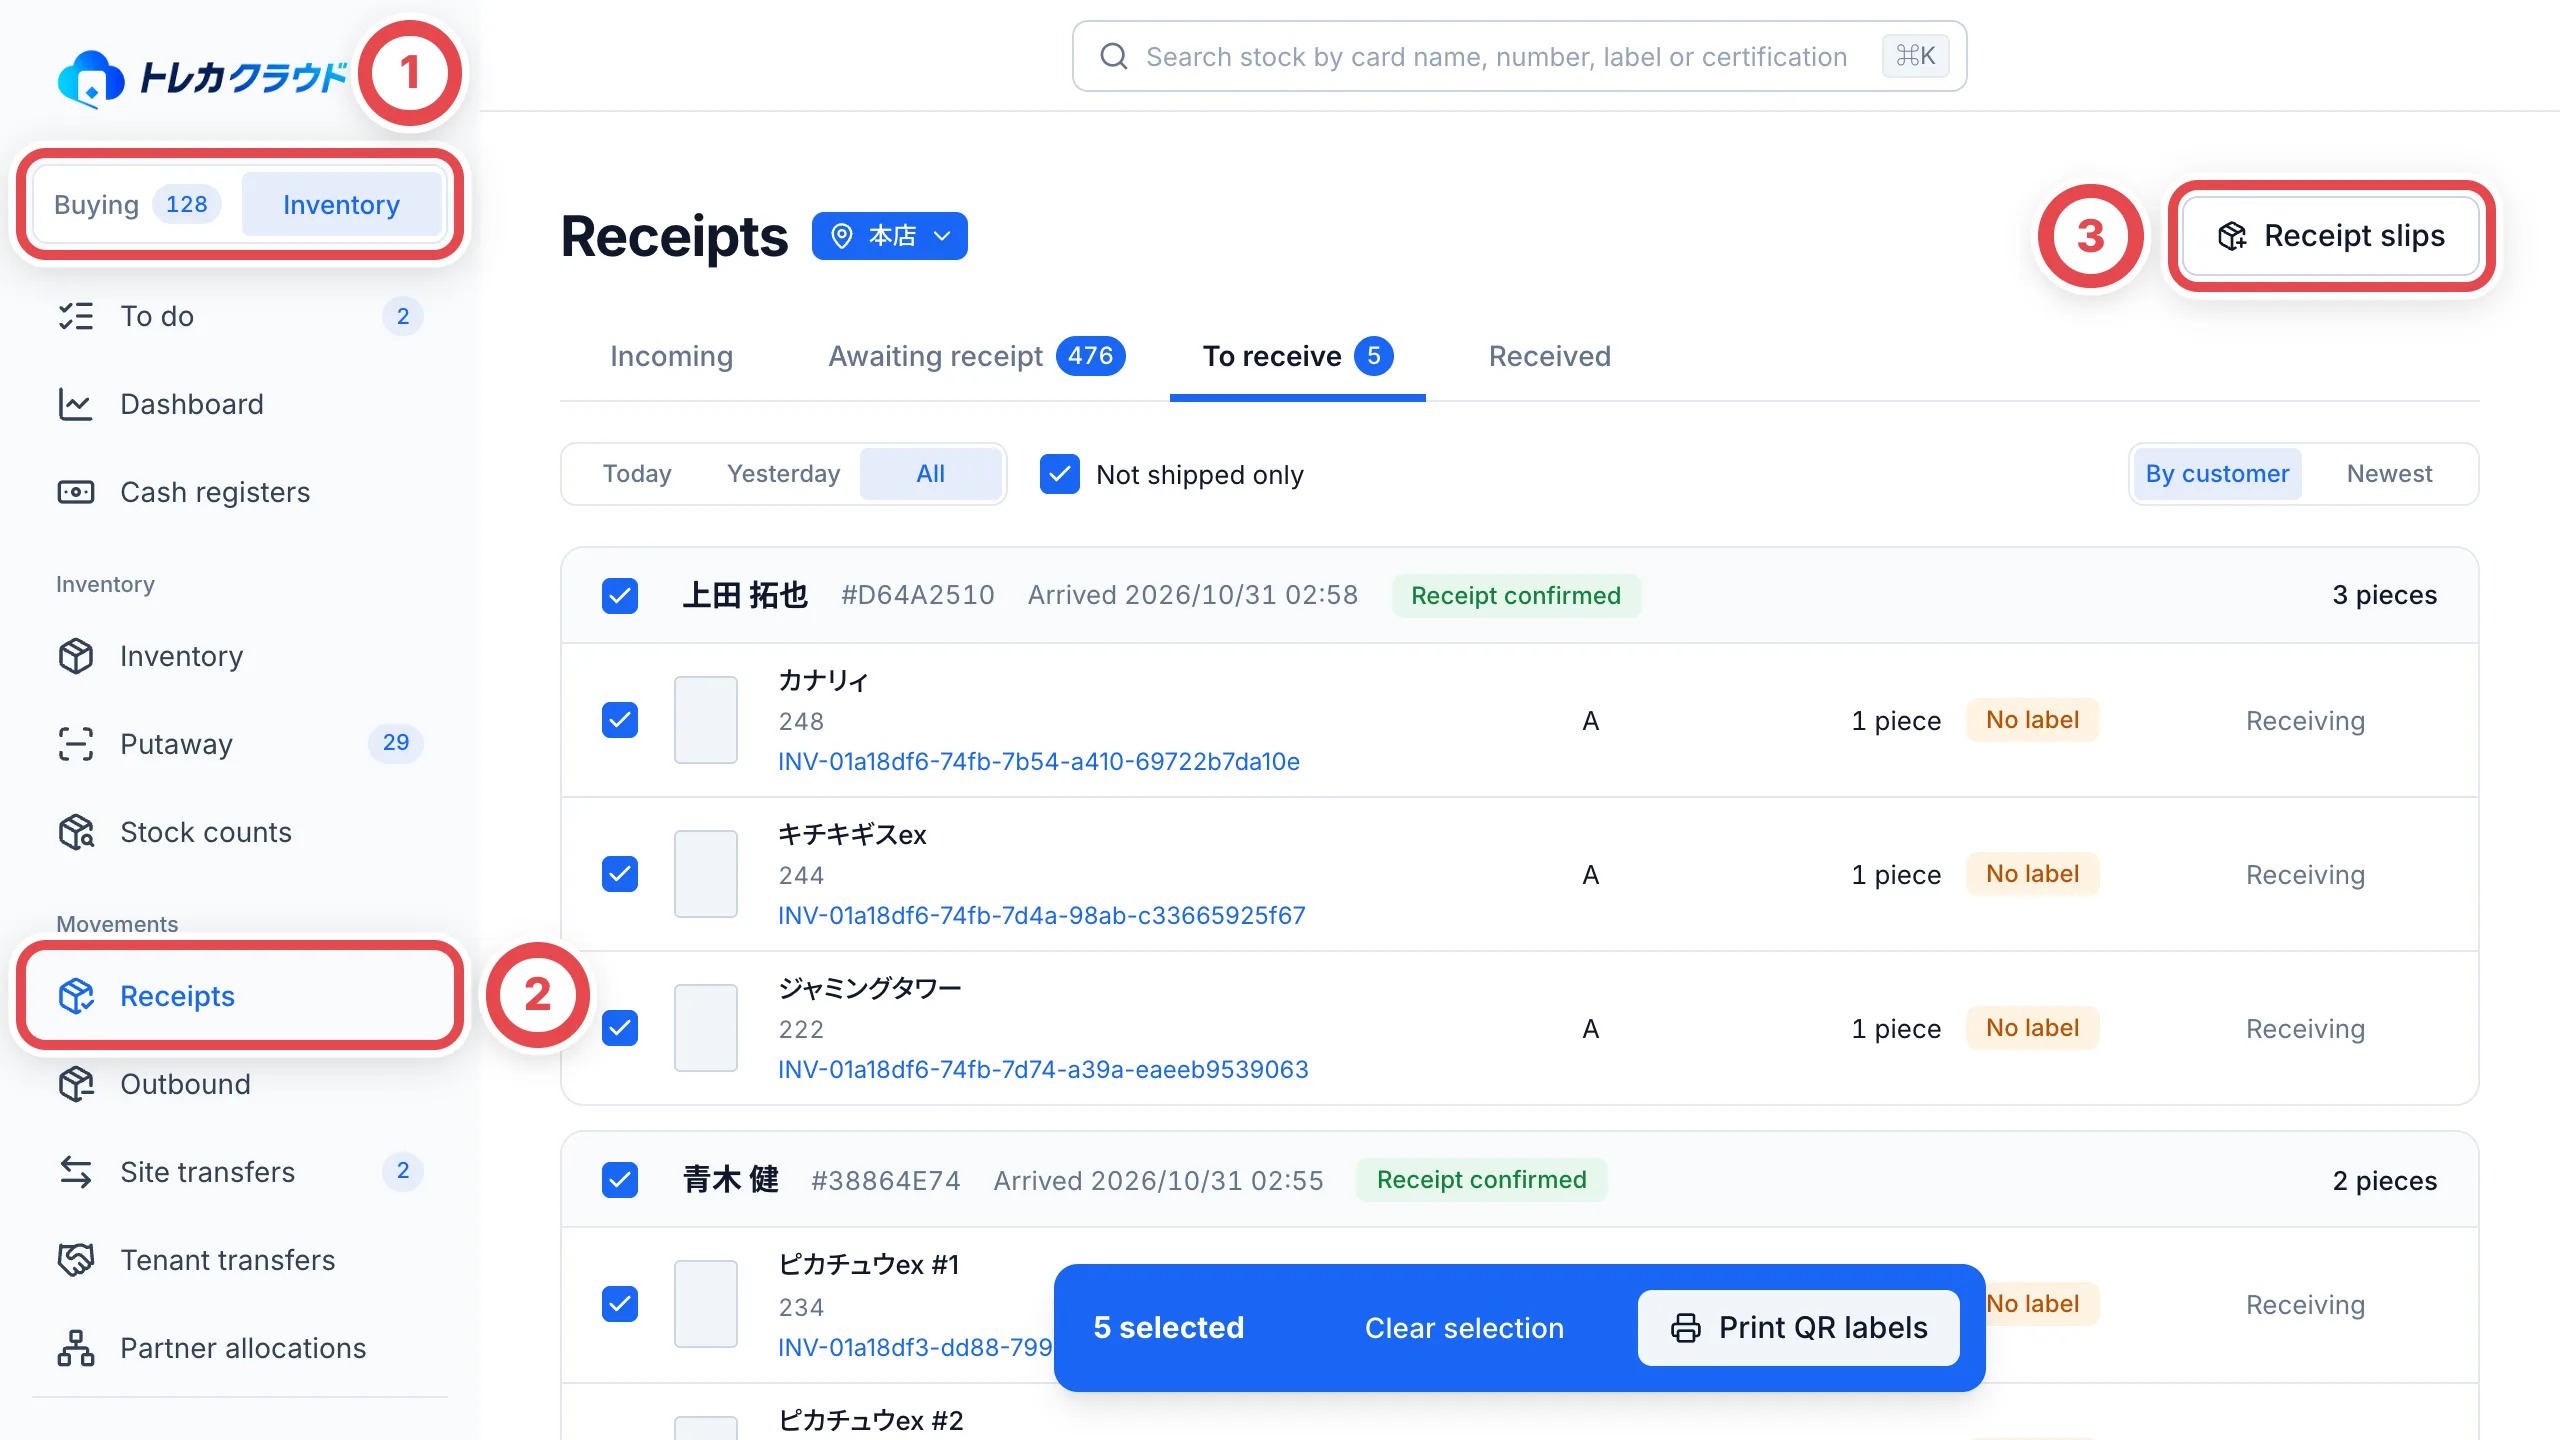
Switch the sidebar to **Inventory** at ① and open **Receipts** at ②. Click **Receipt slips** at ③ to open the list of slips, then click **Receive stock** at the top right. The page for creating a receipt slip opens.
 ### 2. Enter the type, shelf and source
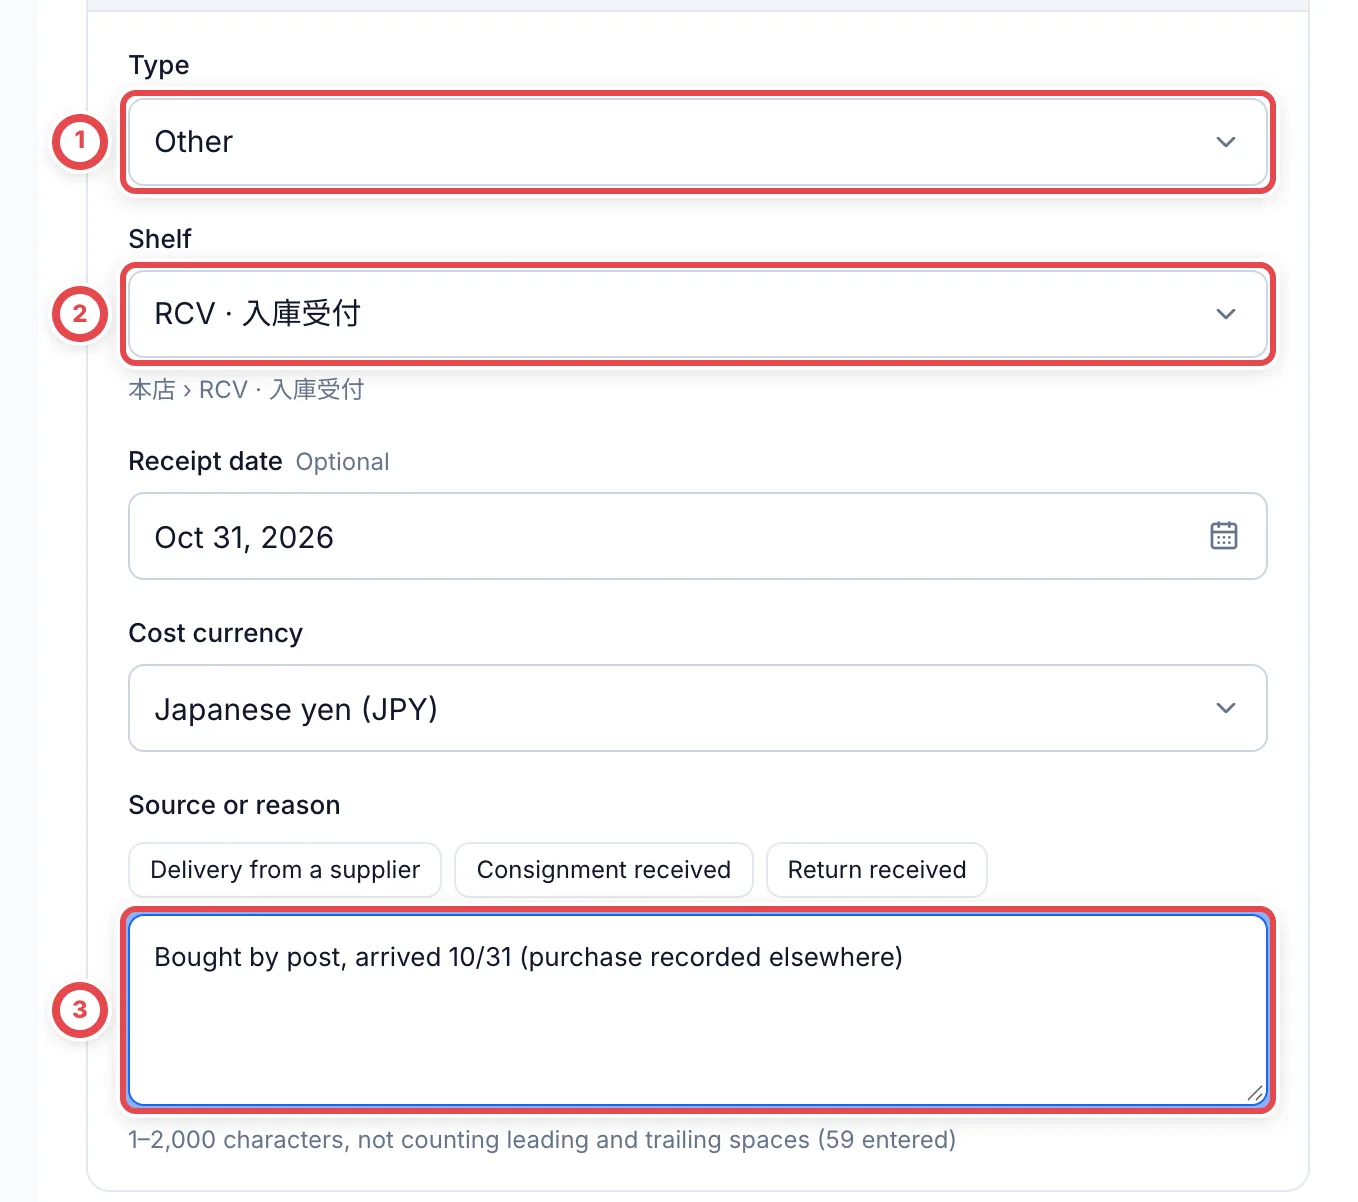
Choose **Other** under **Type** at ①. Under **Shelf** at ②, choose **Receiving** at the site where you will keep the cards. At ③, write in **Source or reason** when the cards arrived and what they are. This lets anyone who opens the slip later see why the stock went up.
Example: "Bought by post, arrived 10/16 (purchase recorded elsewhere)"
**Receipt date** is filled in with today's date. Change it if the parcel arrived on a different day.
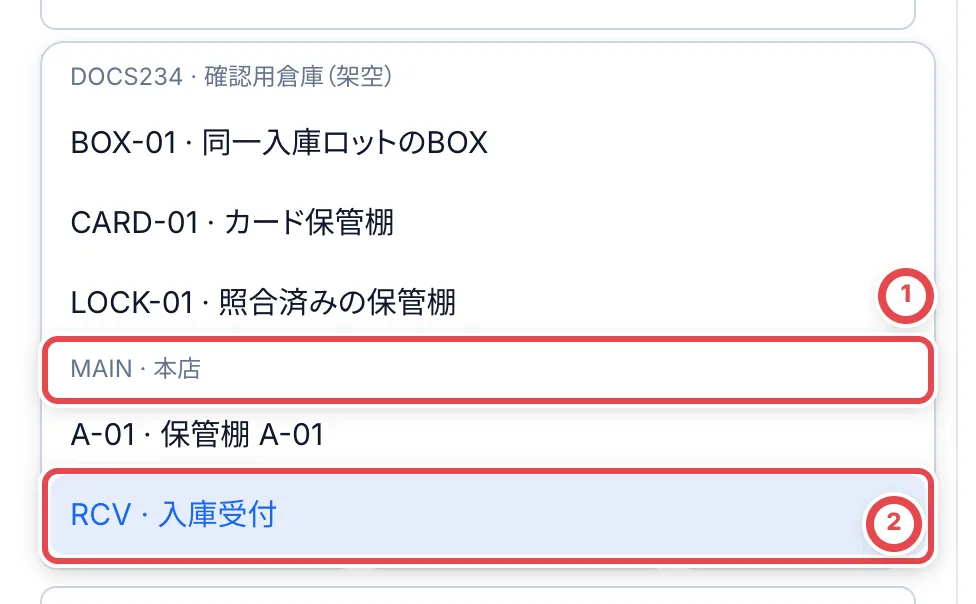
 The shelf list is split by site. Check the site name at ①, then choose that site's **Receiving** shelf at ②. If you choose the wrong site, the cards become stock at another site.
 ### 3. Choose the card
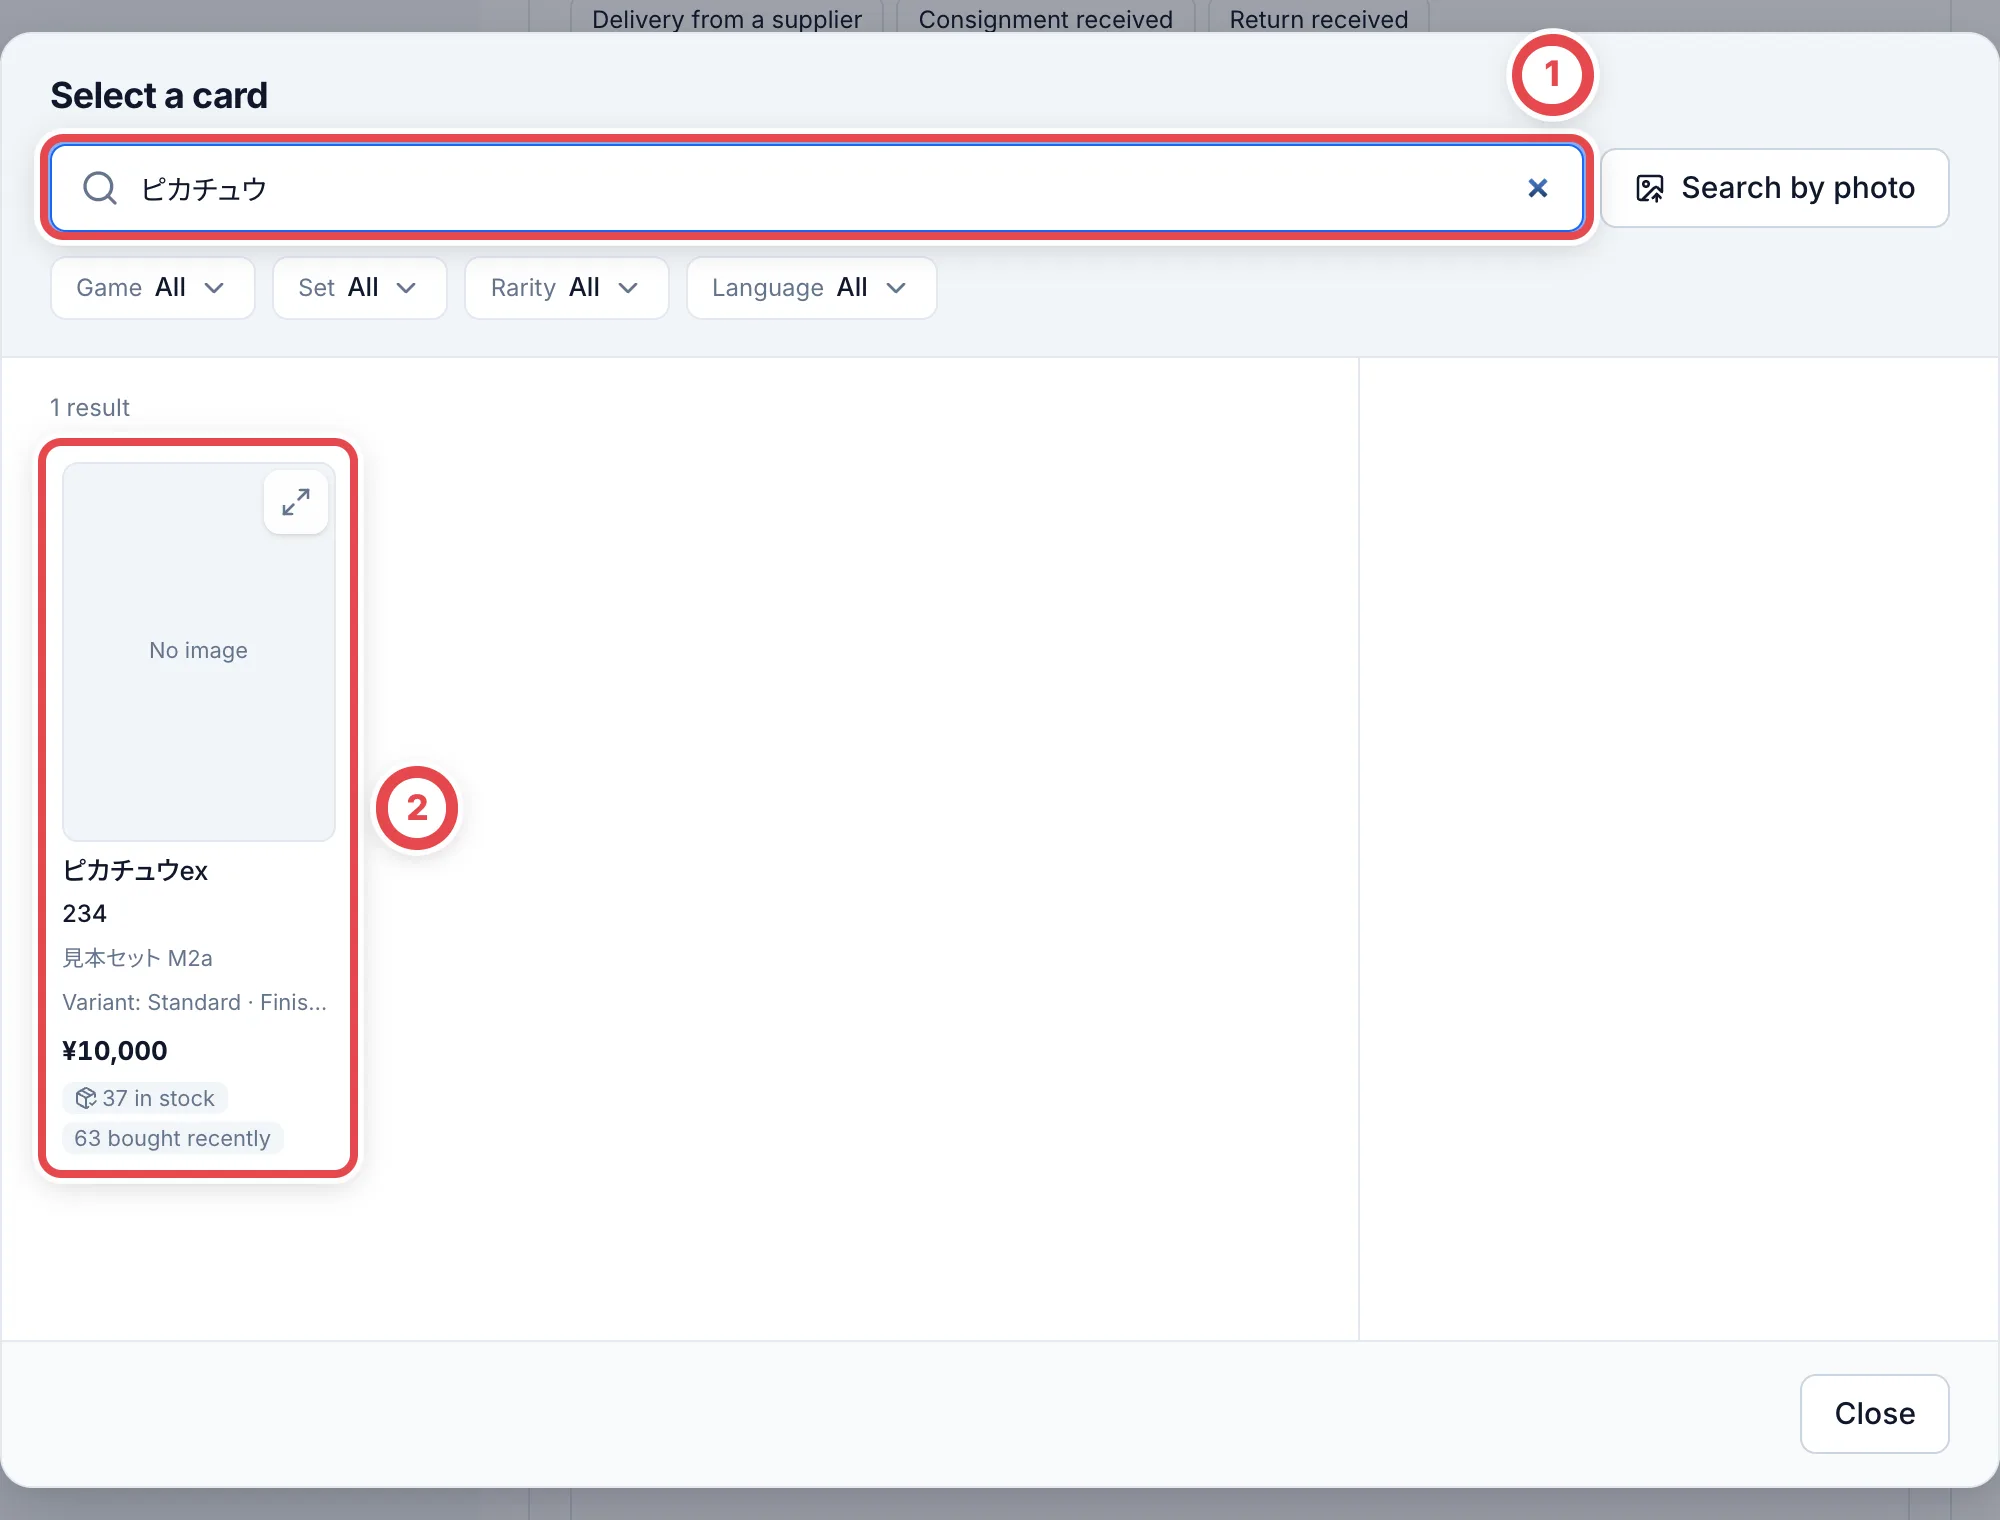
Under **Cards to receive**, click **Search for a card**. Enter the card name or number at ①, then check the number and set in the candidates at ② and choose one. Many cards share the same name, so check the number before you choose.
 ### 4. Enter the quantity and cost
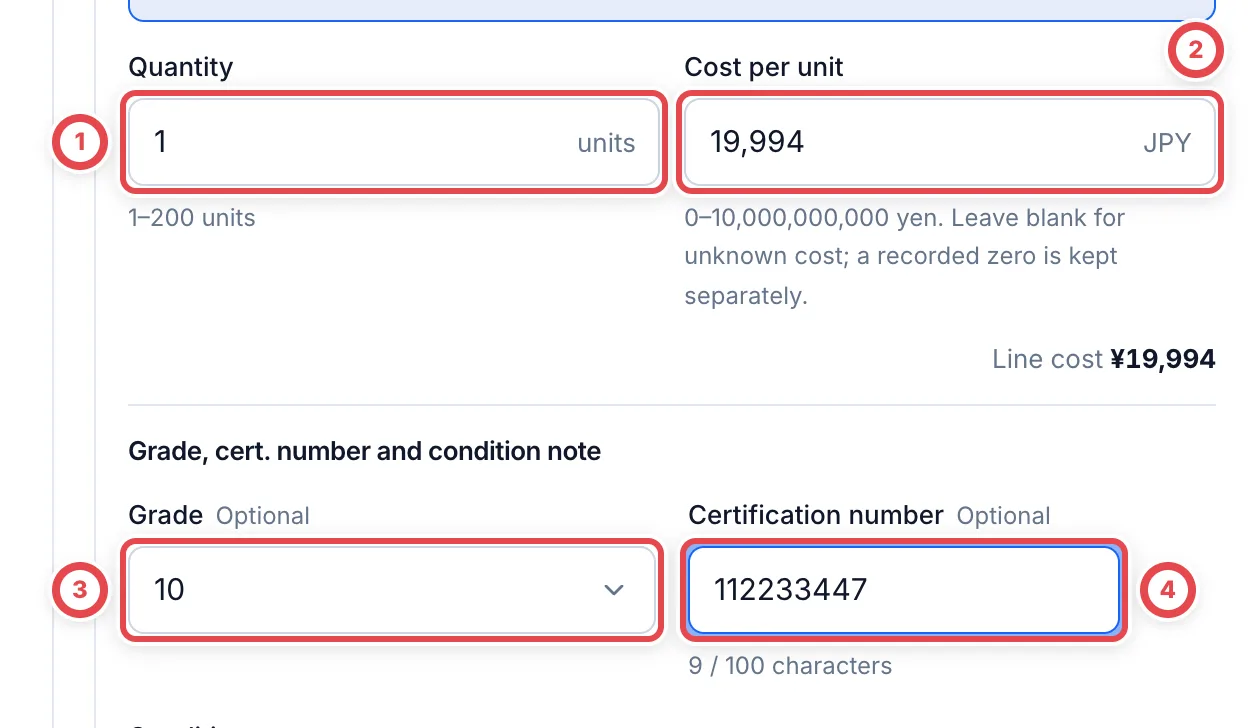
Enter the **Quantity** at ① and the **Cost per unit** at ②. For the cost, enter what you paid the customer for each unit. Leave the cost blank if it is still unknown. Enter 0 only for a confirmed free acquisition; blank and zero are recorded separately.
Put each graded card, such as a PSA card, on its own line. In the grade field shown on the line at ③, choose the grading company and grade, then enter the certification number from the case label at ④. Certification numbers require a quantity of 1 and a third-party grade. The condition note is also available on the same line.
To receive more cards, click **Add card** to add a line. One receipt slip can hold up to 100 lines and 500 units in total.
 ### 5. Review and confirm
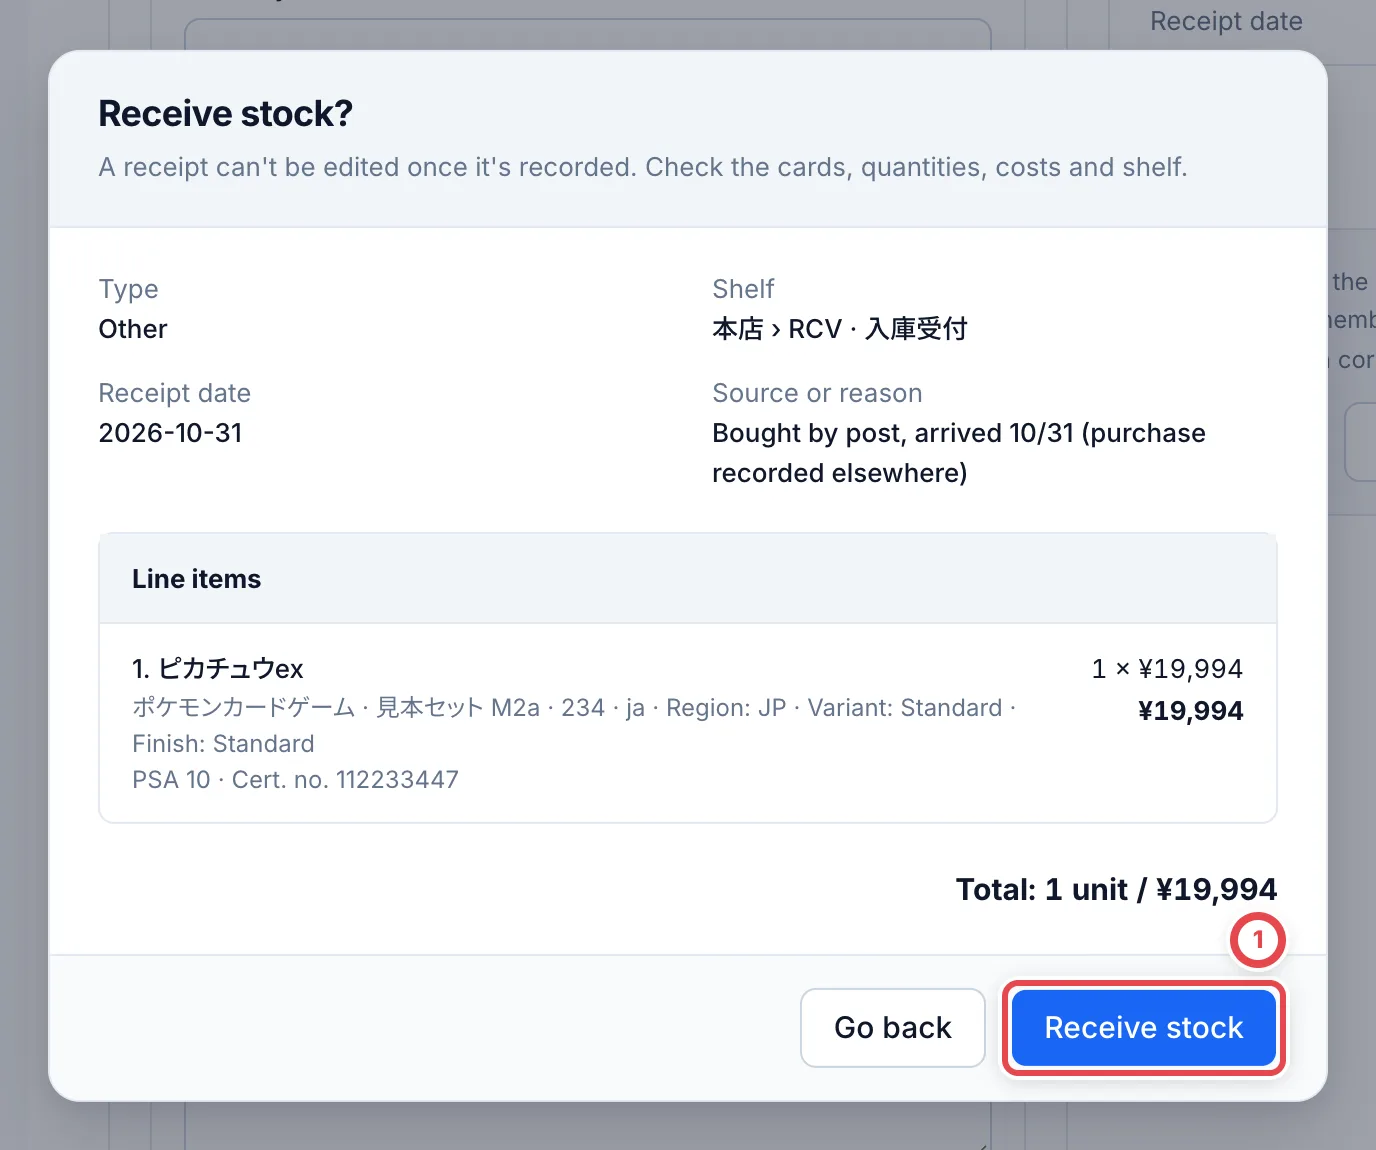
Click **Review** to open the check before you confirm. Look over the type, shelf, source and the card lines, then click **Receive stock** at ①. To fix something, click **Go back**.
 :::warning
For cards registered by mistake, click **Select items to cancel registration** on the receipt, select only the affected cards, enter a reason and confirm. The original record and cancellation history remain. Registering them again creates new units and labels.
:::
### 6. Print labels and put the cards away
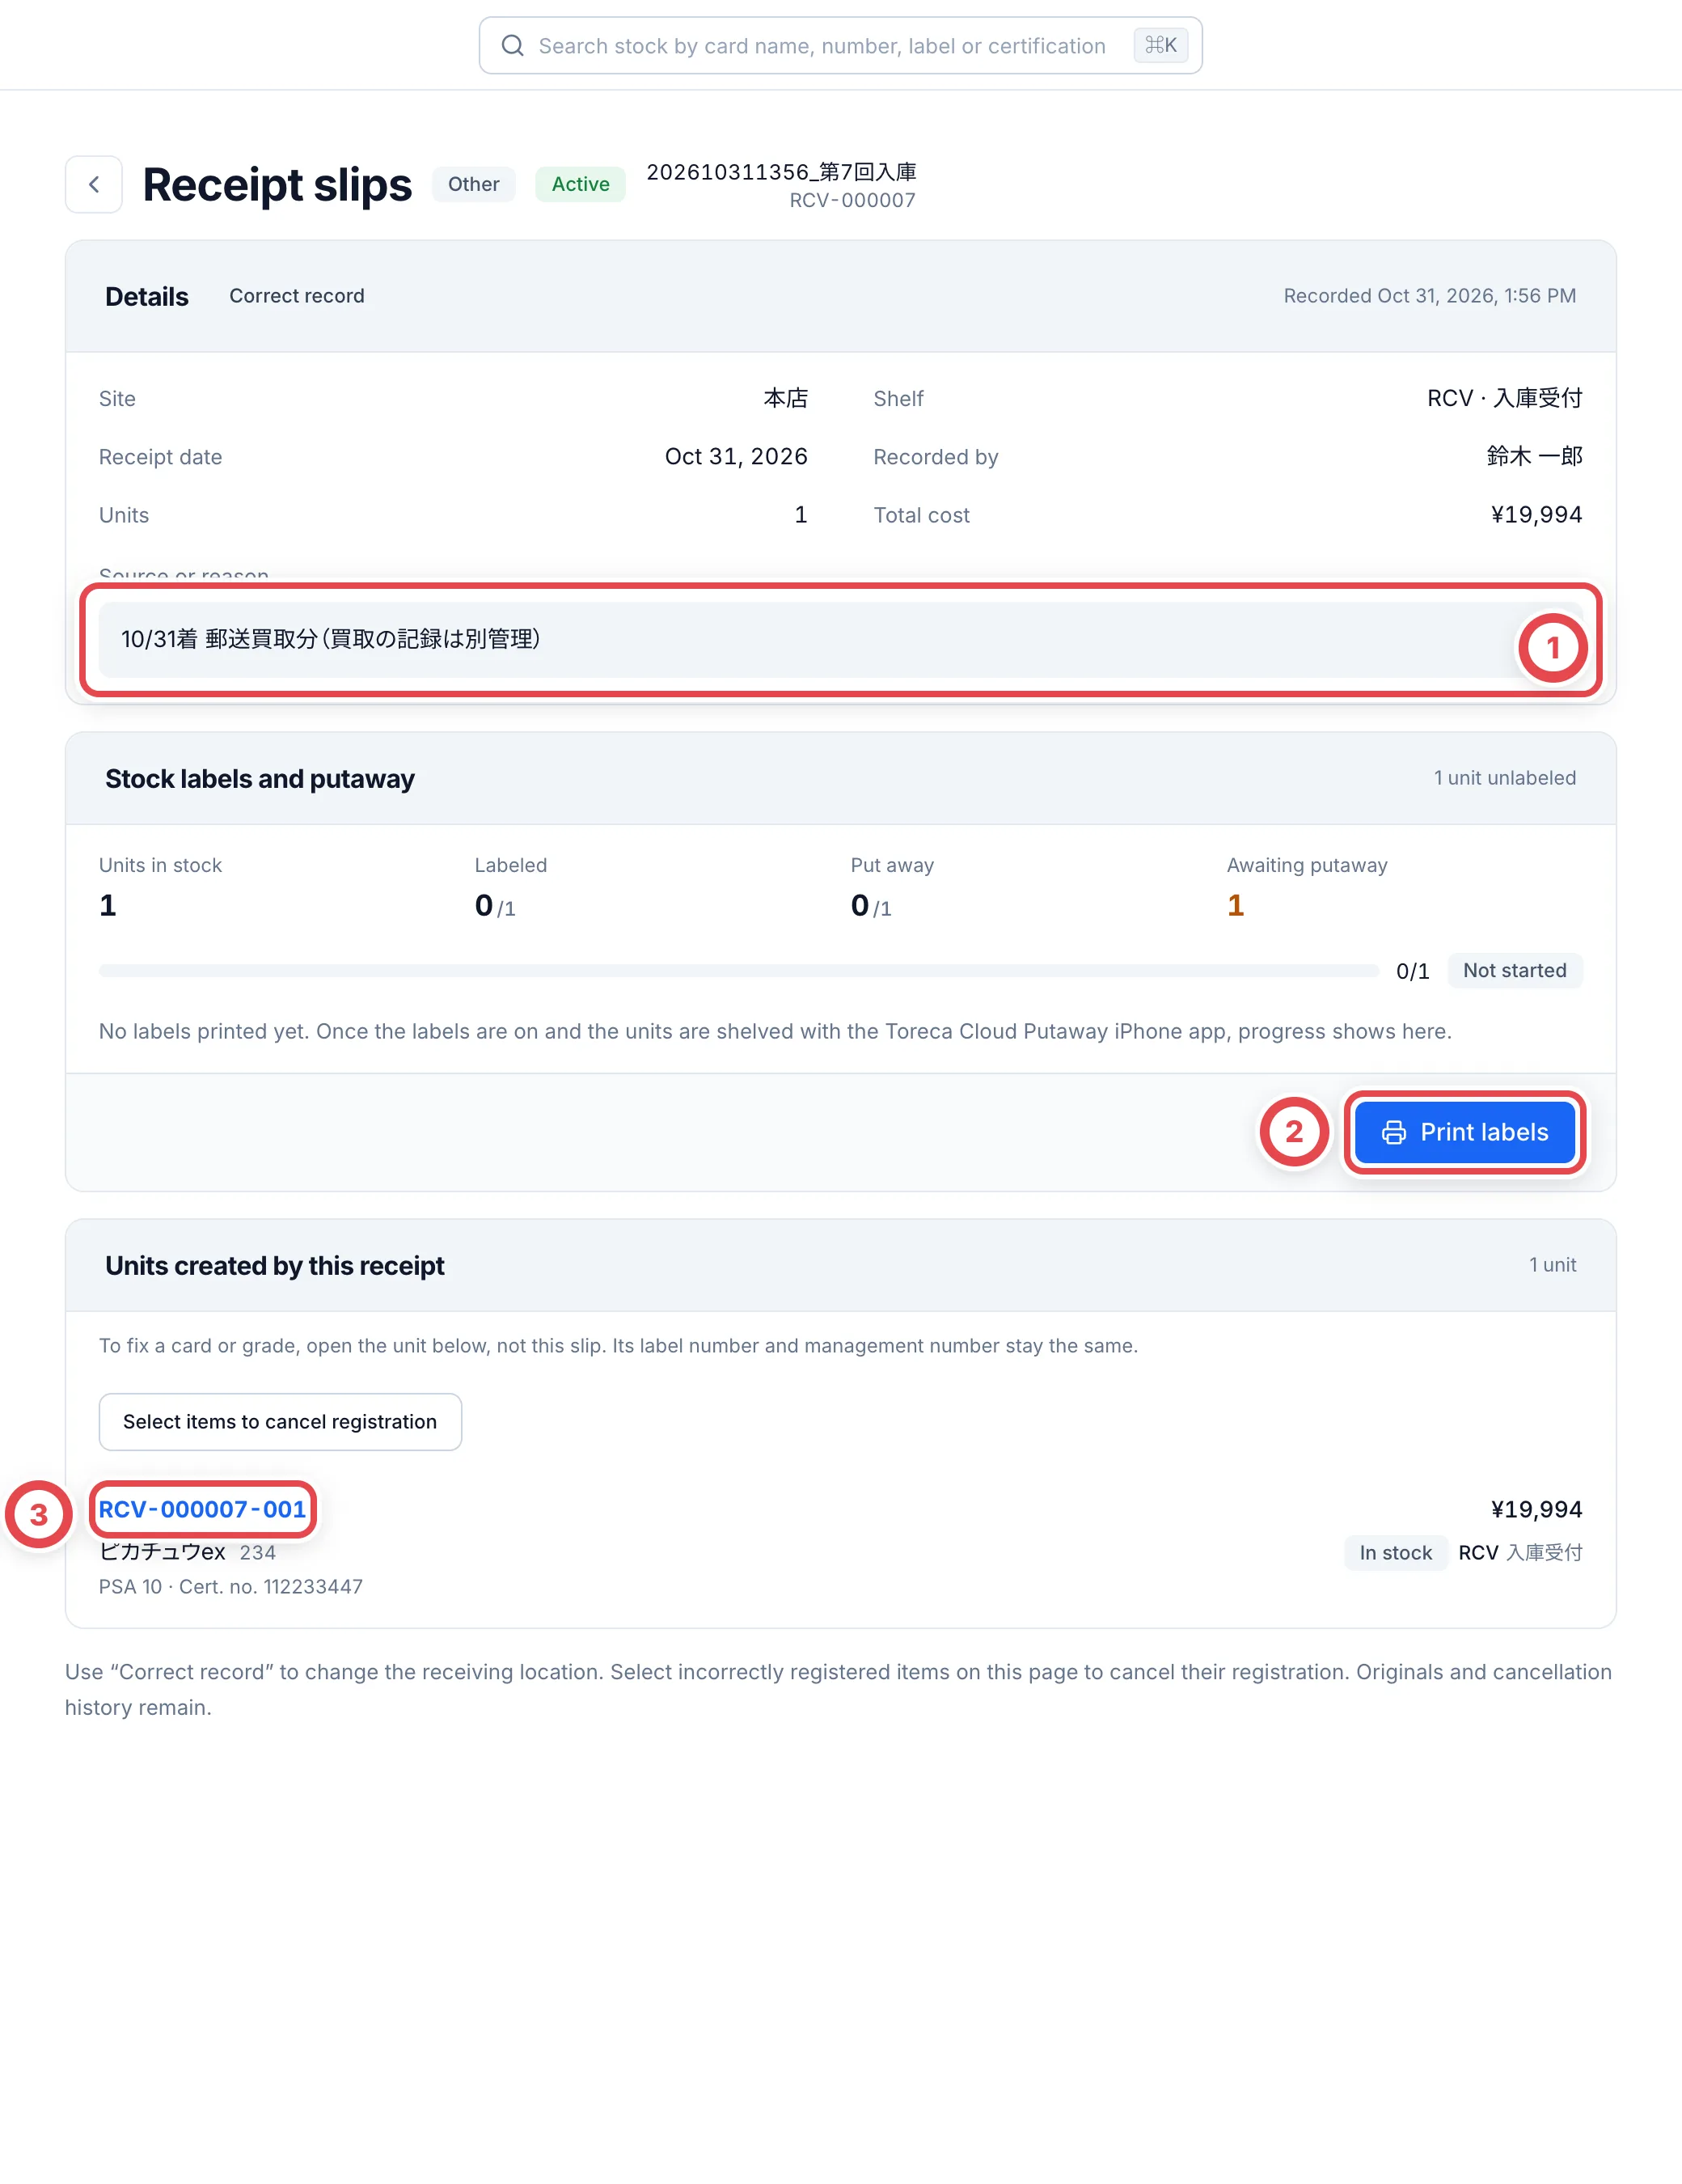
After you confirm, the receipt slip opens and the source stays at ①. Each card becomes its own unit of stock; open its number at ③ to check the details. For units grouped together, press the row to open it. Click **Print labels** at ② to print stock labels, stick them on the cards and put the cards on a shelf. For printing and putaway, see [Putaway and QR labels](/en/guides/inventory/putaway).
 ## Method 2: Record it as a purchase request
Create one deal for each customer and move it through the quote, acceptance, final appraisal, and stock and payout. You don't use LINE. Staff record the exchanges with the customer as they go.
**Next step** at the top of the deal shows what to do at that point. If you're not sure what comes next, click the button under **Next step**.
| Step | What to do | Deal status |
| ---- | ------------------------------------------------------------------ | ---------------------------------- |
| 1 | Add the purchase request and add the cards | New |
| 2 | Save the preliminary appraisal amounts | Appraising |
| 3 | Tell the customer the quote and mark it as presented | Quote sent |
| 4 | Record acceptance of the preliminary quote | Accepted |
| 5 | Record the shipping instructions | Awaiting shipment |
| 6 | Enter the final appraisal and present the final quote | Final appraisal → Final quote sent |
| 7 | Fill in the customer's details, payout account and identity check | Final quote sent |
| 8 | Record acceptance of the final quote, then create stock and payout | Awaiting payout |
| 9 | Submit and approve the payout, then record the result | Awaiting payout → Purchased |
| 10 | Record receipt | Done |
:::note
Record the shipping instructions in step 5 even if the parcel has already arrived. You can't go on to the final appraisal until you do. You don't need to send the customer new instructions.
:::
### 1. Add the purchase request and add the cards
Switch the sidebar to **Buying**, open **Purchase requests** and click **Add purchase request**.
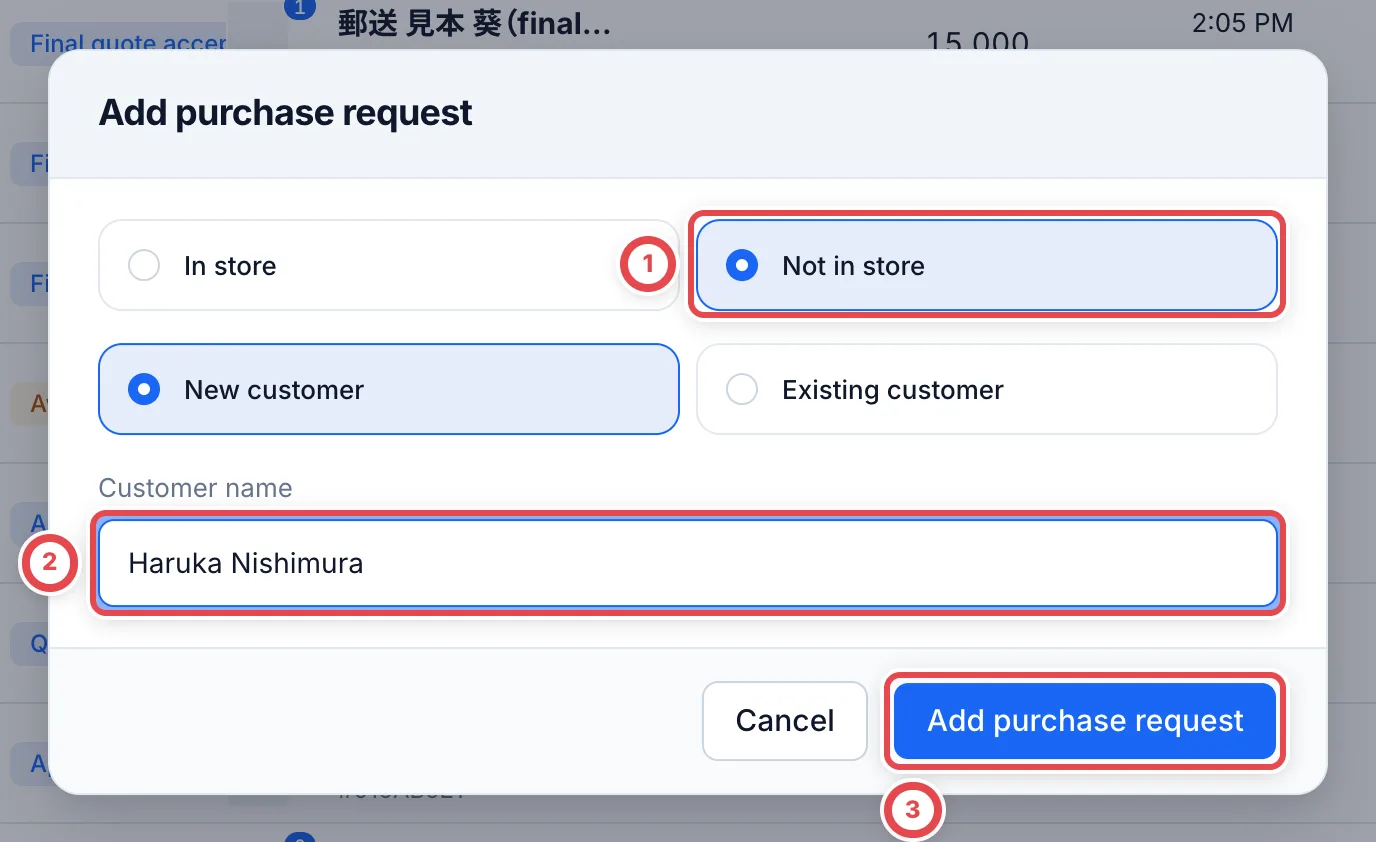
Choose **Not in store** at ①. For a first-time customer, leave **New customer** selected and enter the name at ②. For a customer you've bought from before, choose **Existing customer** and search. Click **Add purchase request** at ③ to create the deal, and the deal opens.
 If **Not in store** isn't shown, online buying is turned off for your shop. Ask your shop admin.
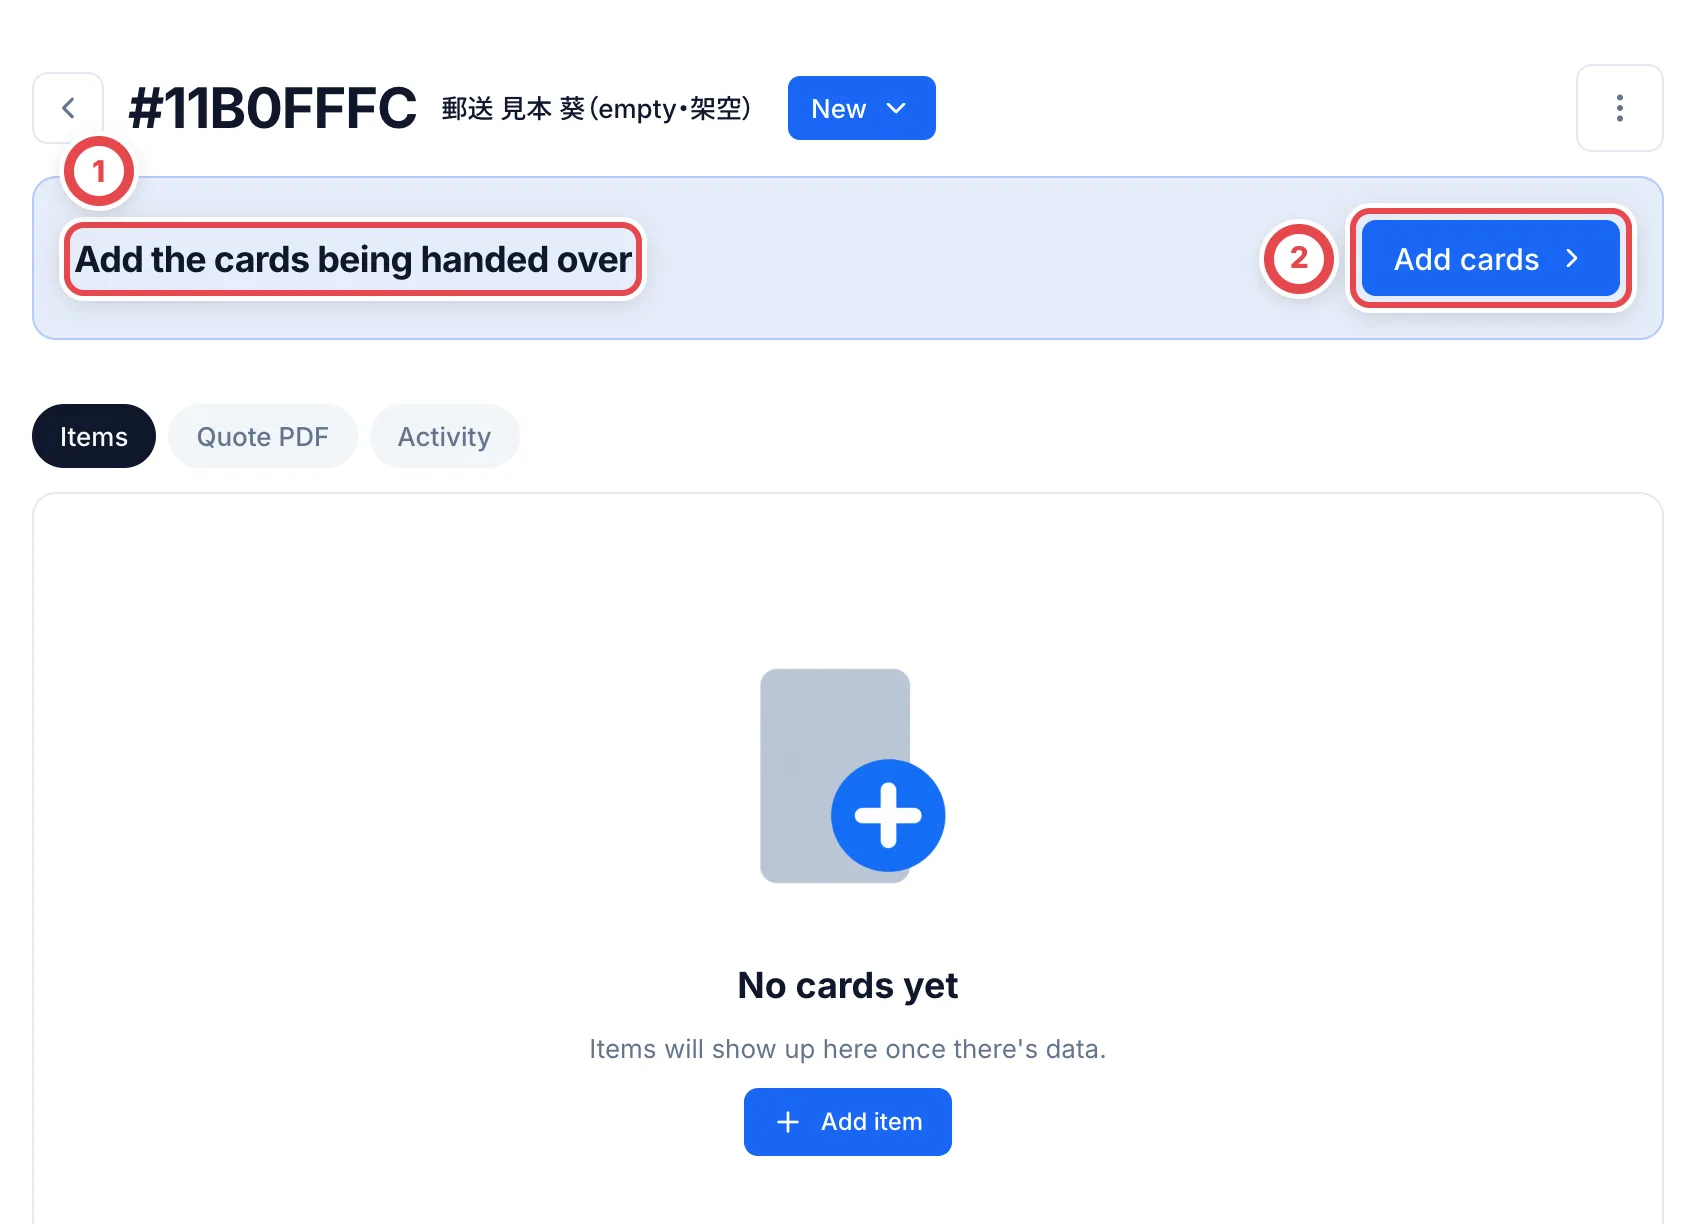
On the deal, ① under **Next step** shows what to do now. Click **Add cards** at ② to reach the appraisal items, then open **Add item**.
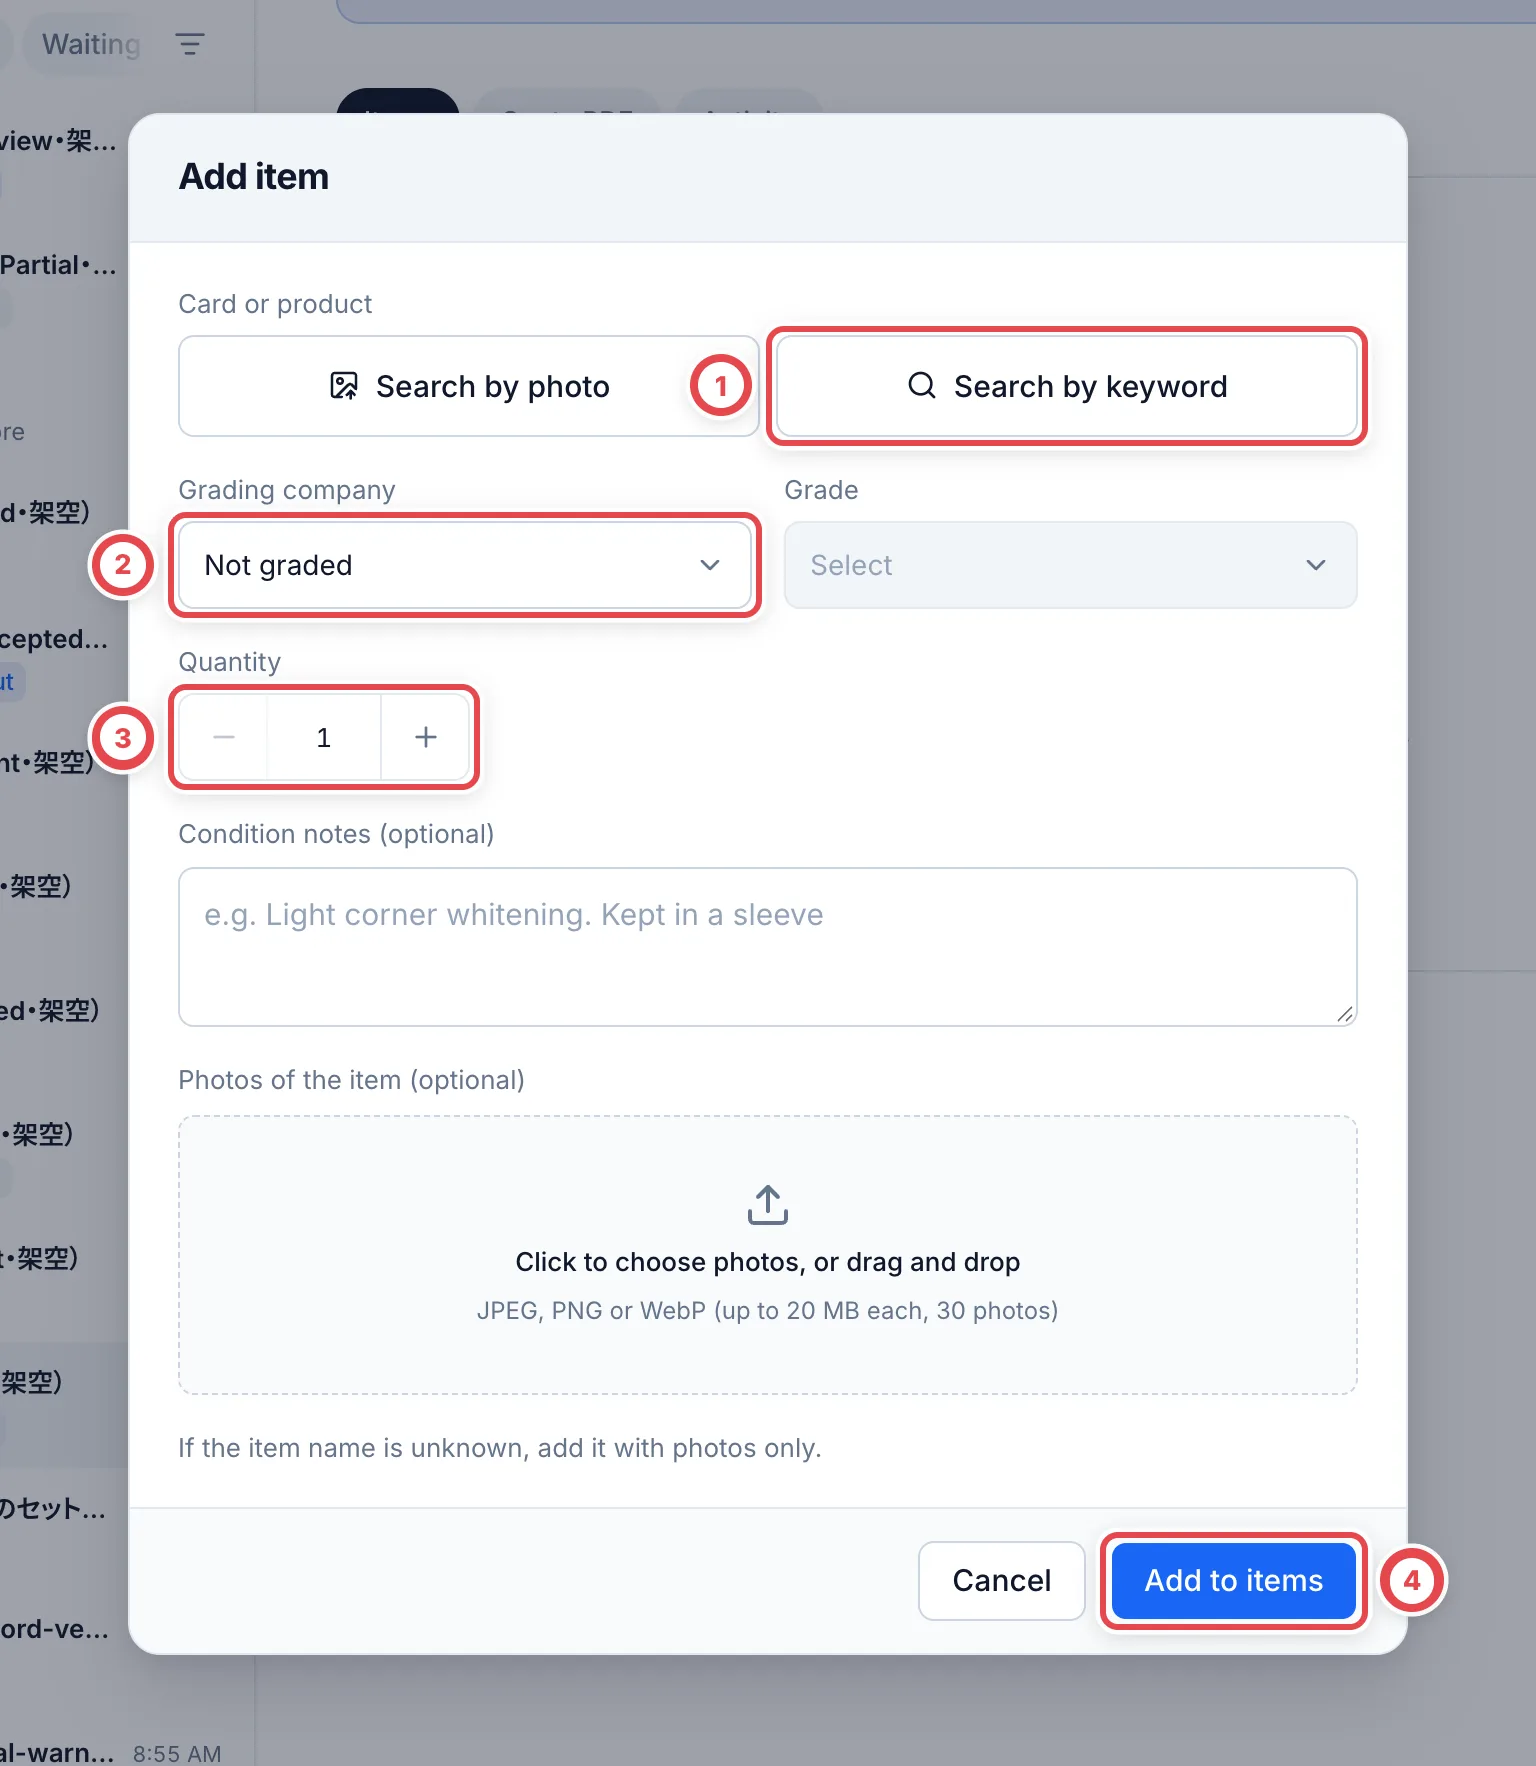
 Choose a card with **Search by keyword** at ①. For a graded card, choose the **Grading company** at ②. Enter the number of cards that arrived at ③ and click **Add to items** at ④. Repeat this for each kind of card.
 ### 2. Save the preliminary appraisal amounts
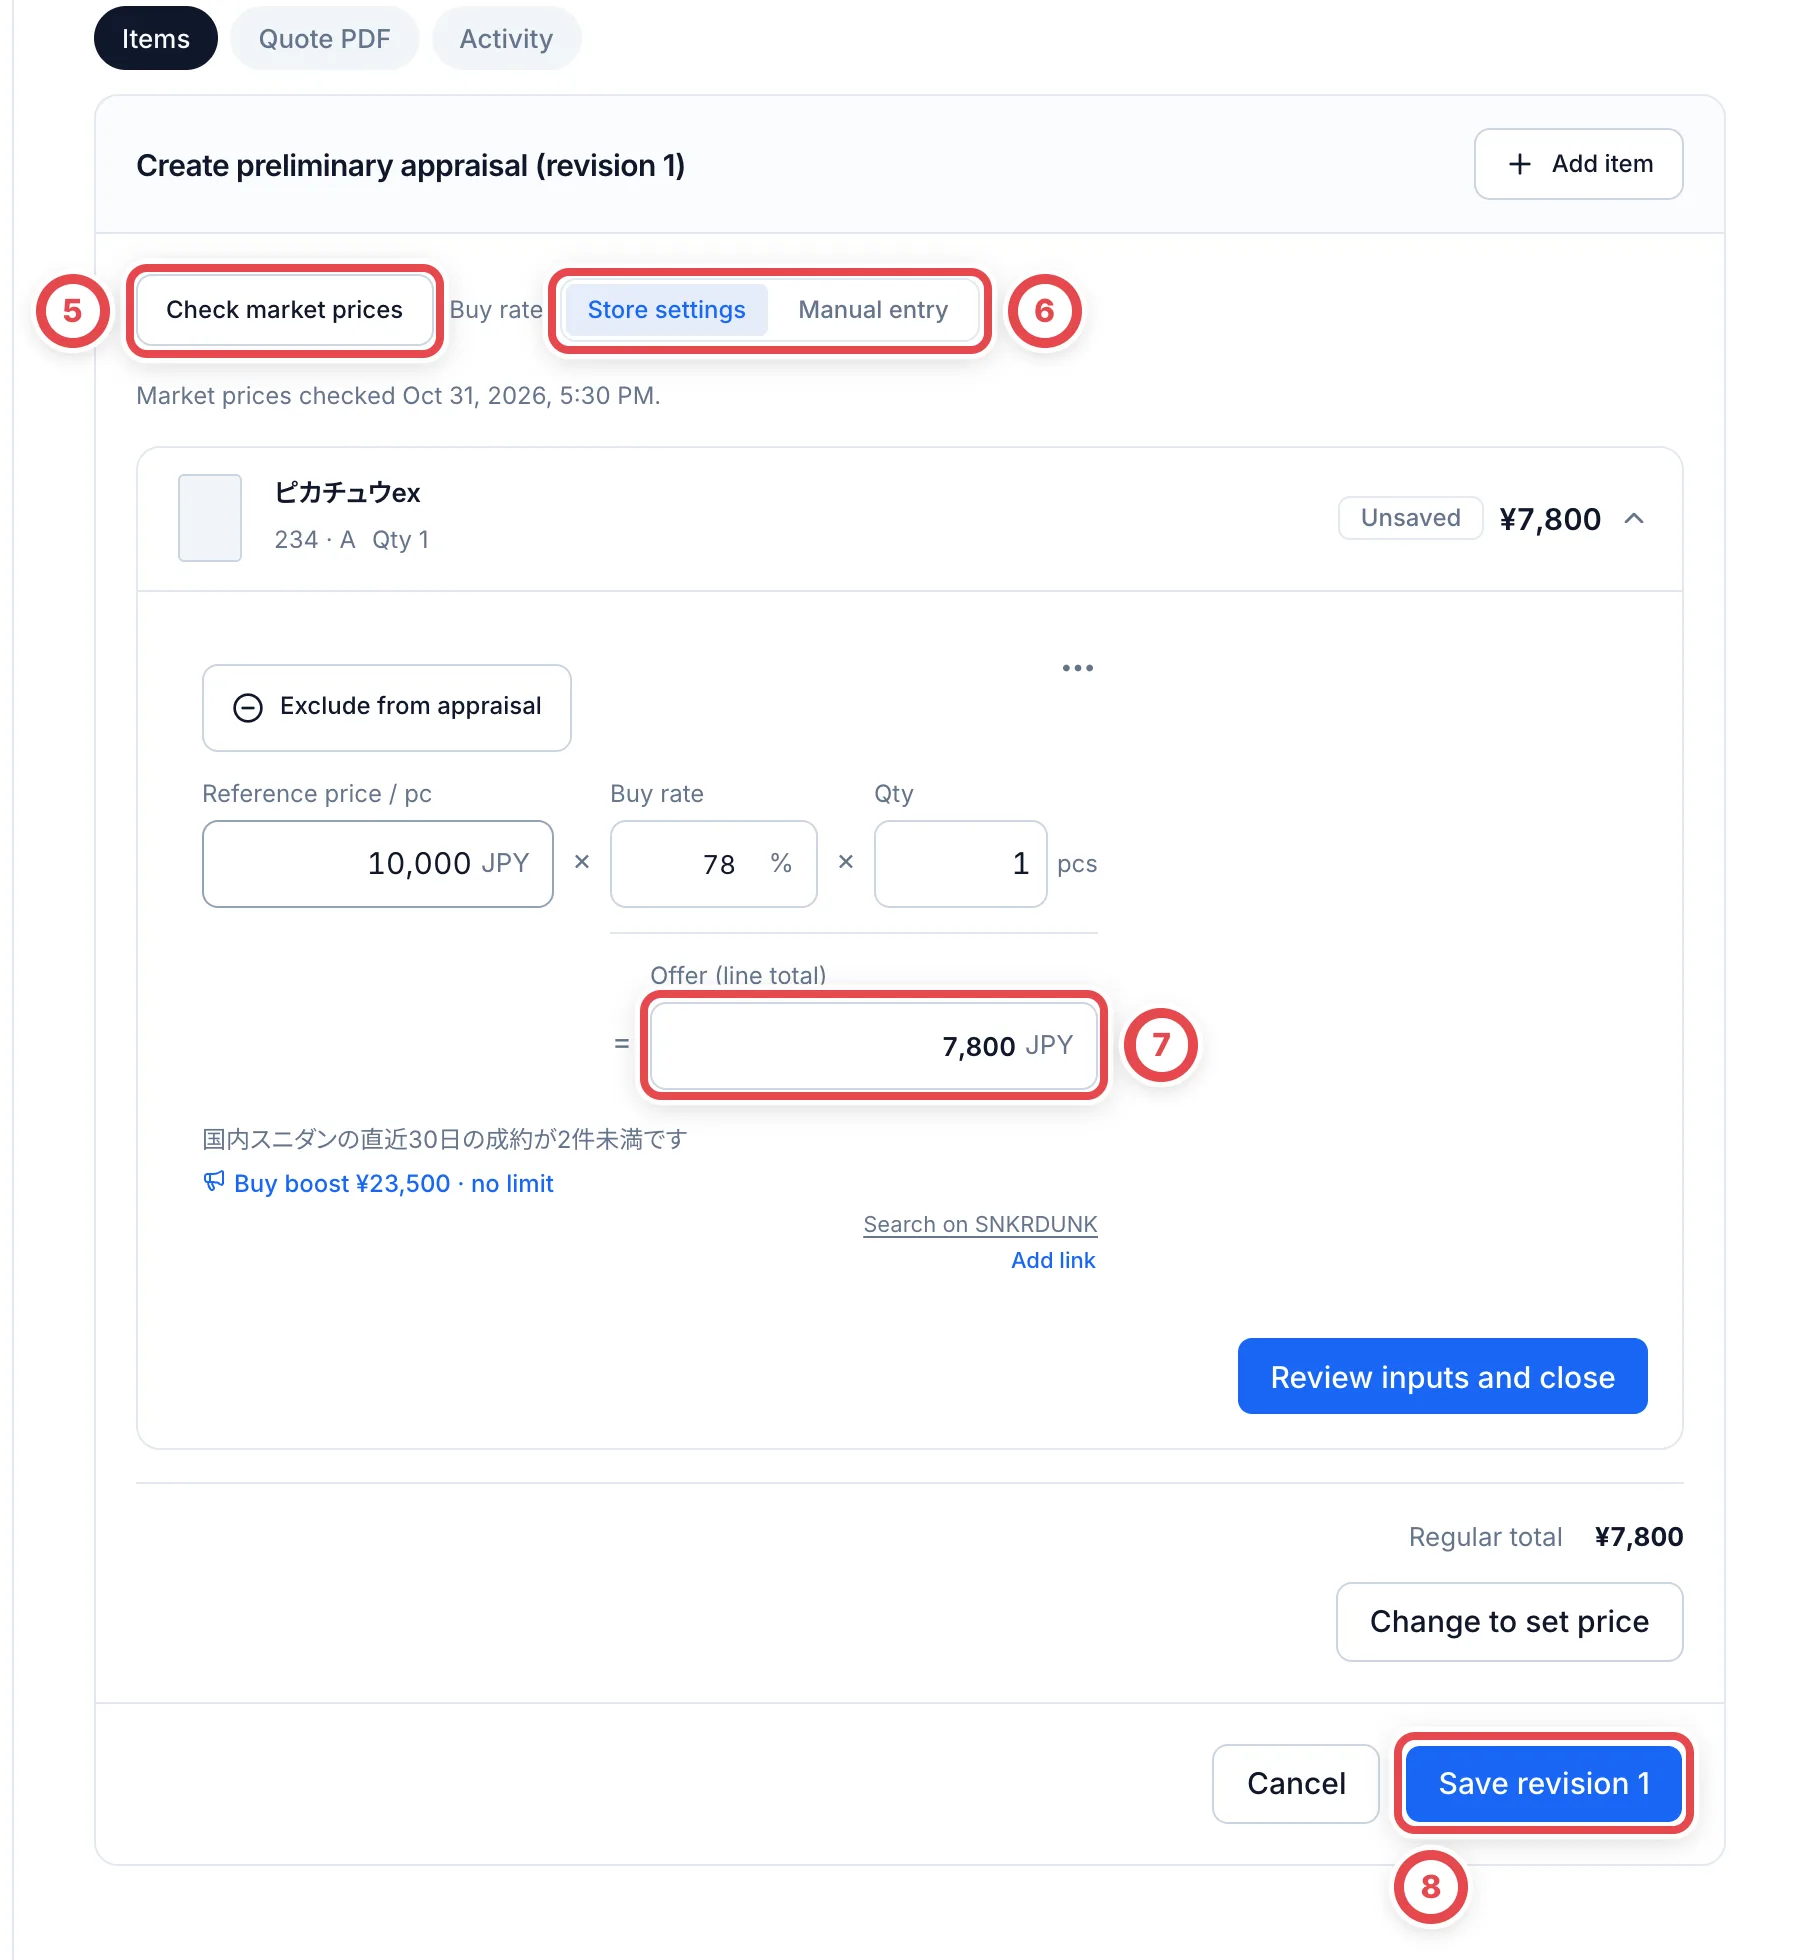
Once you add the cards, you can enter amounts in the appraisal items. Click **Check market prices** at ⑤ to load the latest prices. With **Store settings** selected at ⑥, default rates appear immediately and applicable conditions are calculated once all prices are entered. Choose **Manual entry** to edit the rates directly. If you've agreed an amount with the customer, adjust each card's amount at ⑦. When the amounts are right, save at ⑧.
 To set only the total offer, use **Change to set price** below the lines before saving. See [Change to a set price](/en/guides/purchase/set-price) for entering, saving and removing it.
When **Request a review of the quote** appears under **Next step**, ask another member to check the amounts. You can't present the quote until it is approved. See [Research and reviews](/en/guides/purchase/research-and-reviews).
### 3. Tell the customer the quote and mark it as presented
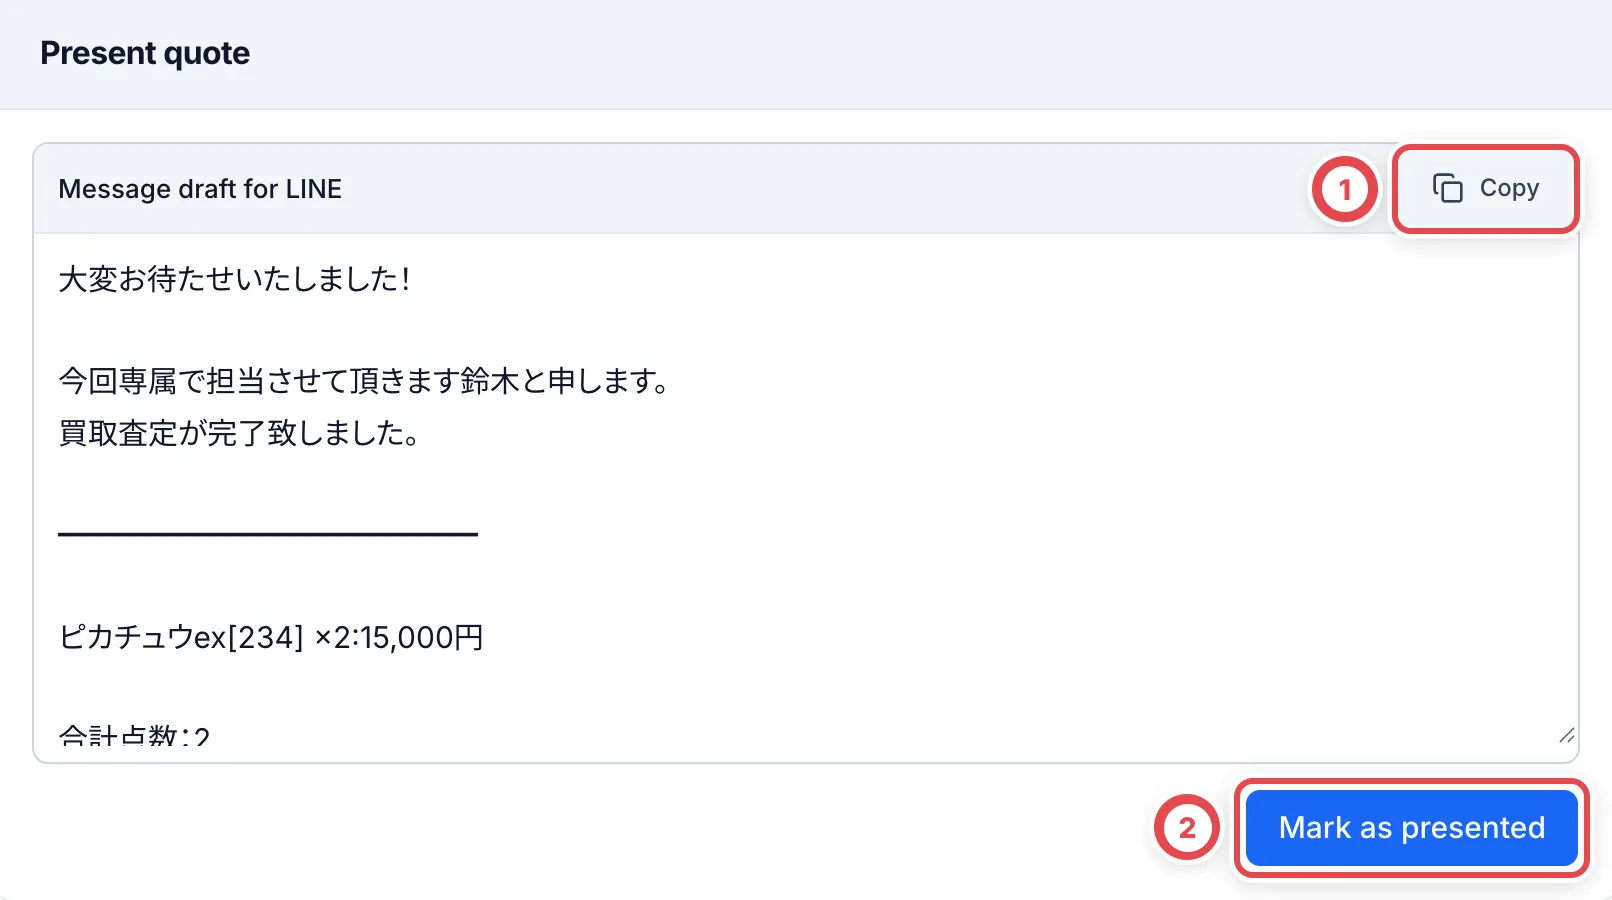
When **Next step** becomes **Present the quote to the customer**, use the **Present quote** section. Copy the message with **Copy** at ① and tell the customer by email, phone or another way. Once you've told them, click **Mark as presented** at ② and record it in the confirmation dialog.
 :::warning
The deal page asks for confirmation before recording. From a To do dialog, choosing **Presented another way** makes the final **Mark as presented** button the confirmation. Record it only after you have told the customer.
:::
### 4. Record acceptance of the preliminary quote
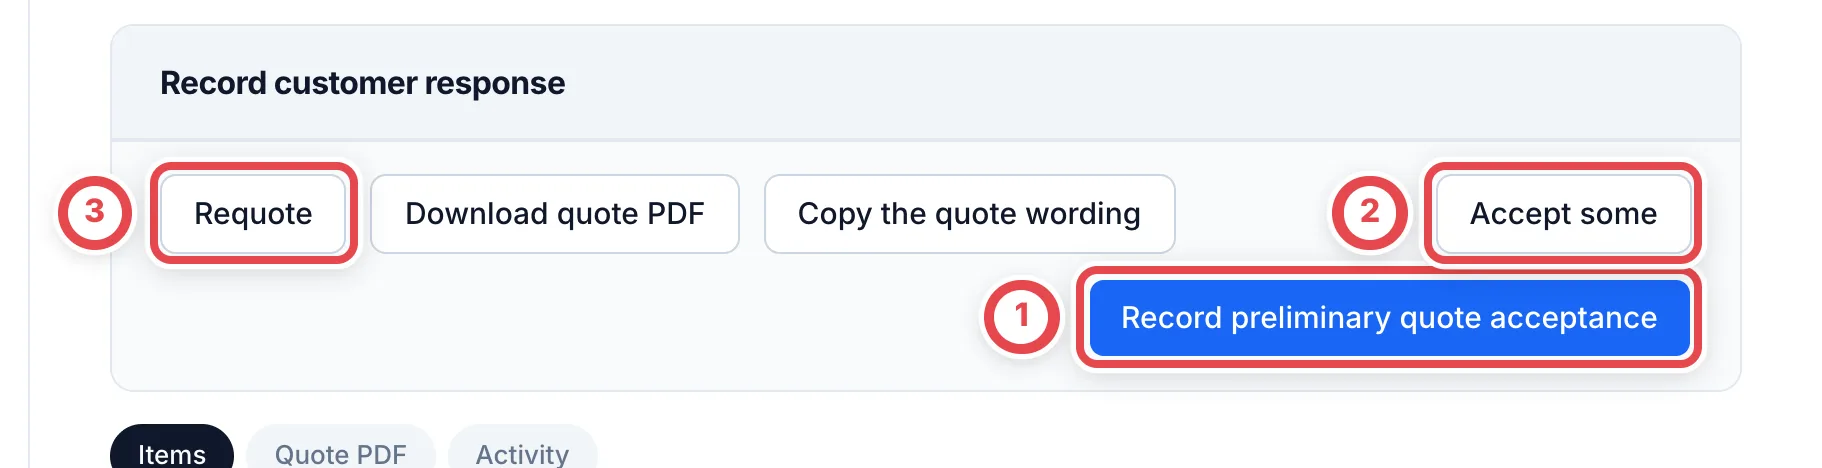
When the customer replies, record it with **Record customer response**. If they accept every card, click **Record preliminary quote acceptance** at ① and record it in the confirmation. If they accept only some cards, use **Accept some** at ②. If the amount didn't work for them, use **Requote** at ③.
 ### 5. Record the shipping instructions
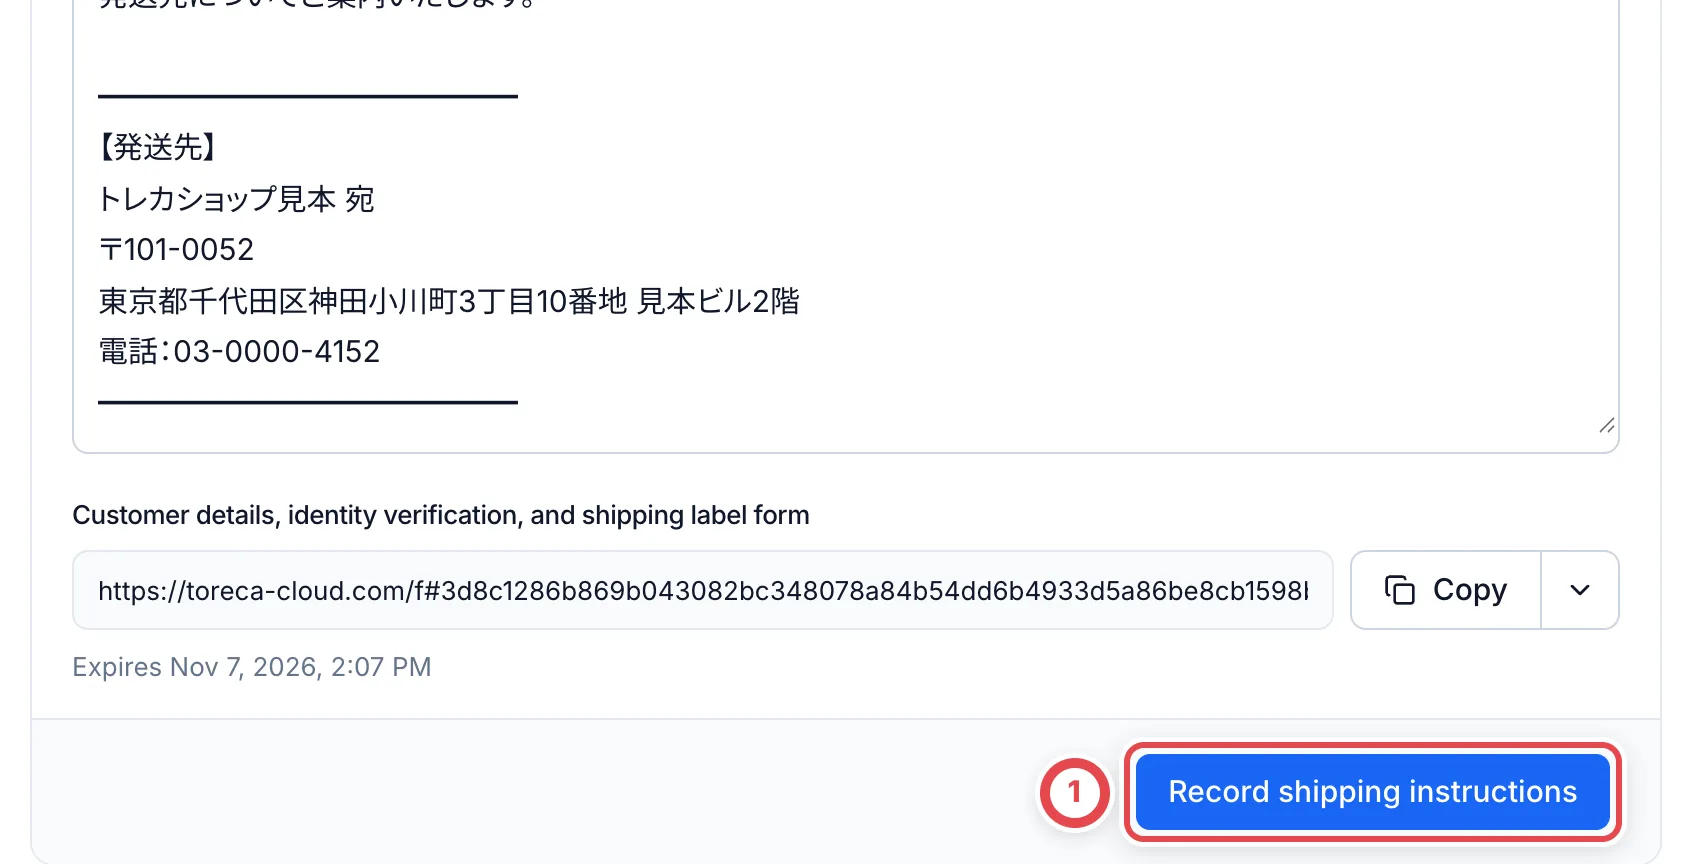
When the deal becomes **Accepted**, the shipping screen opens. Click **Record shipping instructions** at ① and click **Record** in the confirmation.
 ### 6. Enter the final appraisal and present the final quote
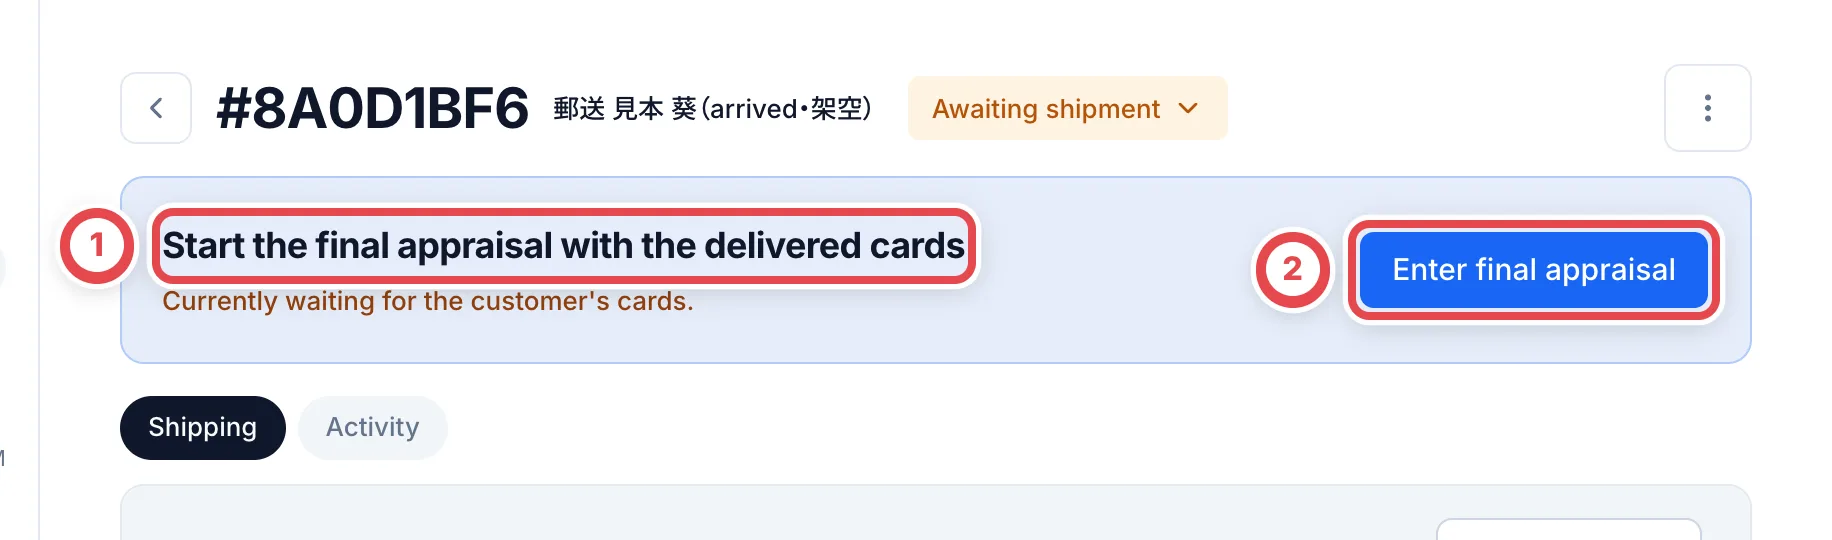
**Next step** becomes ① **Start the final appraisal with the delivered cards**. Click **Enter final appraisal** at ②, then check the rows that arrived in **Select arrived items**. **Continue to appraisal** records receipt and opens the appraisal for received items only.
 :::note
Unselected rows remain awaiting arrival and are excluded from appraisal, inventory, the secondhand ledger and returns. Save any current edits, then use **Add arrivals** when more items arrive. Save the appraisal again with those items before presenting it. If the final quote has already been presented, return to reappraisal first. Arrivals after settlement require a separate transaction.
:::
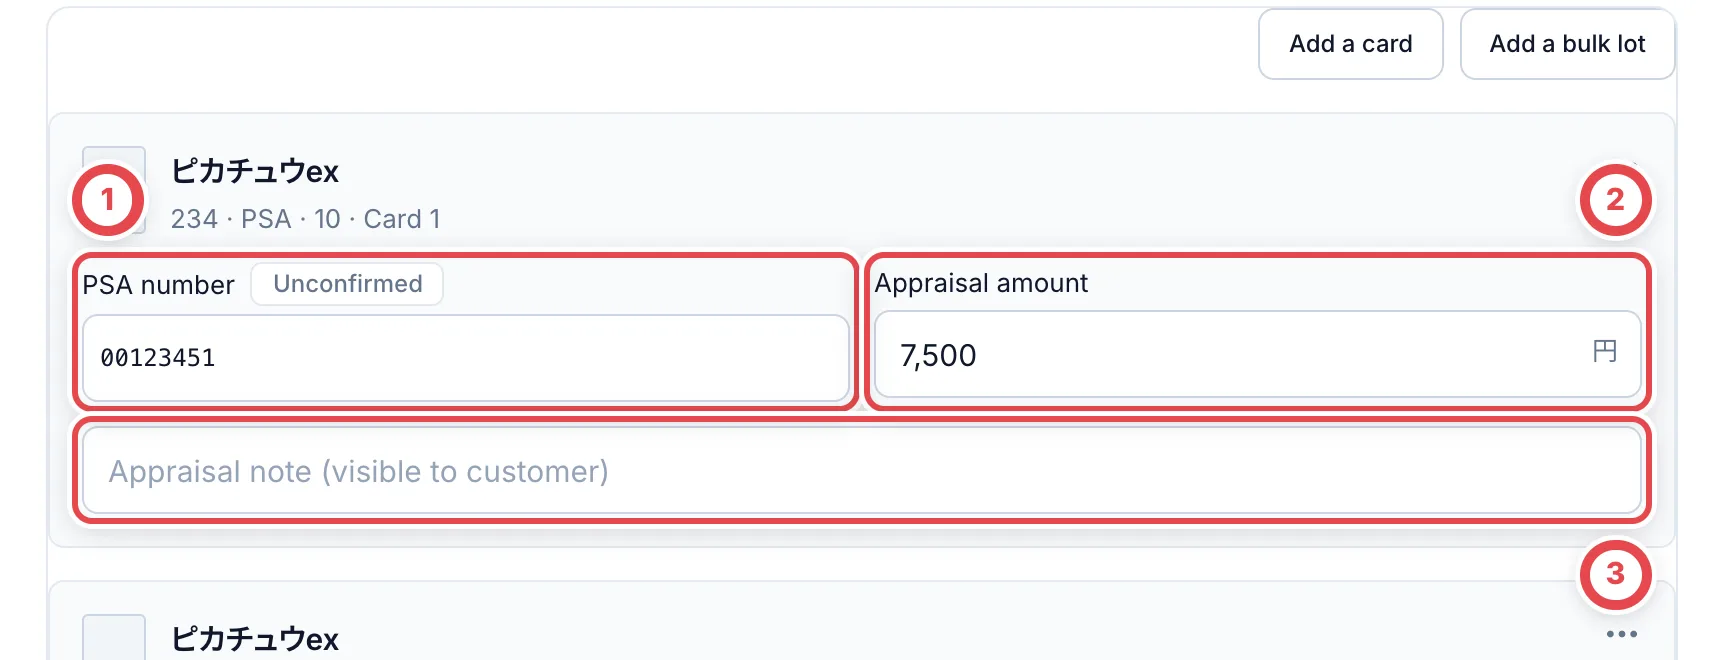
The final appraisal records **Card 1**, **Card 2**, and so on individually. Check the certification number at ①, enter the amount for this one card in ② **Appraisal amount**, and explain the price at ③ **Appraisal note (visible to customer)**. See [Final appraisal](/en/guides/purchase/final-appraisal) for rejection, missing cards, saving and checking the result.
 After you save, get a review if you need one, as with the preliminary appraisal. Then tell the customer the final quote and click **Mark as presented**, as in step 3.
### 7. Fill in the customer's details, payout account and identity check
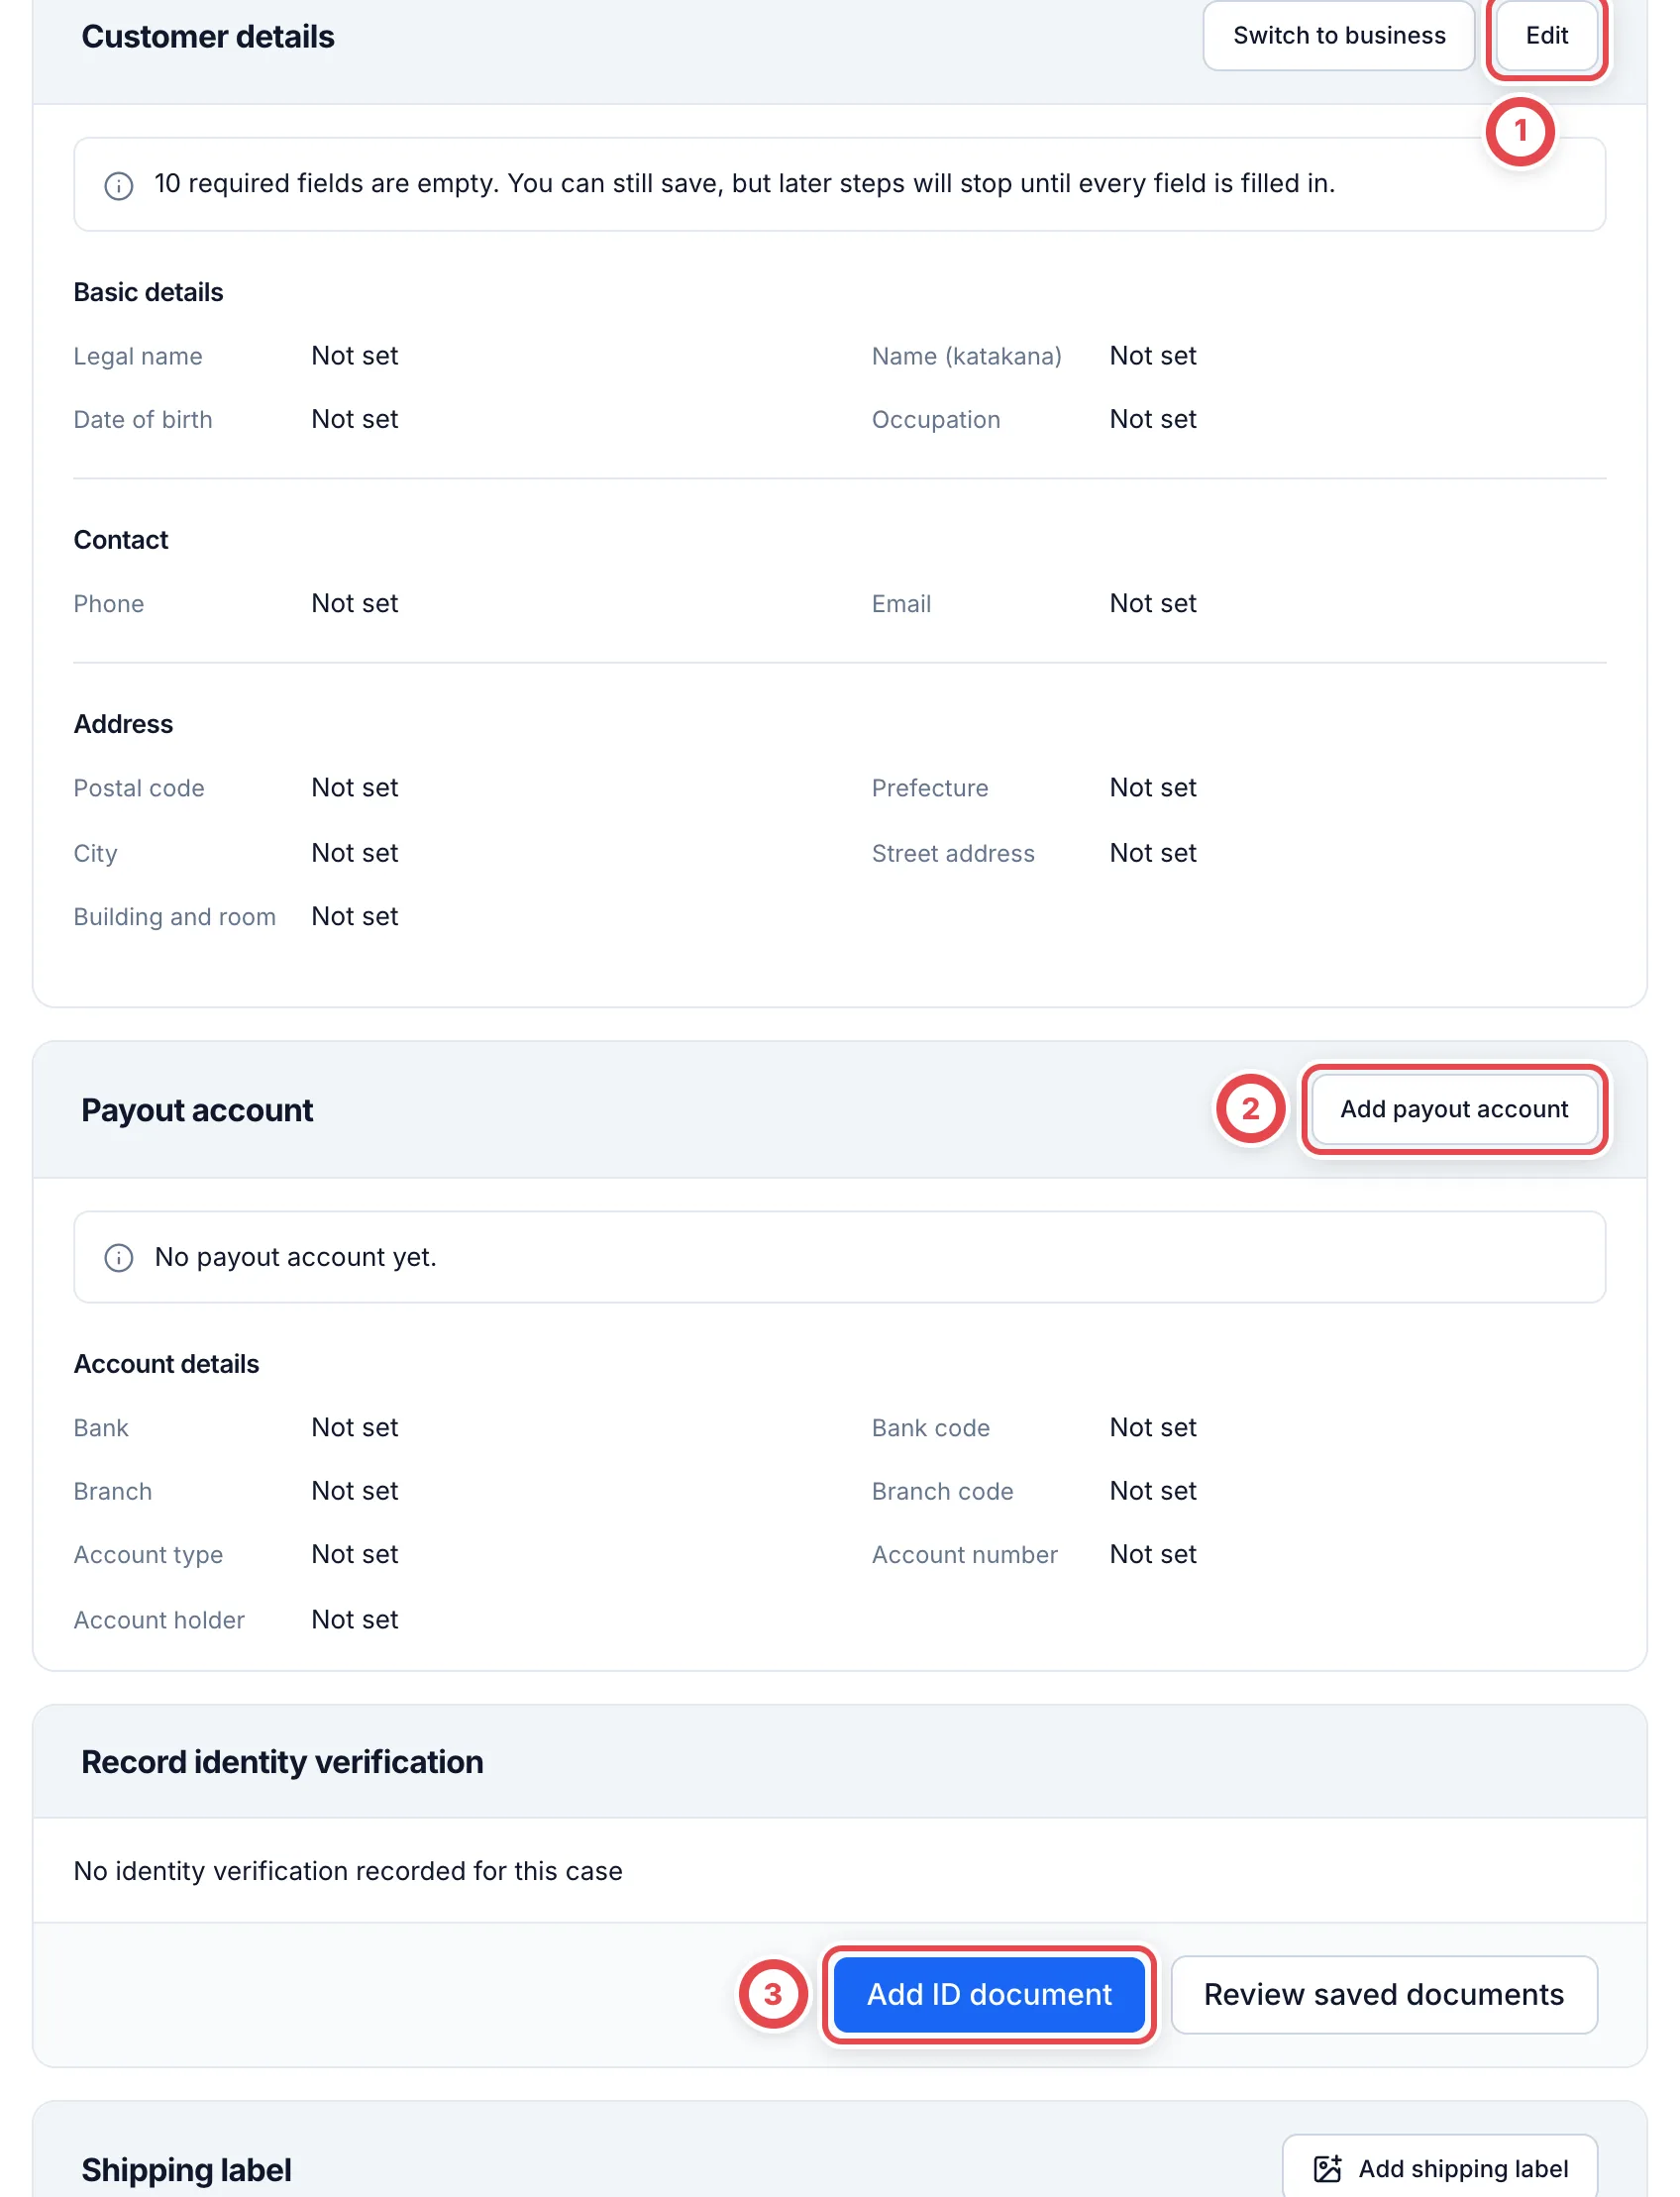
To create stock and payout, you need the customer's details, a payout account and an identity record. Scroll down the shipping screen. Under **Customer details** at ①, click **Edit** and enter the name, address, date of birth and occupation. Click **Add payout account** at ② to register the account. Click **Add ID document** at ③ to record identity verification.
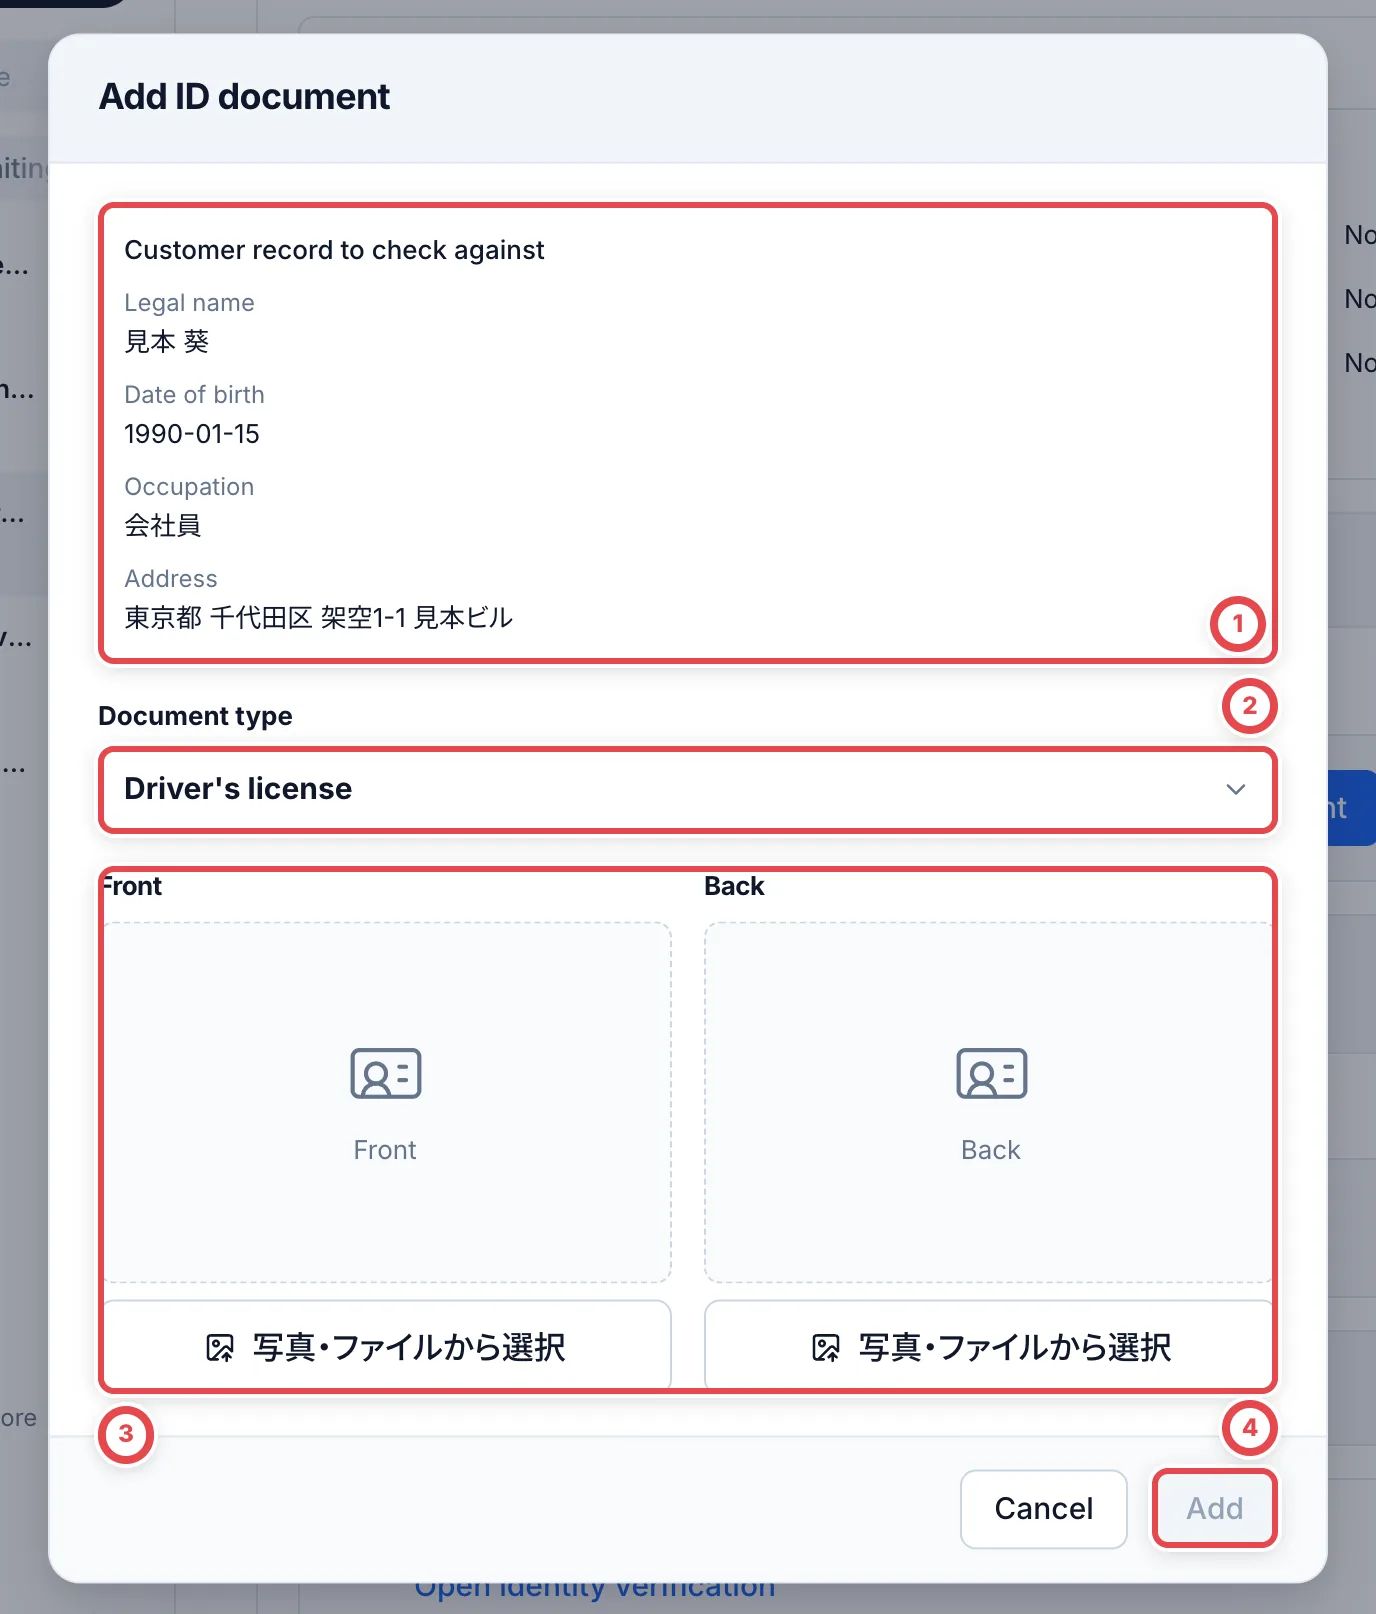
 In the dialog for adding an ID document, compare the customer record at ① with the document. Choose the document type at ②, and add images of the front and back of the document at ③. Click **Add** at ④ to record it. For details, see [Identity verification](/en/guides/purchase/identity).
 ### 8. Record acceptance of the final quote, then create stock and payout
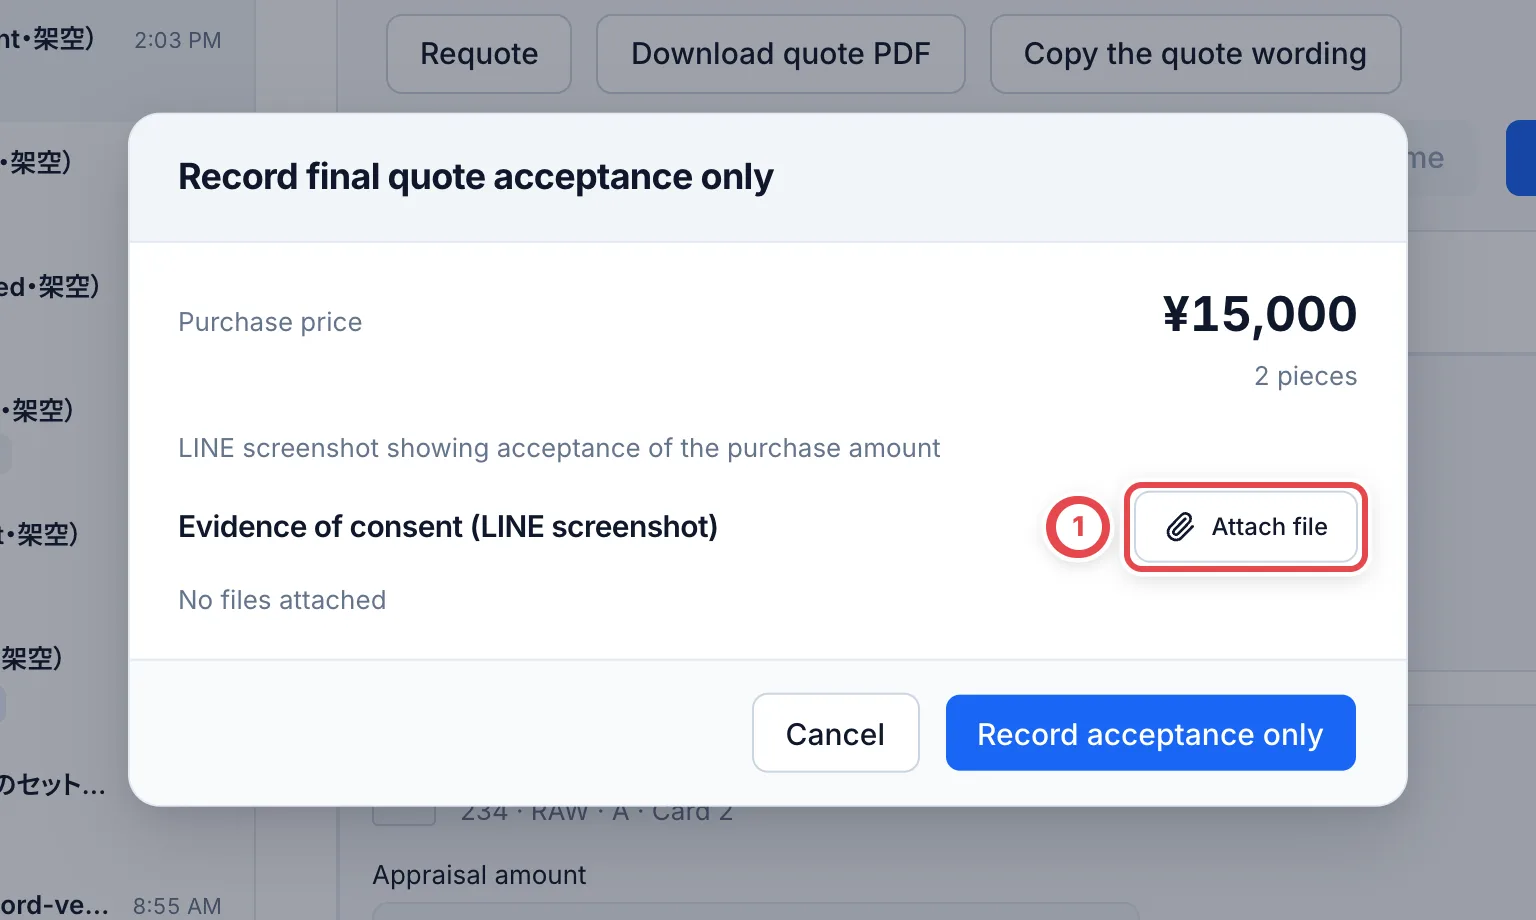
When the customer accepts the final quote, record it under **Customer response**. In the dialog for recording acceptance, use **Attach file** at ① to save a screenshot of the customer's reply, such as an email or message. You need this image when you submit the payout in step 9.
 **Identity verified**
Click **Record final quote acceptance** and confirm. At the same moment, the
purchased cards are added to stock and a payout request is created.
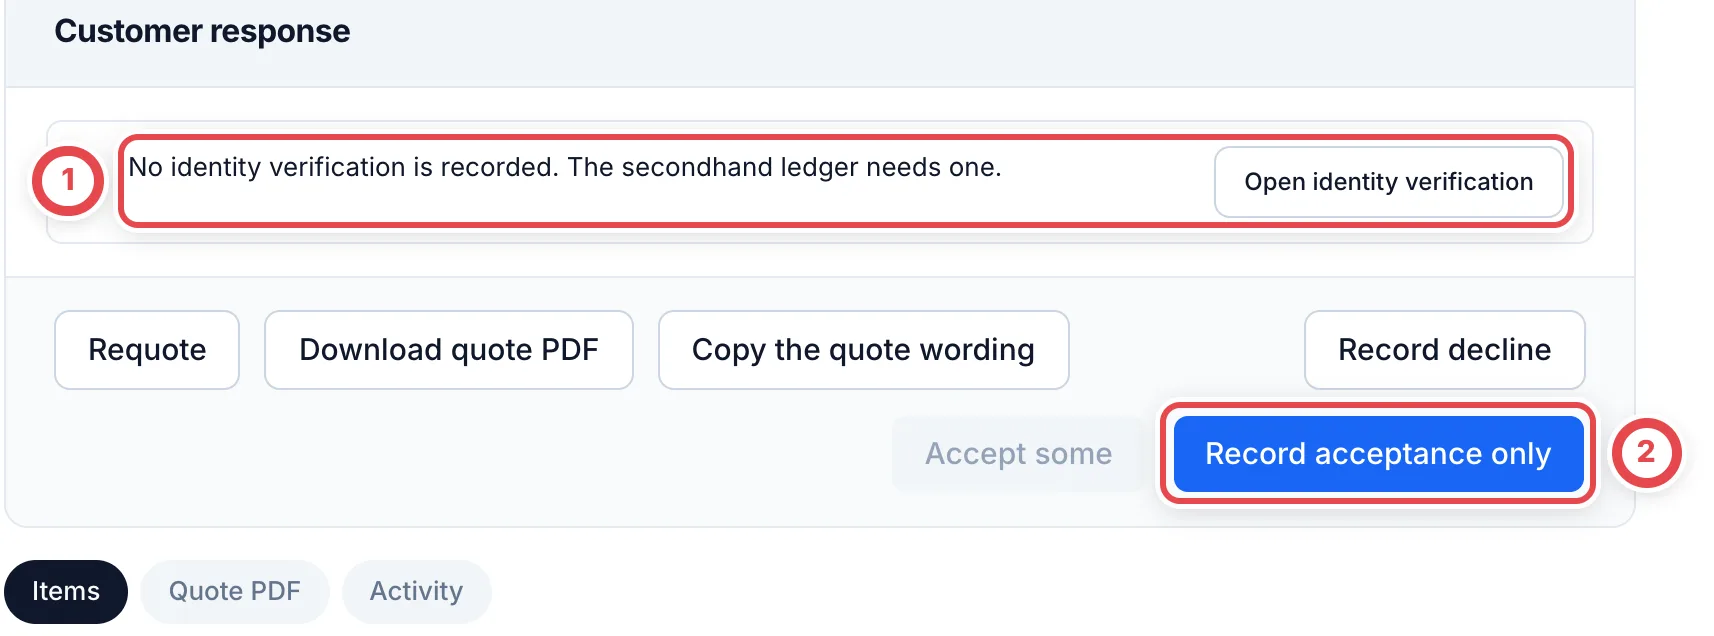
**Identity not yet verified**
Click **Record acceptance only** at ② and confirm. After you record identity
verification in step 7, click **Create stock and payout** under **Stock and
payout**.
 ### 9. Submit and approve the payout, then record the result
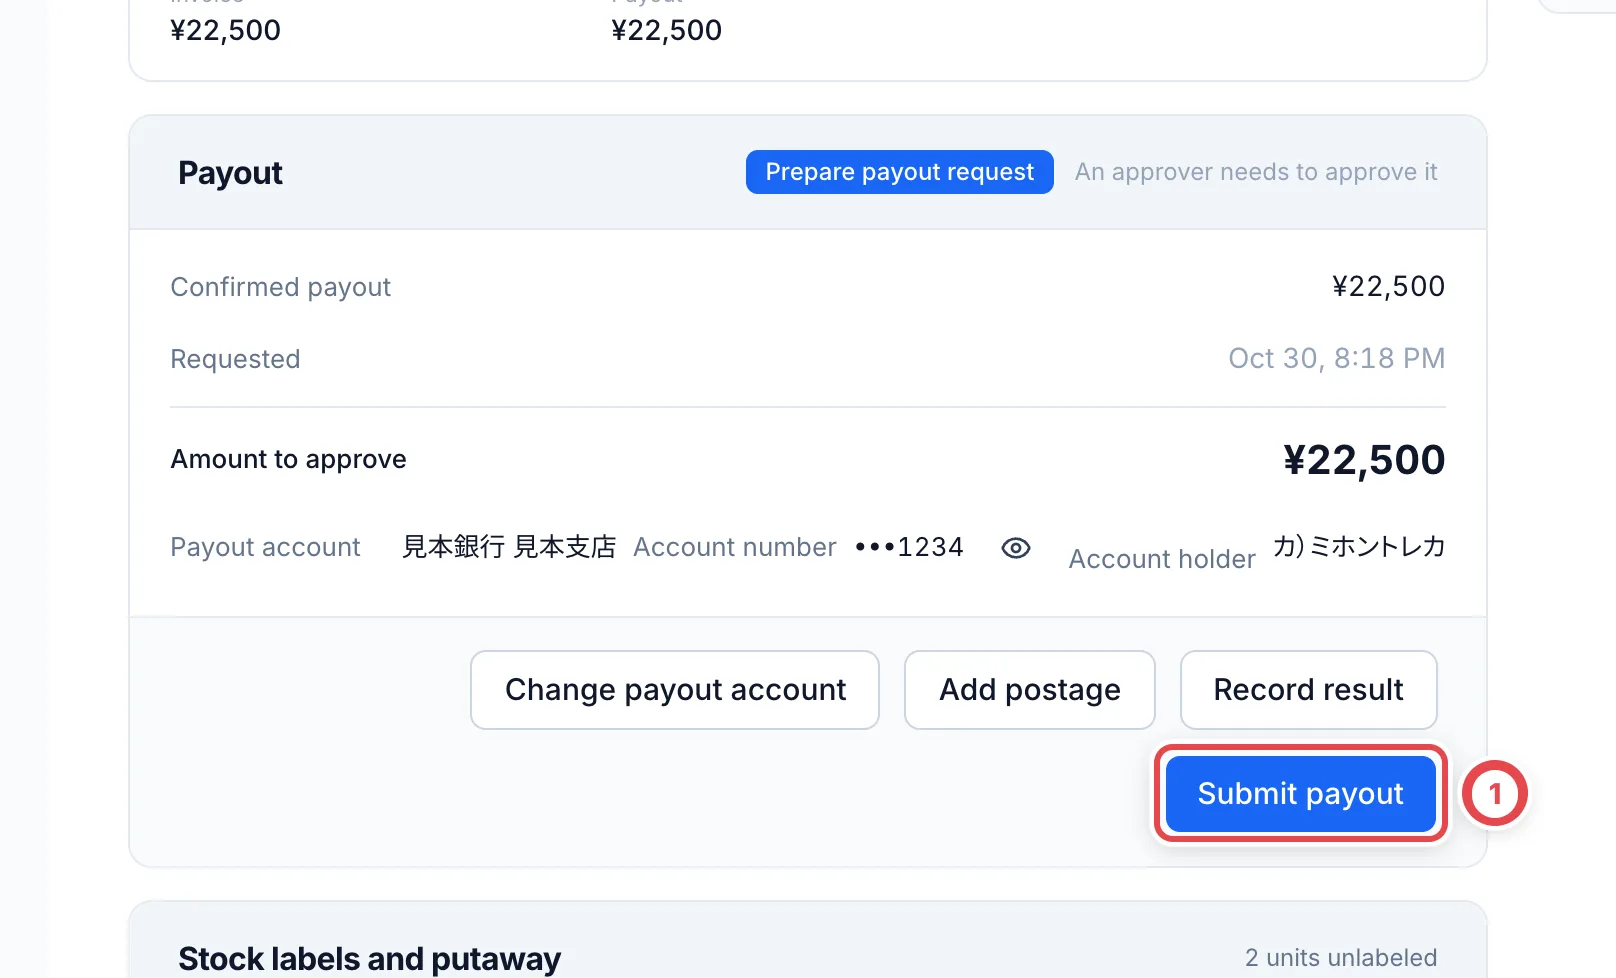
After you create stock and payout, the payout screen opens. Click **Submit payout** at ①.
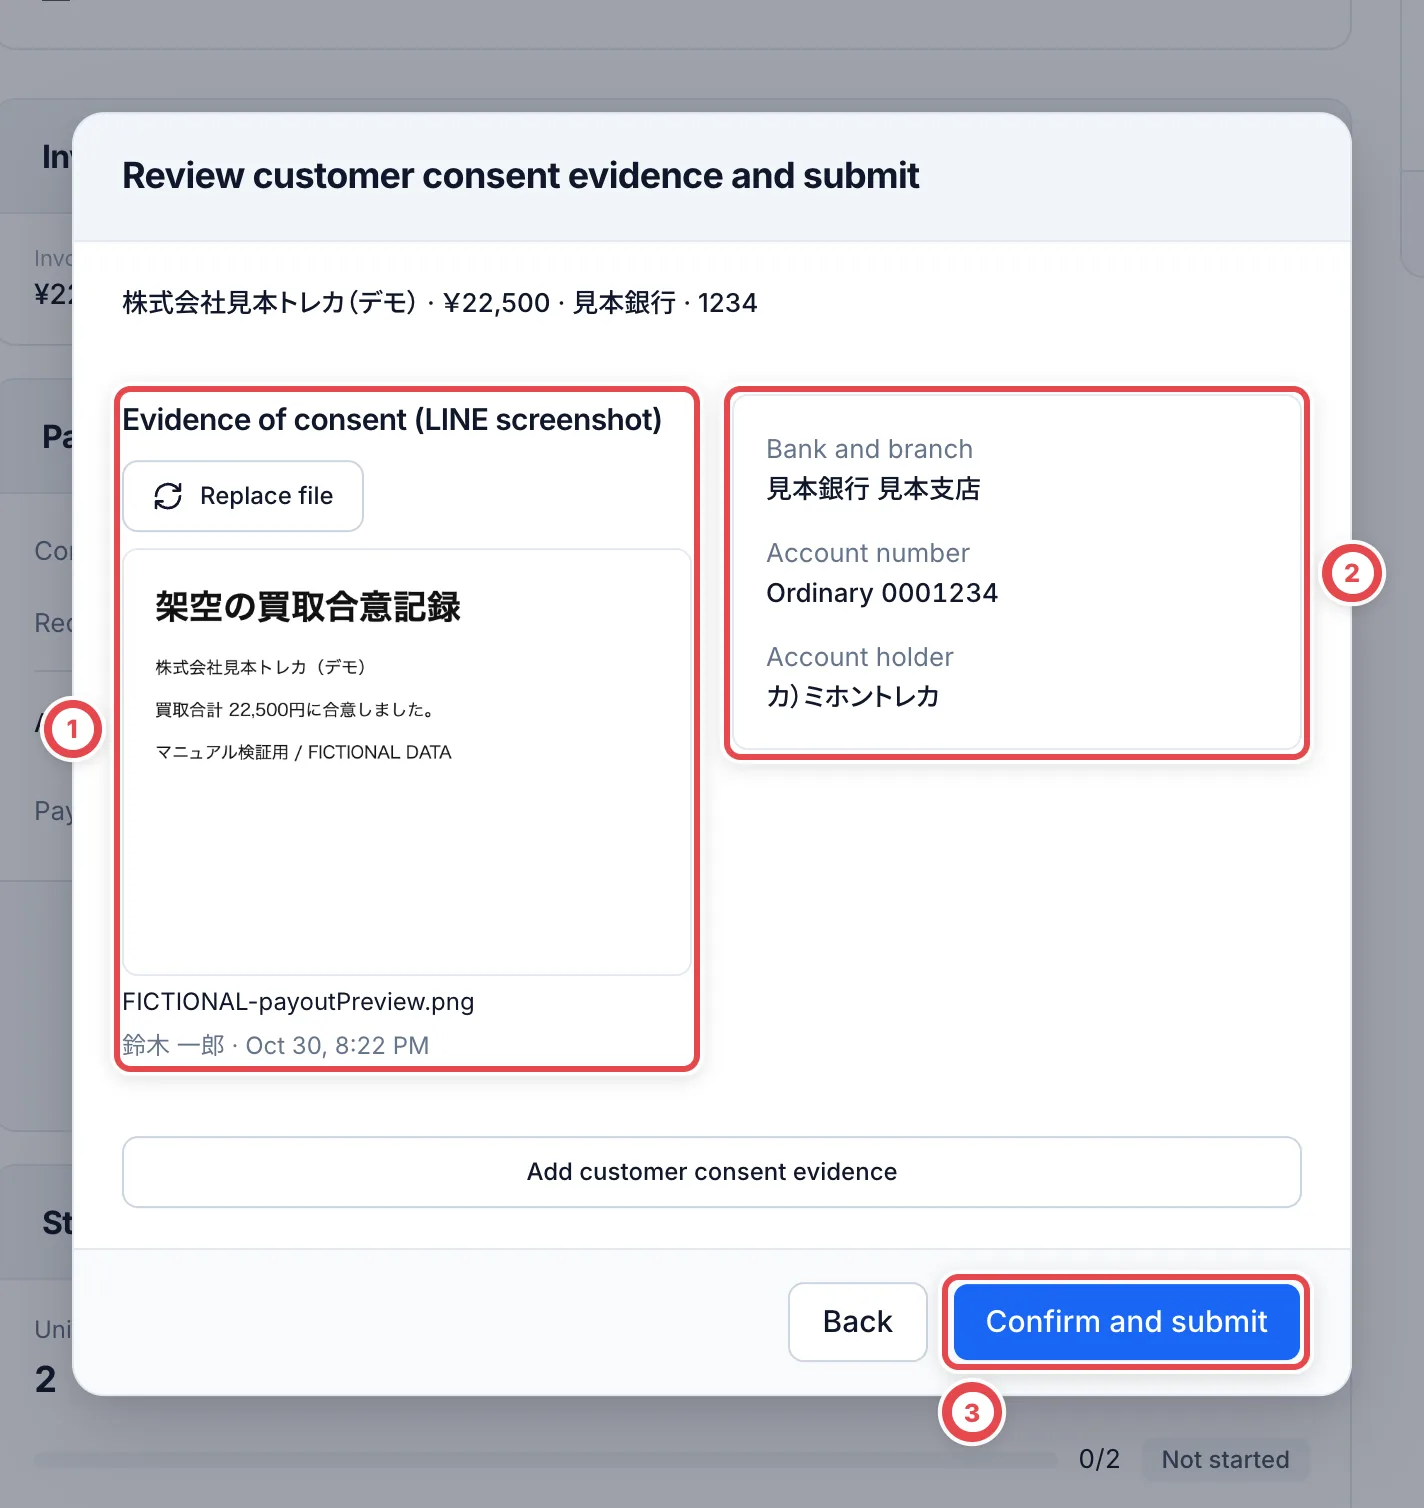
 On the submission screen, open the saved image at ① and check the consent and the amount. If everything is right, click **Submit payout** at ②.
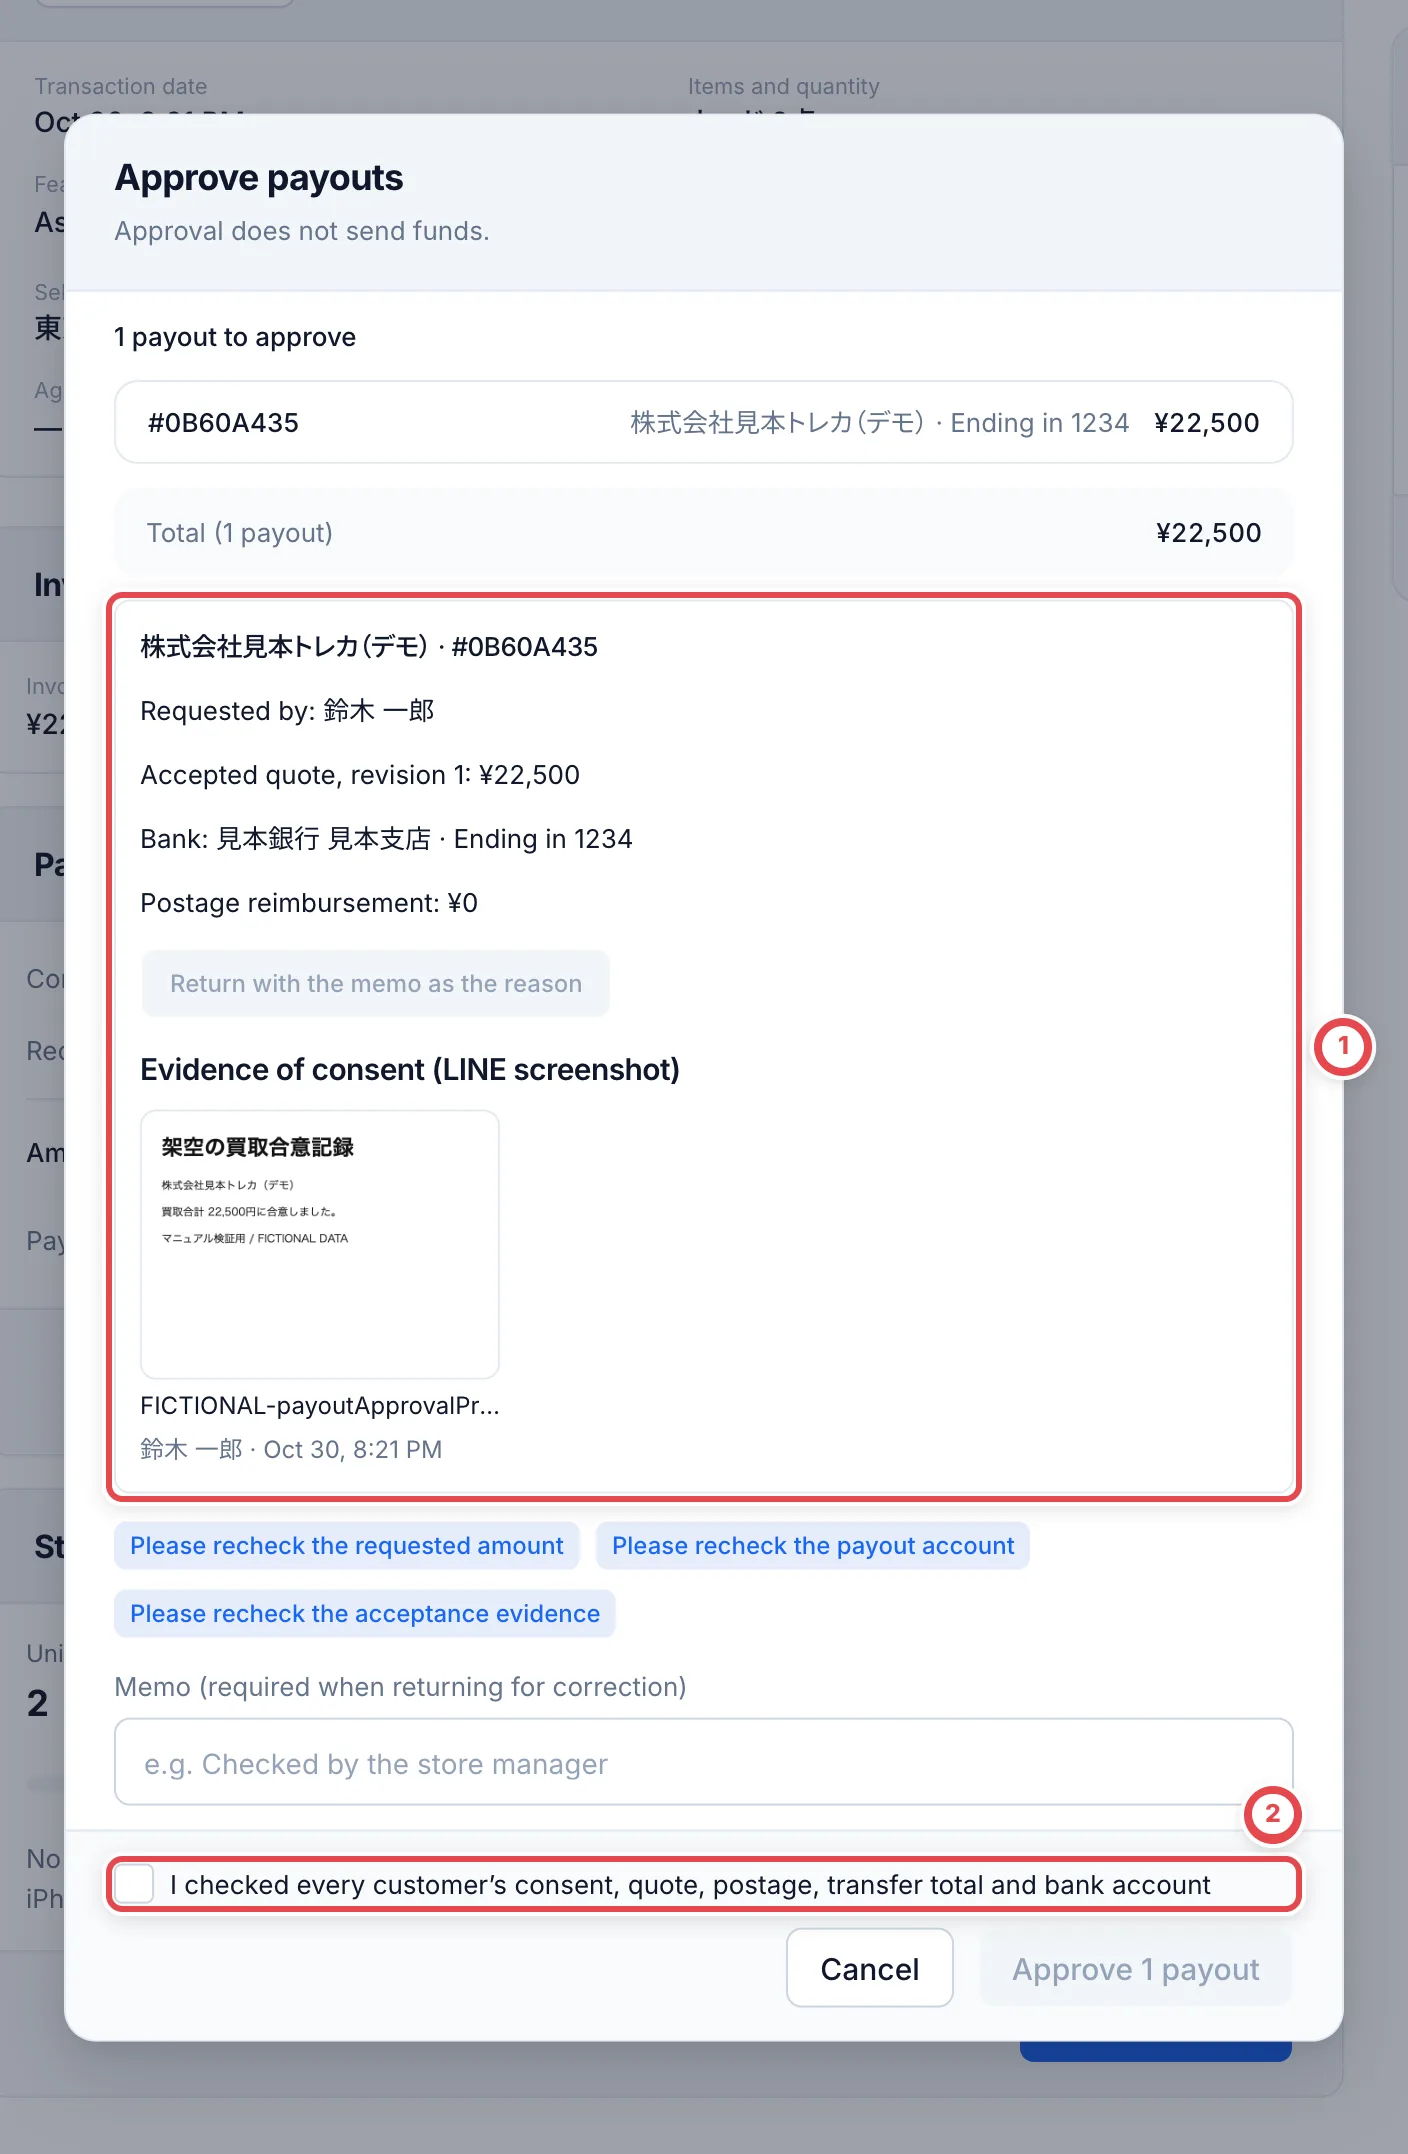
 An owner or admin other than the applicant approves it from **Pending approval** under **Payments** in the sidebar. Check the evidence of consent, amount and payout account at ①, then tick the box at ② and approve.
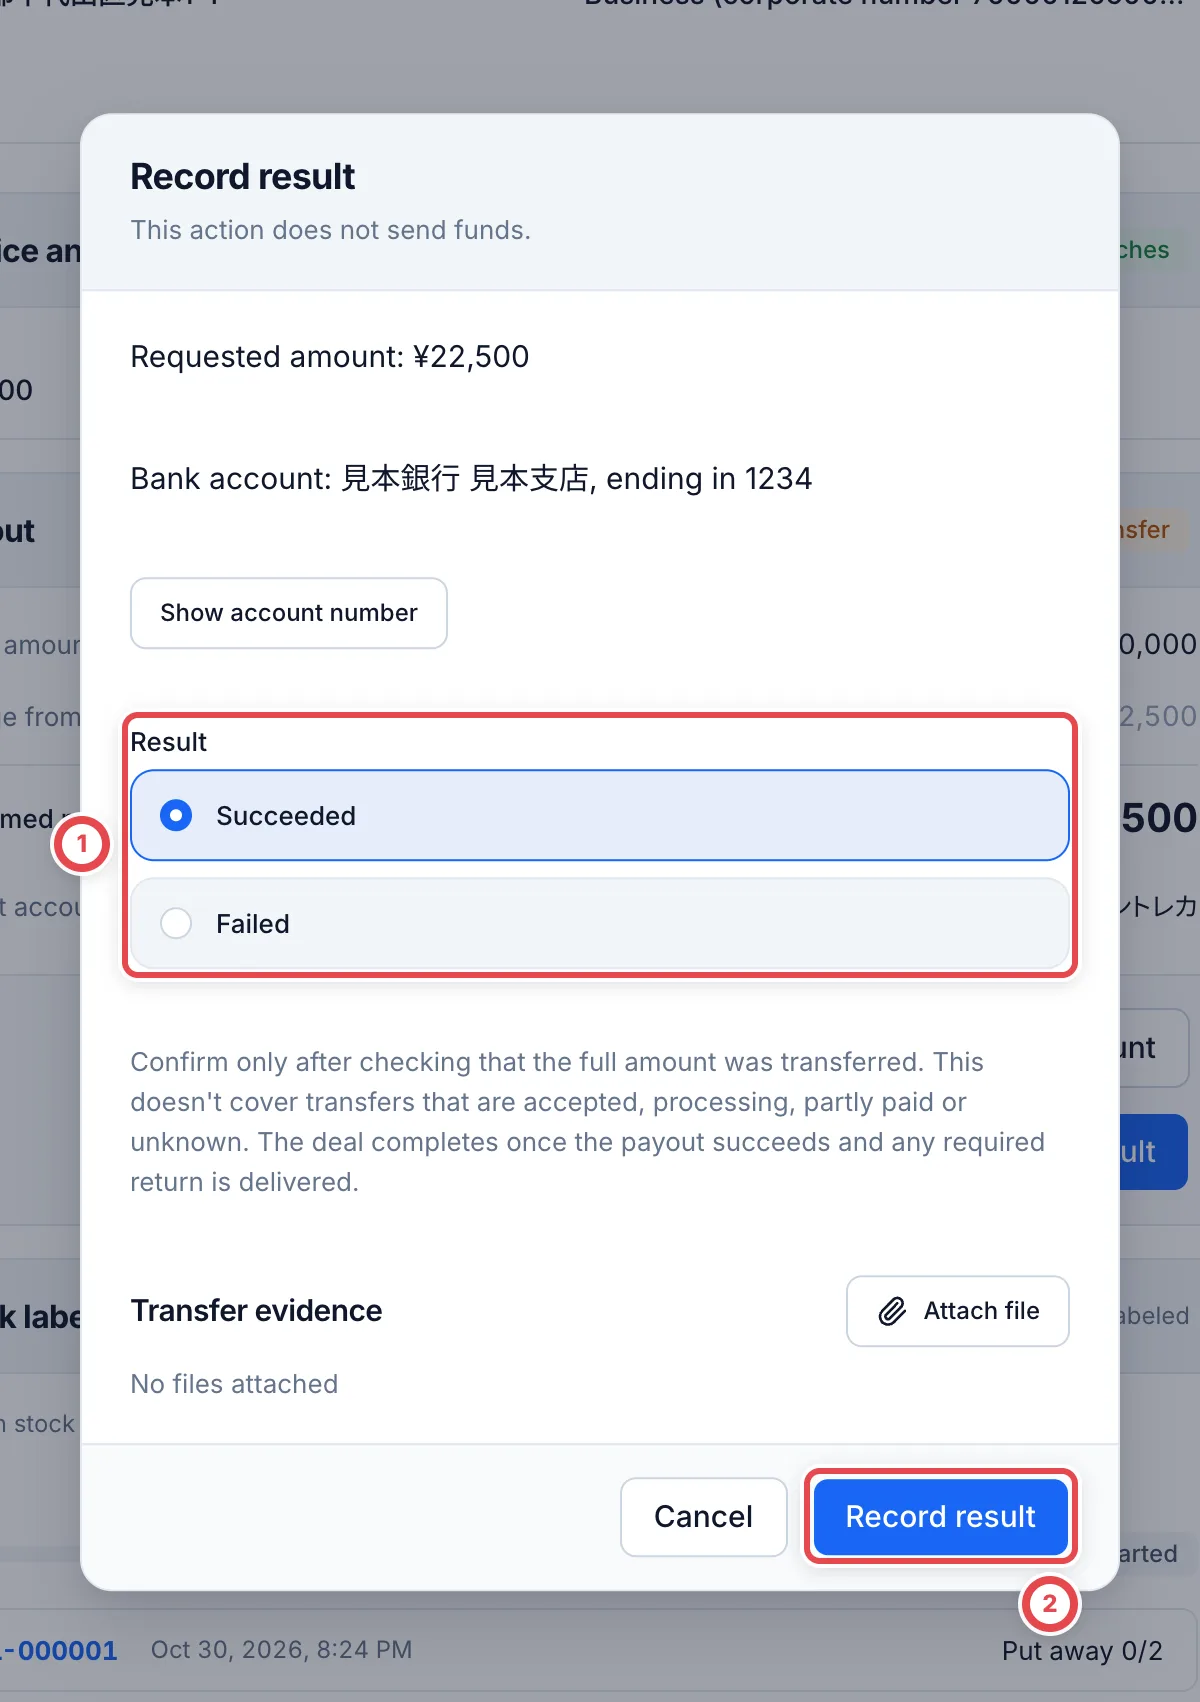
 After you make the transfer at your bank, open **Record result** on the deal's payout screen. If the transfer went through, choose **Succeeded** at ① and click **Record result**. If it didn't, choose **Failed**.
 :::note
If you've already paid the customer outside Toreca Cloud, submit and approve the payout in the same way and record the result as **Succeeded**. This doesn't send any money.
:::
### 10. Record receipt
Under **Payments** in the sidebar, open **Awaiting receipt** and click **Record receipt** on the deal. Copy the payout message with **Copy** at ① and send it to the customer. When you've confirmed the customer received the money, click **Record** at ②.
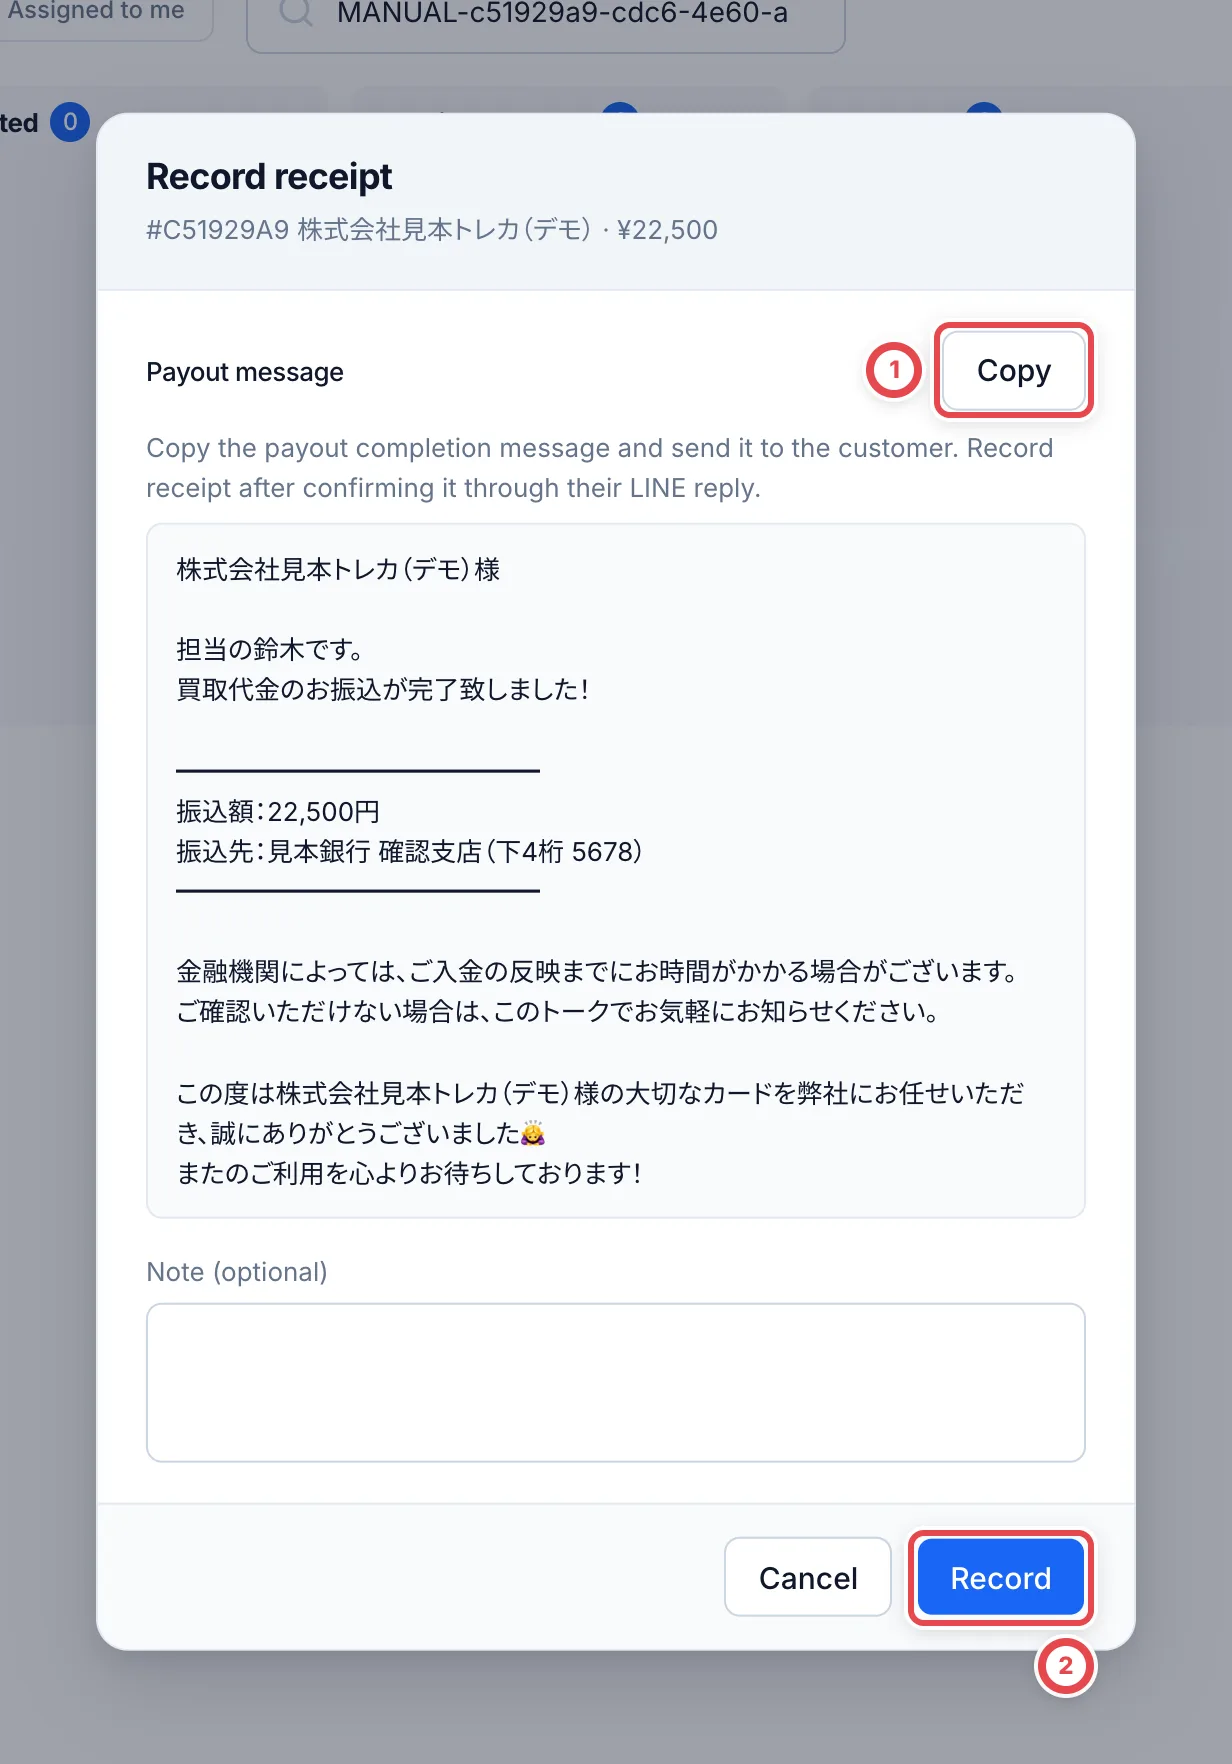 Until you record receipt, the purchased cards stay **Awaiting receipt** in Inventory. You can still print labels, put the cards away and move them between shelves at the same site. Shipping out and transfers to another site become available after you record receipt.
### Check the cards are in stock
Switch the sidebar to **Inventory** and open **Receipts**. Use the tabs at ① to see which stage each card is at. Cards whose receipt you recorded move to **To receive**. Print labels with **Print QR labels** at ③ and put the cards away.
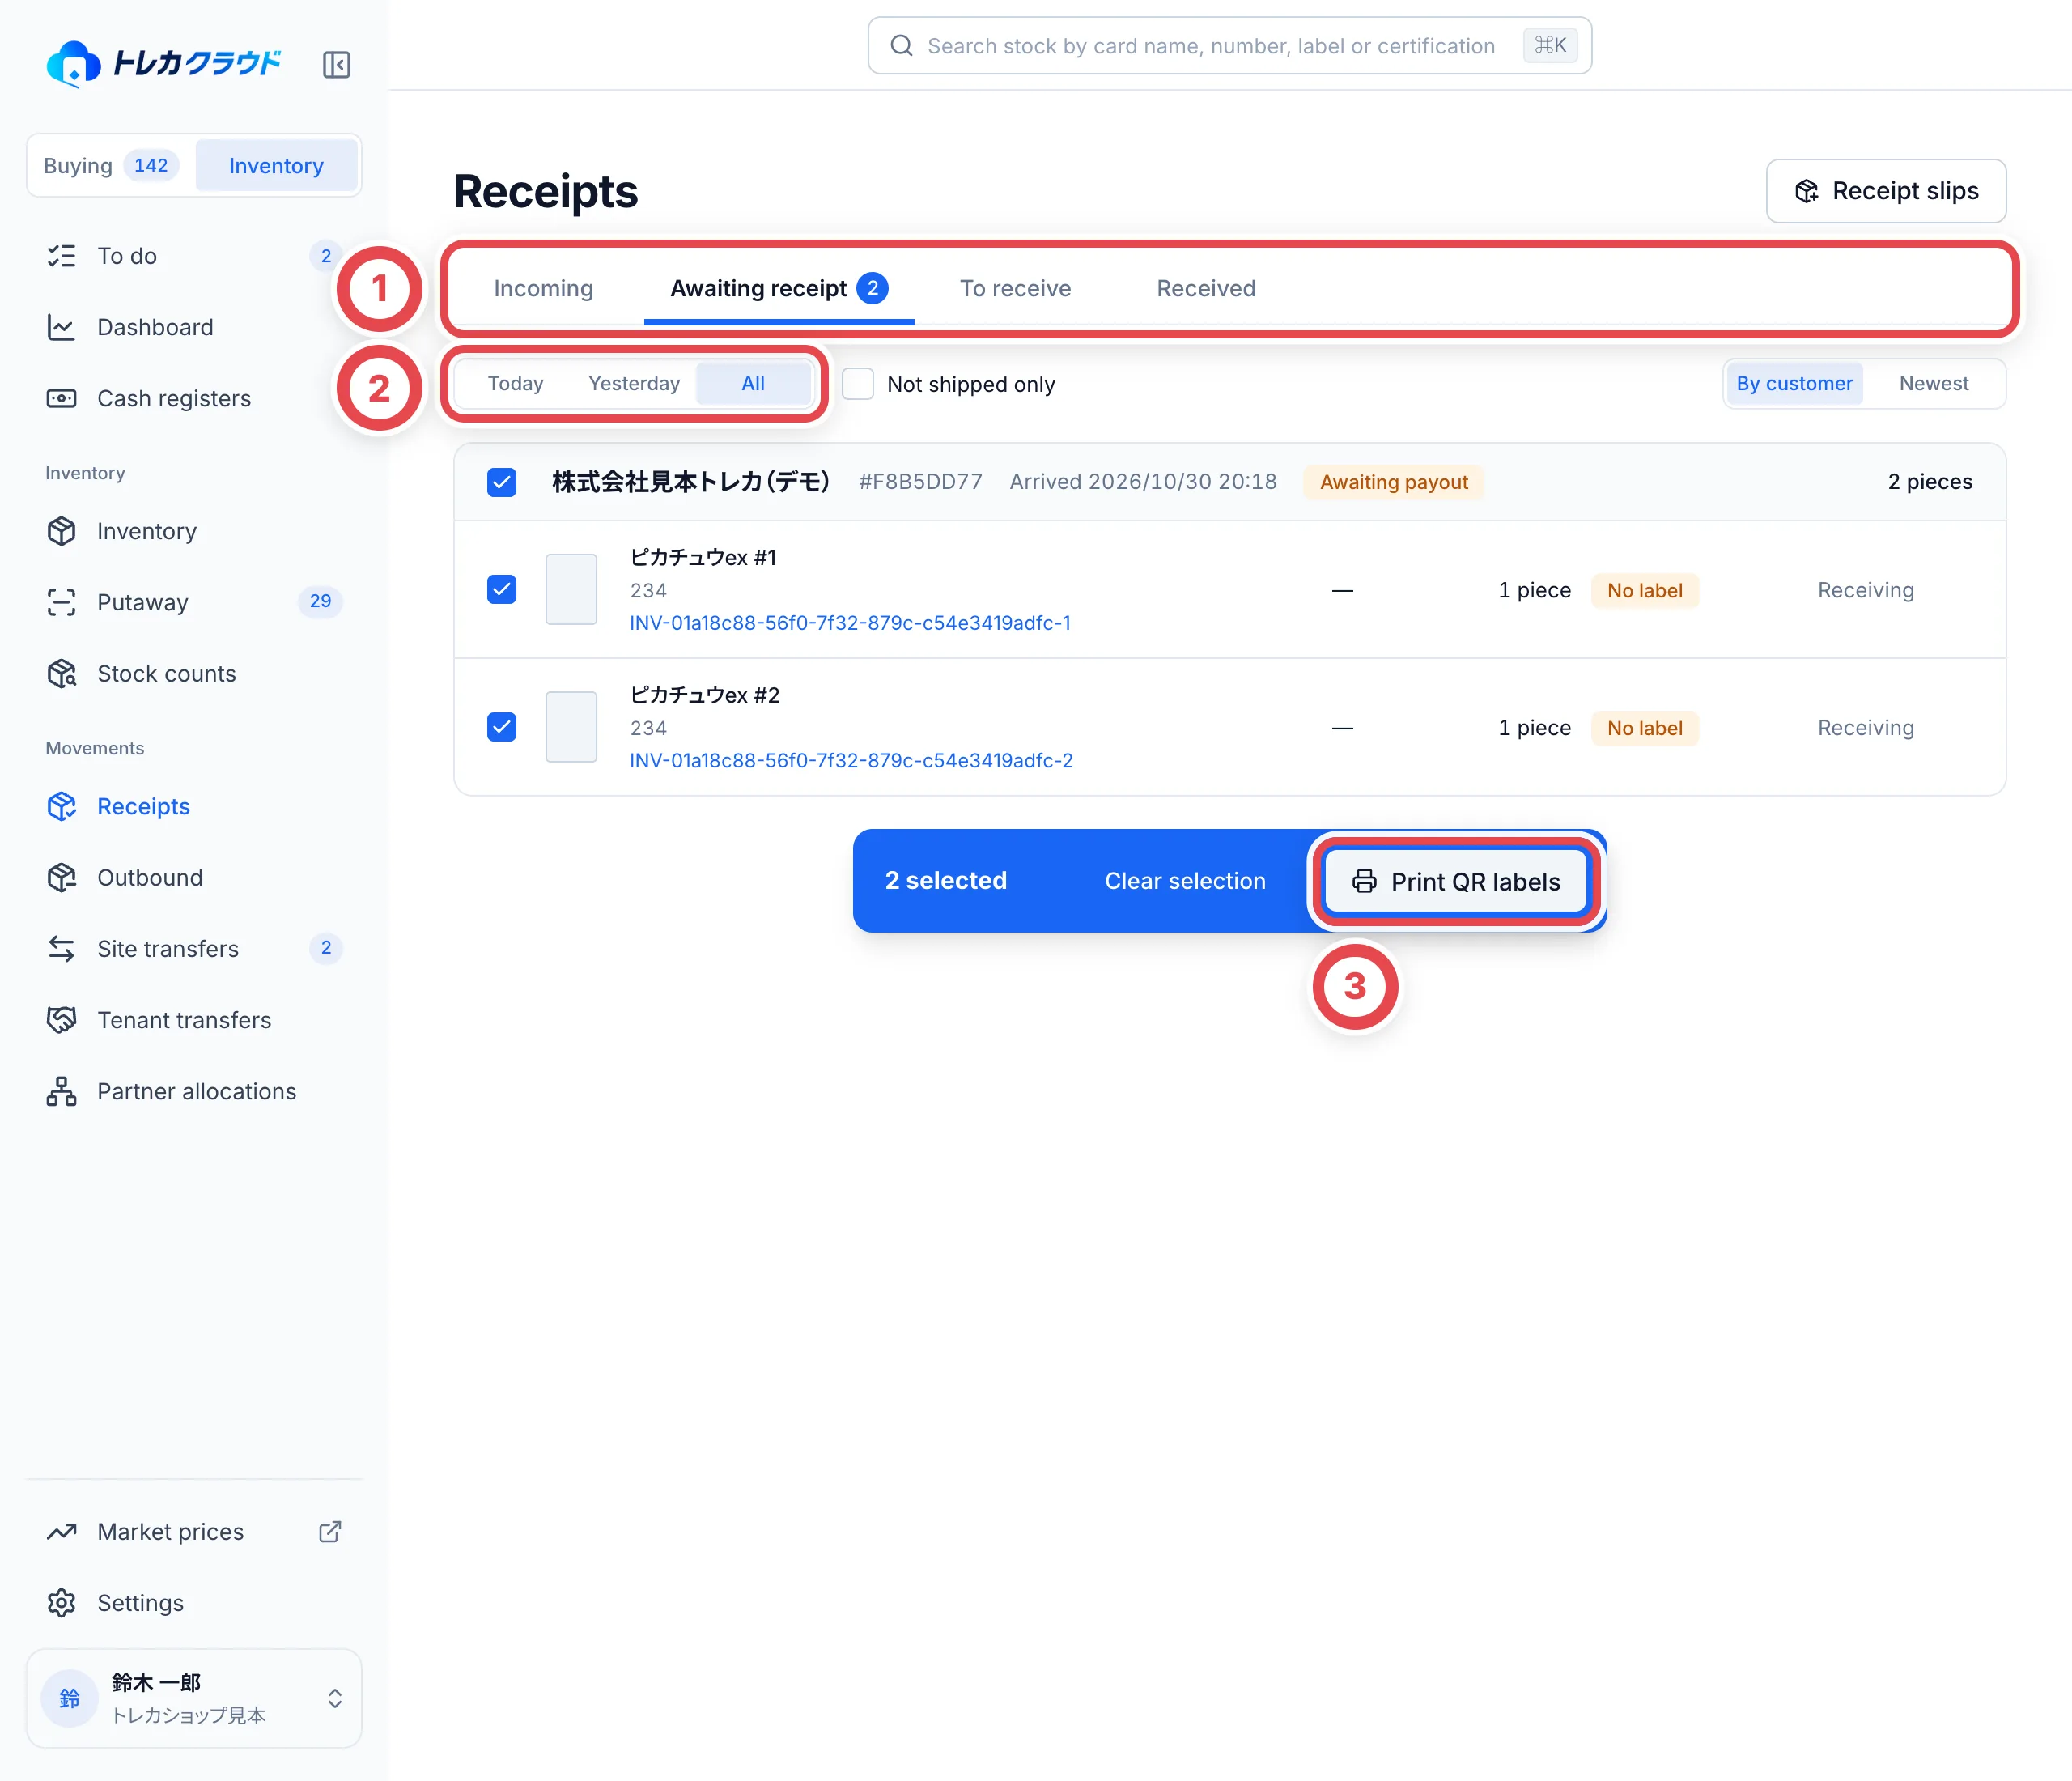 Choose a stage with the tabs in ① and filter in ②. Print labels for the selected cards with ③.
## When something goes wrong
| What's happening | What to check and how to fix it |
| ------------------------------------------------------------------------------ | -------------------------------------------------------------------------------------------------------------------------------------------------------------------------- |
| You can't find the card in the search | Search again with part of the card name or just the number. If it still doesn't appear, it isn't in the card catalog. You can't receive or buy it, so contact your admin. |
| You can't enter a certification number | Set the line's quantity to 1, and choose a third-party grade such as PSA 10 under the grade. |
| You confirmed a receipt slip by mistake | Select the affected cards on the receipt and cancel their registration. Registering them again creates new units and labels. |
| **Not in store** isn't shown | Online buying is turned off for your shop. Ask your admin. |
| **Enter final appraisal** doesn't appear | Check that you recorded the shipping instructions. You also can't go on while there are unidentified items or unresolved discrepancy records. |
| The quote has expired | This only happens on deals that were given a deadline earlier. The deadline can't be changed on screen; contact the Toreca Cloud team. |
| You can't click **Create stock and payout** | ① in the image below shows what's missing. You can click it once you have identity verification, the customer's payout account, a dealer license and a site for the cards. |
| You can't approve a payout yourself | The applicant can't approve it. Ask another owner or admin to approve. |
| You can't use purchased cards for outbound orders or transfers to another site | They stay **Awaiting receipt** until you record receipt in step 10. You can move them between shelves at the same site before that. |
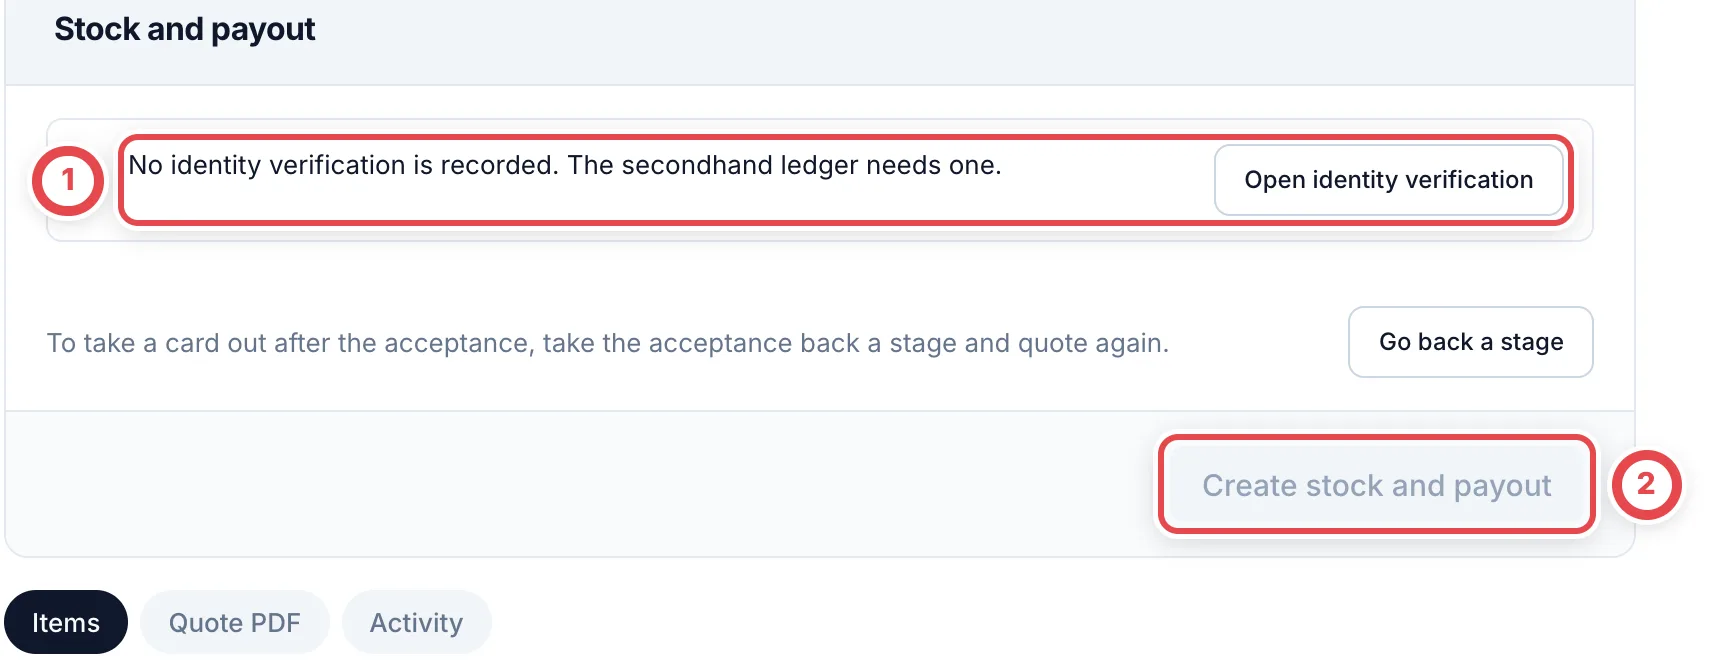 A deal without identity verification. Once everything in ① is done, you can click ②.
## Check purchase completion
After method 2, check [online purchase completion](/en/guides/purchase/overview#confirm-completion-and-continue). For partial acceptance or full decline, follow [final quote responses and returns](/en/guides/purchase/shipping-and-final). Method 1's receipt slip alone does not record purchase completion.