

Intake form
The intake form is one shared form per shop for receiving online buying requests. The link never changes, so you can put it in your LINE rich menu or greeting message. Each new submission of personal details creates a new customer and deal.
How it differs from per-deal input links
| Intake form (this page) | Per-deal input link | |
|---|---|---|
| When to use | For customers with no deal yet, to make their first request | For customers who already have a deal, to fill in what’s missing (appraisal request, ID, shipping label, etc.) |
| Link | One per shop. Never changes | One per deal. Stops working after 7 days, and you can reissue it |
| When submitted | A new customer and deal are created | It’s applied to that deal |
| Where you get it | Settings › Intake form | Request form on the customer screen, or Request shipment on the Shipping tab |
Per-deal input links are covered in Customers and deals and Shipping and final appraisal.
What you need
- Only members with permission to manage integrations (owners and admins) can change the intake form settings. To save them, you also need permission to view and edit customers and deals
- The LINE Official Account (or Liny / L Step) you use to reach customers
The steps and deal statuses
| Step | What you do | Who | Deal status |
|---|---|---|---|
| 1 | Publish the intake form and copy the link | The shop | ― |
| 2 | Share the link on LINE or elsewhere | The shop | ― |
| 3 | Enter their details and submit | Customer | New |
| 4 | Declare their items and apply | Customer | New |
| 5 | Appraise the request that arrived | The shop | Appraising |
1. Publish the intake form and copy the link
Open Settings › Intake form and click Change next to Intake form delivery. Set Status (①) to Live, decide on a Form heading (1 to 100 characters), and click Save changes. It applies to the form as soon as you save. The shared link is created the first time you save (until then it shows Not issued yet).
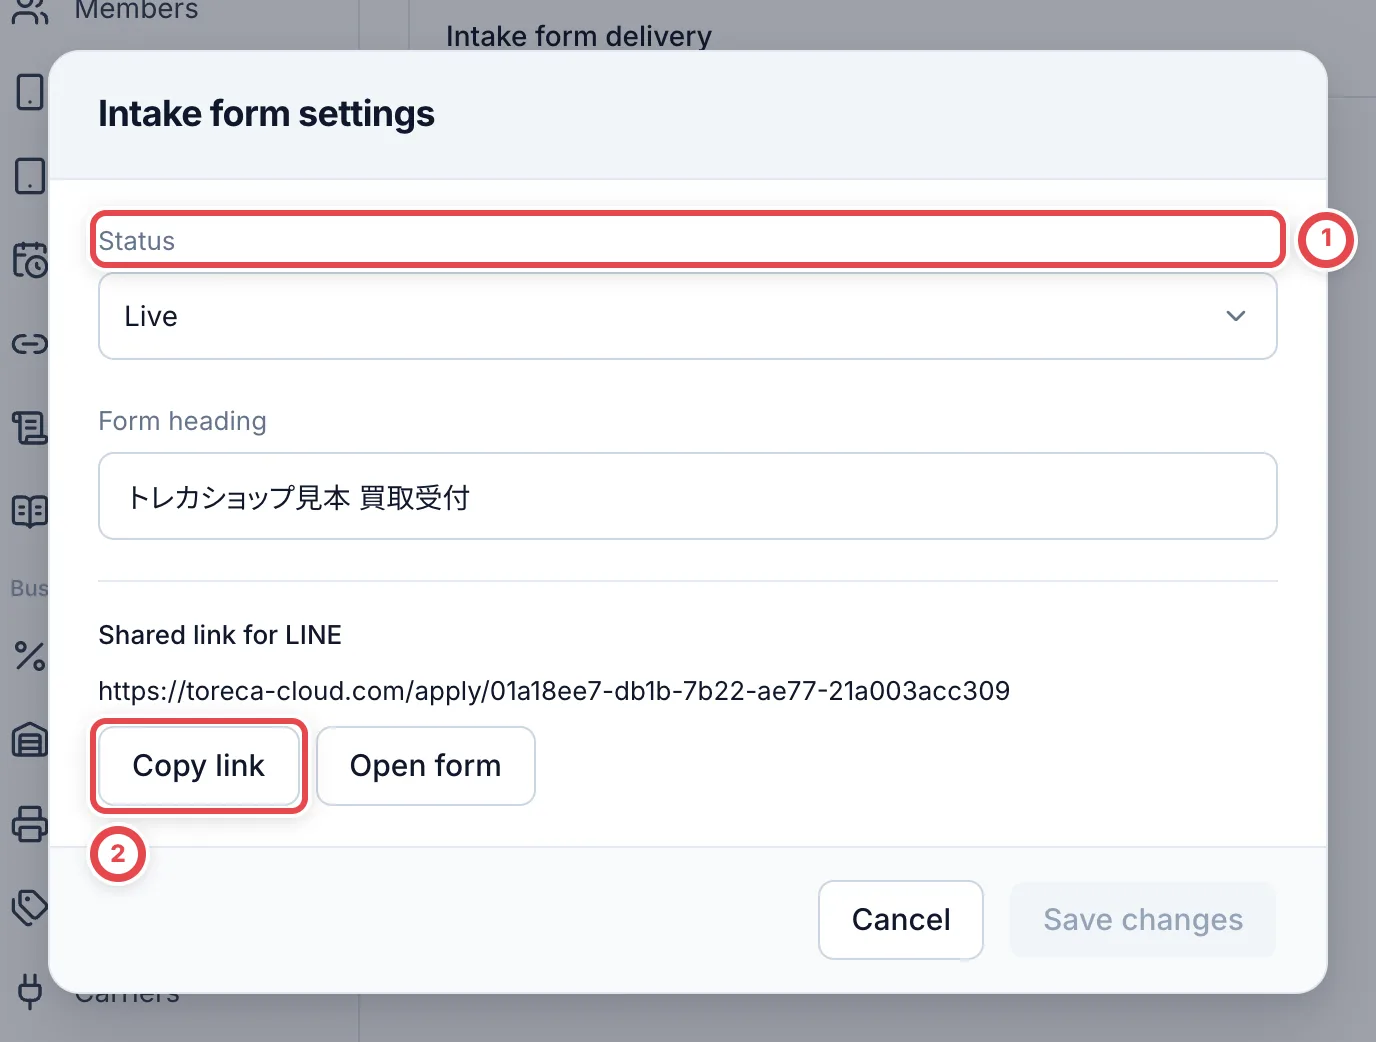
Click Copy link (②) to copy the link. The link doesn’t change when you change the heading or the status. Setting Status to Paused stops new requests from coming in (per-deal input links you already issued keep working).
2. Share the link on LINE or elsewhere
Put the copied link in your LINE Official Account or Liny / L Step rich menu, your greeting message, or similar. Toreca Cloud never sends it to LINE automatically.
3. Enter their details and submit (customer)
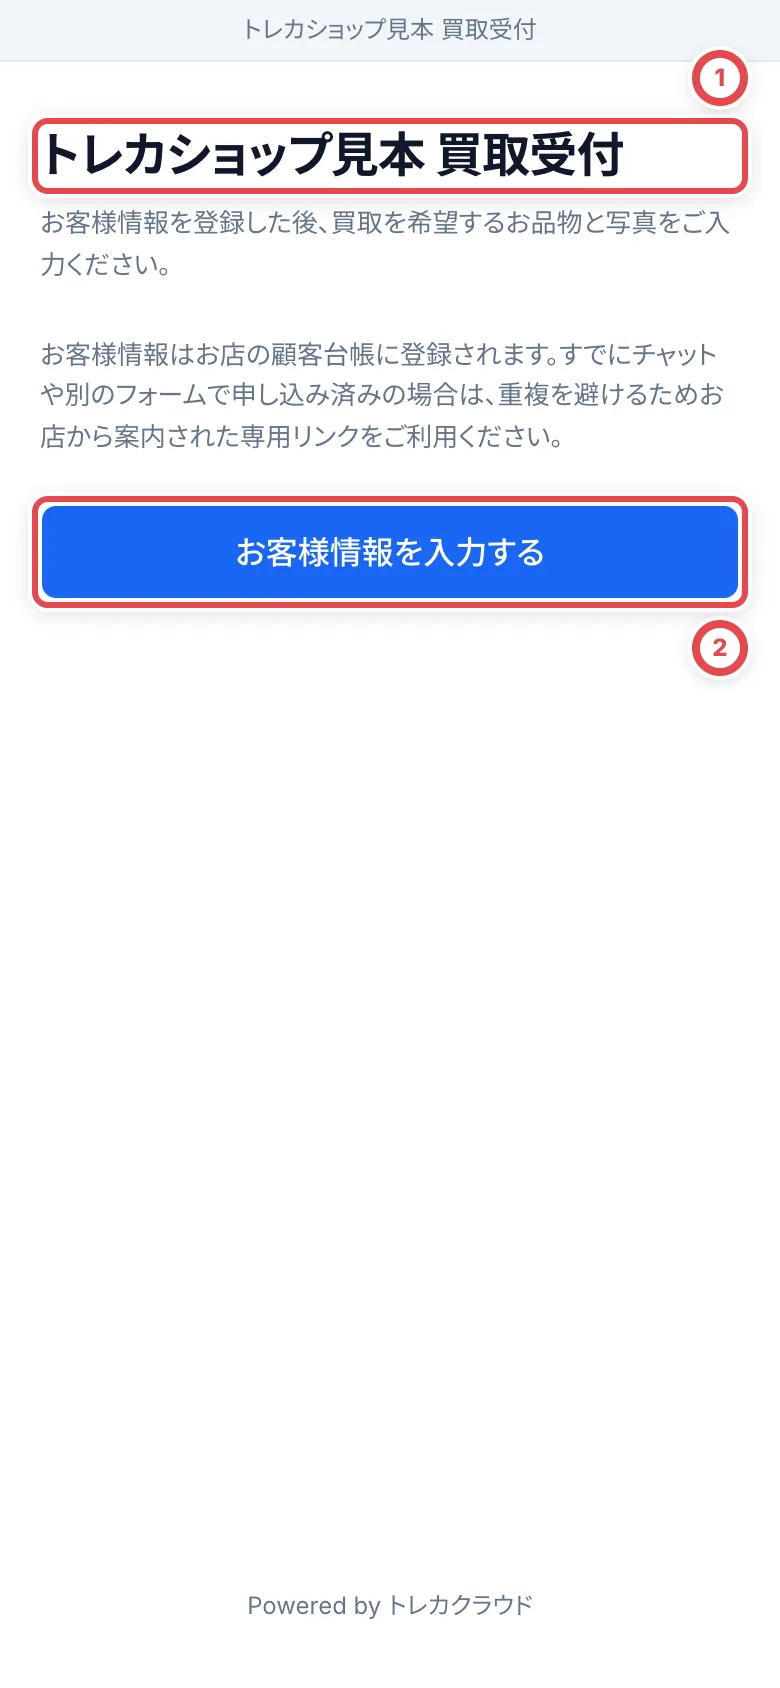
When the customer opens the link, the heading you set appears at ①. They start from 「お客様情報を入力する」 (Enter your details) at ②.
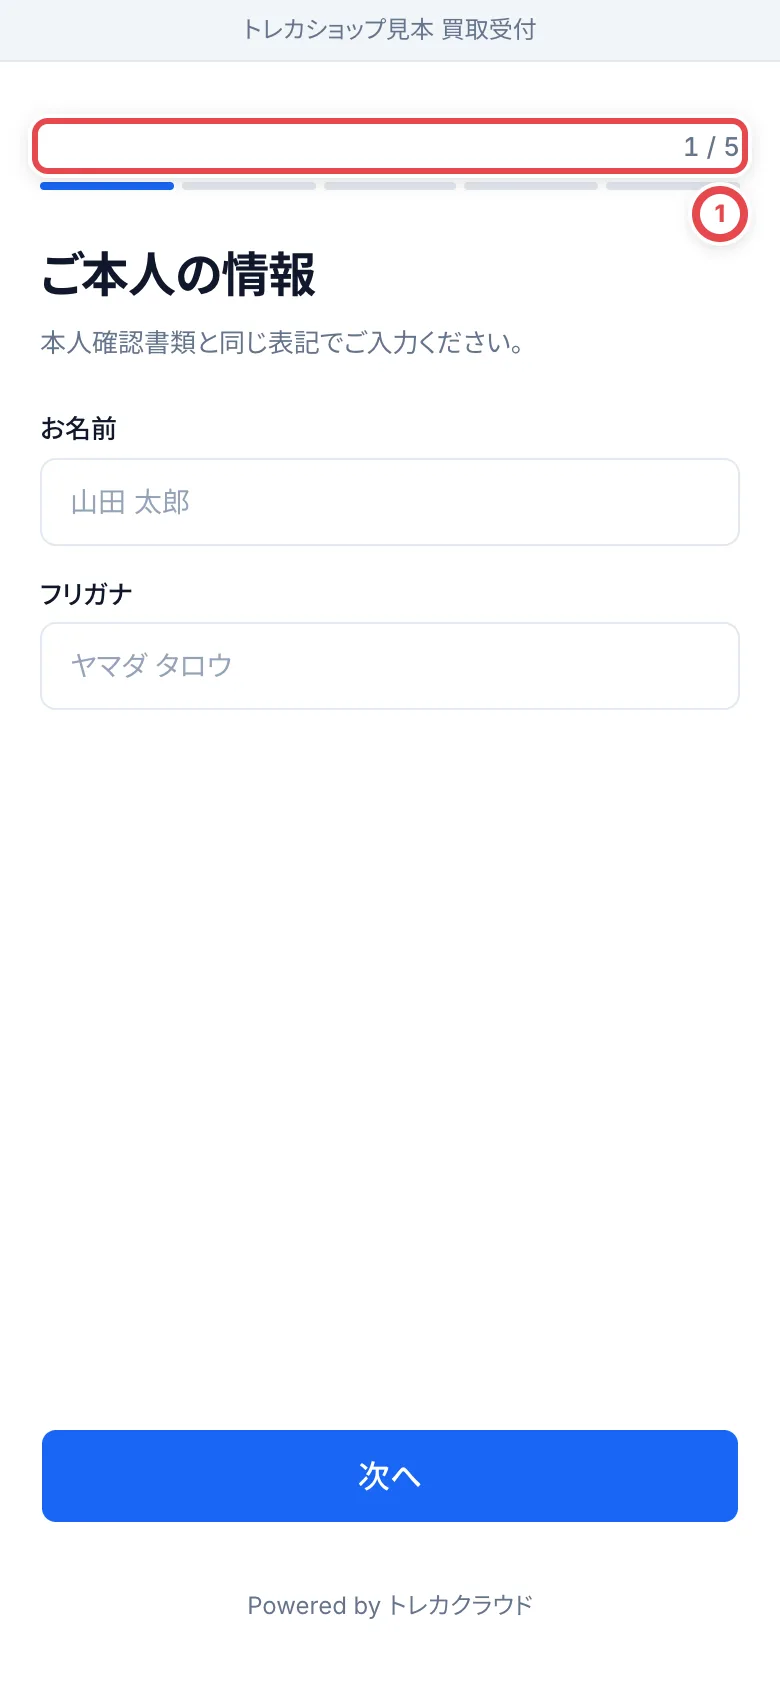
The customer enters their details over five screens, as shown at ①.
- ご本人の情報 (Your details): name and furigana
- 生年月日とご職業 (Date of birth and occupation): items that must be checked under the Antique Dealings Act
- ご連絡先 (Contact details): phone number and email address
- ご住所 (Address)
- 入力内容の確認 (Review your entries)
When they press 「この内容で提出する」 (Submit these details) on the last screen, a new customer and deal (with the status New) are created at that moment. Even if a customer with the same name or phone number already exists, they aren’t merged, and a separate customer is created. Bank account and ID documents aren’t asked for here (you ask for them later with a per-deal input link).
4. Declare their items and apply (customer)
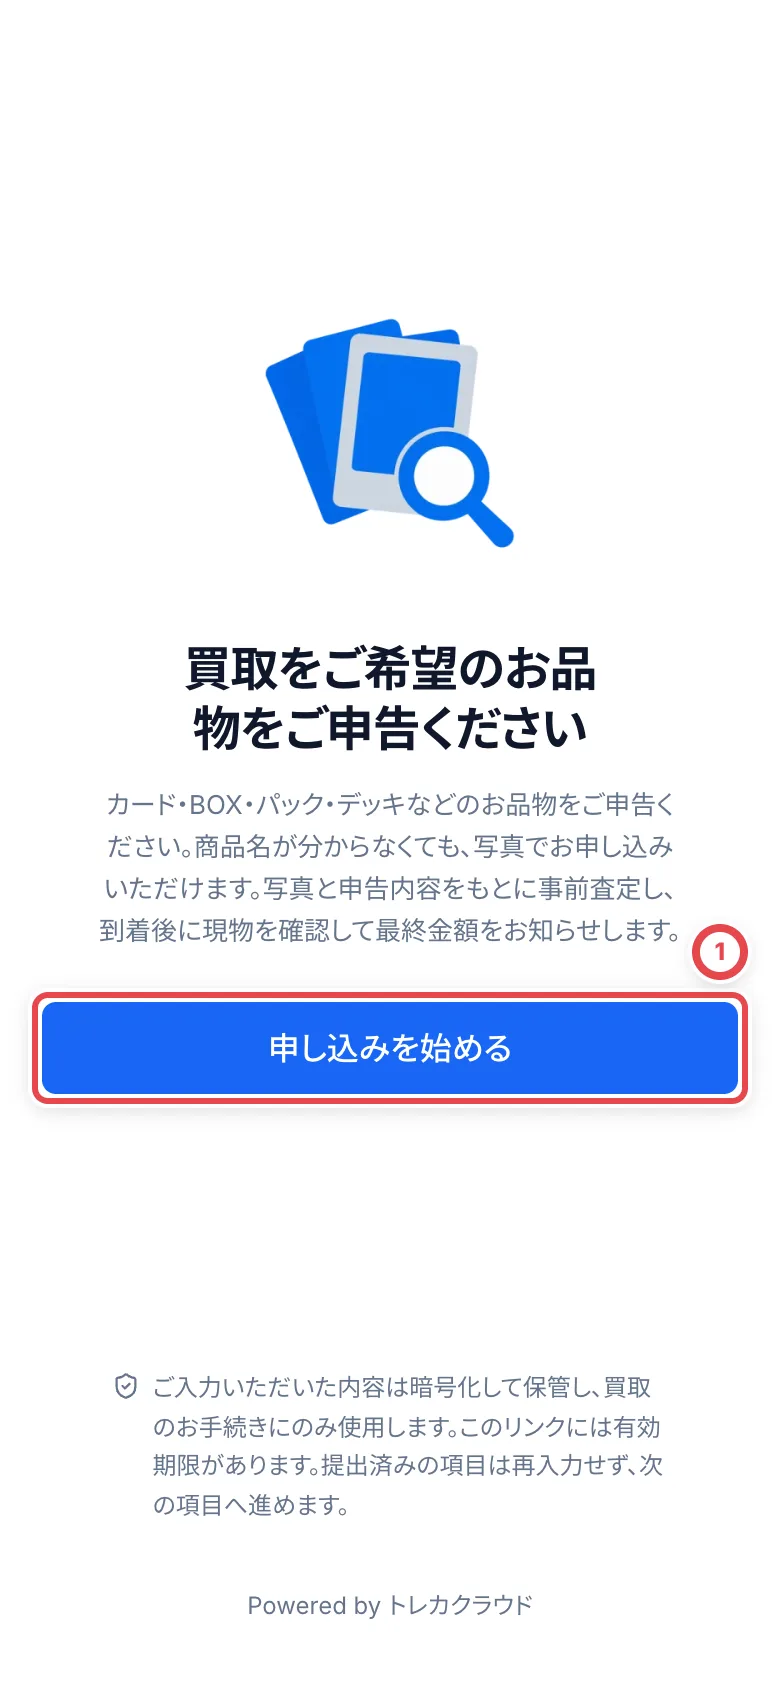
After submitting their details, the customer goes straight on to declaring their items. The screens from here on are the same as the per-deal input link for an appraisal request. They press 「申し込みを始める」 (Start your application) at ①.
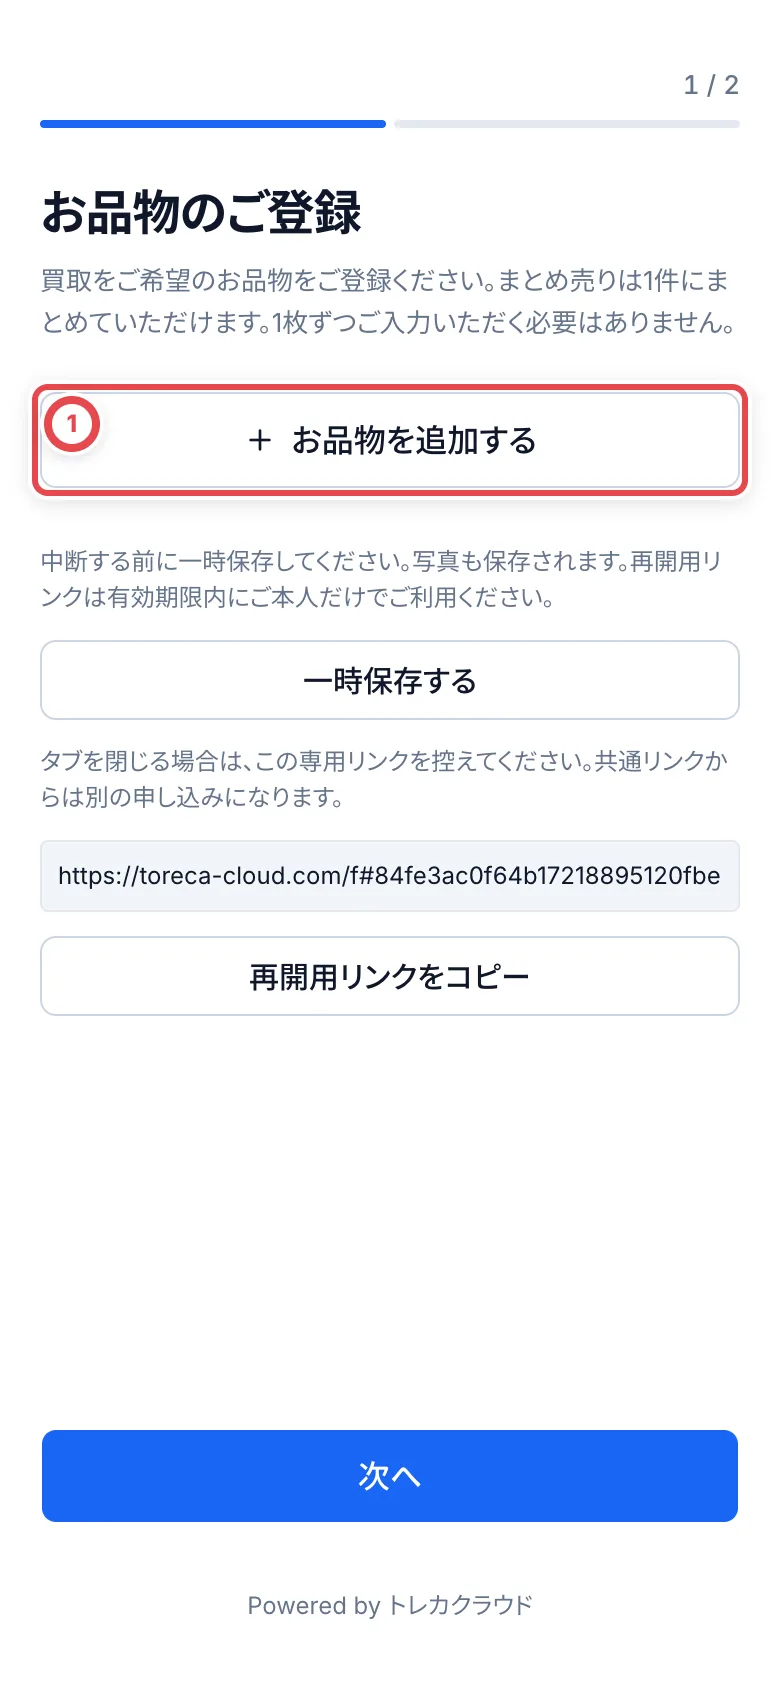
On the 「お品物のご登録」 (Register your items) screen, they press 「お品物を追加する」 (Add an item) at ① and add items one at a time. A bulk lot can be entered as a single item. To stop partway, they press 「一時保存する」 (Save for later) and keep the resume link.
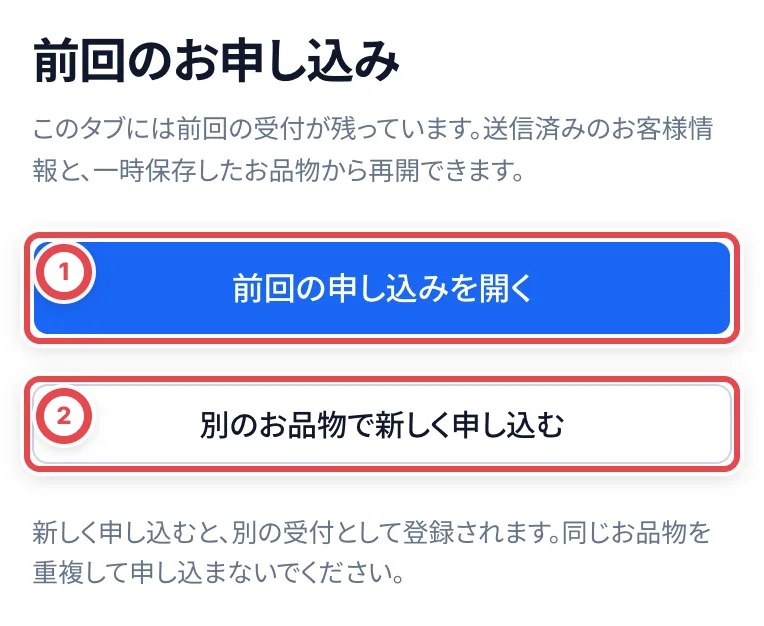
Opening the shared link again in the tab where they submitted their details shows 「前回のお申し込み」 (Previous application). Use 「前回の申し込みを開く」 (Open previous application) to continue. 「別のお品物で新しく申し込む」 starts a separate intake. Another tab or device may not retain the same session, so use the saved resume link to continue there.
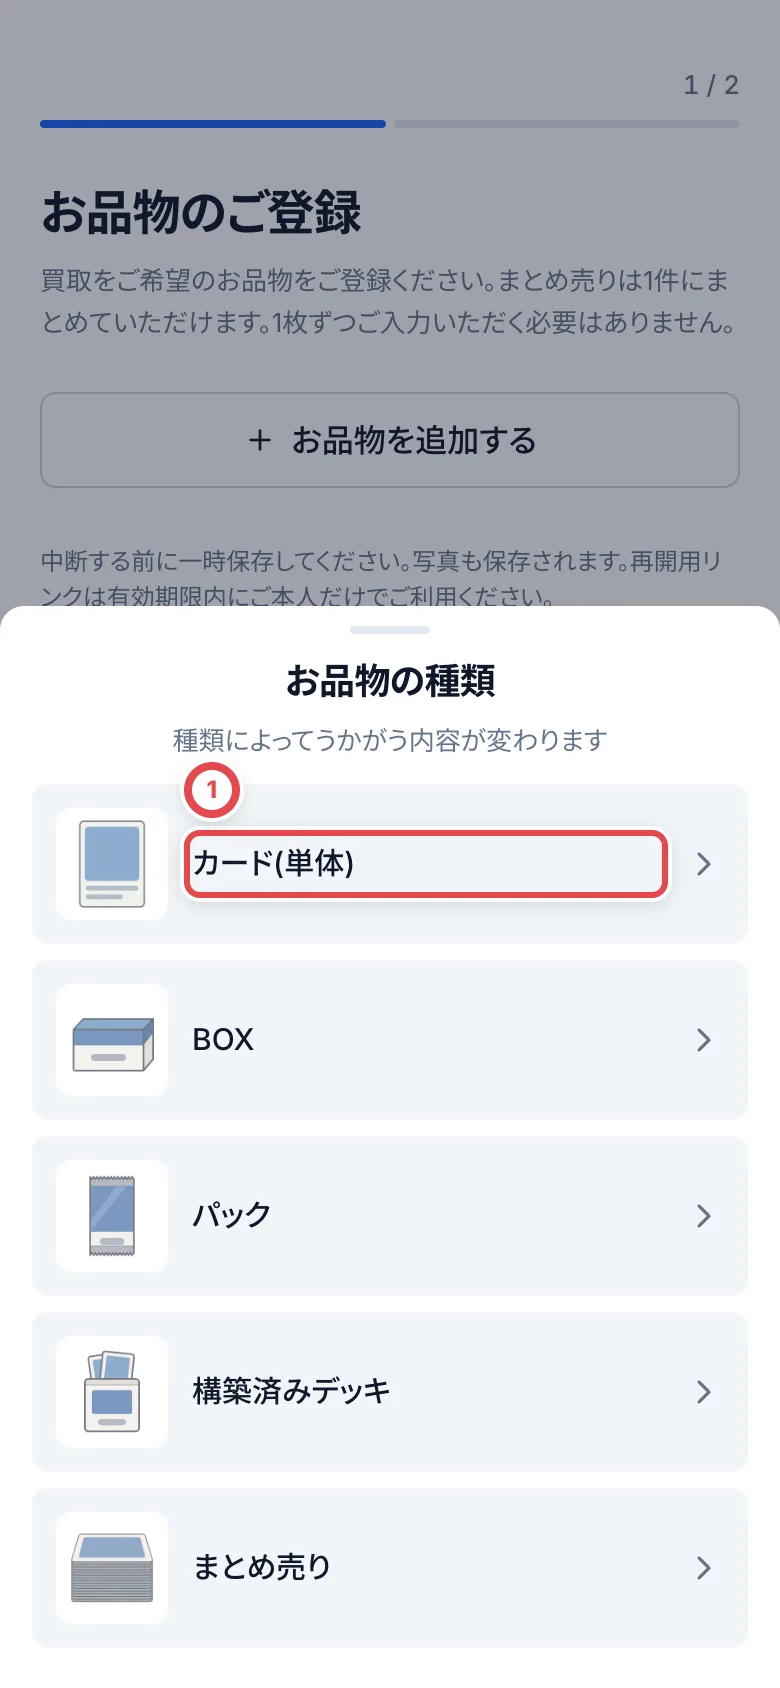
They choose the item type from カード(単体) (single card), BOX, パック (pack), 構築済みデッキ (preconstructed deck) and まとめ売り (bulk lot). The questions change with the type.
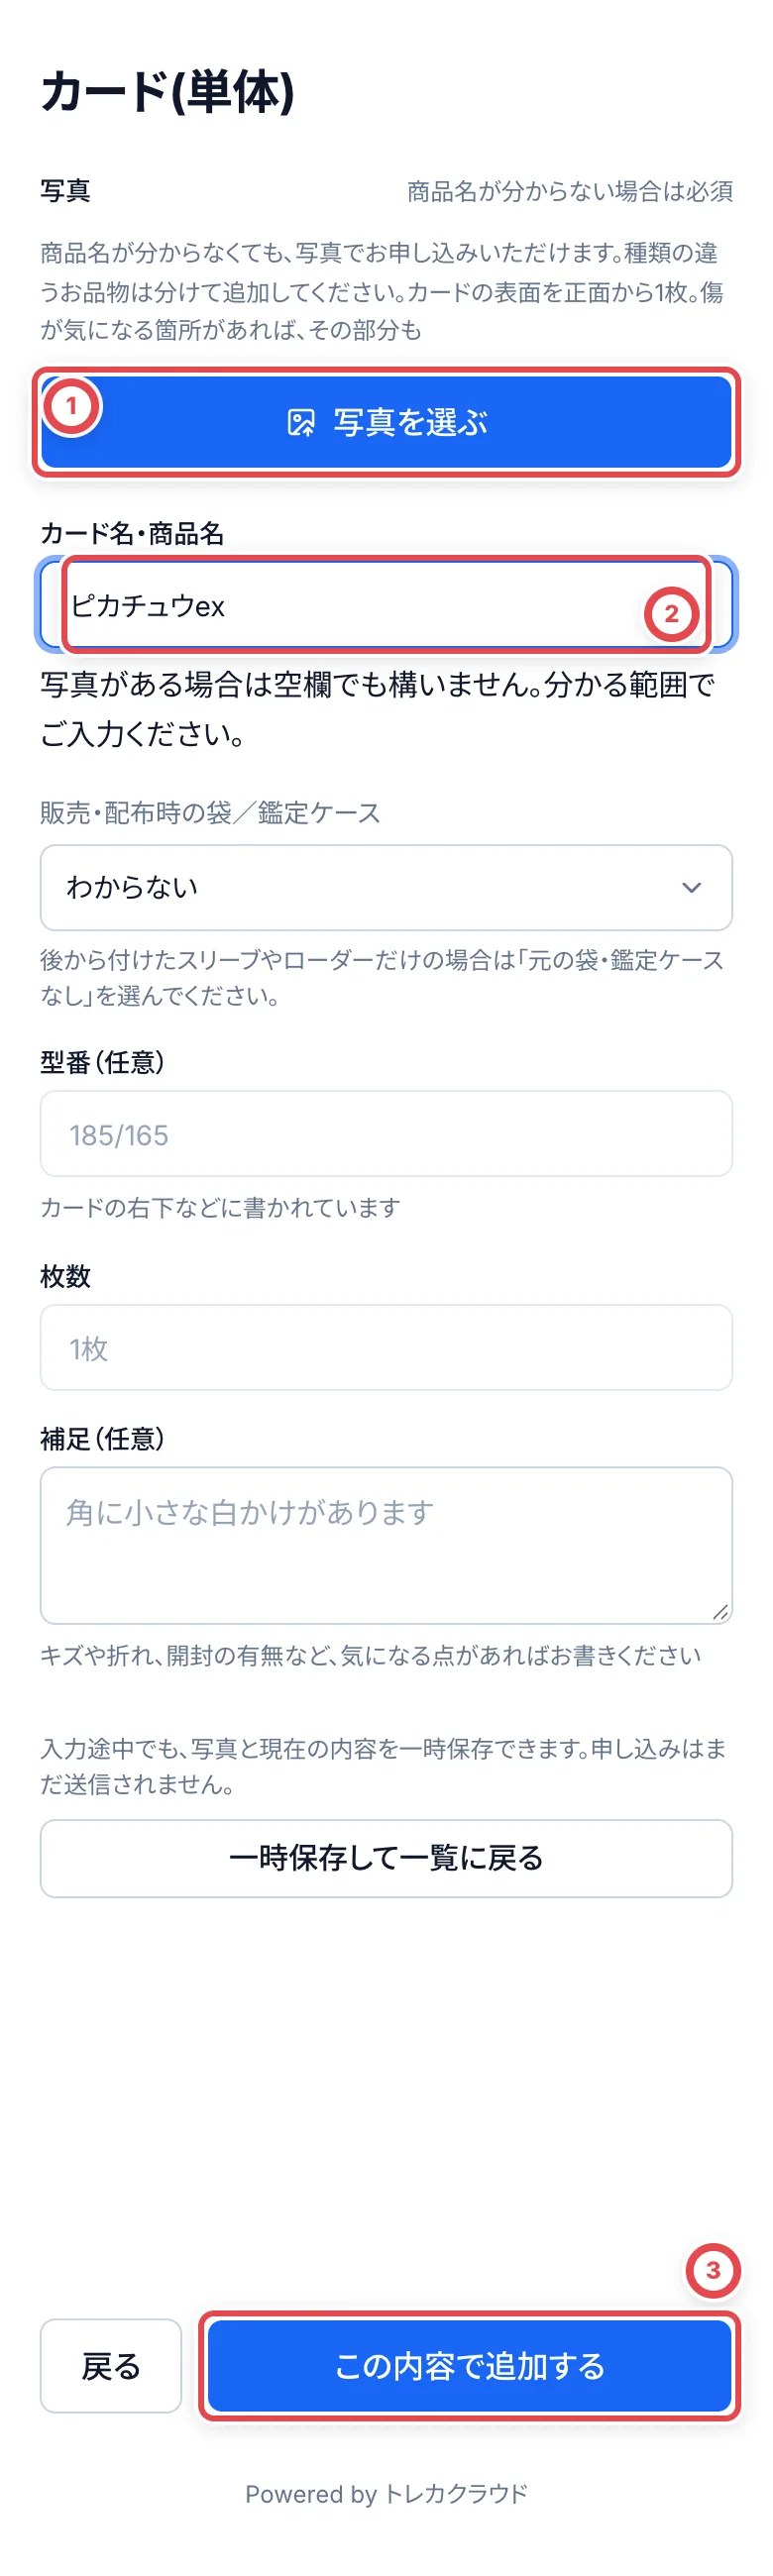
On the item screen, if they don’t know the name, they can attach photos with 「写真を選ぶ」 (Choose photos) at ① (up to 3 per item). At ②, they enter the card or product name as far as they know it. With either a name or a photo, they can press 「この内容で追加する」 (Add with these details) at ③.
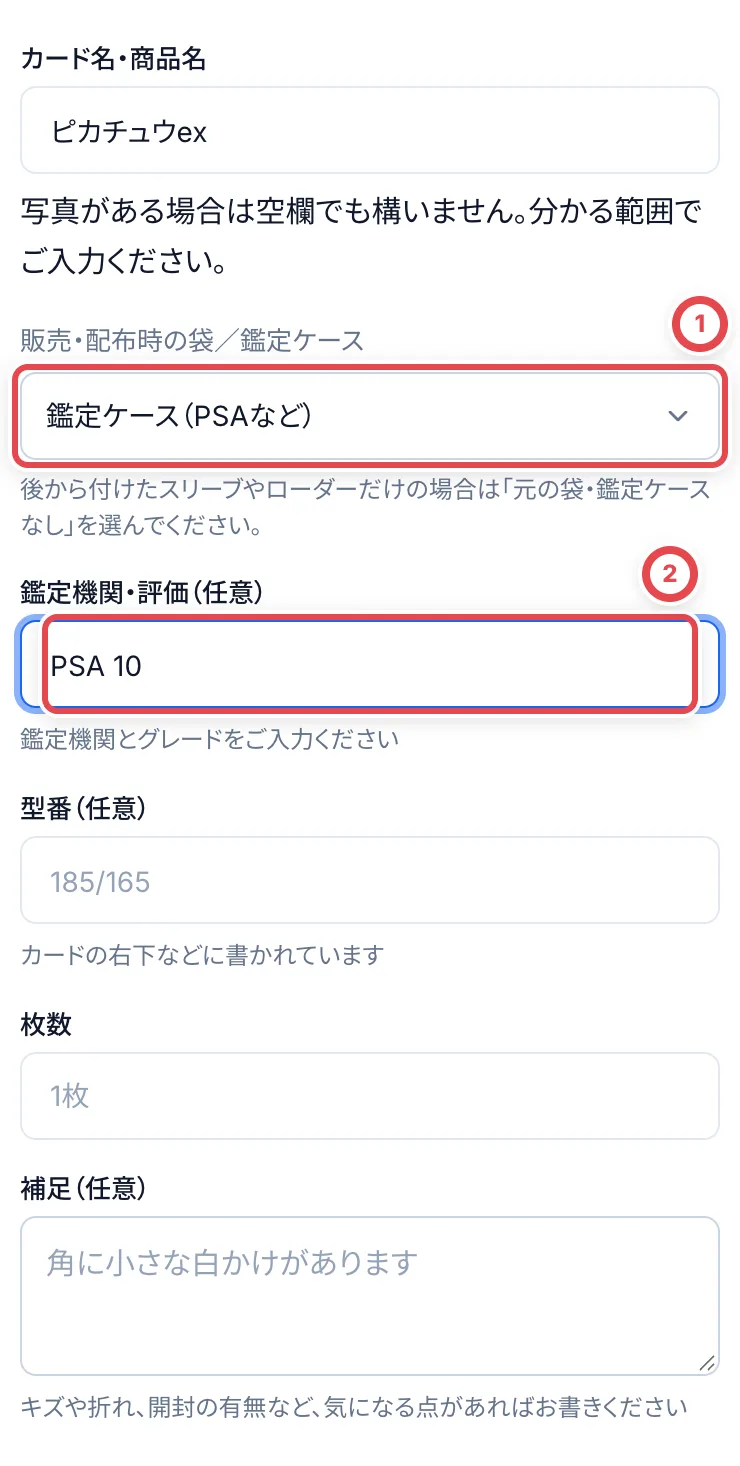
For cards, also choose 「販売・配布時の袋/鑑定ケース」 (Original bag or grading case). A sleeve or loader added later counts as 「元の袋・鑑定ケースなし」 (No original bag or grading case). Selecting 「鑑定ケース(PSAなど)」 reveals the optional grading service and grade field. Use 「わからない」 if unsure. For boxes, packs and preconstructed decks, check packaging and quantity.
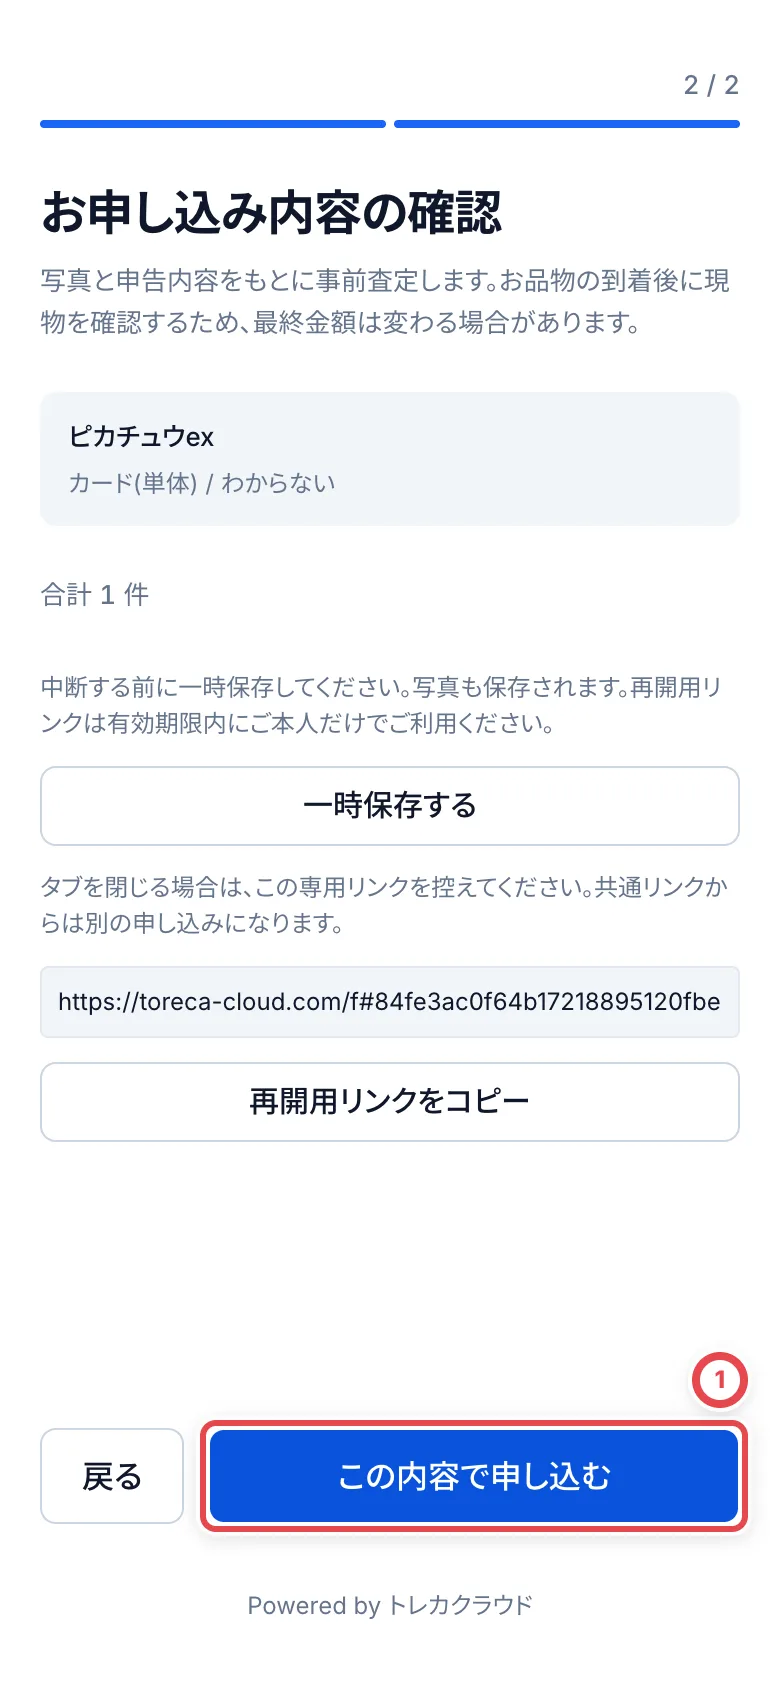
When they press 「次へ」 (Next) on the list, 「お申し込み内容の確認」 (Review your application) appears. When they press 「この内容で申し込む」 (Apply with these details) at ①, the items go into that deal’s declaration and a notification reaches the shop. The customer’s last screen reads 「ご入力ありがとうございました」 (Thank you for your entry).
- A request can have 1 to 20 items and up to 20 photos in total. Photos must be JPEG, PNG or WebP, up to 20 MB each
- The item names and photos are used for the preliminary appraisal. The final amount is decided after you check the items that actually arrive
5. Appraise the request that arrived
You’ll know a request has arrived in these ways.
- Notifications: New buying request (when the customer submits their details) and Form submitted (when they apply with their items). Choose who receives them in LINE and notifications
- The Purchase requests list: it appears as a deal with the status New
- The deal’s history records 「共通フォームから顧客情報を受付(LINE未照合)」 (Customer information received through the shared form; not matched to LINE)
From here it’s the same as a regular online buy: appraise the declared items and send a quote. The flow is covered in How buying works and Appraisals and quotes.
When something goes wrong
| What’s happening | What to check and how to fix it |
|---|---|
| Intake form isn’t under Settings | Online buying isn’t switched on for your shop. Contact Toreca Cloud support. |
| The shared link says Not issued yet | Click Save changes once in Intake form settings and it’s issued. |
| You can’t click Change | You need permission to view and edit customers and deals. Ask an owner or admin. |
| The customer sees 「この受付フォームは現在利用できません」 (This intake form isn’t available right now) | Status is Paused. If it shows when they open the link, set it to Live and save. If you paused it while they were filling it in, it shows when they send; set it back to Live and ask them to send it again. |
| The customer sees 「受付フォームを開けませんでした。再試行するか、お店へお問い合わせください。」 (The intake form couldn’t be opened. Try again or contact the shop.) | The connection failed. Ask them to tap 「再試行」 (Try again) somewhere with a better signal. |
| The customer sees 「この受付は送信済みか、受付設定が変わりました」 (This request was already sent, or the intake settings changed) | The settings changed while they were submitting. Ask the customer to send the same details again. |
| Two customers were created for the same person | Submitting personal details for a separate intake creates another customer and deal. Continue through Open previous application in the same tab, or use the saved resume link. |