

Take a LINE inquiry through to a quote
This procedure is for online purchases taken through LINE, with goods sent by post. If the LINE conversation is before a visit, continue with In-store purchases when the customer arrives.
After you present the quote (the customer accepts, ships the cards, you do the final appraisal, and you pay), continue with Shipping and final appraisal and Payouts.
What you need
- A connection to Liny or L Step. LINE friends and chats are imported about every 5 minutes. For setup, see LINE and notifications.
- A second member who can review the quote. The person who made the appraisal can’t approve it.
- Liny or the LINE admin screen. You paste the quote text made in Toreca Cloud there to send it.
The steps and the deal status
| Step | What you do | Where | Deal status |
|---|---|---|---|
| 1 | Open the unregistered LINE friends | Customers | (No deal) |
| 2 | Check the photos and chat, then add them as customer | LINE friend | (No deal) |
| 3 | Read the cards from the photos | Customers › LINE chat | (No deal) |
| 4 | Check the cards that were read and add them | Review detected items | New |
| 5 | Check condition and amounts, then request a review | Customers › Appraisal requests | Appraising |
| 6 | Another member checks the quote and approves it | Reviews | Appraising |
| 7 | Copy the quote text, send it on LINE, and record it | Customers › Quotes | Quote sent |
1. Open the unregistered LINE friends
Click Customers in the sidebar. At ①, choose your LINE official account from the tabs above the list. Customers that aren’t linked to LINE are in Unassigned.
To see friends who aren’t customers yet, click More filters (the funnel icon) under the search box, and choose Unregistered LINE friends at ②. The number on the icon is how many of those friends you haven’t replied to.
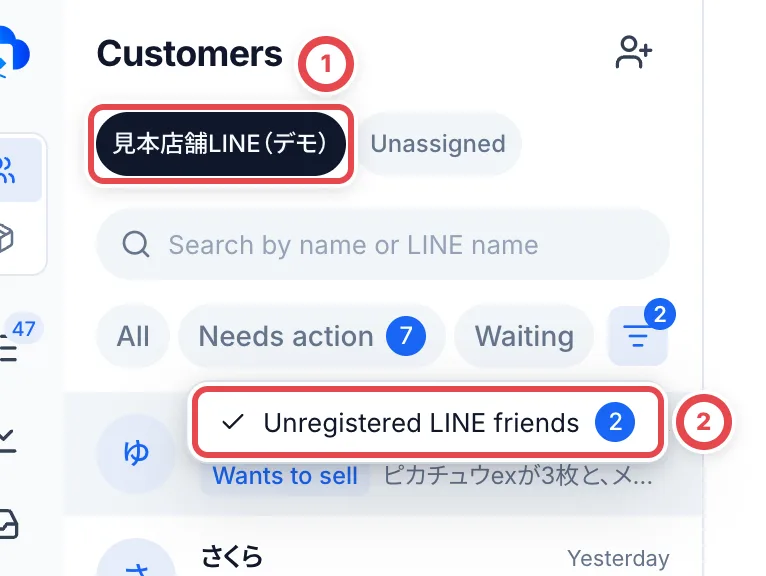
Each friend in the list has a status. Wants to sell means the customer said they want to sell. LINE reply means the last message is still the customer’s. Replied means your shop sent the last message.
2. Check the photos and chat, then add them as a customer
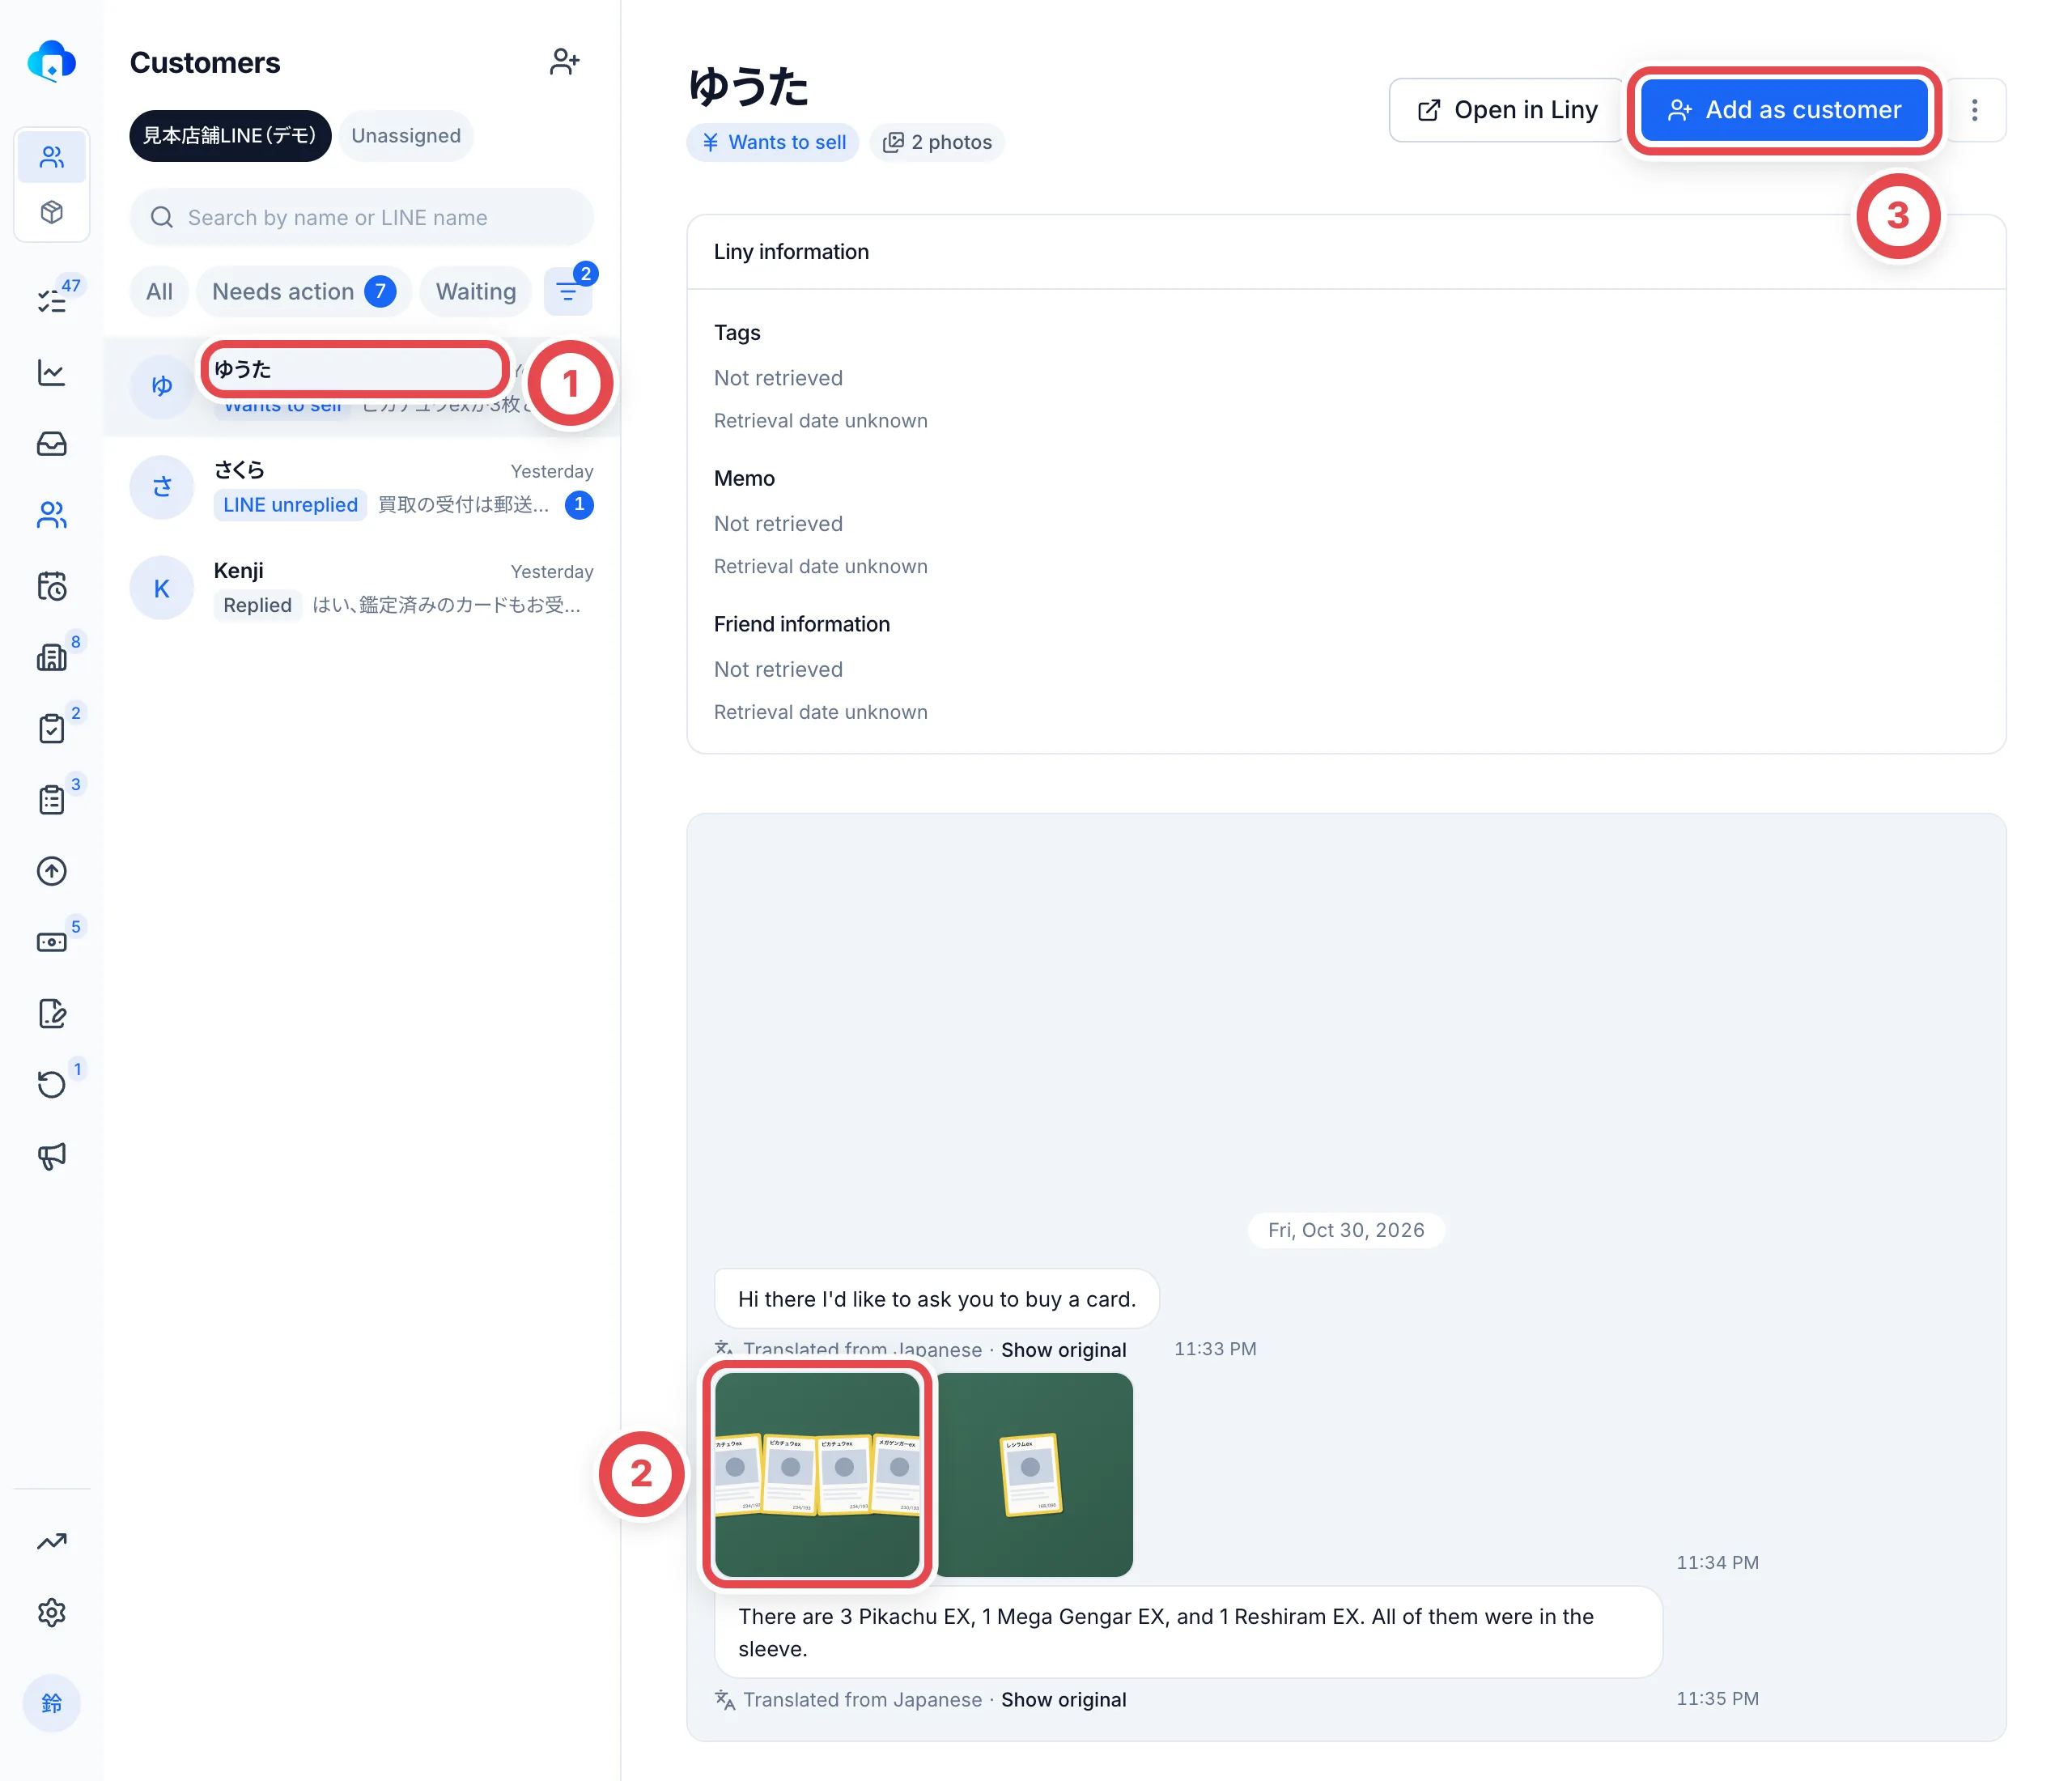
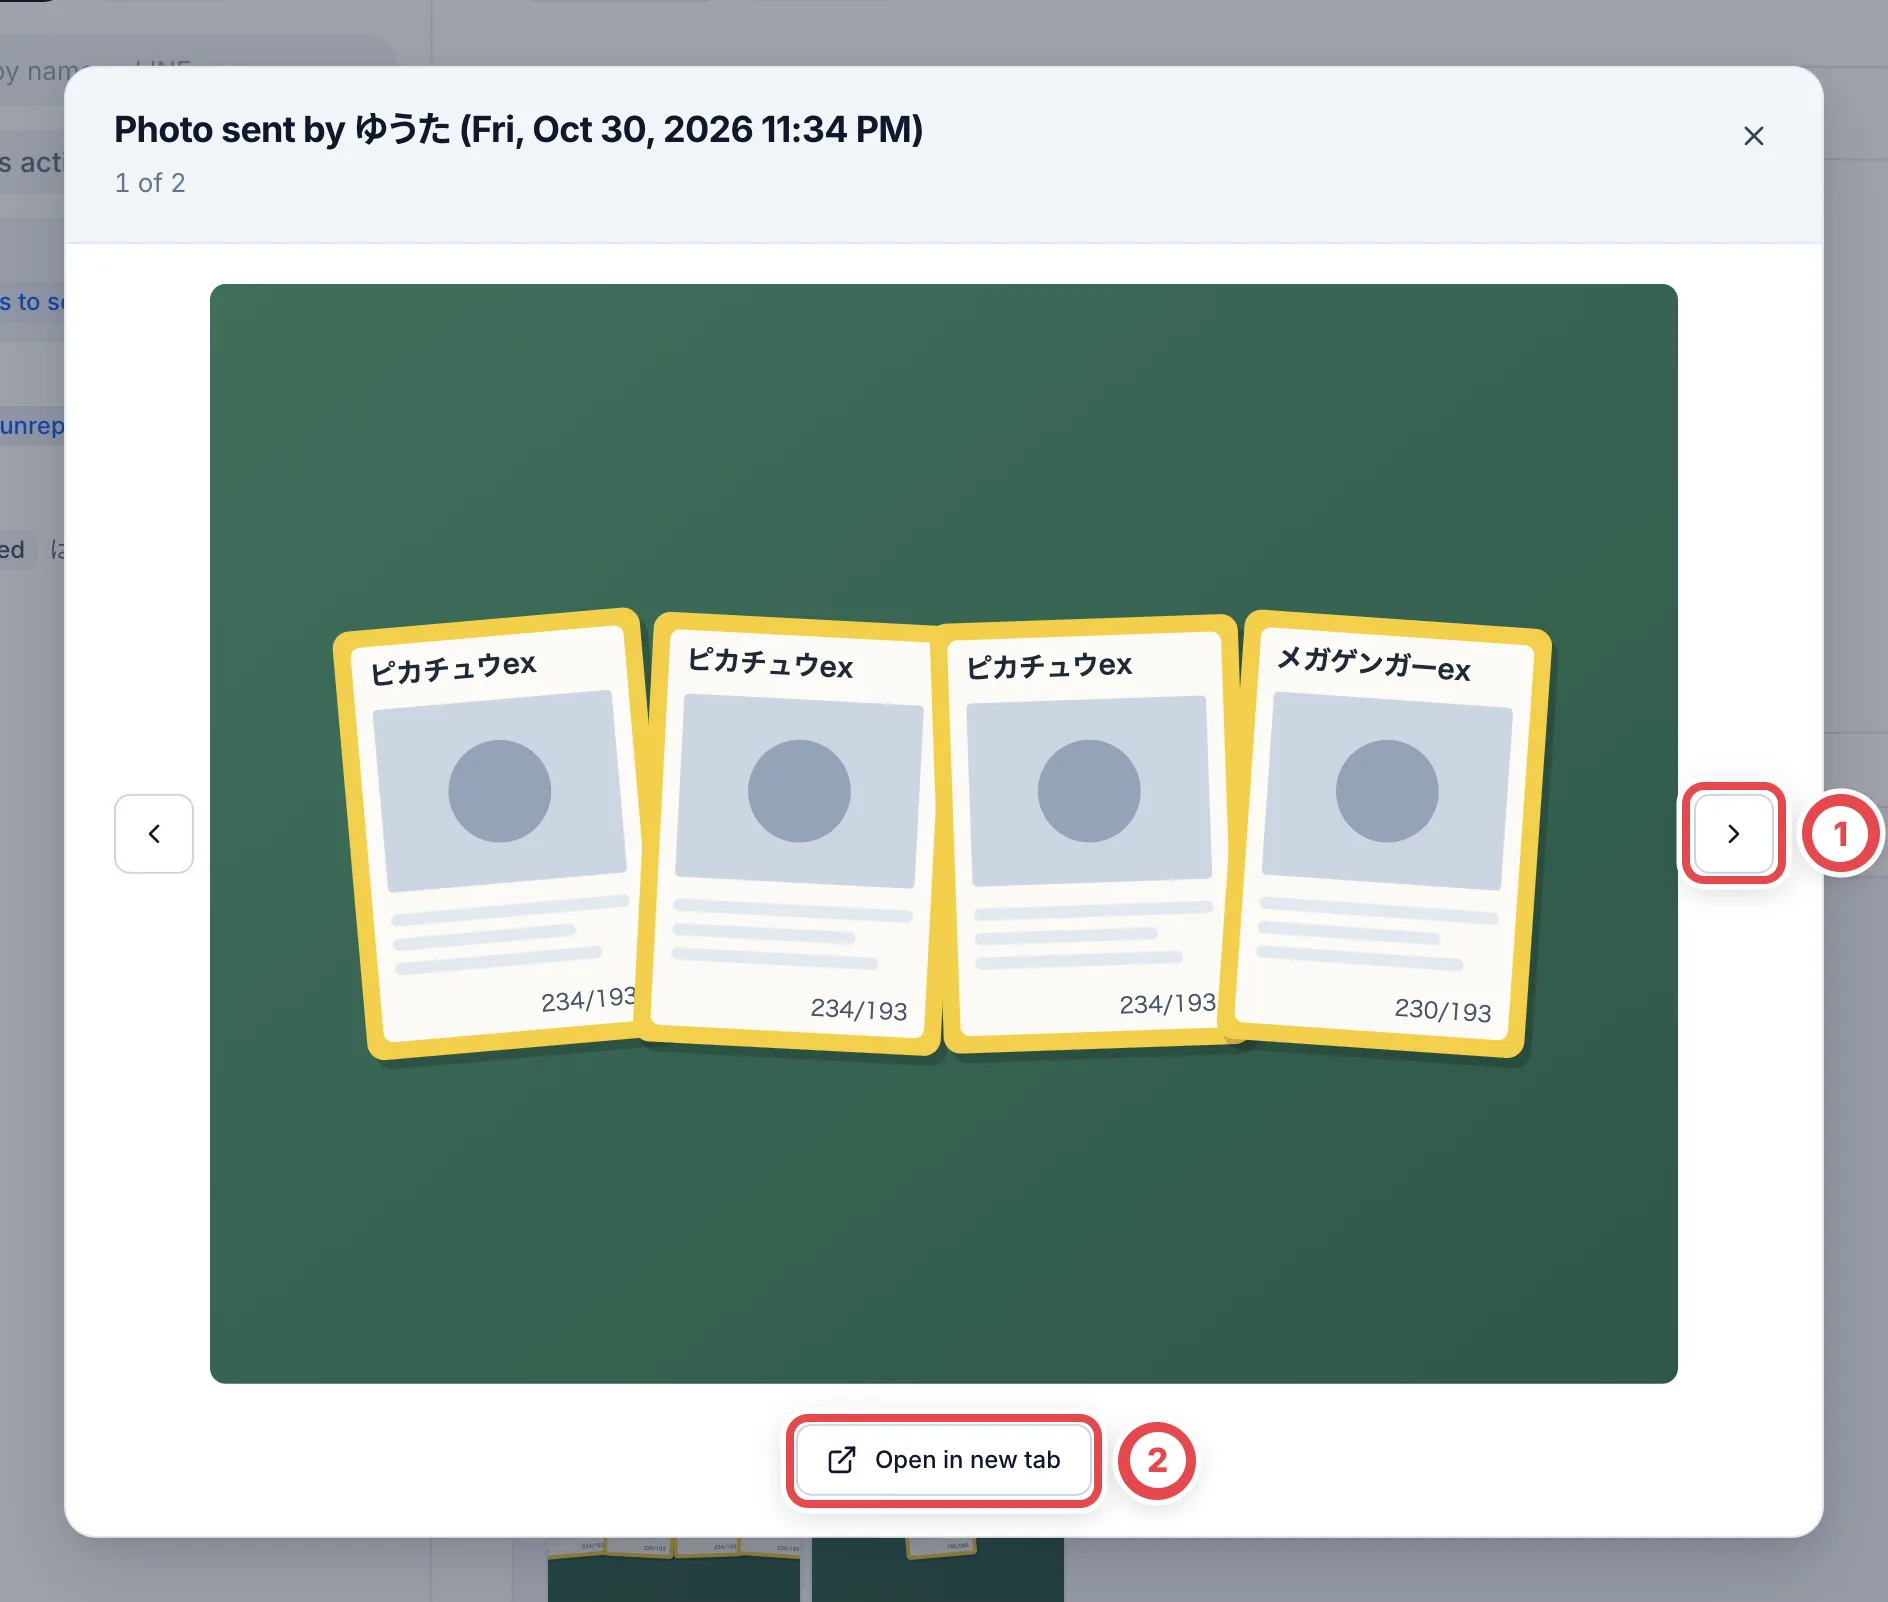
Choose a friend at ① and the chat opens on the right. The photos they sent are listed as at ②. Click a photo to open the enlarged viewer. Move between photos with its arrow buttons or the keyboard arrow keys. The viewer also offers an option to open the image in a new tab.
Once you know it’s a buying inquiry, click Add as customer at ③.
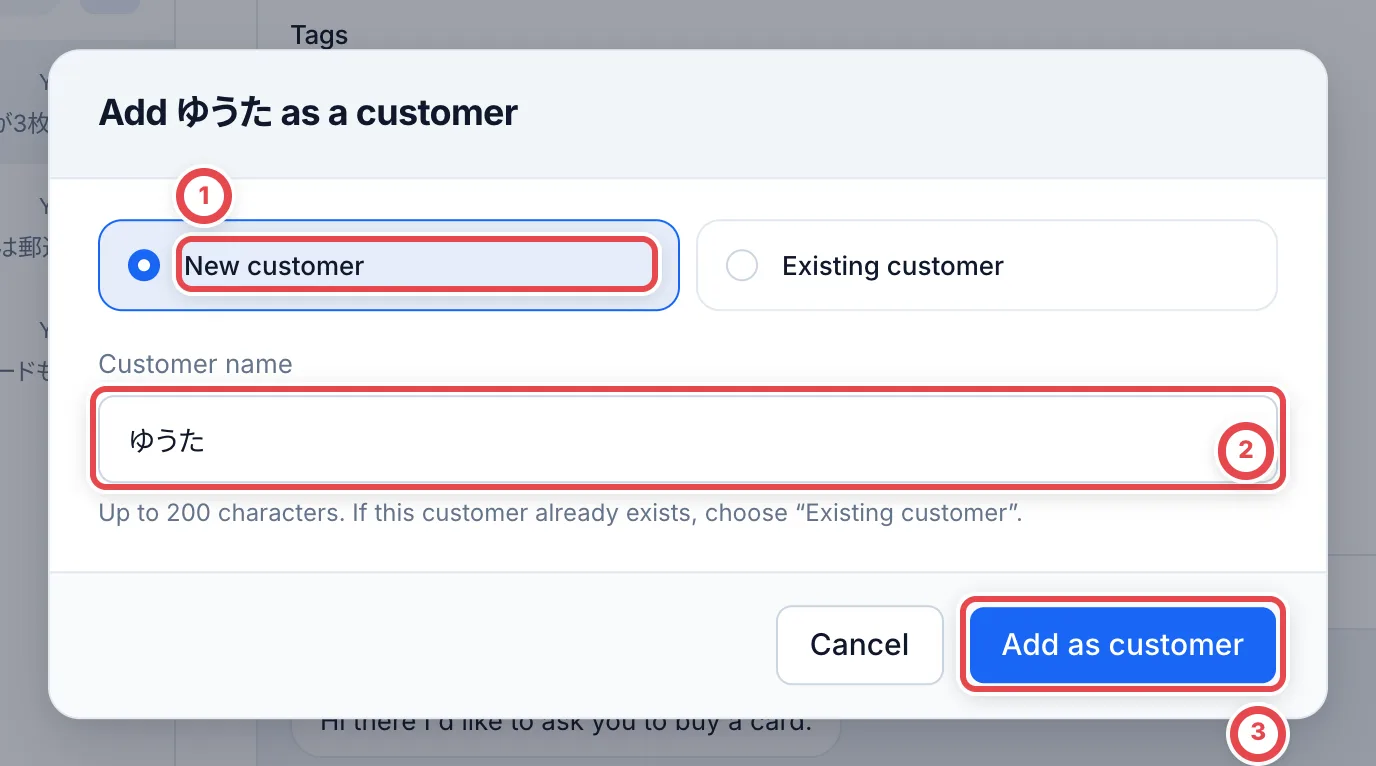
For a first-time customer, keep New customer at ①. The Customer name at ② is filled with their LINE name. Change it to their real name if you know it. Click Add as customer at ③ to create the customer. Their LINE chat tab opens. No deal exists yet.
If a returning customer is contacting you from a different LINE account, choose Existing customer, then search for them and link. For friends who aren’t selling, open the menu (︙) at the top right and click Dismiss to take them off the list.
In the English console, supported browsers translate Japanese chat on the device. Use Show original to check the original wording. Preparing the translator can take time on first use; unsupported browsers or a failed setup leave the original text visible. This display translation is separate from reading cards from photos below.
3. Read the cards from the photos
On the customer’s LINE chat tab, AI reads the cards and quantities from the photos and messages the customer sent. When reading is done, a bar such as “Found 3 items from 2 photos and 4 messages” appears above the chat. Click Review at ① to check the result.
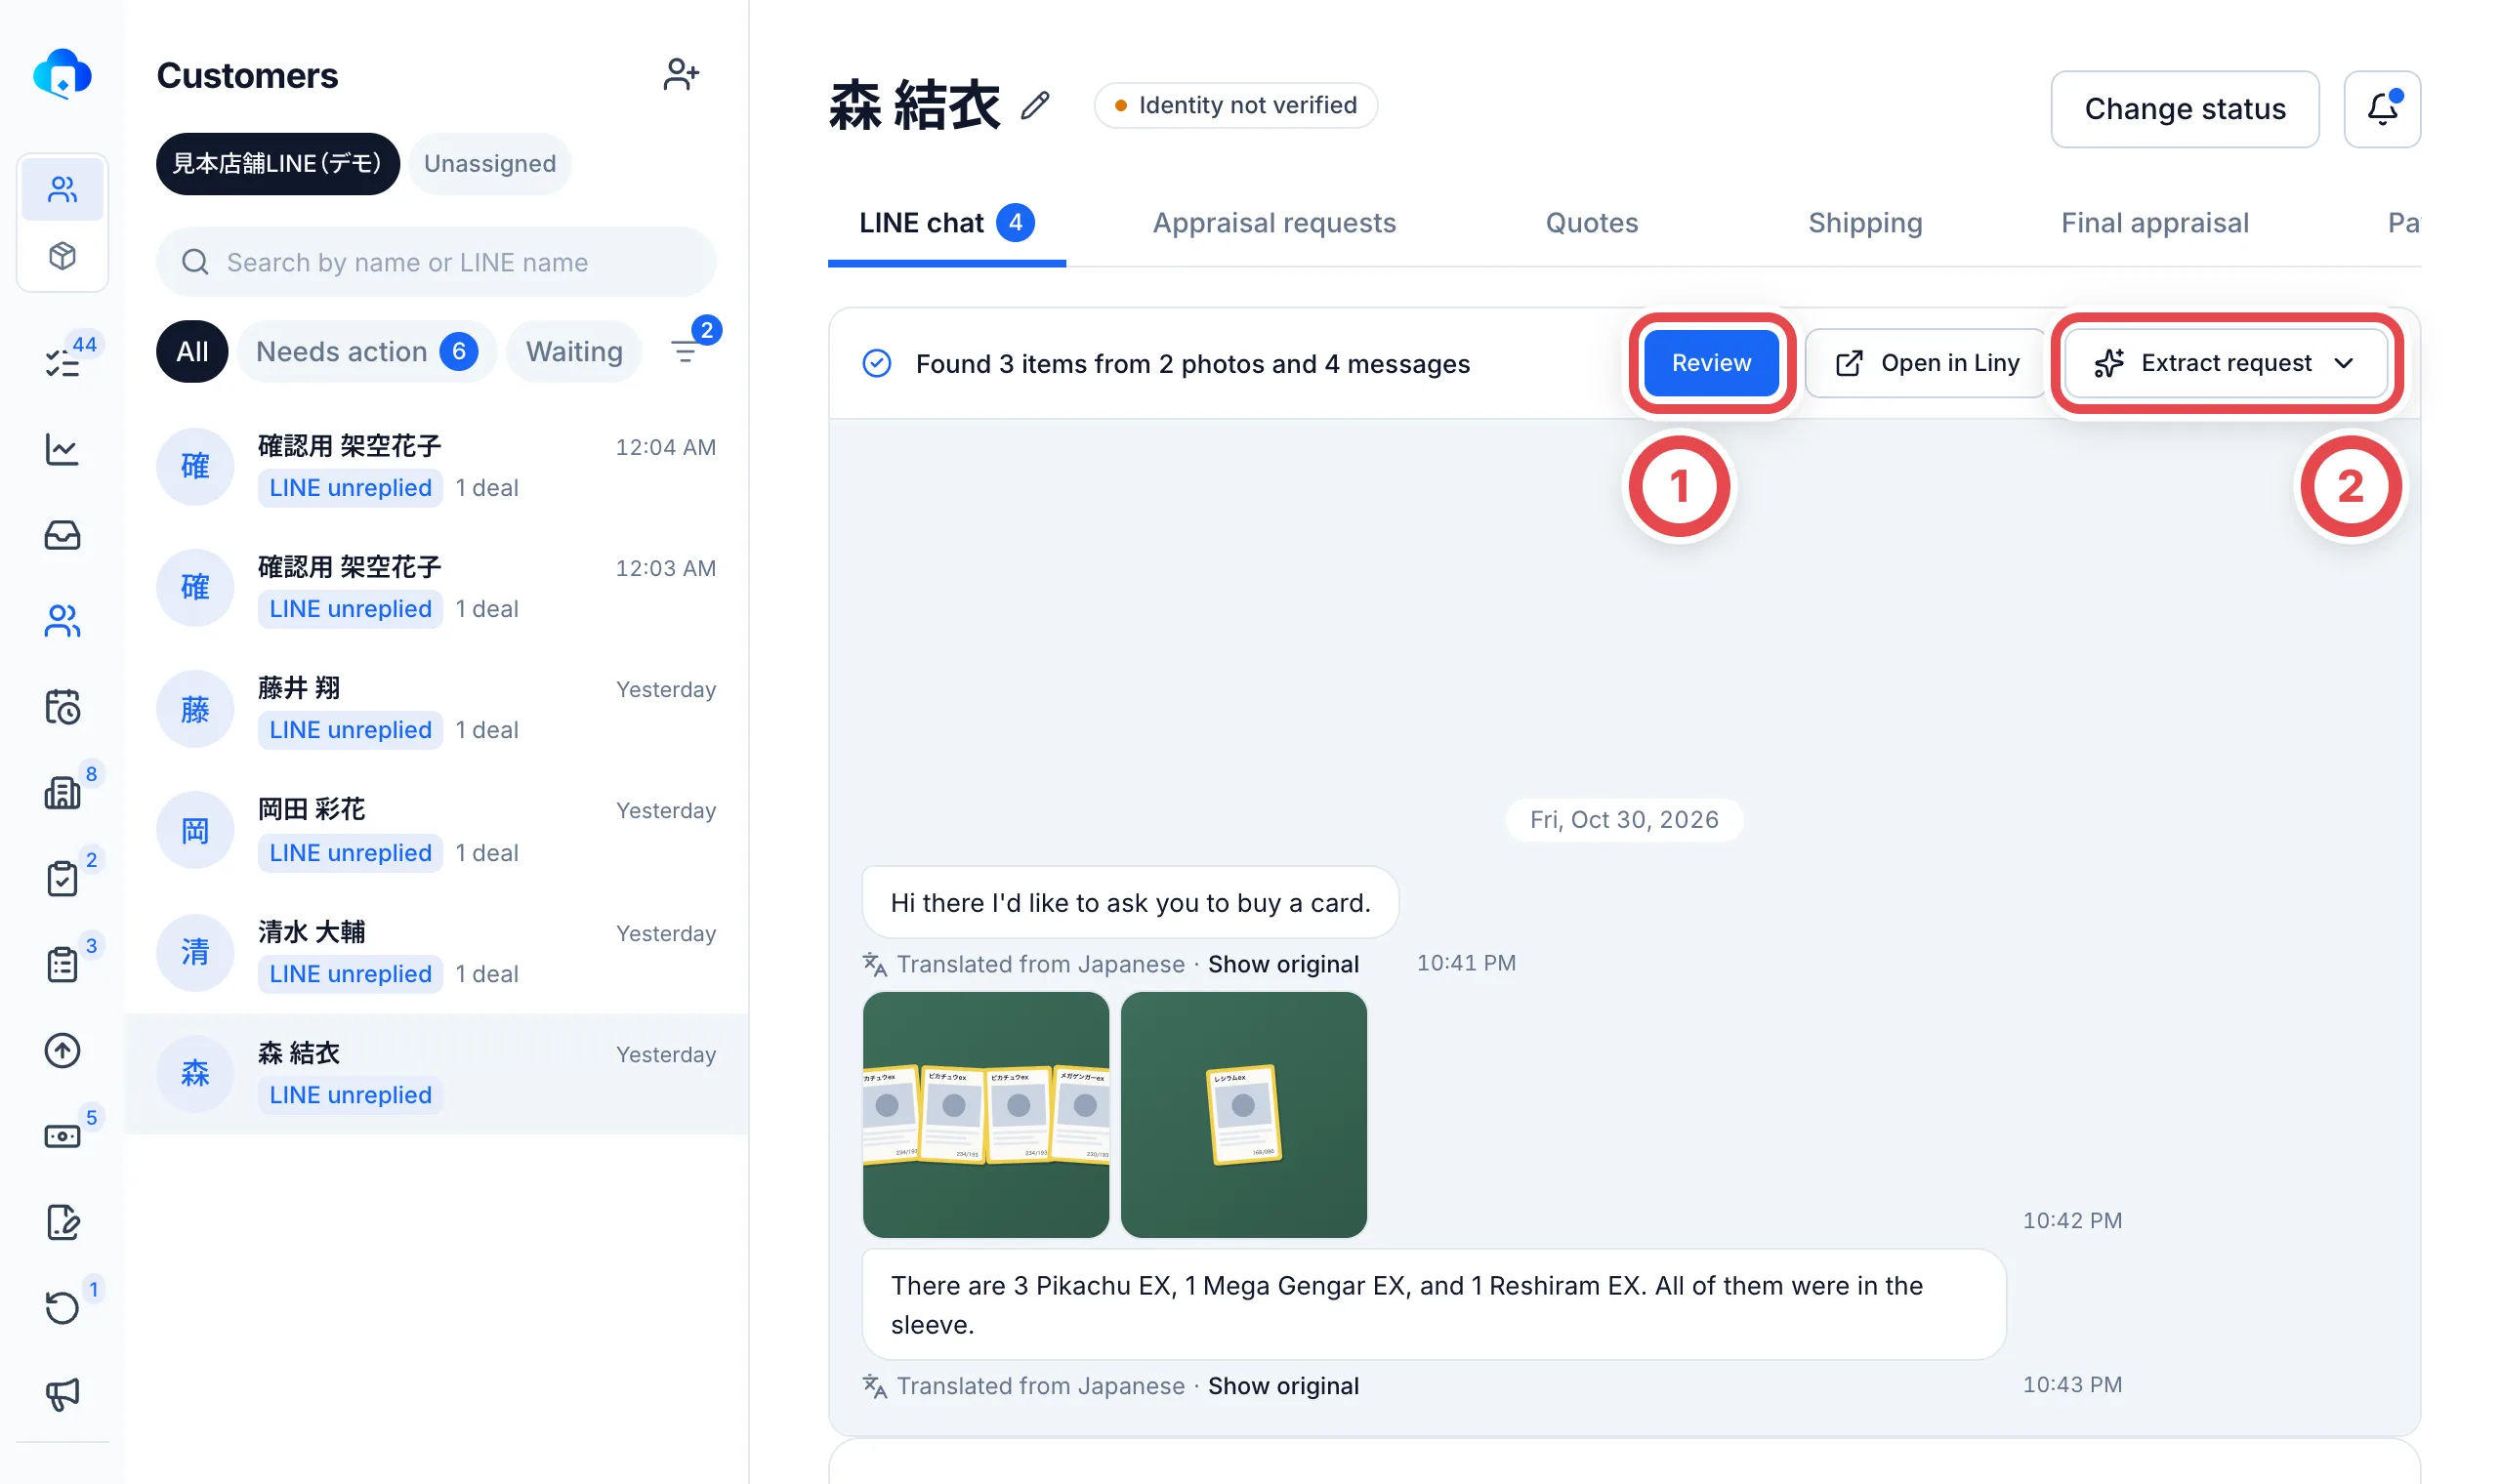
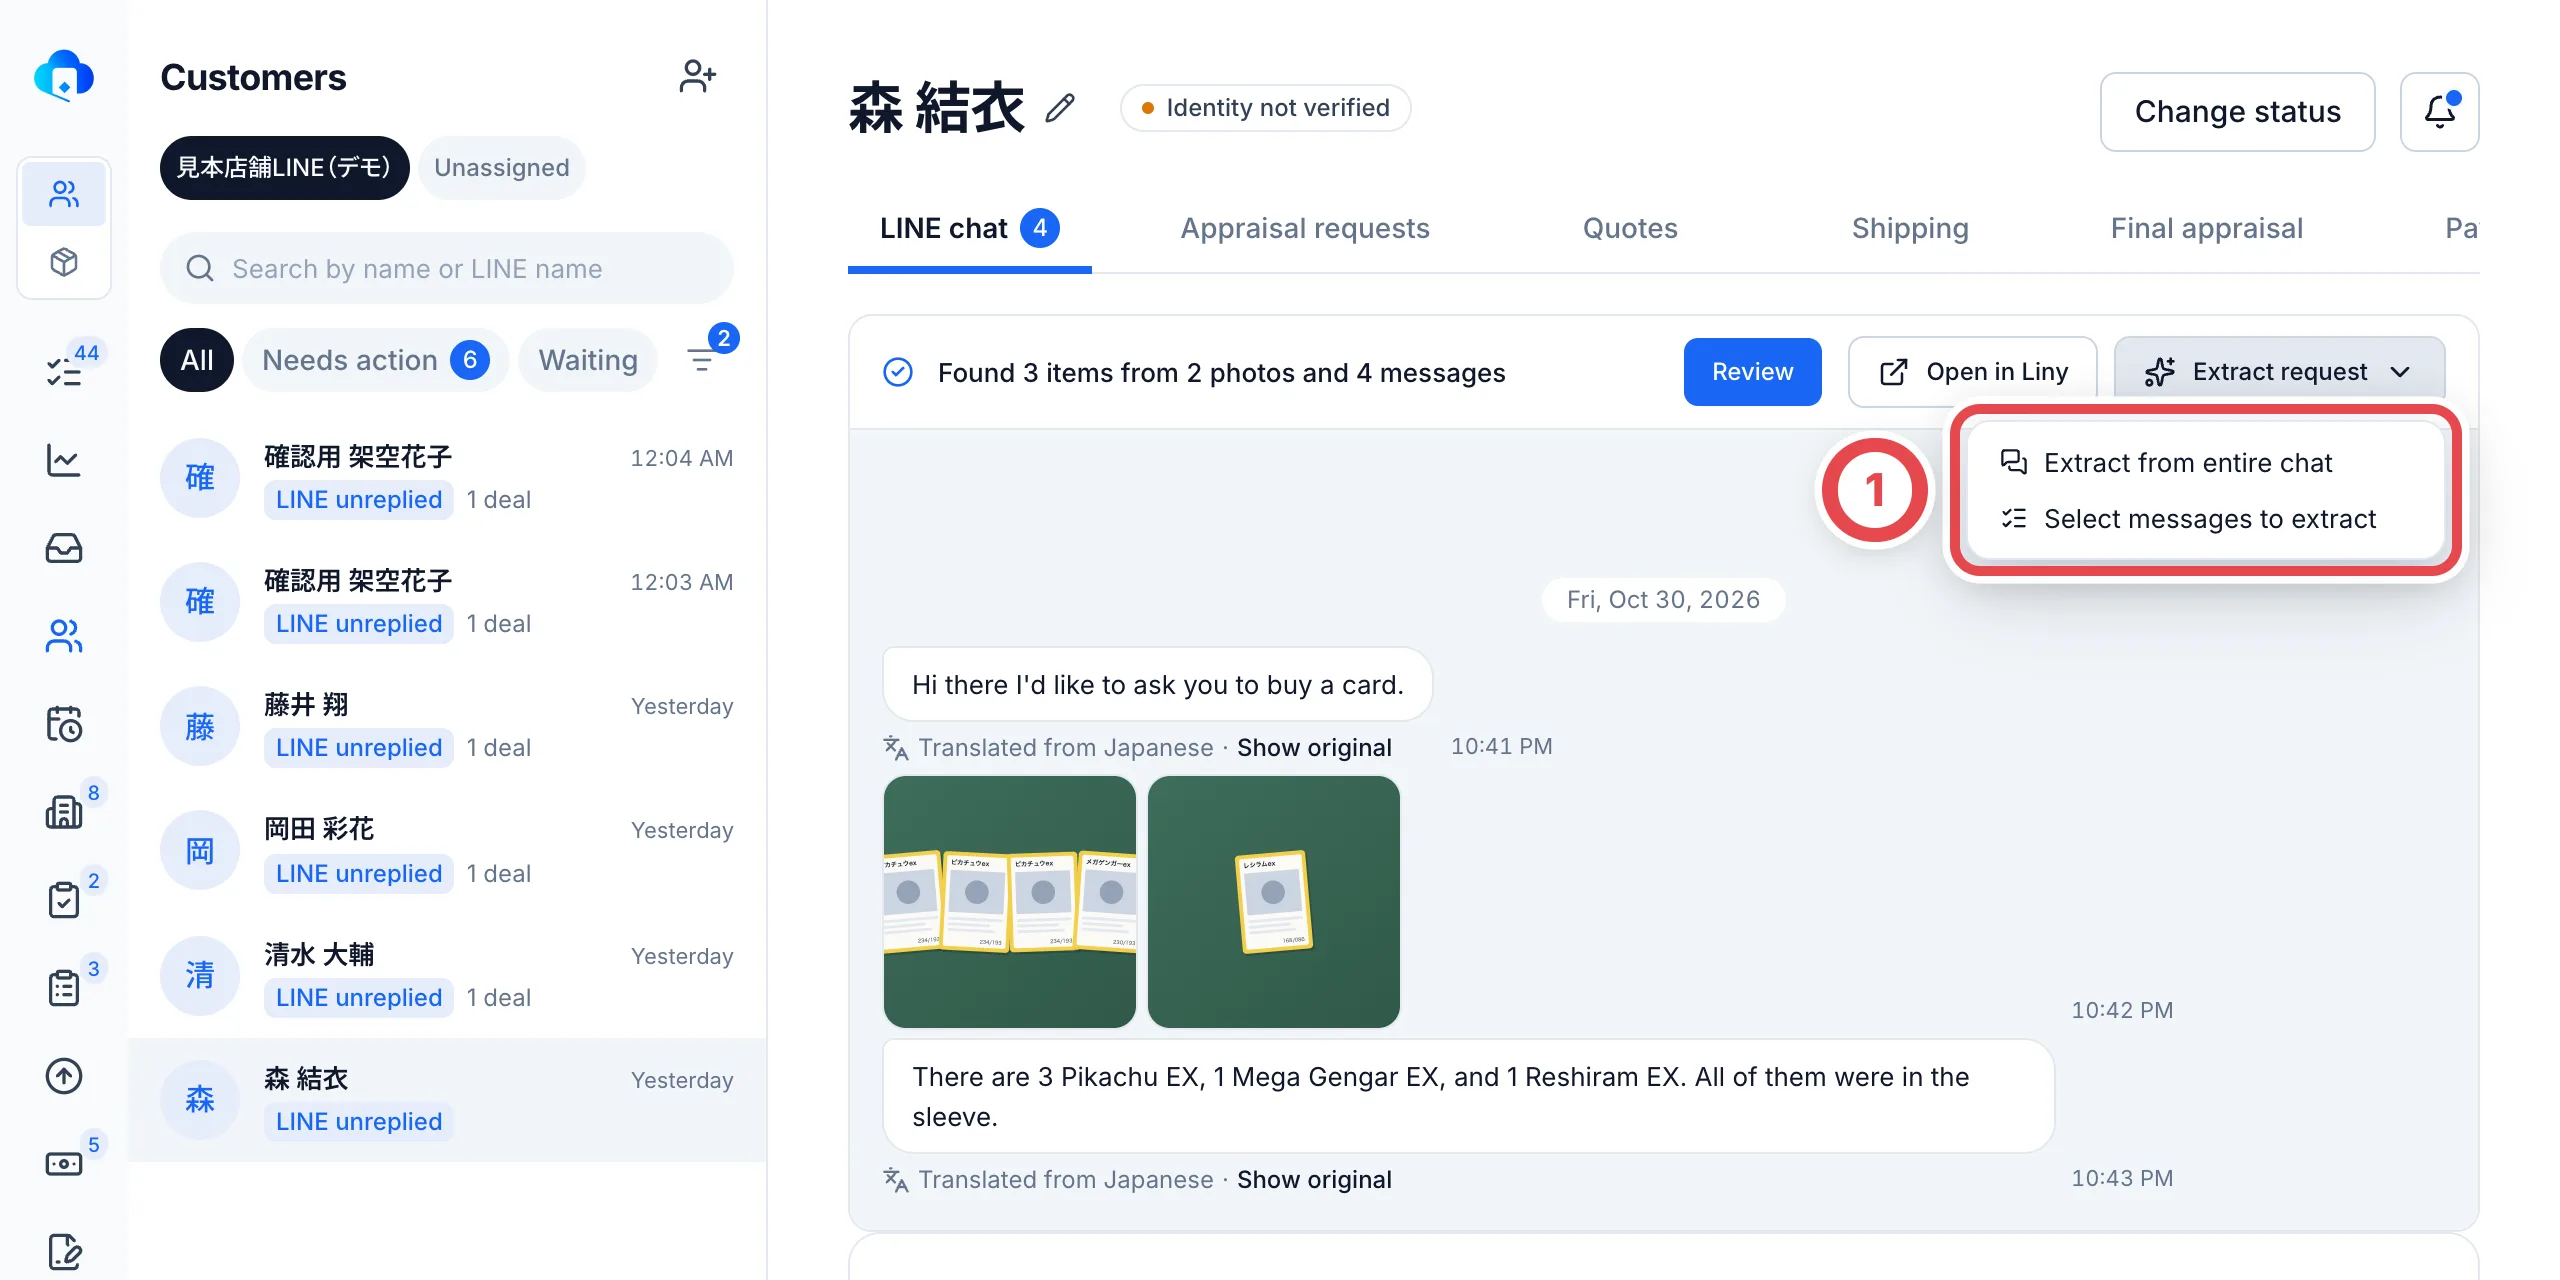
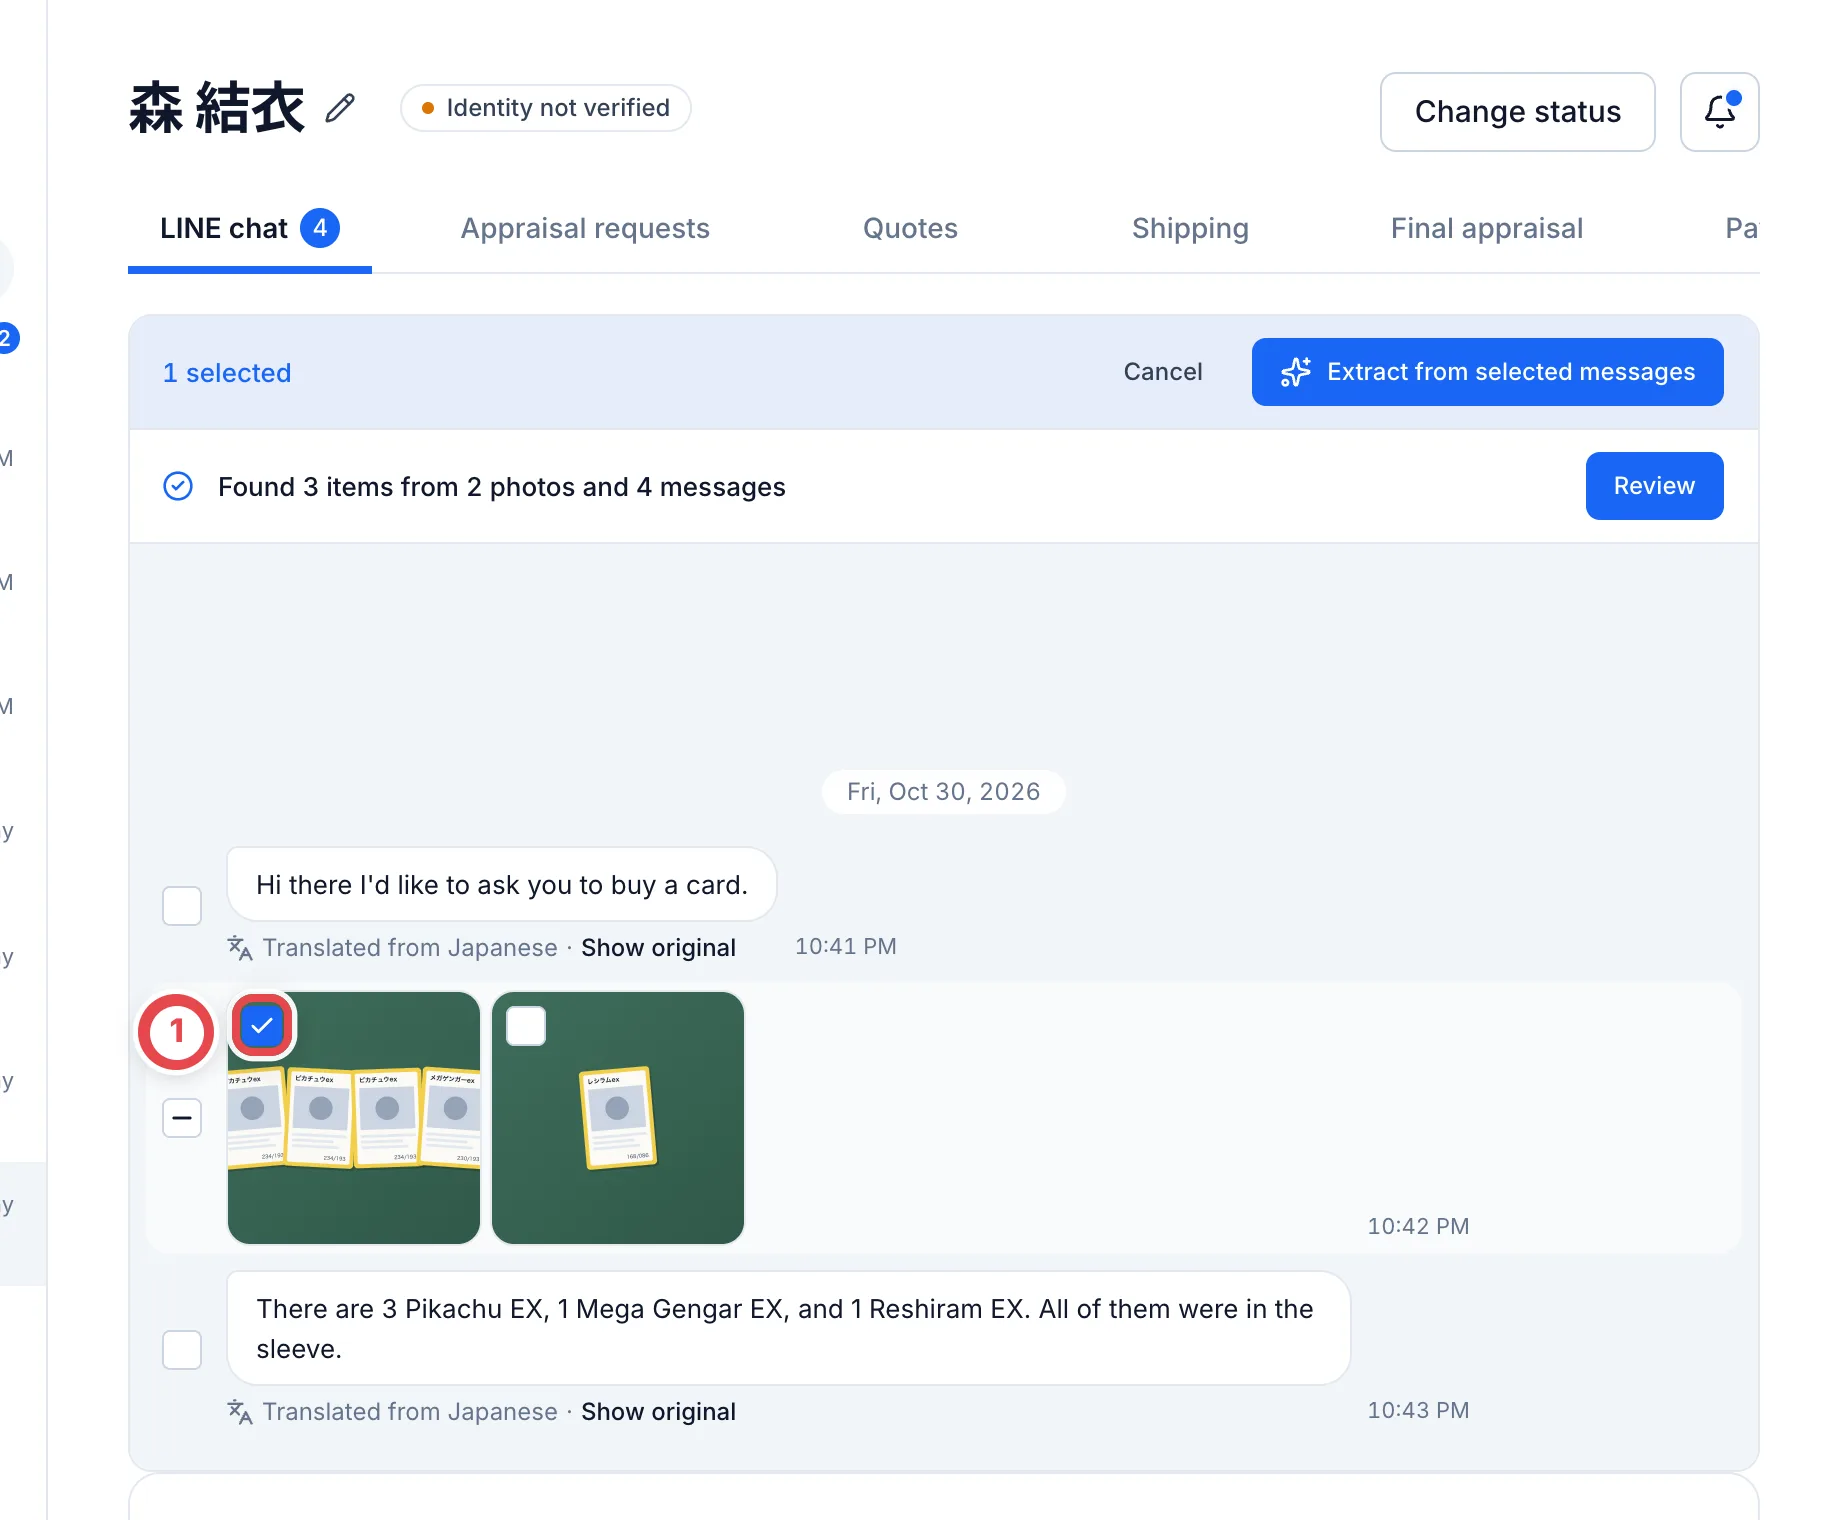
If the bar isn’t there, or you want to read again after new photos arrive, click Extract request at ②. To read the whole chat, choose Extract from entire chat. To read only certain photos or messages, choose Select messages to extract, pick the messages, and click Extract from selected messages. Reading takes a little while. It continues after you leave the page; return to check the result.
Reading the entire chat uses up to the latest 16 photos and 80 text messages. Explicit selection allows up to 64 photos and 80 text messages, with at most 300 selected messages overall. Select an entire album or individual photos within it. Remove excess items and wait for pending photos; photos that could not be retrieved cannot be read.
4. Check the cards and add them to the appraisal request
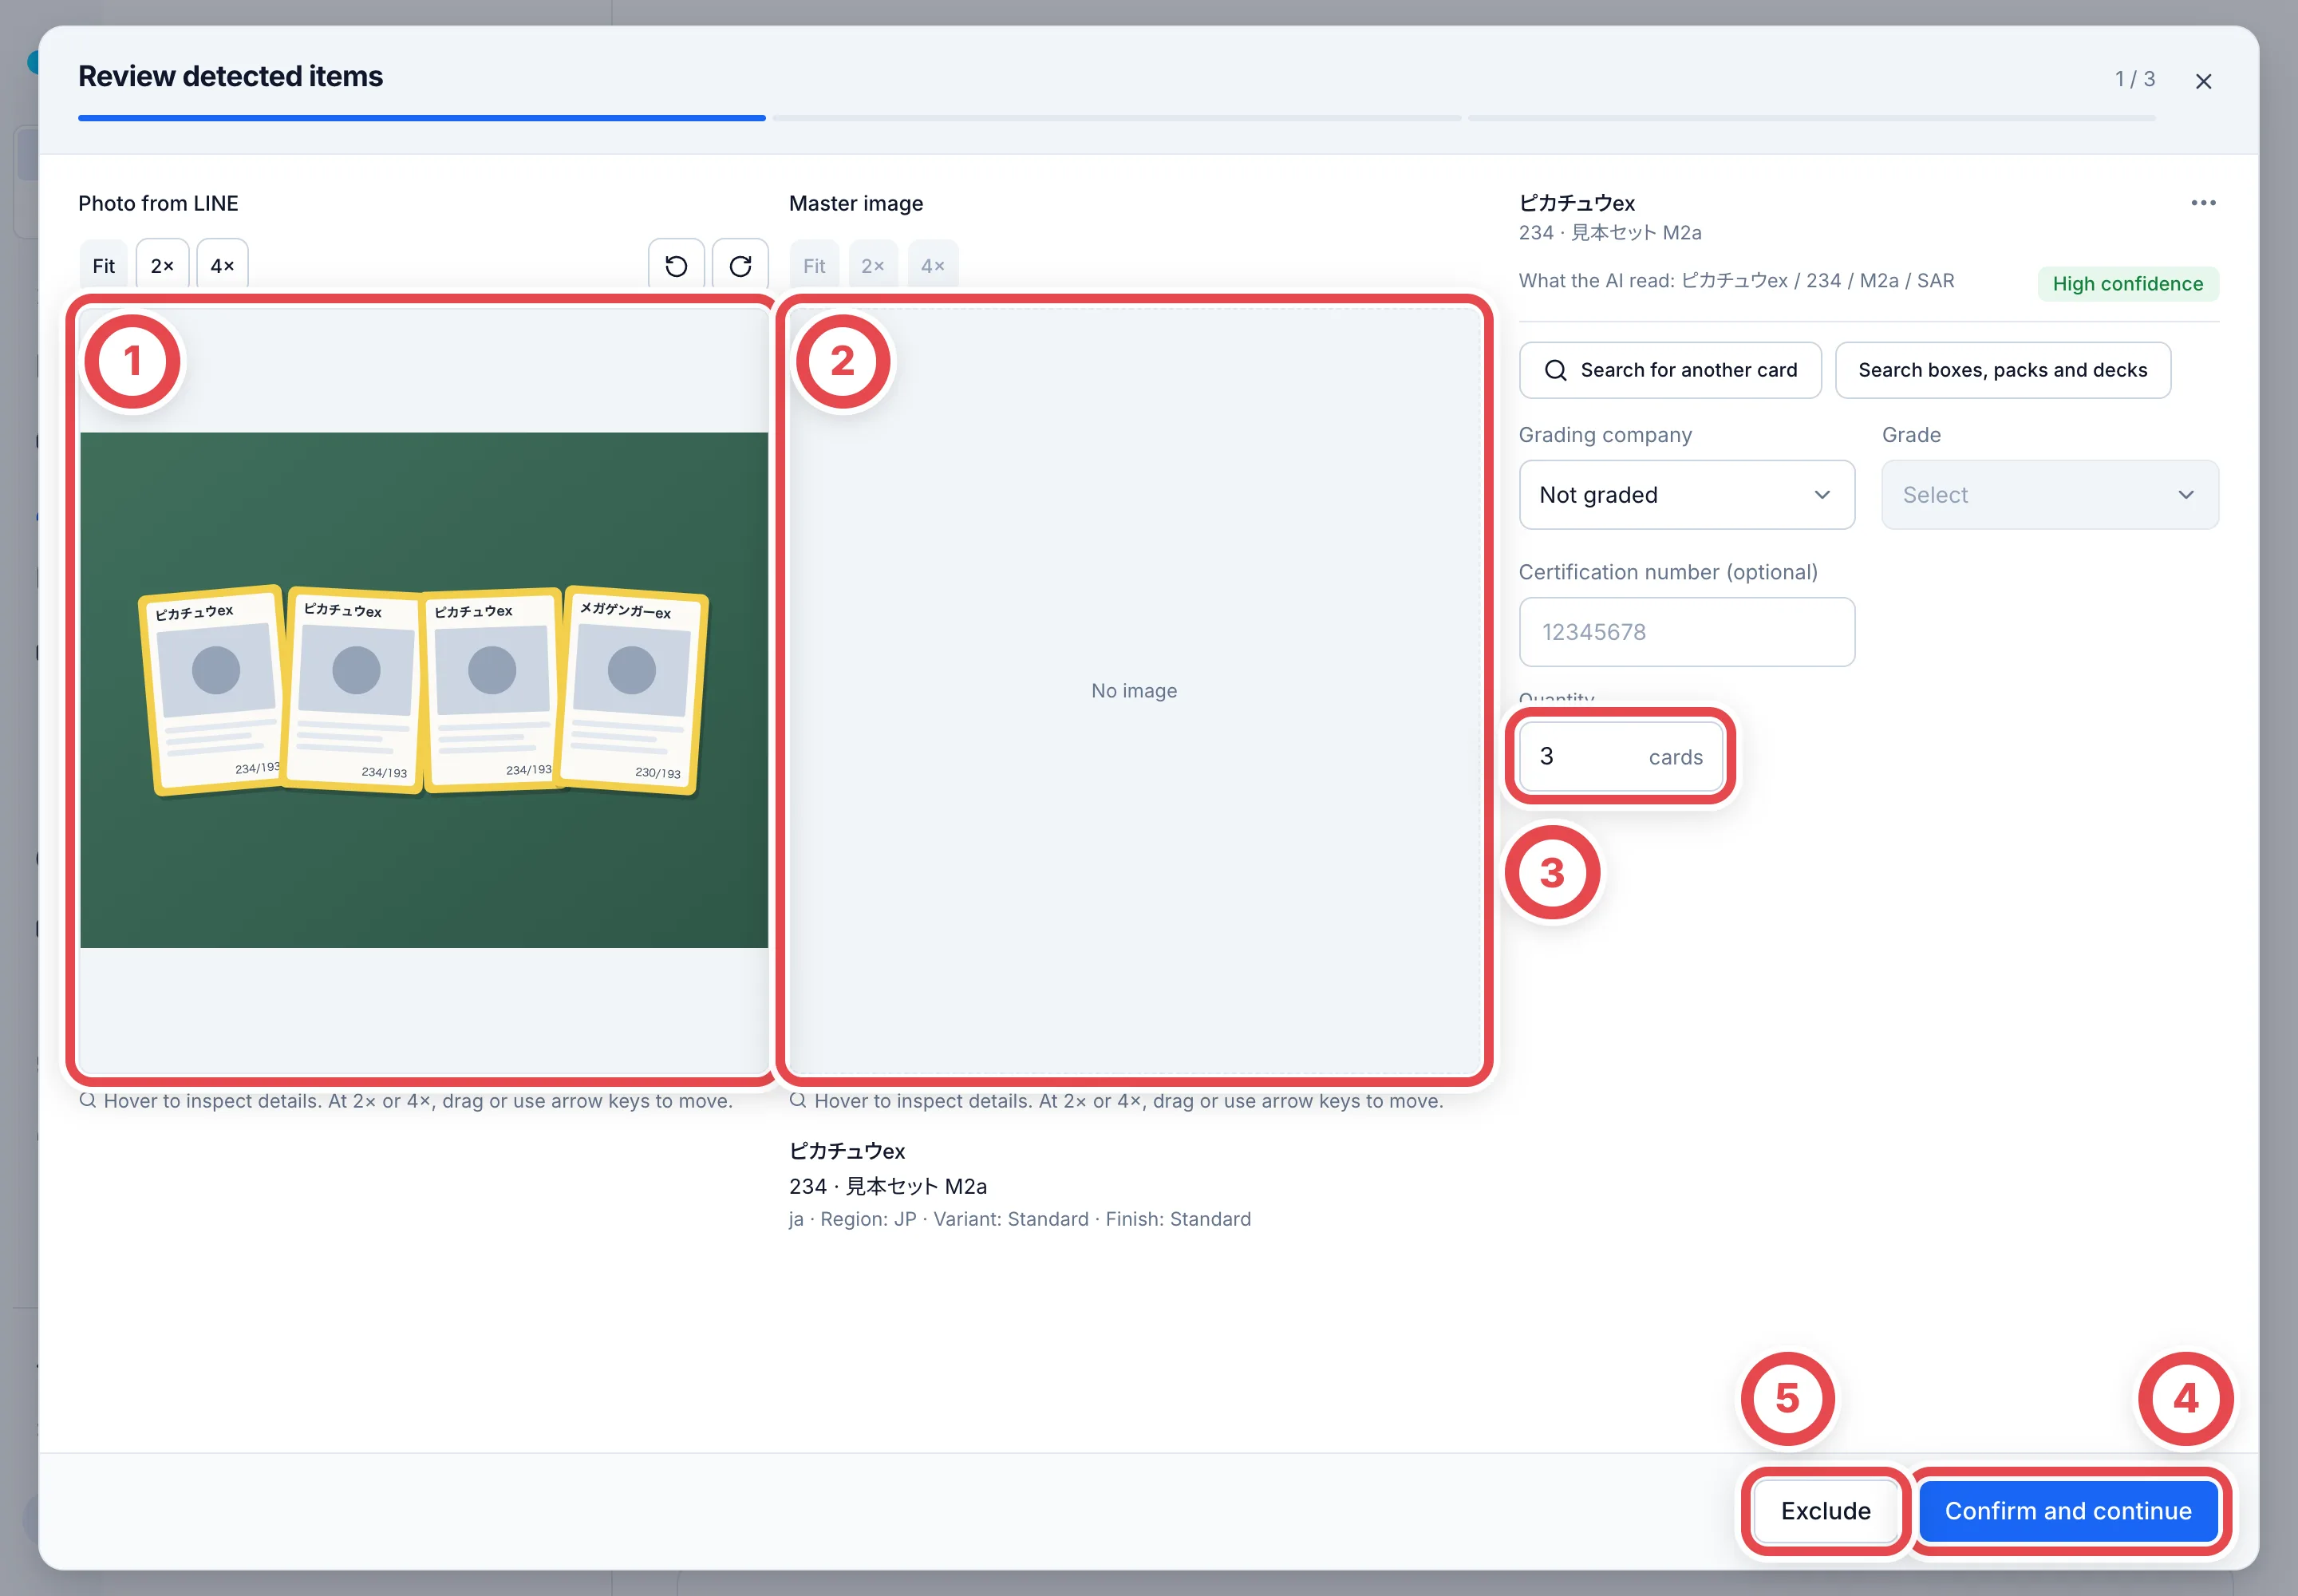
Review detected items opens, and you check each item one by one. ① is the customer’s photo and ② is the card the AI read. Compare them with the photo. Check that the card name and number match, and that the quantity at ③ matches the photo and messages.
If the master has no registered image, it shows No image; compare the name, number and edition information too.
If it matches, click Confirm and continue at ④. For anything that isn’t a card, such as only sleeves or a box, click Exclude at ⑤. These decisions do not add items to the appraisal request yet. Management notes, opened from the item’s top-right menu, are saved separately and remain if you close the review.
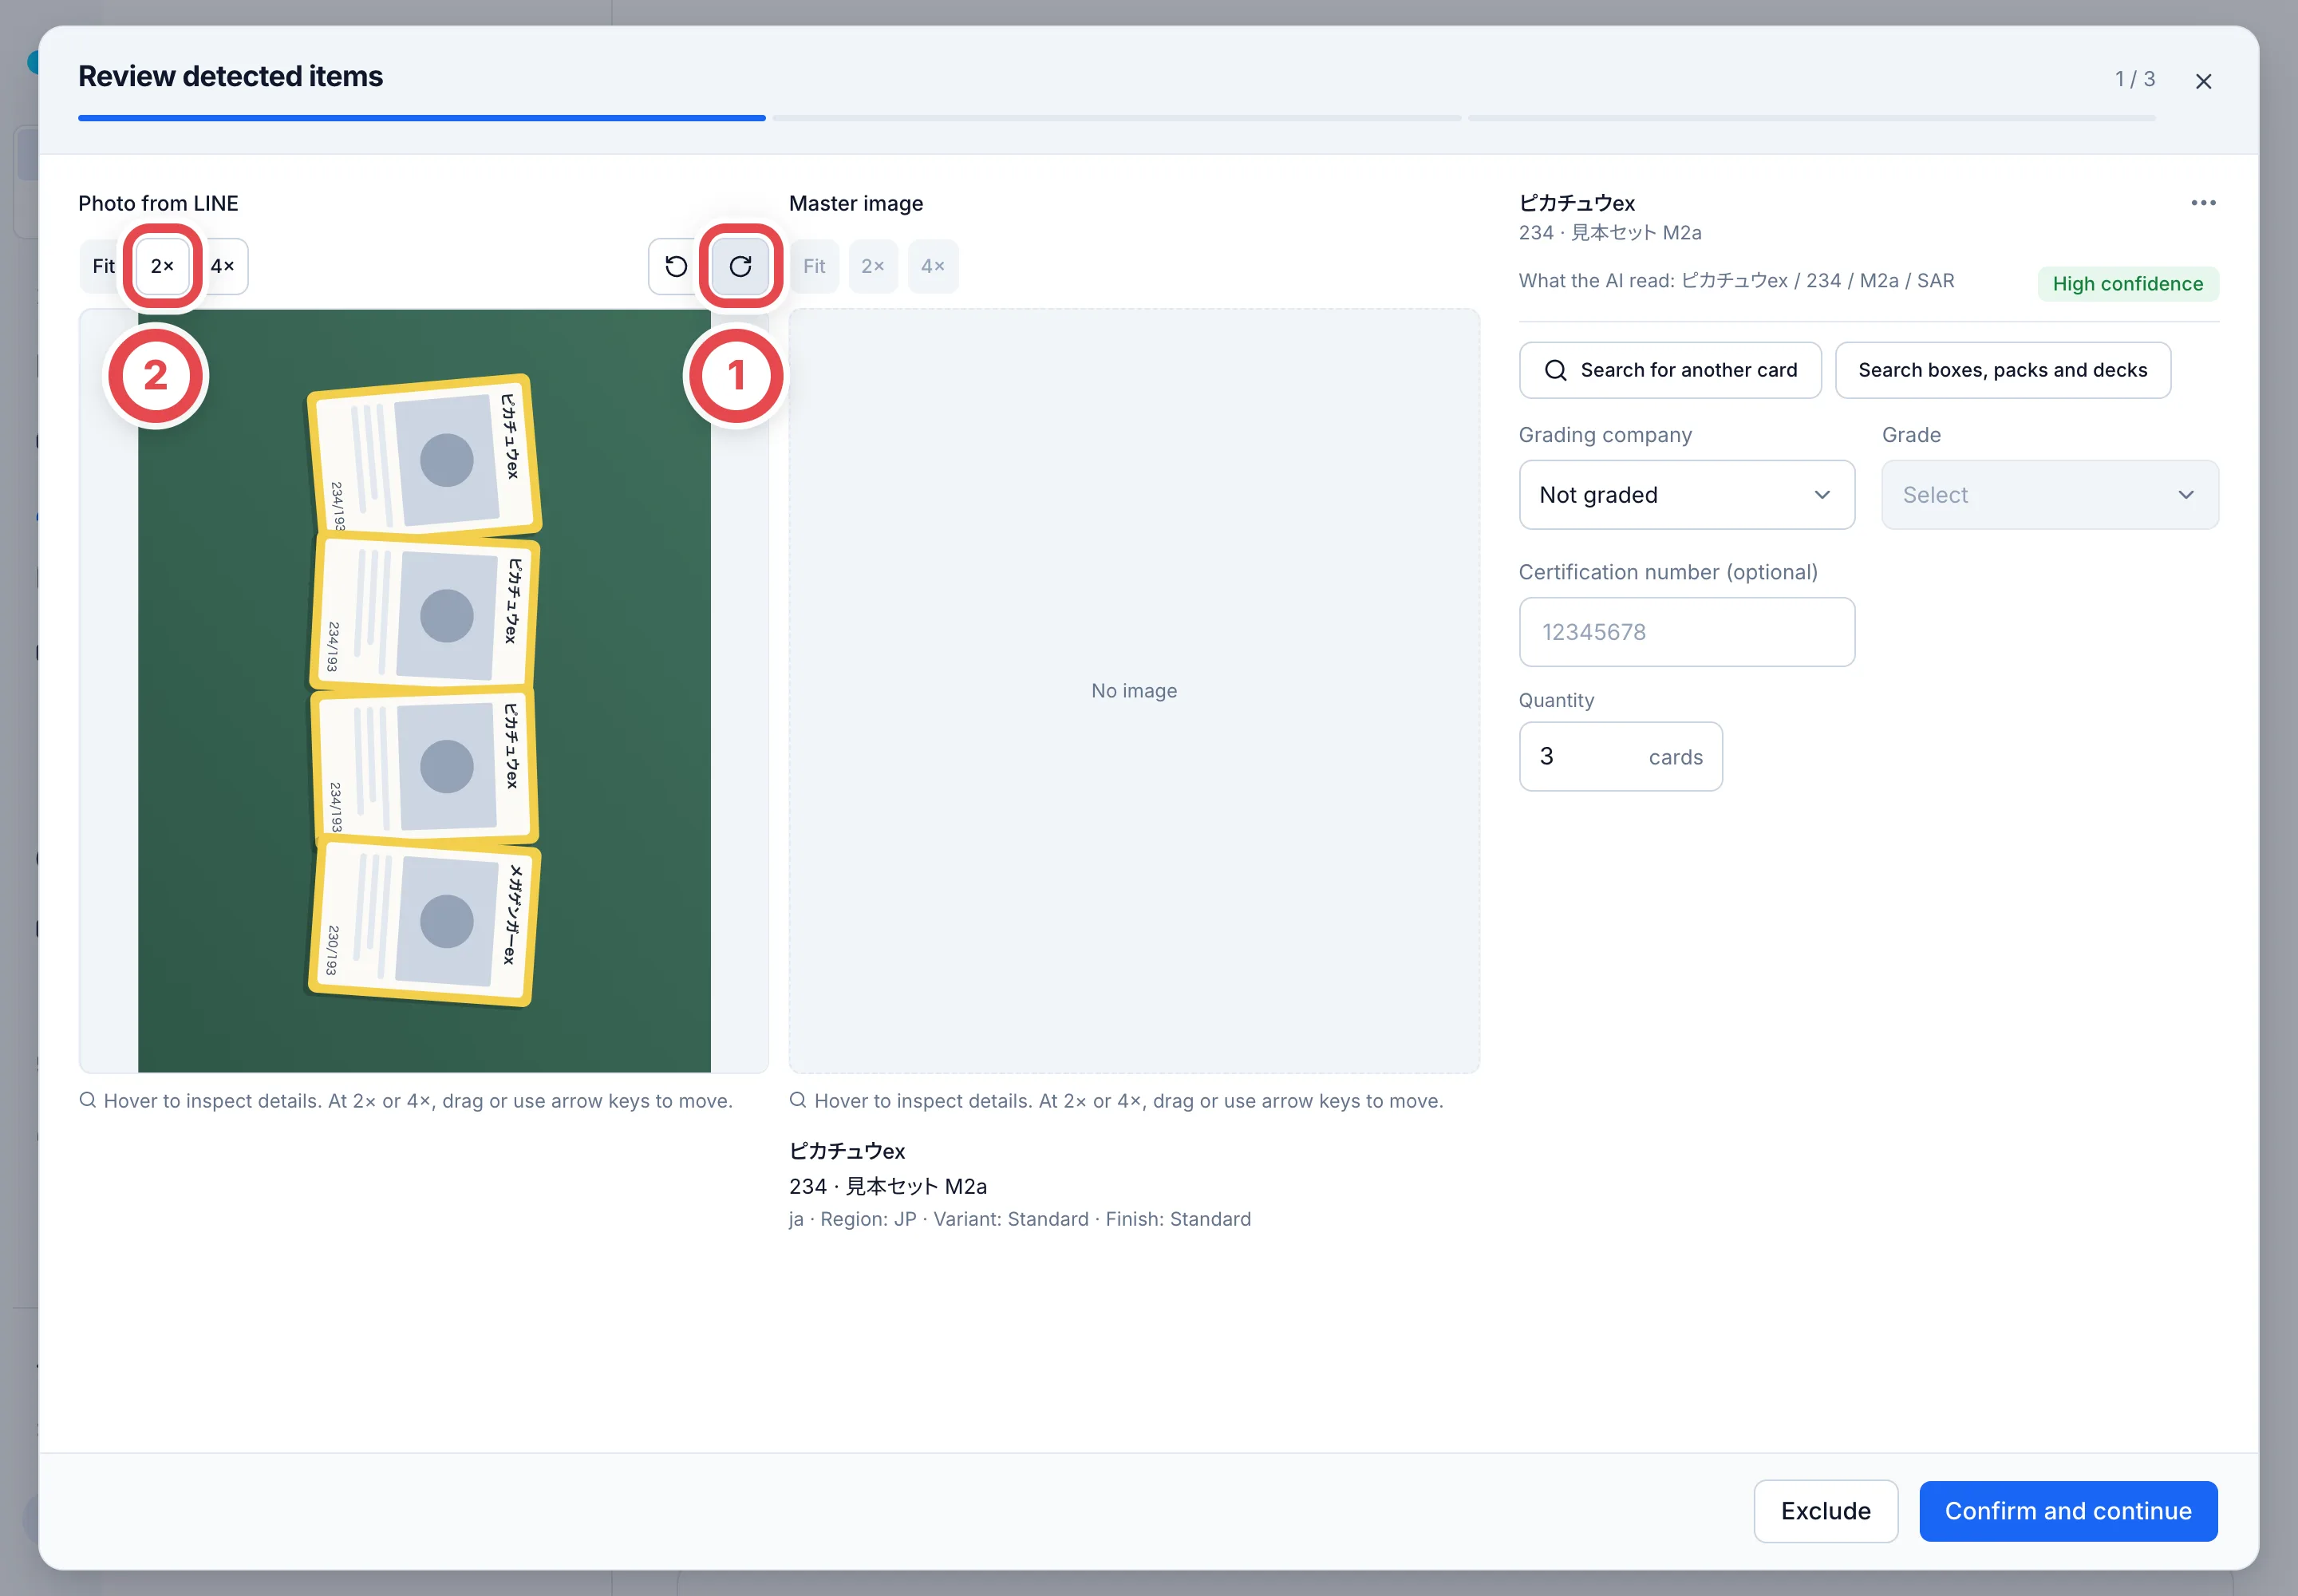
For an item the AI isn’t sure about, a badge such as ① Medium confidence appears with the reason. At ②, select an illustrated candidate under Choose from matches, or Search for another card to find the right one. Use 2× or 4× to zoom the photo and master image on the same screen. If a photo arrives sideways, turn it 90° at a time with the buttons at the top right of Photo from LINE.
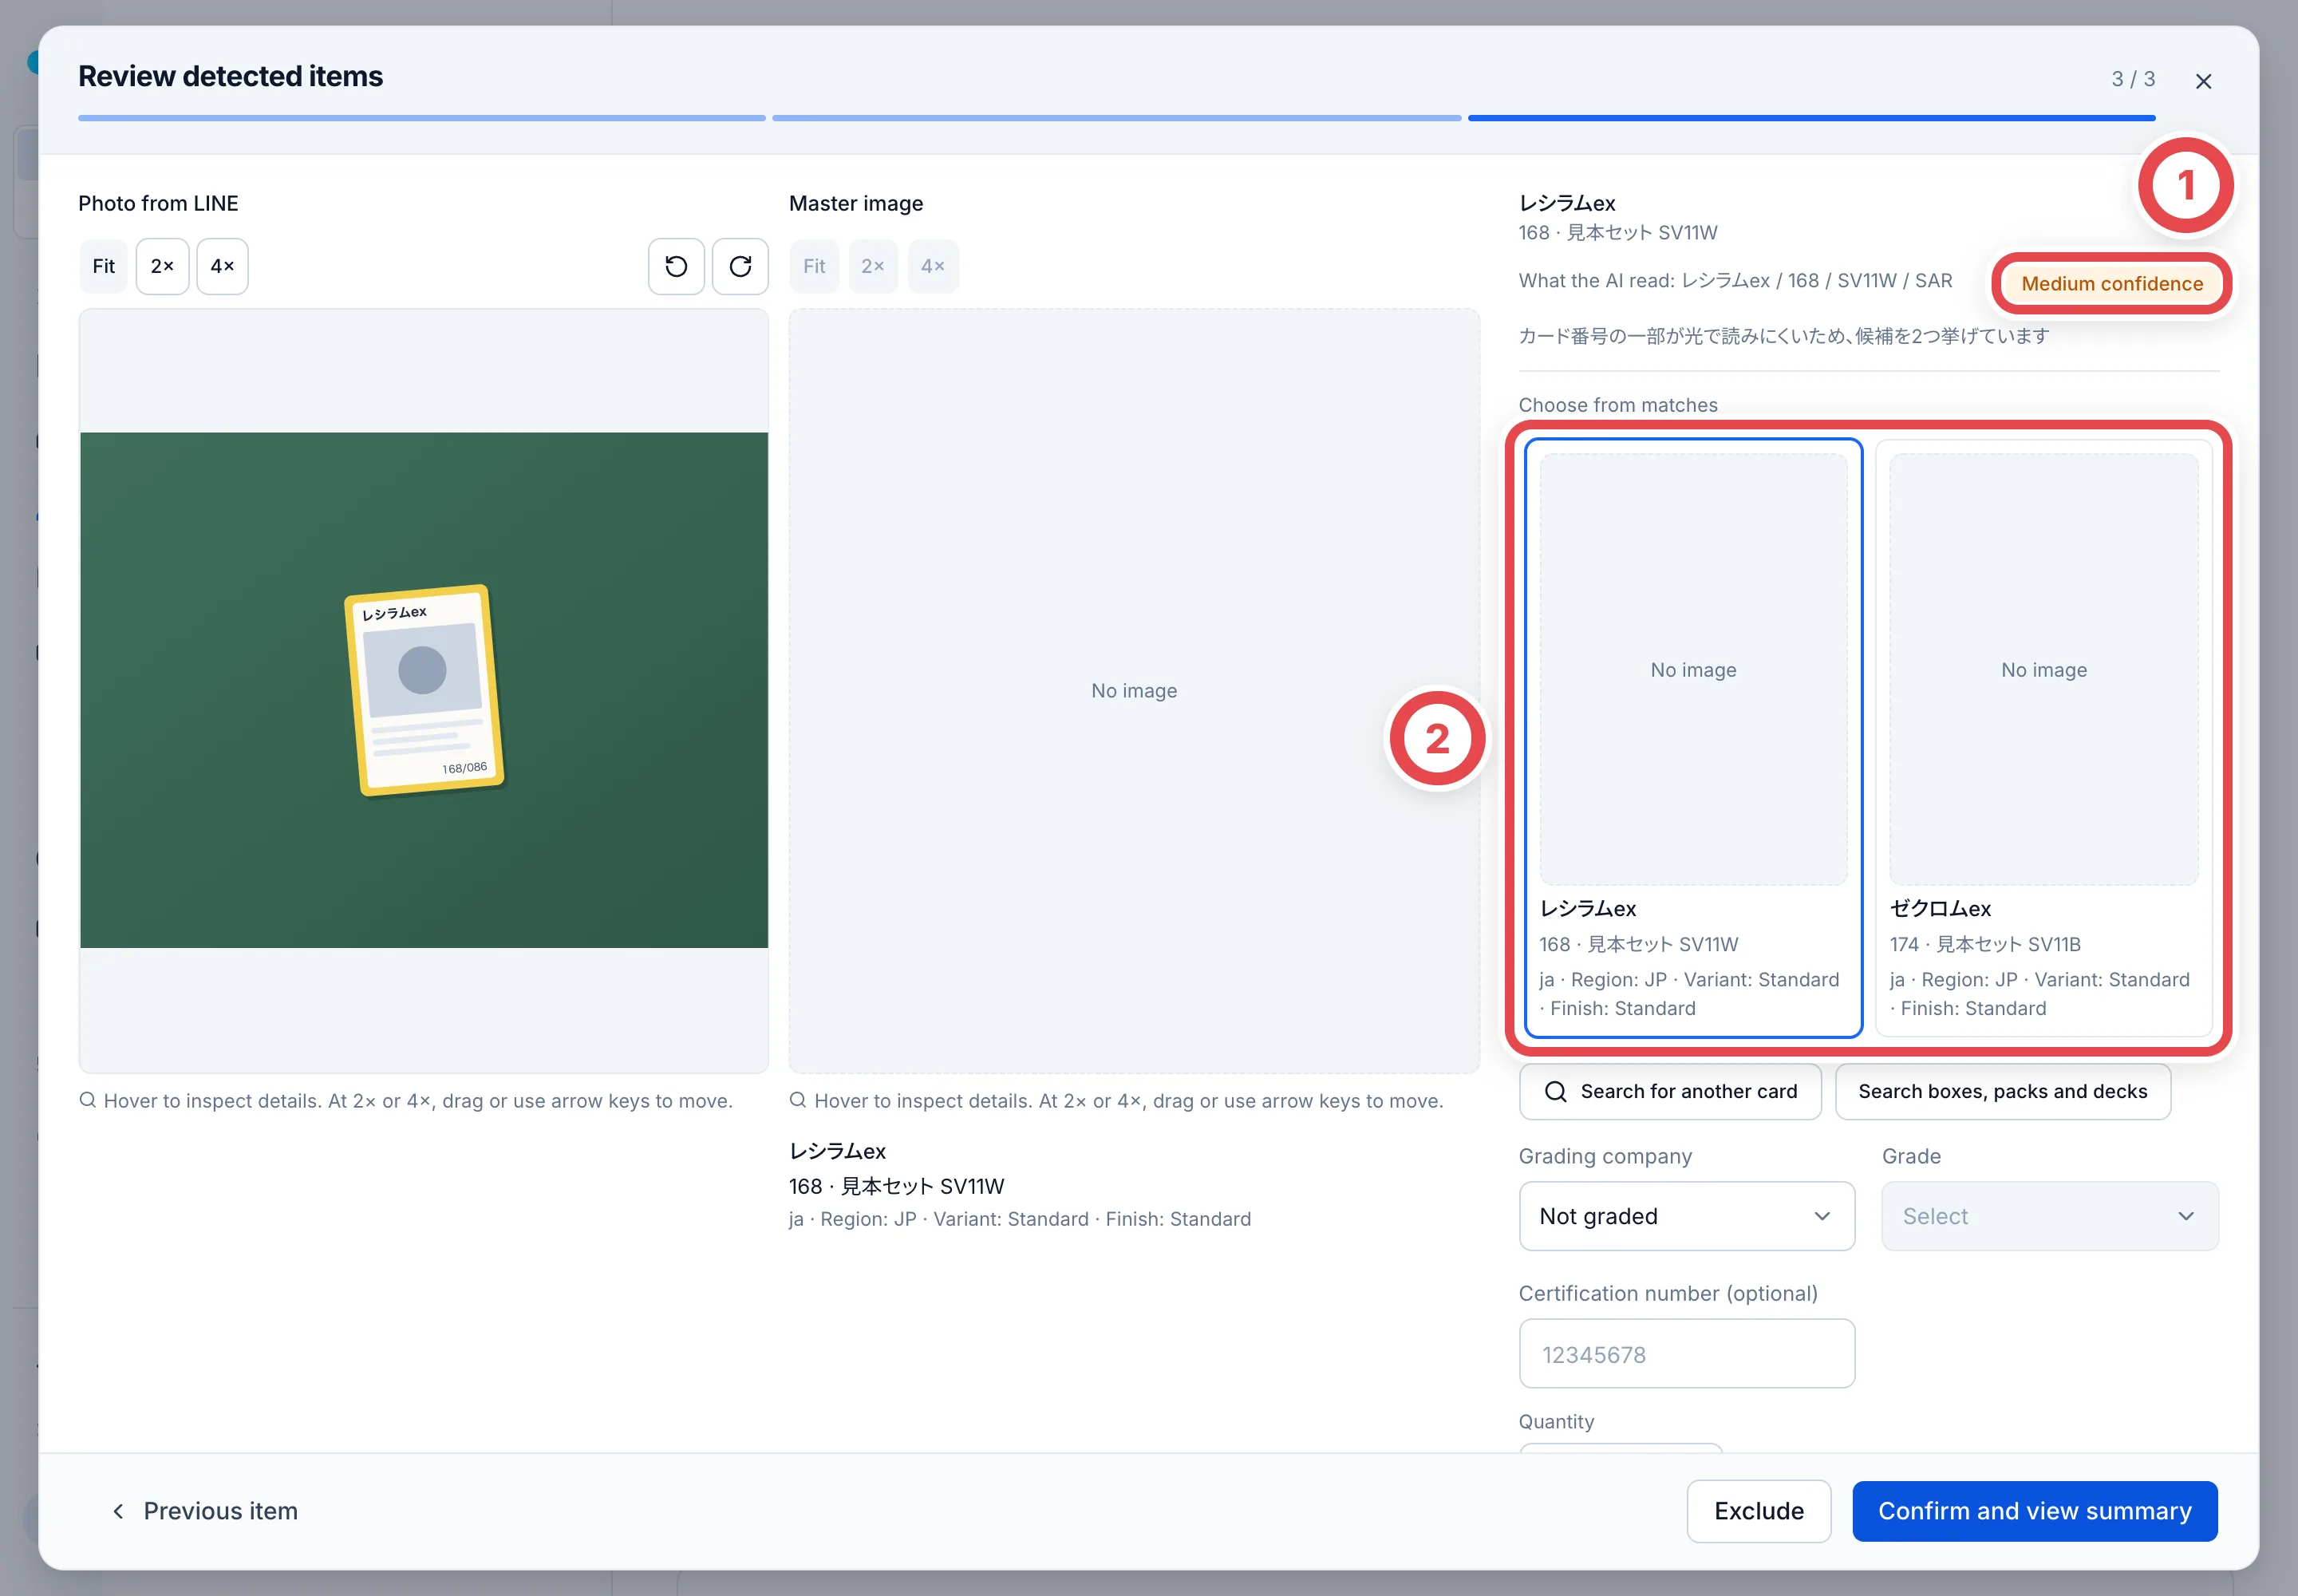
For graded cards, the grading company and certification number are read too. Check and correct them against the photo of the actual card. Different certification numbers remain separate units even for the same card. If one number is read for multiple units, confirm its use as a representative number. Check the edition, language and card number below the image too. Select a BOX or other product when appropriate. For a missing card master, prepare a registration request; it is applied when you finally click Add to appraisal request.
On the last item, click Confirm and view summary. The list appears under Items to add. Check the items and quantities at ①. To change one, click the pencil icon. Click Add to appraisal request at ②. This creates the deal and puts the cards on the customer’s Appraisal requests tab.
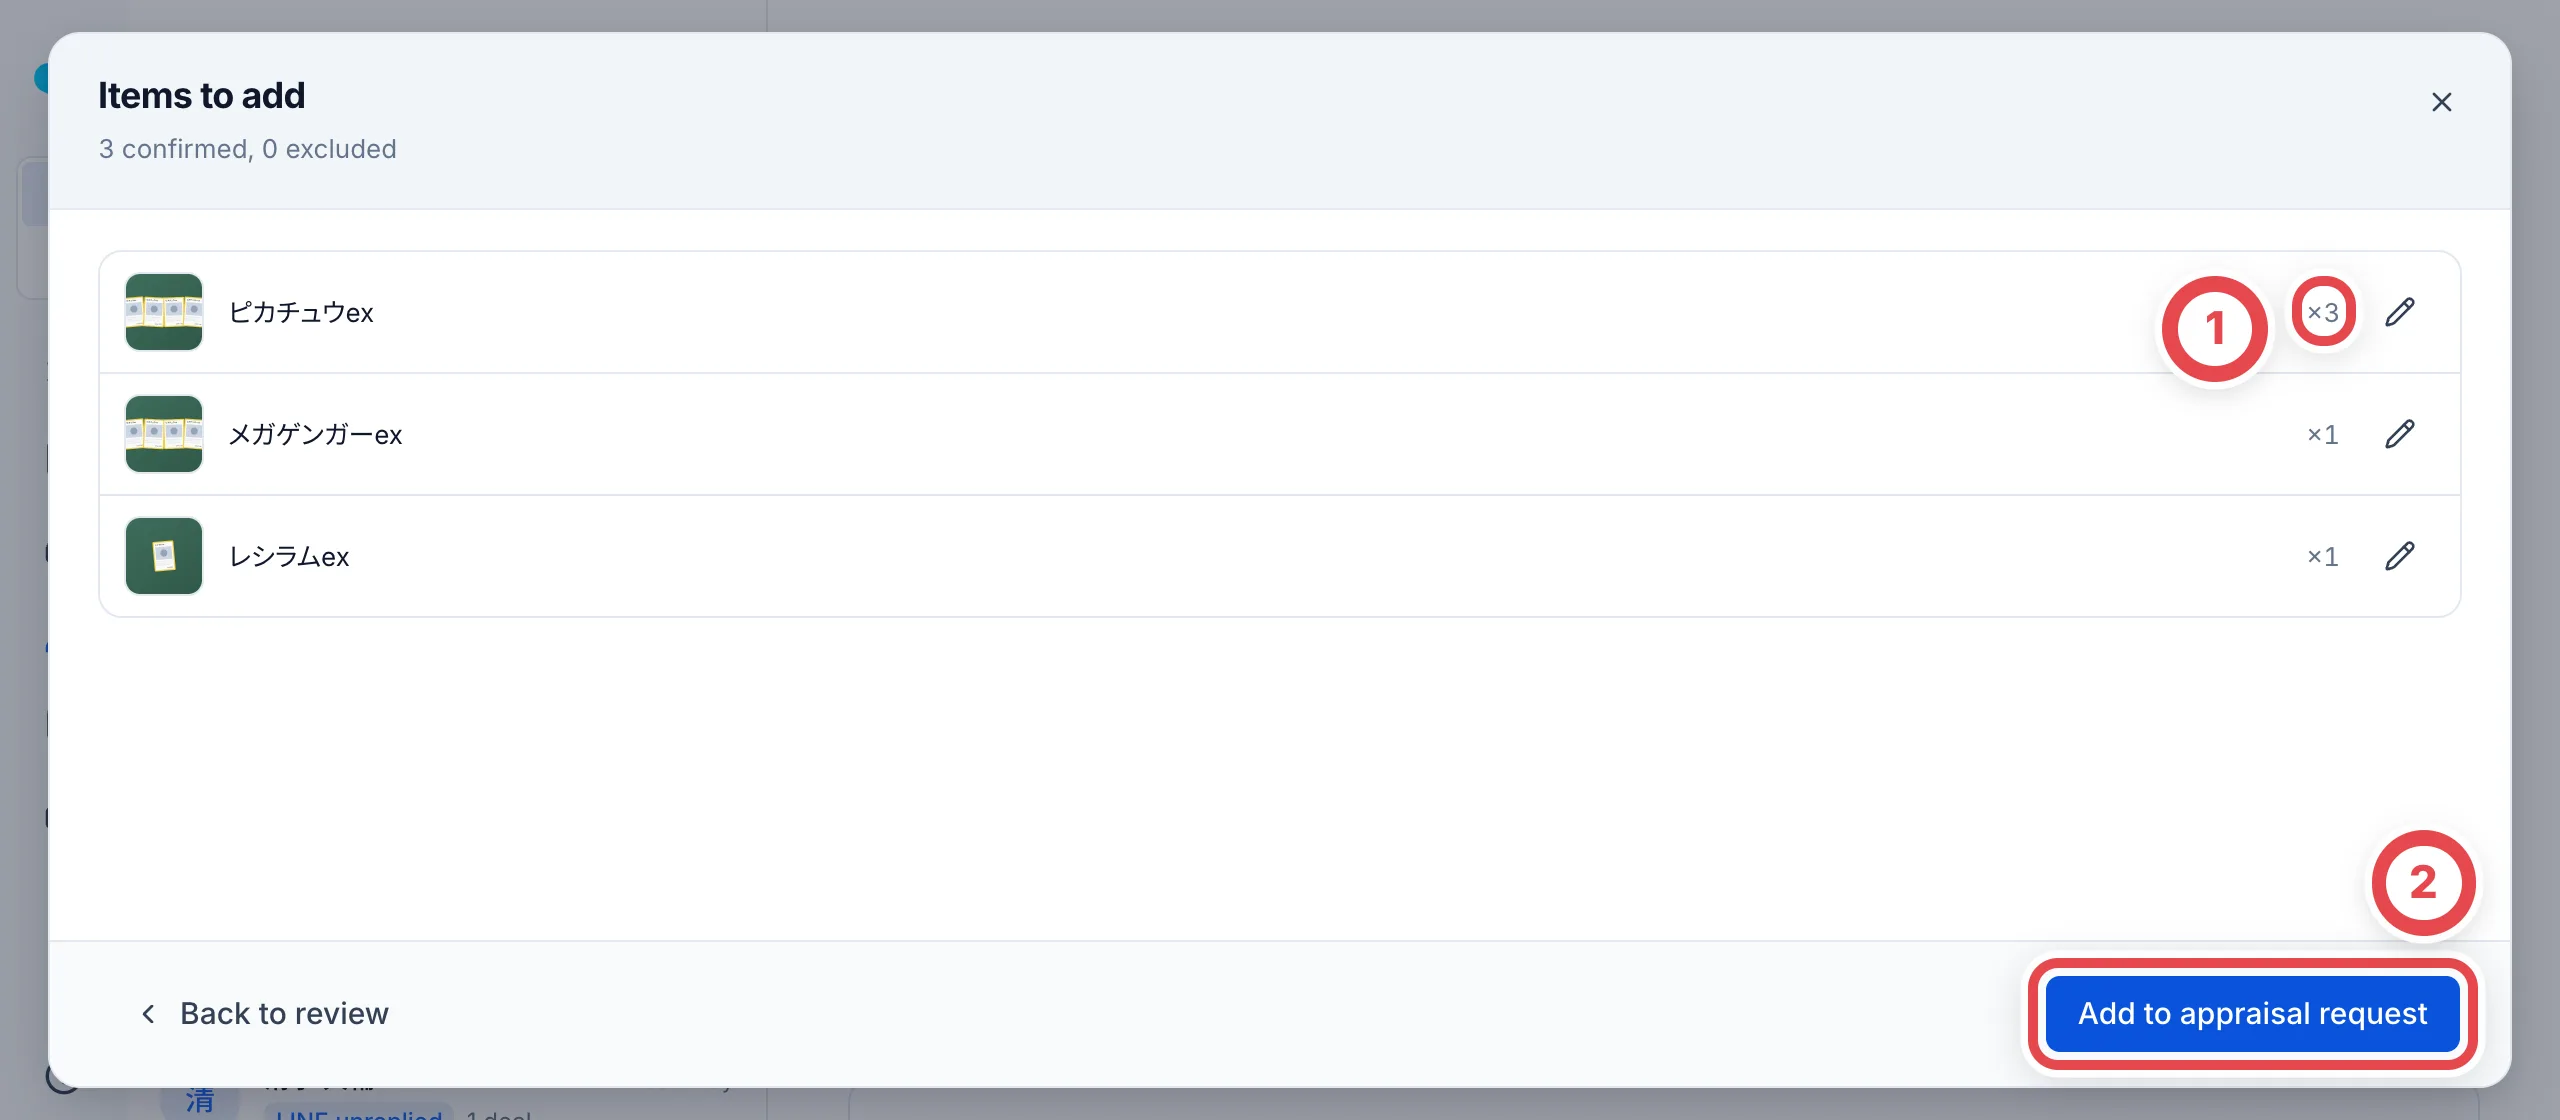
Reading doesn’t set any prices. You decide the amounts in the next step.
5. Check condition and amounts, then request a review
The cards you added are listed under Not quoted on the customer’s Appraisal requests tab. For each card, choose the condition and grade at ①. The reference price and buy rate are filled in from the market price and your shop’s rates. Adjust them to match the condition of the card in the photo. The amount for each line appears at the far right.
Select the cards to quote with the checkboxes at ② (the checkbox in the header selects them all). Then click Go on with selected at ③, which appears at the bottom of the screen. If a card has no reference price, the confirmation asks you to request research or Go on without research. If the inputs are complete, the confirmation shows the amounts; check the amounts and click Request second review. You can set a total set price there when needed. Apply the answer or withdraw any open research request first, and save quantity changes before proceeding. Do not enter zero merely to fill an empty field. See Research requests and quote reviews.
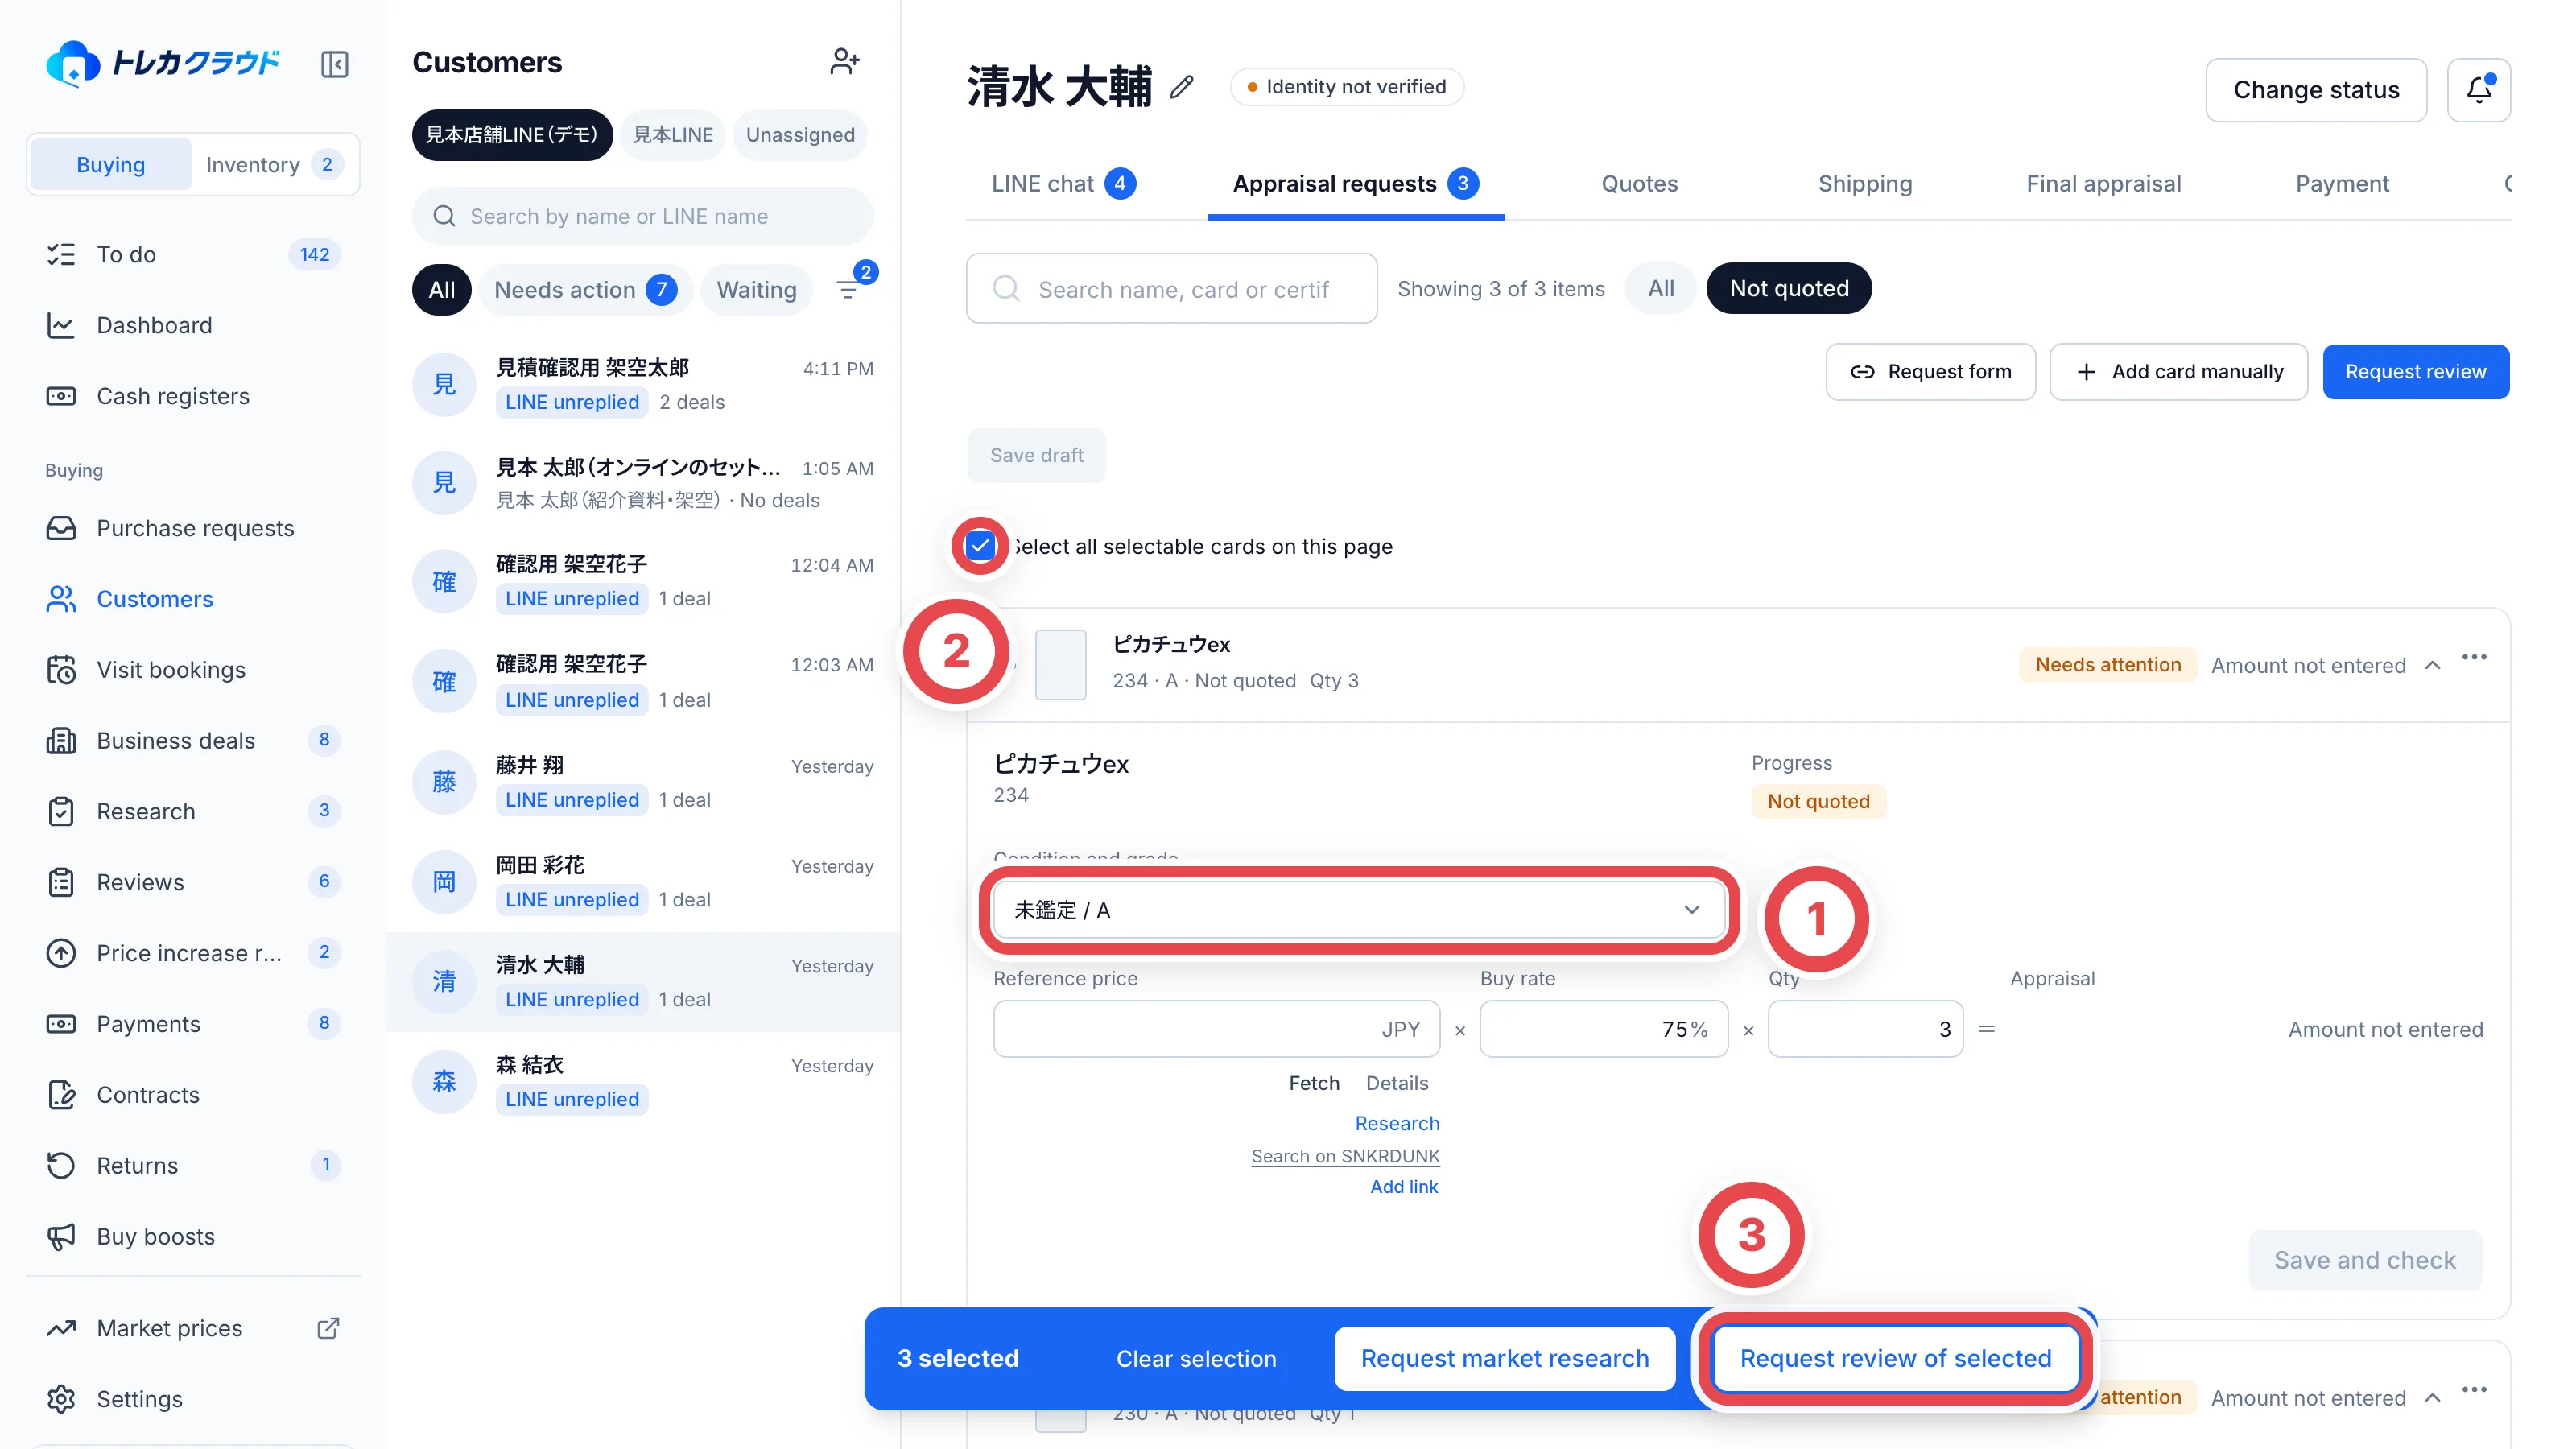
If there’s no market price for a card, the reference price is empty. Click Research under it to have it looked up, or enter an amount yourself. The research is for the grade chosen at ①. When the answer arrives, the grade the researcher confirmed fills in ①. A grade chosen at ① or saved in the draft stays. When ① differs from the answer’s grade, the answer’s grade and price show under the reference price. Changing ① away from a researched grade asks first, then lets you request research for the new grade straight away. For how to request research, see Research requests and quote reviews.
After changing a condition and grade, reference price or buy rate, click Save draft above the table. Saved values stay when you leave the page, and other members see the same values. When a card is waiting for a research answer, save the other cards’ values, leave, and request the review for all of them together once the answer arrives.
- Values you changed but haven’t saved show next to the button, as in 3 unsaved changes. Reloading the page before saving brings back the last saved values
- If you move to another tab or page through the page’s tabs or links with unsaved changes, you’re asked first. Discard changes and leave puts the changed values back. The browser’s back and forward buttons don’t ask; the changed values go back
- Fields you didn’t change aren’t saved; they’re filled in again from the market or the research answer each time. Saving a reference price also saves the condition and grade the row shows at that moment. A saved reference price and grade stay when a research answer arrives later, and the answer shows under the field as Research answer: ¥…
- Requesting the review removes the card’s draft; its values move to the quote
- When a draft’s reference price came from a saved shop price that was confirmed more than 30 days ago or invalidated, the field says so. Selecting the card and requesting the review or combining it into a quote asks whether to go on with the price as entered by hand. Proceed as entered by hand puts the same amount into the quote as a reference price entered by hand. To use it as the saved shop price, confirm and register the price again
- Identifying the card as another card after saving removes the draft’s reference price. Identifying it as a BOX or other product removes the whole draft
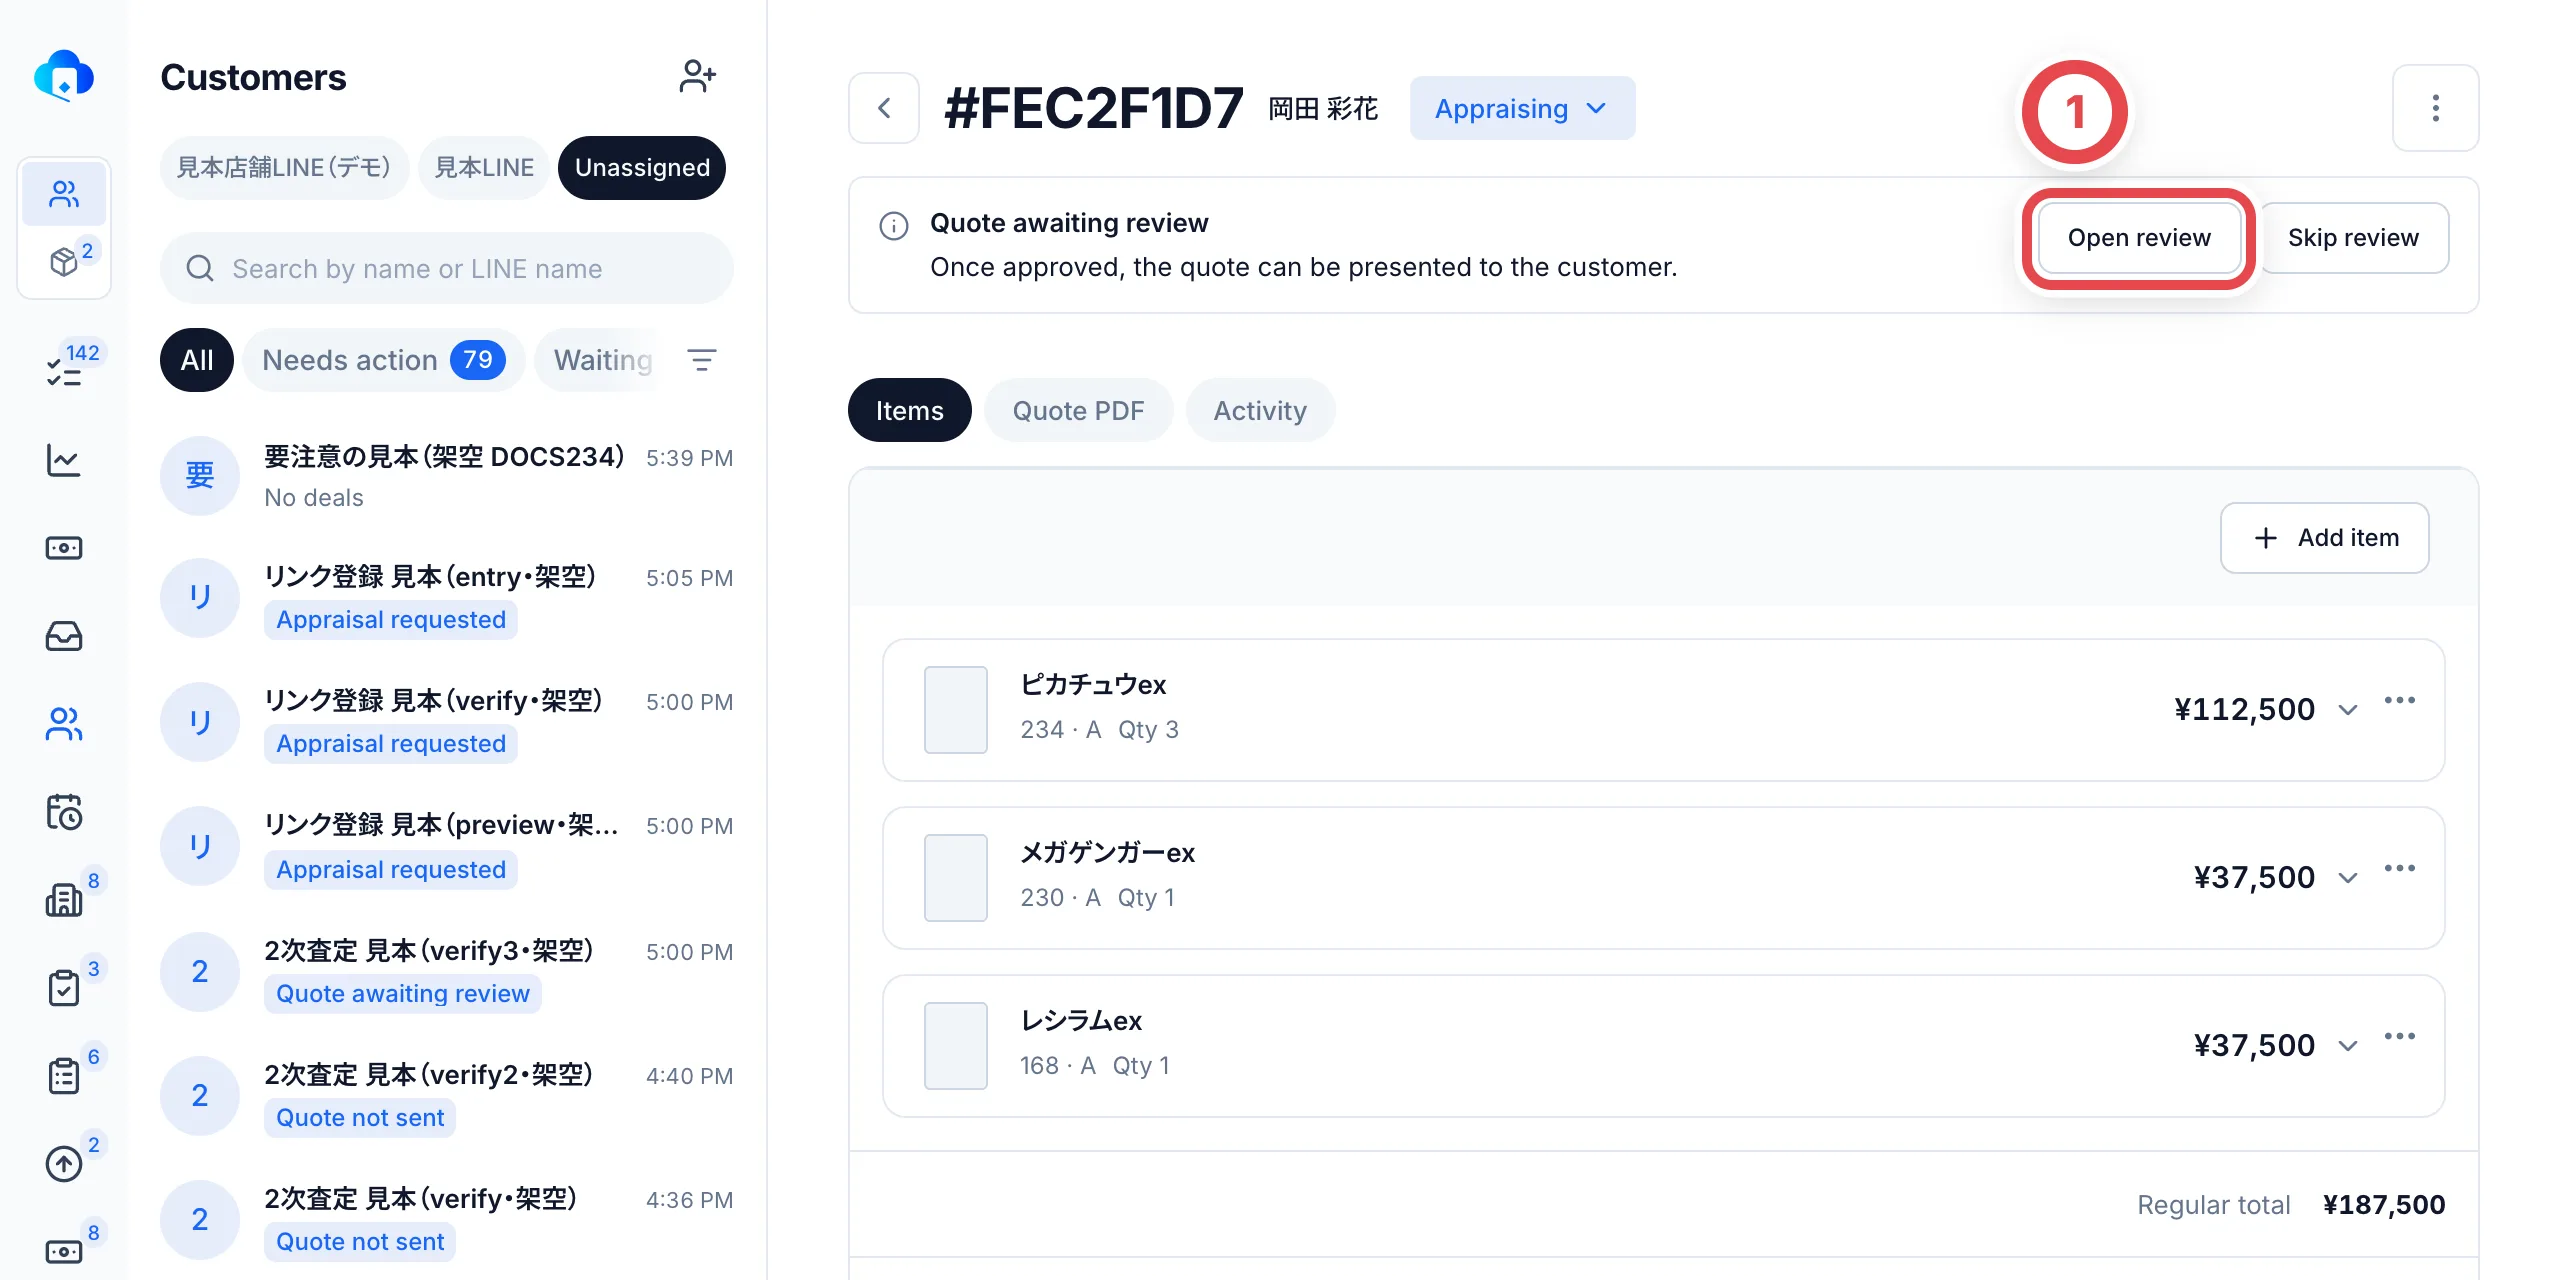
A different member opens the request from Reviews. For a review of an already saved quote, its page shows Open review at ①.
6. Another member checks the quote and approves it
Items handed over from appraisal requests open in the preparation review. Identify the cards and complete the grade, reference price and buy rate, then review and approve.
For an already saved quote, the reviewer opens Review preliminary quote, either from Reviews in the sidebar or from Open review on the quote page. Check the offer amounts at ① against the market price and quantity. If you want to change an amount, you can edit it there (once you edit it, the approval is recorded as approved with changes). Leave anything you noticed in Review comment at ②, then click Confirm at ③ to approve.
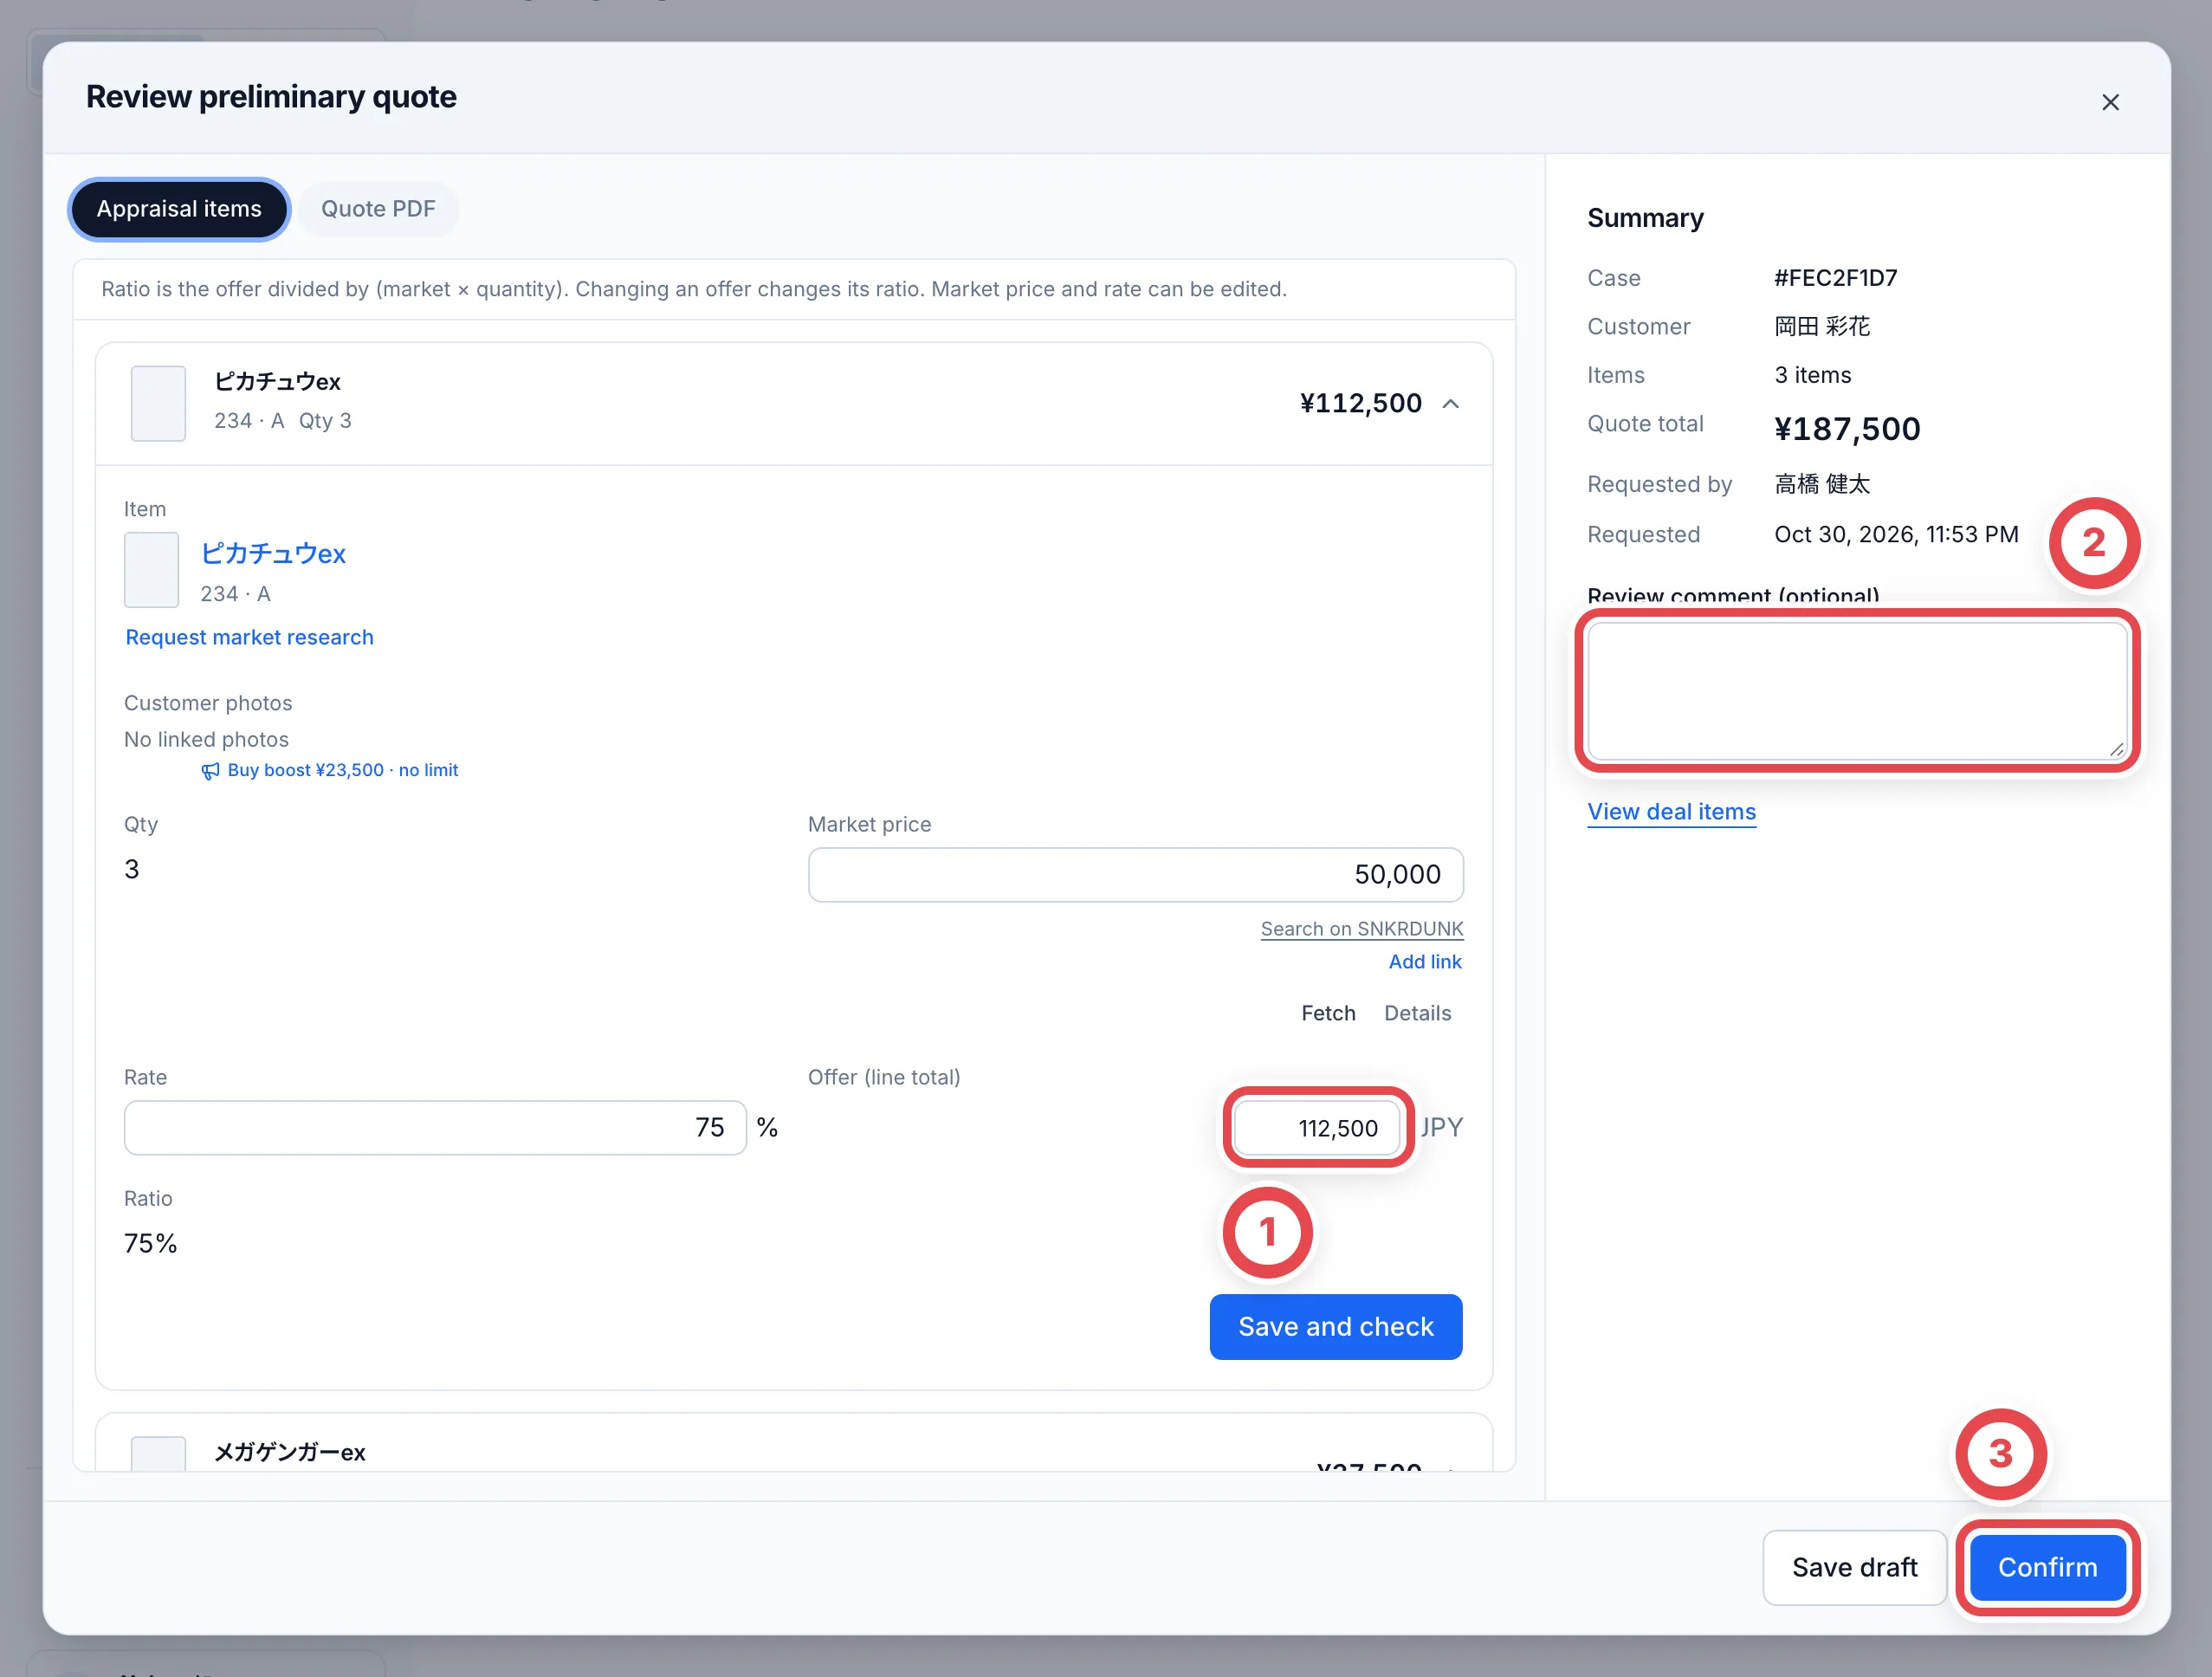
The person who made the appraisal can’t approve their own quote. If you’re in a hurry and need to skip the review, click Skip review on the quote page. The skip is recorded, and you can’t change the amounts when you skip.
7. Copy the quote text, send it on LINE, and record it
On the approved quote page, Present quote appears. The text to send to the customer is in Message draft for LINE at ① (it uses the wording your shop set in Settings › LINE messages). Click Copy at ②, then paste it into the chat in Liny or the LINE admin screen and send it. If your shop has templates, switch between them with Template above the draft. You can edit the draft there; the message you send is matched against the edited text.
After you send it, click Mark as presented at ③. On the deal page, confirm the prompt after checking that you have presented the quote. In the dedicated action dialog, the final button after choosing Presented another way records it. Don’t click it before you send the message to the customer.
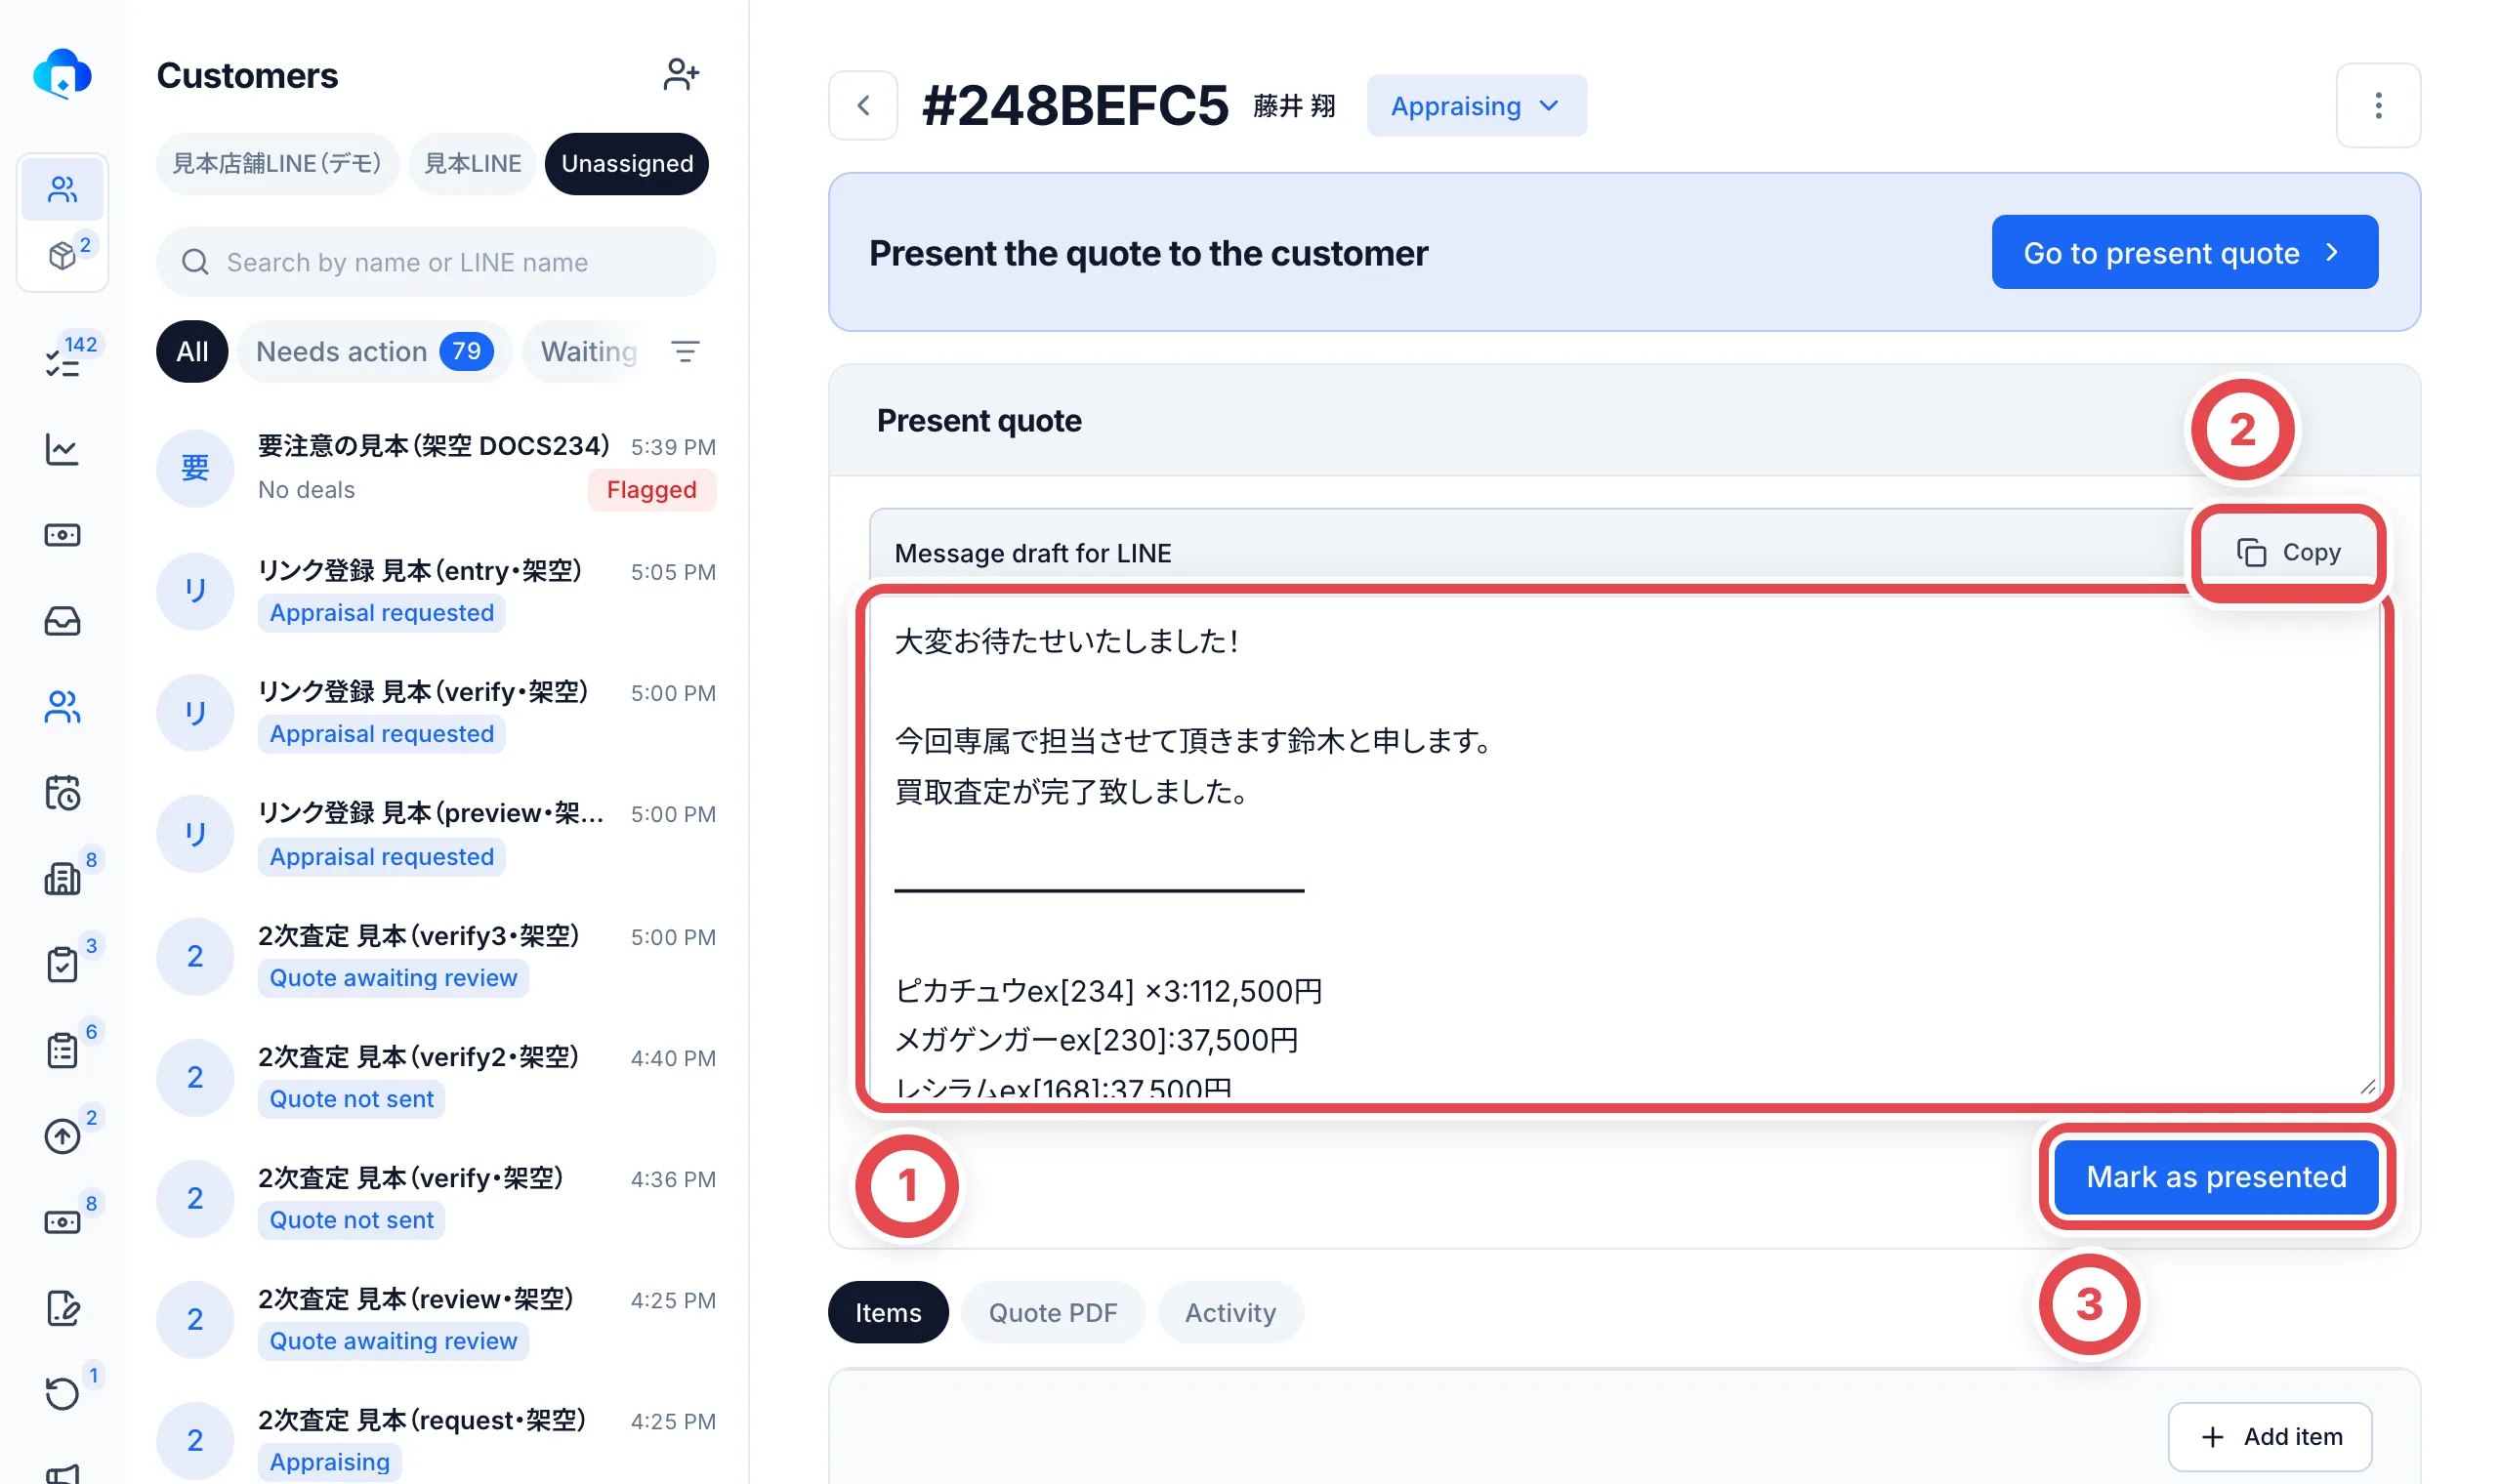
The amounts in the text must match the quote total. If you add an earlier amount or similar, don’t put “appraisal” or “total” next to it. The check against the quote total will no longer match.
If your shop has Liny set to send Present quote automatically, Send quote on LINE also appears. In that case you can send straight from the button.
After this, record the customer’s reply (accepted, partly accepted, or declined) and move on to the shipping instructions. For the next steps, see Shipping and final appraisal.
Troubleshooting
| What’s happening | What to check and how to fix it |
|---|---|
| A friend who should be there isn’t in Unregistered LINE friends | Check that you chose that friend’s LINE account in the tabs at the top. Imports run about every 5 minutes. Friends who are already customers don’t appear. |
| A photo stays on Fetching from LINE… | The photo is still being imported from LINE. Wait a moment and reopen it. If it says LINE setup needed, check LINE and notifications. |
| A photo says Couldn’t get the image. | The photo couldn’t be imported from LINE. Ask the customer to send it again. |
| The reading bar doesn’t appear | The chat hasn’t been read yet, or it was read more than 7 days ago. Read it again with Extract request. |
| The card that was read is wrong | Change it to the right card with Choose from matches or Search for another card. Remove anything that isn’t a card with Exclude. |
| The same photo’s card might be added twice | Reading the entire chat skips photos already filed into appraisal requests. Explicitly selecting messages can read them again. Check existing-request warnings and quantities in the review to avoid duplicates. |
| Go on with selected stops with a message | Check the selection and the confirmation’s message. Unidentified and unpriced items can be handed over. Save quantity changes before proceeding. The reviewer must finish identification and pricing before approving and presenting the quote. |
| You created this appraisal, so you can’t approve it. appears in the review | Ask a different member to confirm it. If you’re in a hurry, use Skip review on the quote page. |
| You clicked Mark as presented before sending | The record stays in Activity on the deal page. Ask an admin. |