

Returns
This procedure covers shipping goods back after an online purchase. To hand goods back at the counter, follow Partial acceptance and full decline in store.
The shop itself contacts the customer, gets their approval, arranges pickup and ships the parcel. Toreca Cloud only “records” each of these. The step-recording buttons do not send customer messages or book a pickup. Photo delivery through LINE is a separate action in step 2.
You can arrange a return for these cards. Cards you bought are not included.
- Cards left out when the customer accepted only part of the final quote
- Cards from a final quote the customer declined in full
- Items, such as boxes, that you marked for return after a condition check
Accepting only part of a preliminary quote, or declining it, doesn’t create a return, because you haven’t received the goods yet. Recording a decline is covered in step 10 of Shipping and final appraisal.
The steps and the return stages
After shipment, the tracking-notice and delivery buttons may both appear.
| Step | What you do | Return stage |
|---|---|---|
| 1 | Open the return | ― |
| 2 | (If needed) Save photos of the cards you’re returning | ― |
| 3 | Check the return address and save it | Confirm address |
| 4 | Send the address confirmation, then record it | Confirm address |
| 5 | Record the customer’s approval | Awaiting address approval |
| 6 | Arrange pickup, then record it | Arrange pickup and shipping |
| 7 | Record shipment | Arrange pickup and shipping |
| 8 | Send the tracking number, then record it | Send tracking number |
| 9 | Record delivery | Returning → Completed |
1. Open the return
Open Returns in the sidebar. At ①, you can narrow the list by stage: Pending, Confirm address, Awaiting address approval, Arrange pickup and shipping, Send tracking number, Returning, Completed and All. You can also search by customer name, deal number or tracking number. Click Open return at ② to open that return.
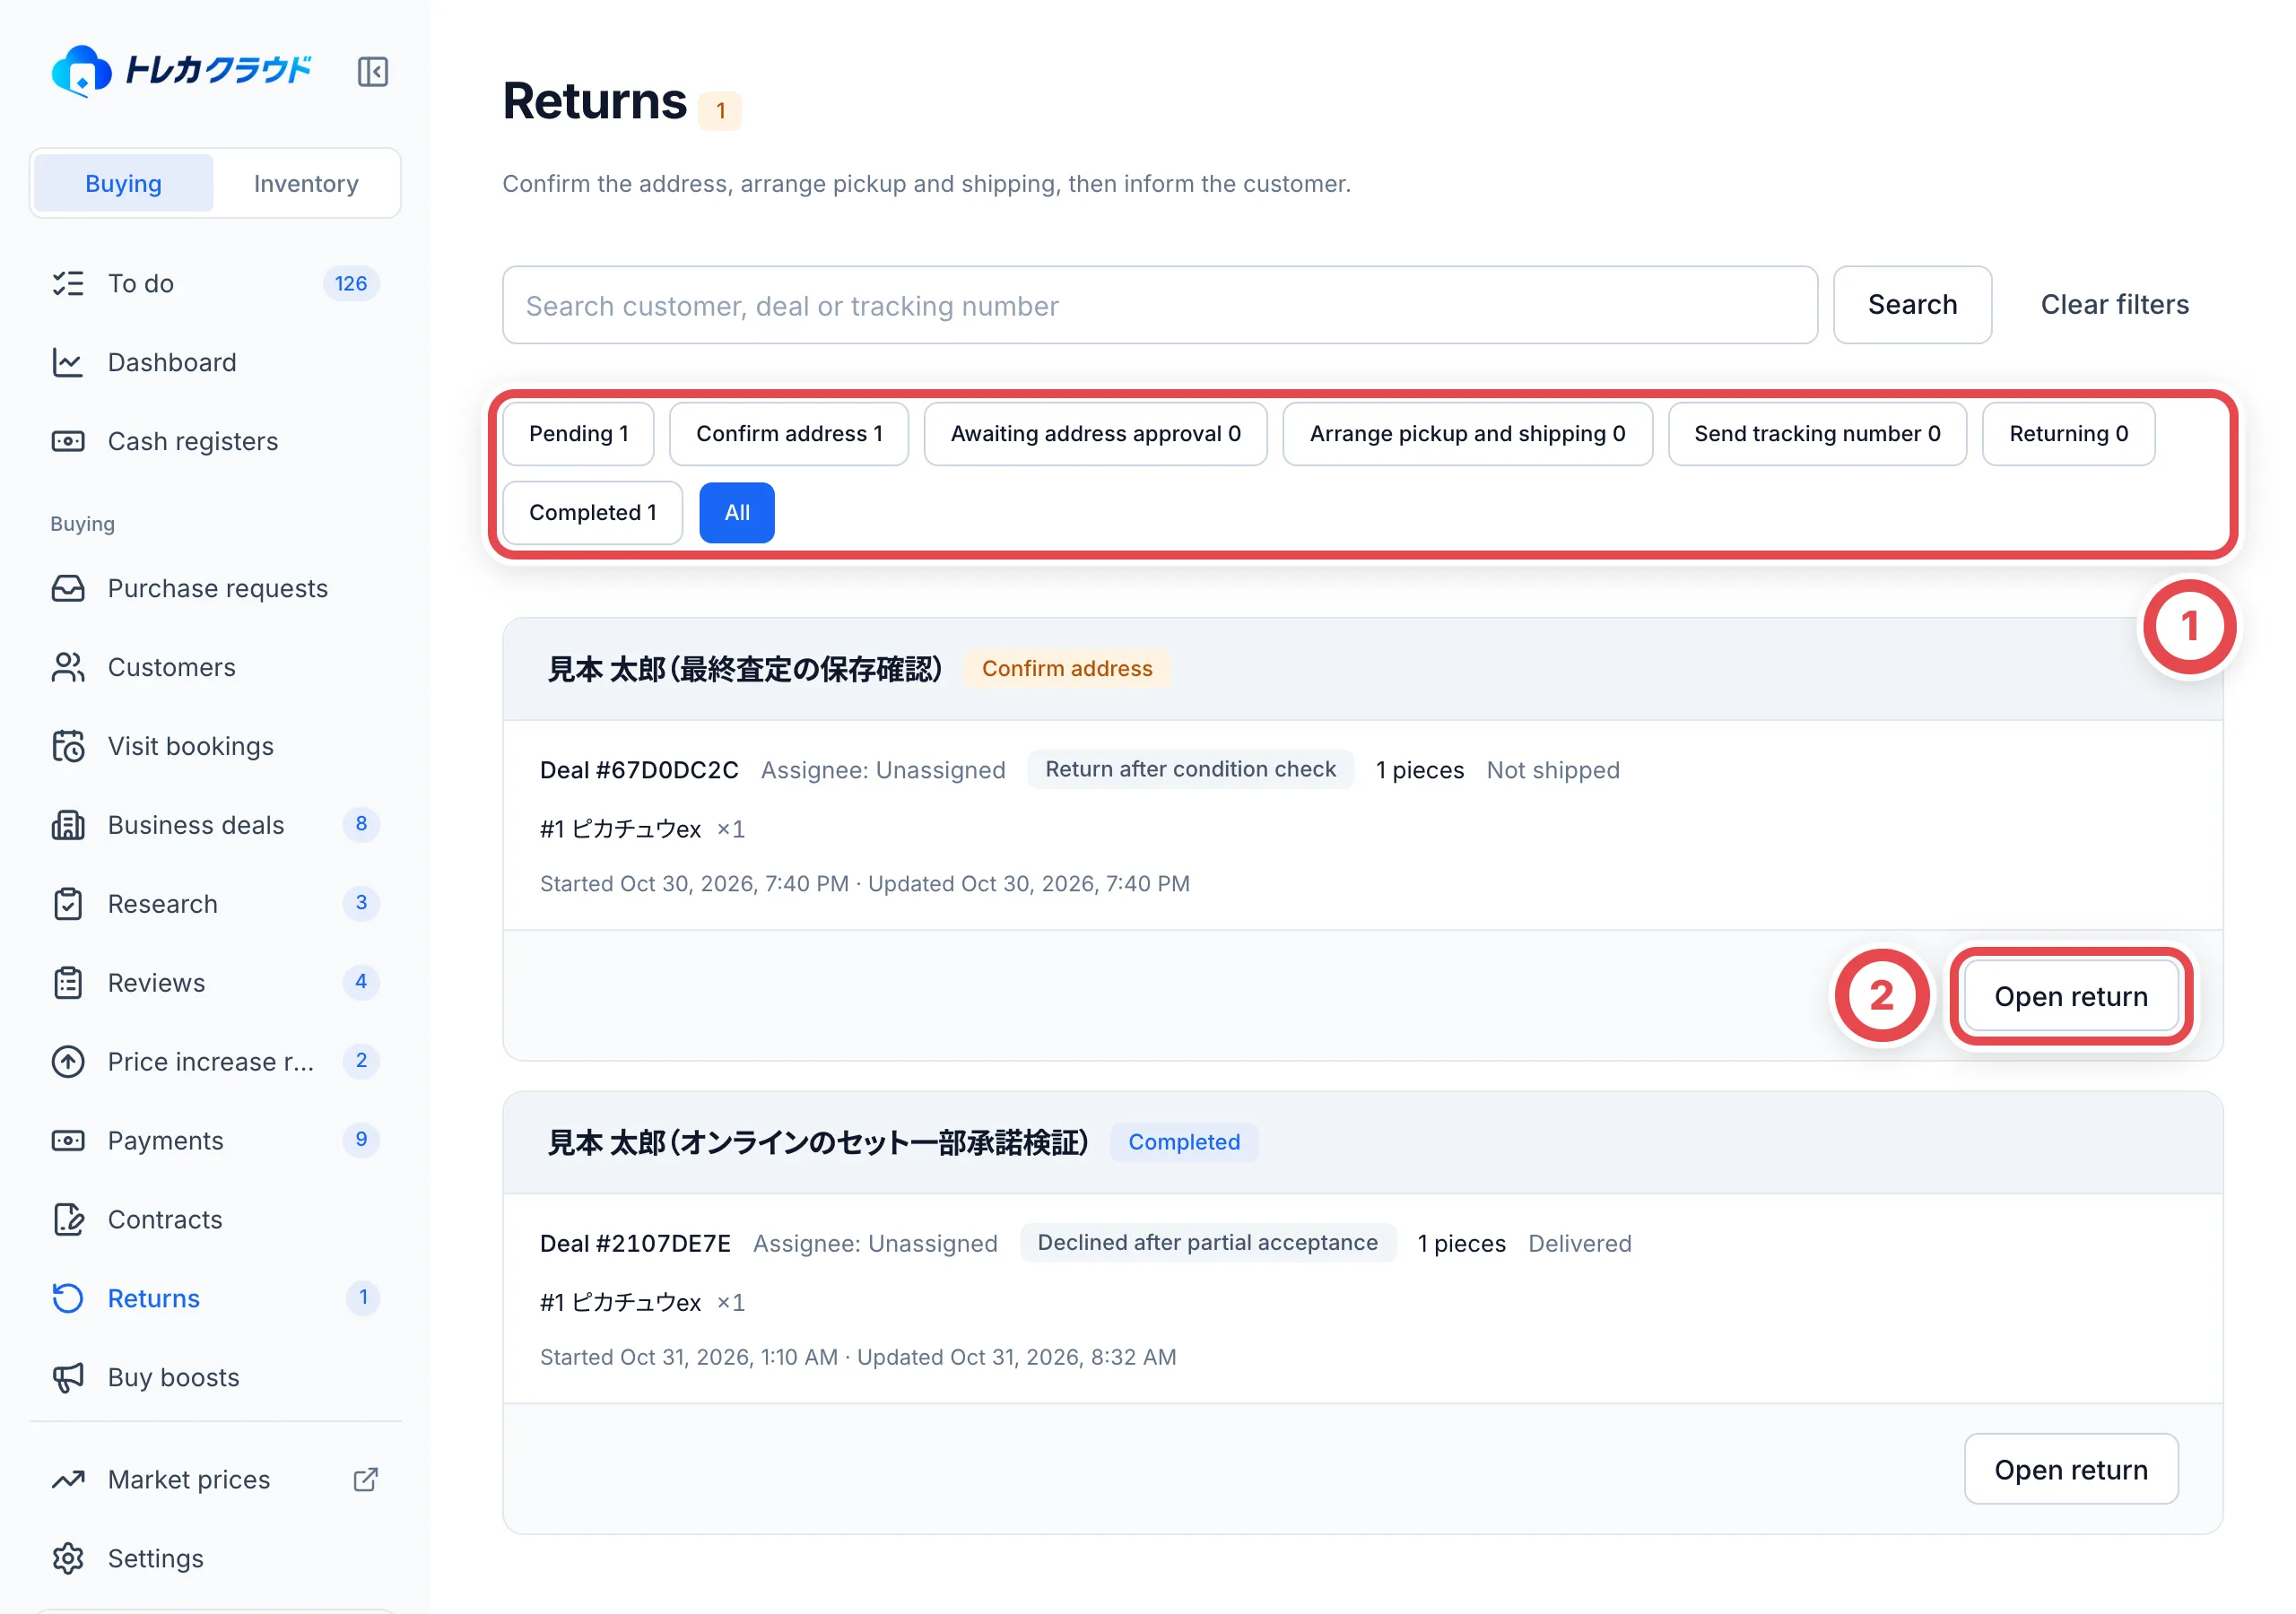
You can also open it from the deal. On the Shipping tab, click Open return under Next step, or click Returns under Arrange and record return. On the Payment tab, click Arrange return under Return of declined items. Once it’s open, check the cards and quantities to send back under Items to return on the right.
2. (If needed) Save photos of the cards you’re returning
To keep photos of the cards and packing before you send them back, click Add photos at ① under Return item and packing photos. Choose JPEG, PNG or WebP photos (up to 20MB each, 30 at a time), then click Save photos. Saving alone doesn’t send anything to the customer.
If your shop uses LINE and this customer’s LINE account is linked to the deal, choose the photos to send at ② (up to 4). Then click Review customer message at ③, check the message, and click Send to LINE. Clicking Send to LINE sends it right away. The review screen is the same as for arrival photos (step 4 of Shipping and final appraisal).
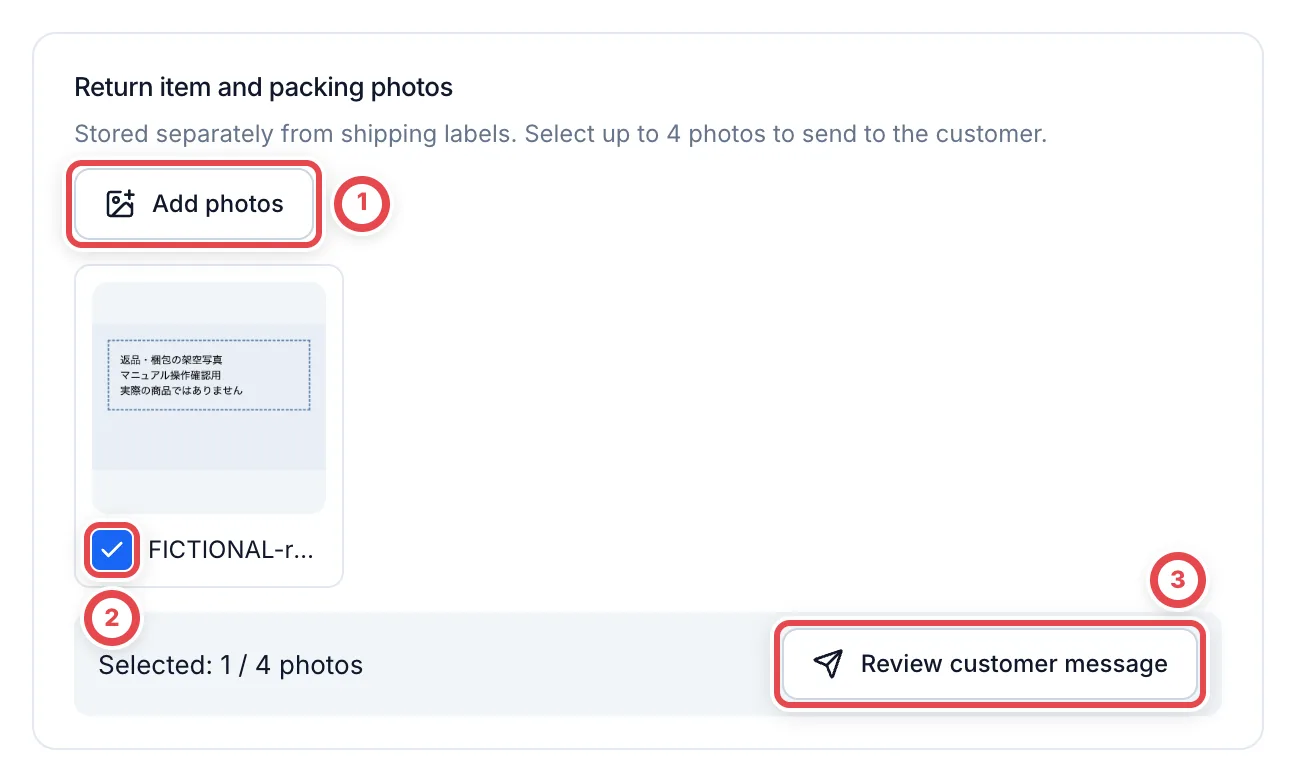
Saving or sending photos doesn’t move the address confirmation or shipping records forward. Do the steps below in order.
3. Check the return address and save it
Return address is filled in from the customer’s details with the recipient, postal code, address and phone number. Check and correct them at ①, then click Save return address at ②.
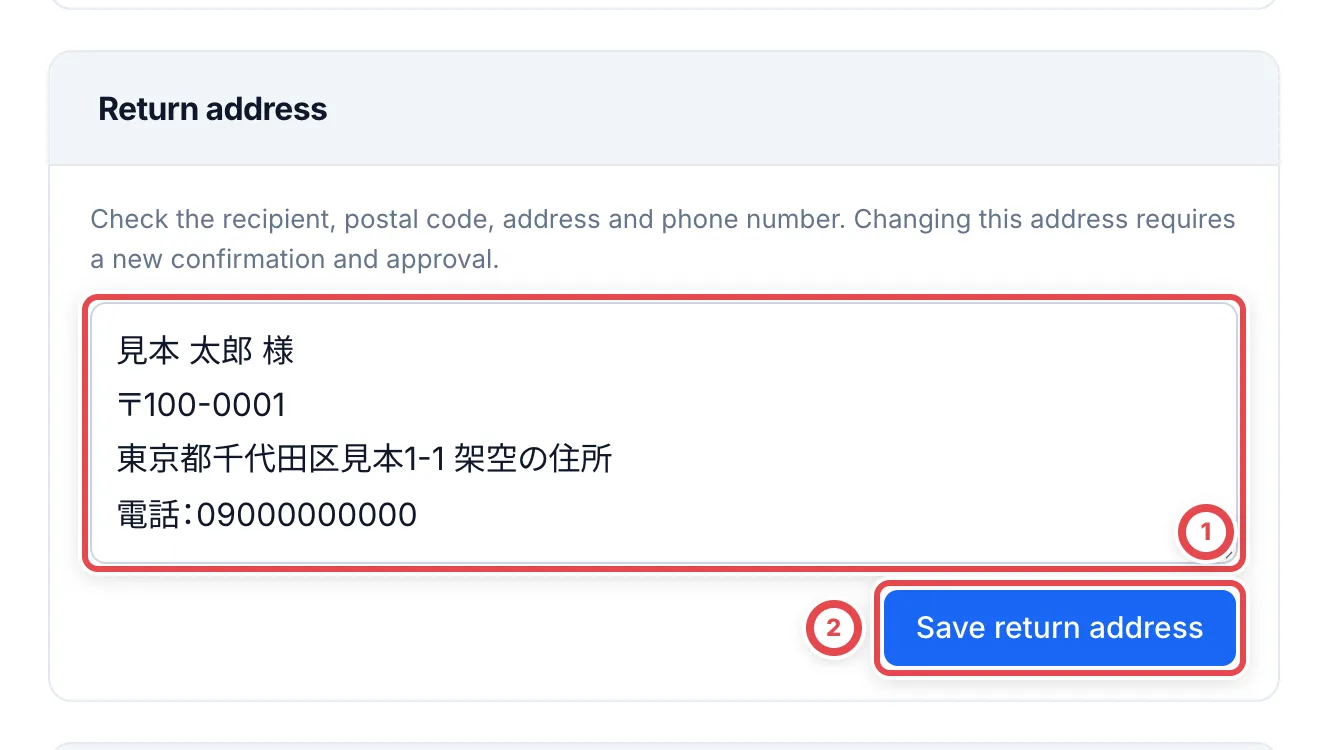
4. Send the address confirmation, then record it
1. Confirm the address has a message with the saved return address in it. Click Copy message at ① and send it to the customer on LINE or another channel. After you send it, click Record address contact at ②.
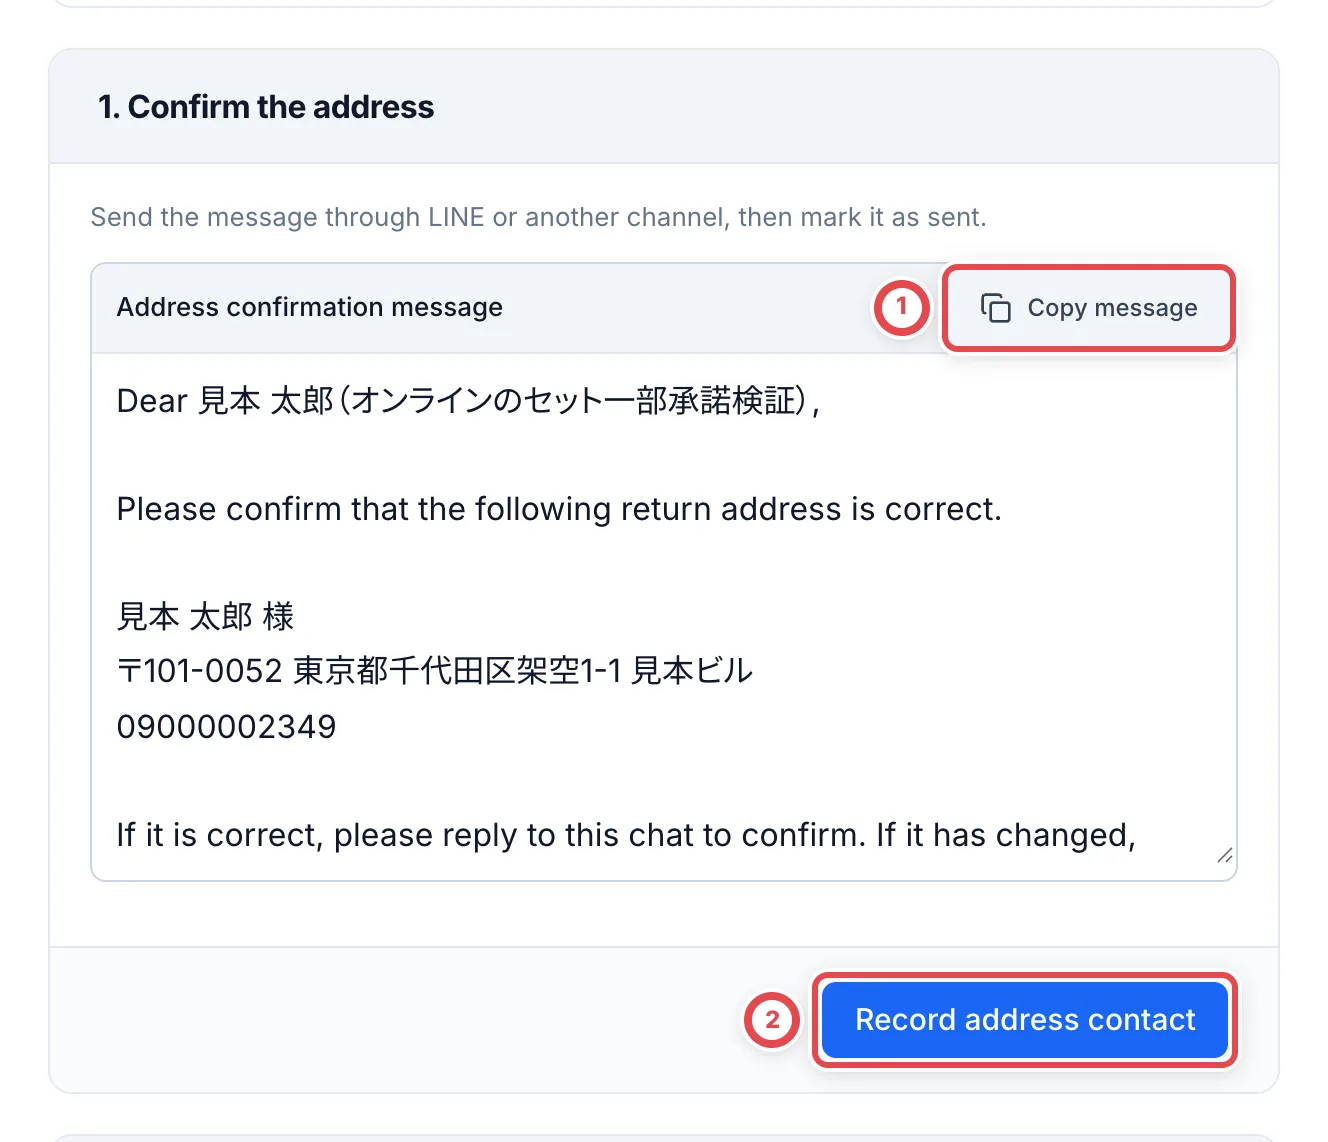
5. Record the customer’s approval
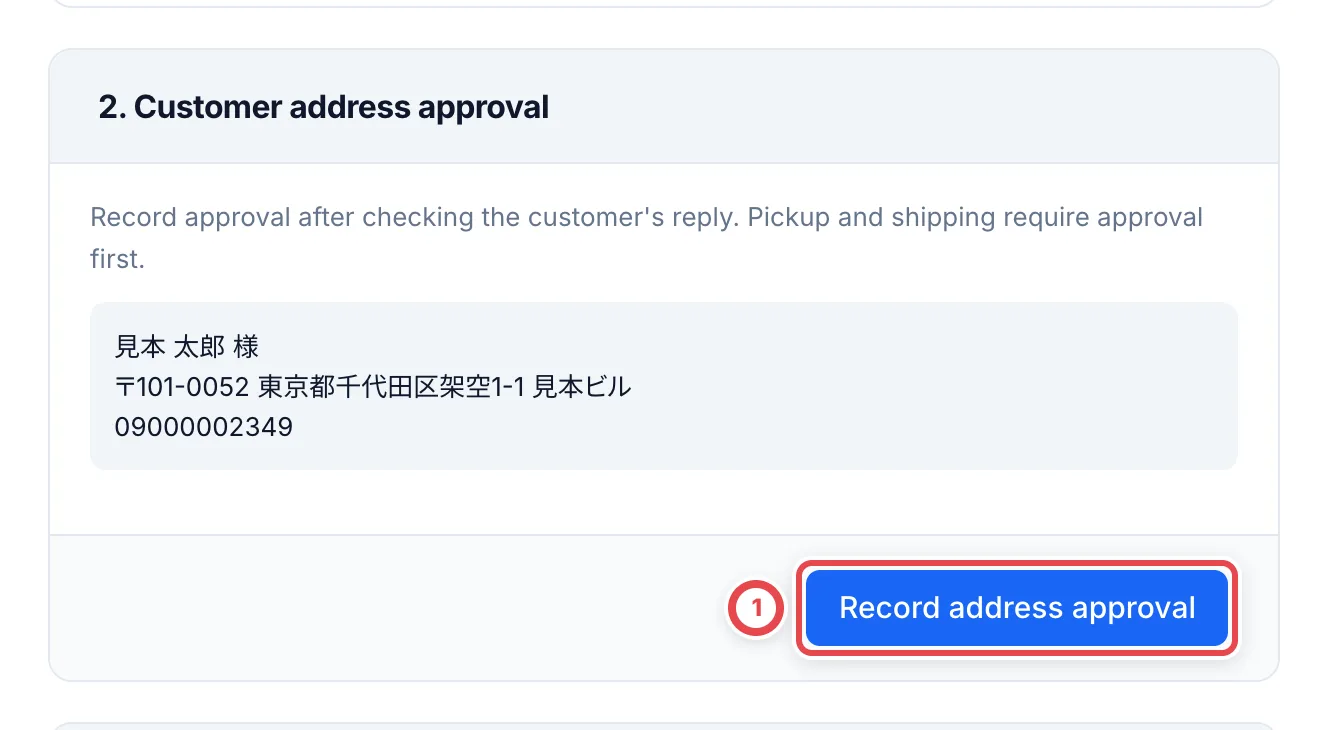
When the customer replies that the address is fine, click Record address approval at ① under 2. Customer address approval. You can’t go on to pickup or shipping until you record approval.
6. Arrange pickup, then record it
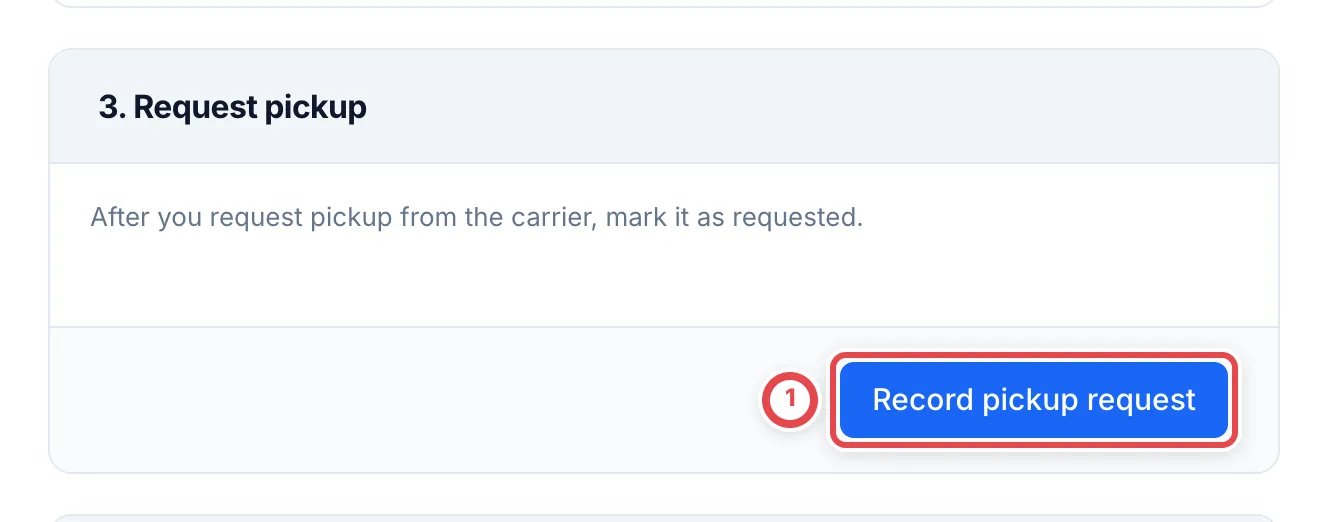
After you ask the carrier (Yamato Transport, for example) to pick up the parcel, click Record pickup request at ① under 3. Request pickup.
7. Record shipment
After you hand over the parcel, enter the carrier at ① and the tracking number at ② under 4. Record pickup and shipping (both are required). Also check the sender name and address, who pays the shipping fee and the return shipping fee, then click Record shipment at ③.
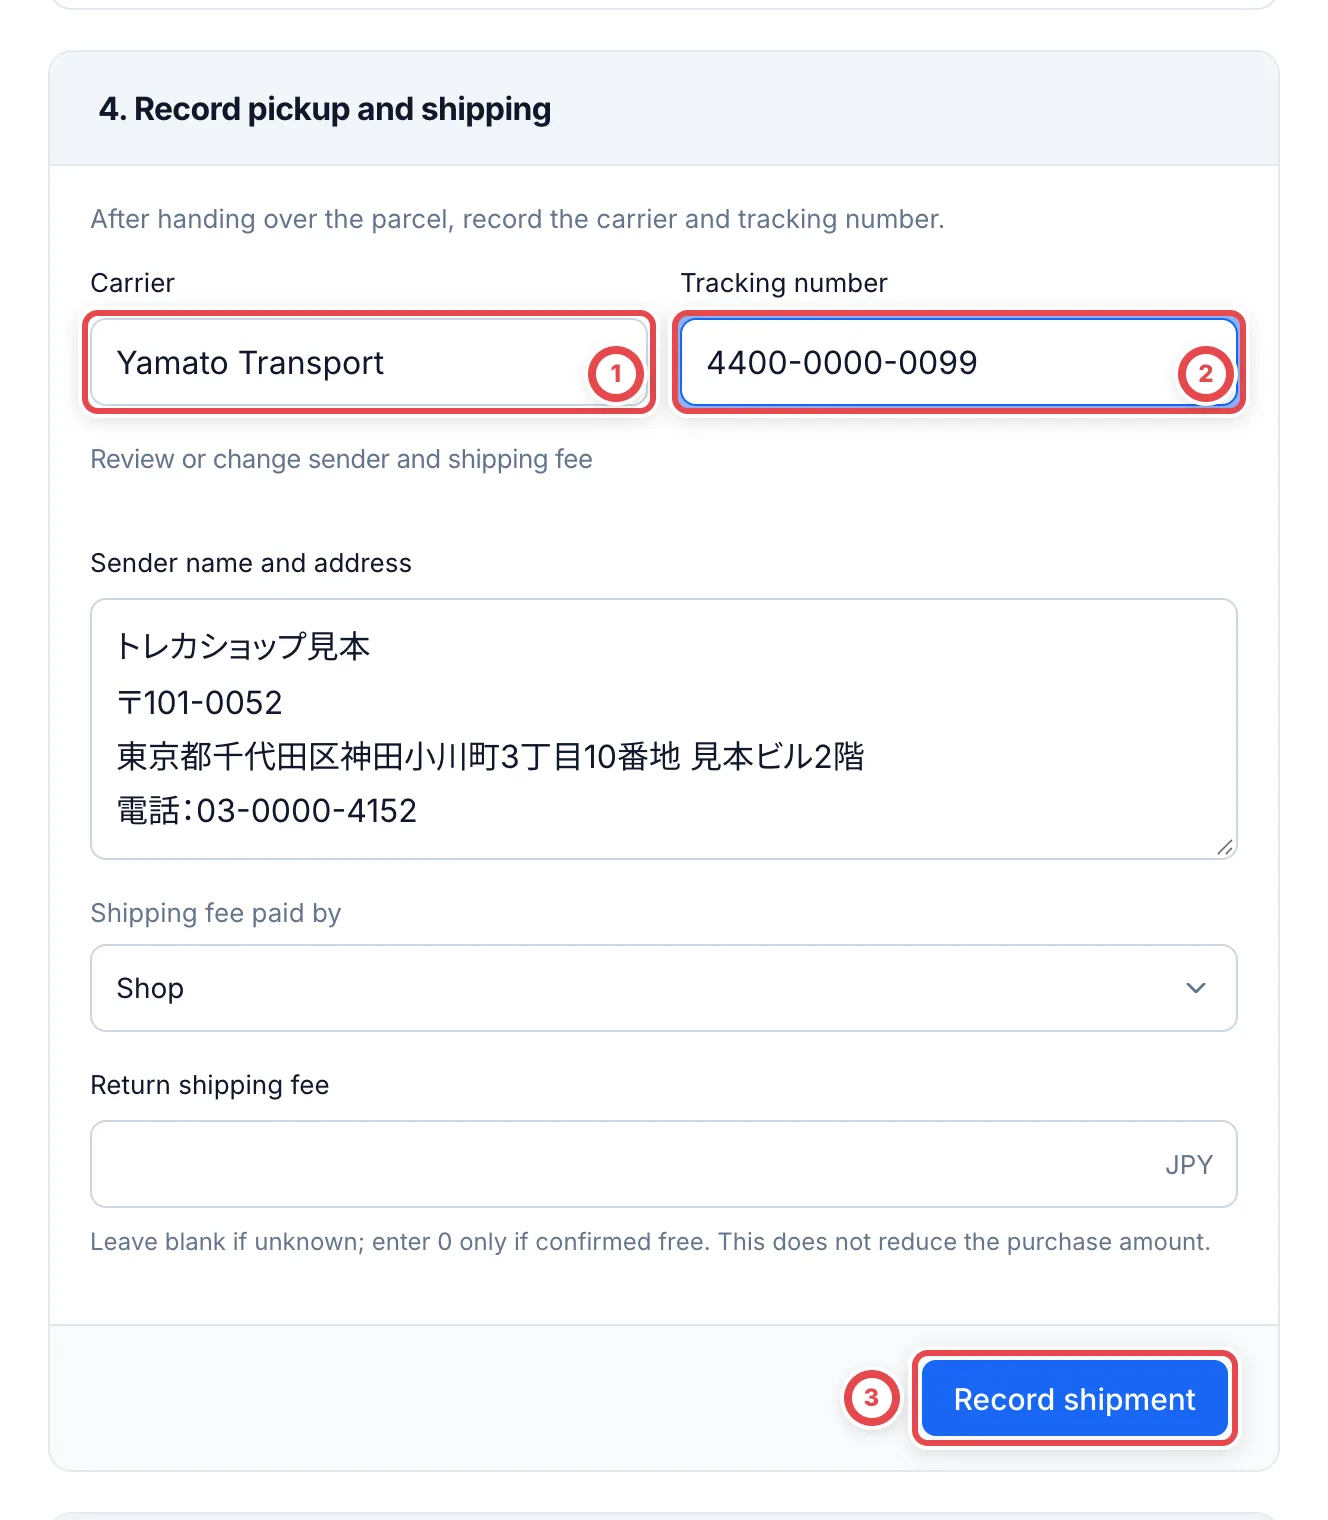
Leave Return shipping fee blank if you don’t know the amount yet. Enter 0 only if you’ve confirmed it’s free. Choose Shop or Customer under Shipping fee paid by. The fee you record isn’t deducted from the purchase amount or the payout automatically.
8. Send the tracking number, then record it
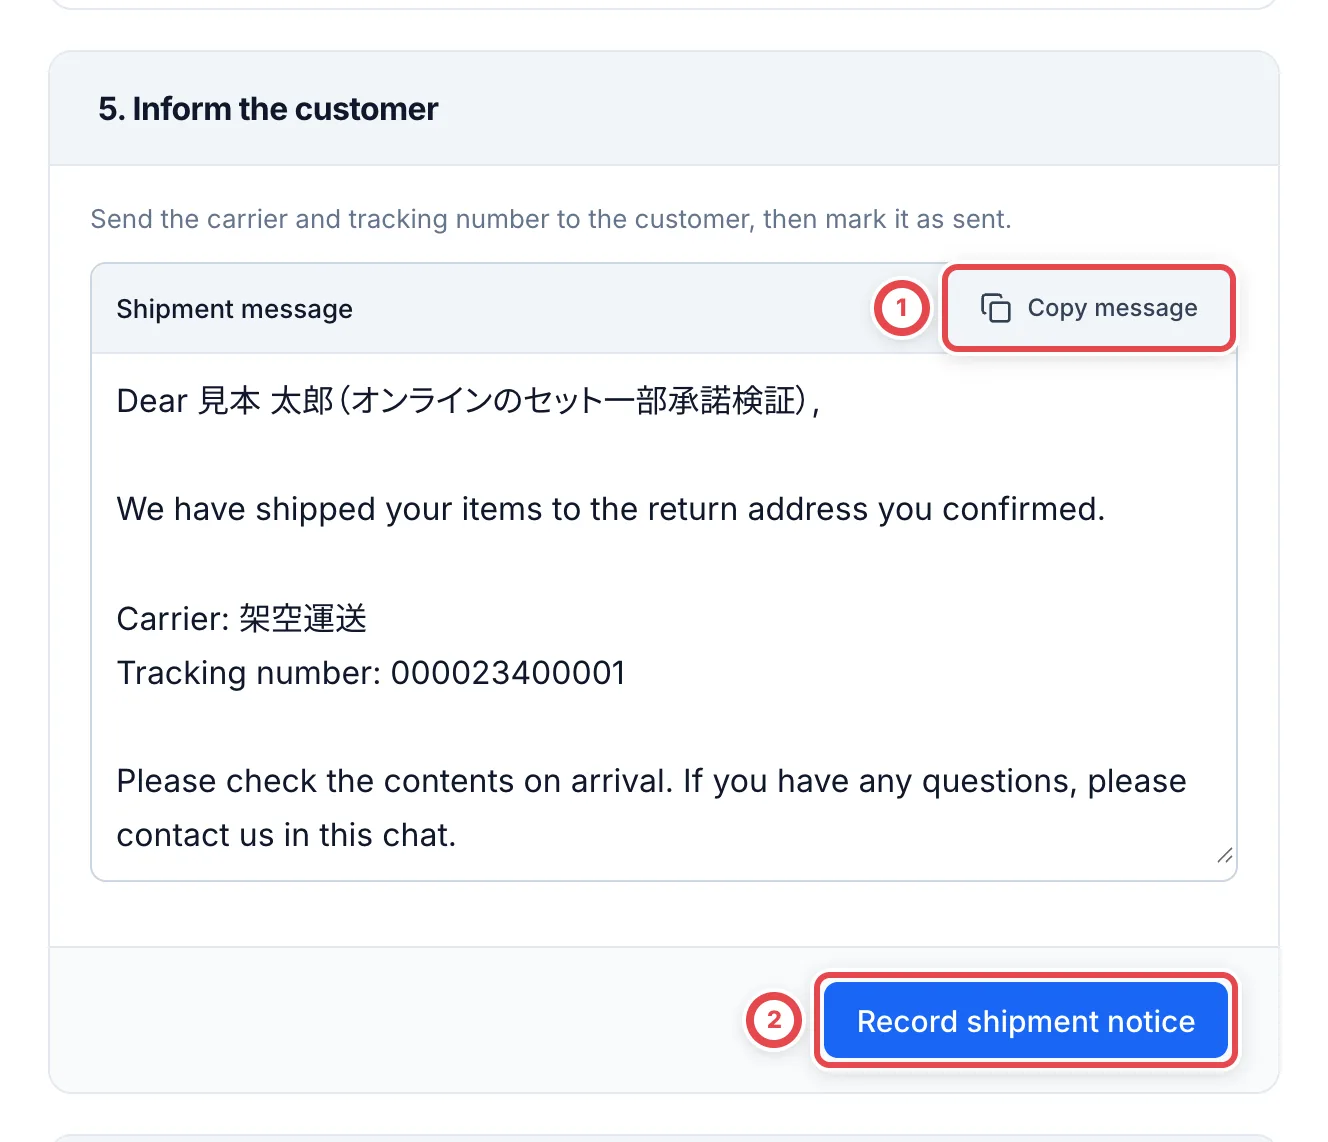
5. Inform the customer has a message with the carrier and tracking number in it. Click Copy message at ① and send it to the customer. After you send it, click Record shipment notice at ②.
9. Record delivery
When you’ve confirmed on the carrier’s site or similar that the parcel was delivered, click Record delivery at ① under 6. Confirm delivery. The return becomes Completed once the tracking notice is also recorded. Otherwise it remains Send tracking number; finish step 8.
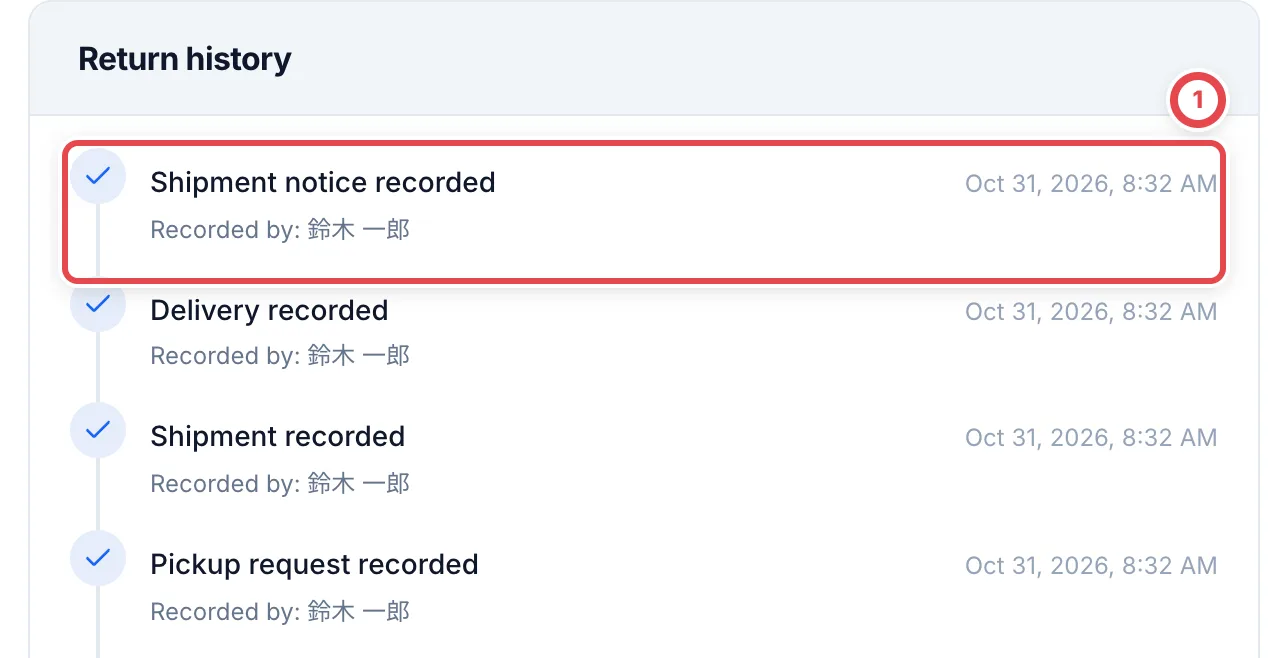
Return history lists each action you recorded, with its time and who recorded it, newest first, as at ①.
When you change the address
Before shipping, you can change the address with Change address under Return address. After a change, you need to record the address confirmation, the customer’s approval and the pickup request again. You can’t record shipment until the approval and the pickup request for the latest address are both recorded. You can’t change the address after shipping.
A deal with both a return and a payout
When the customer accepted only part of the quote, you can do the payout and the return in either order. For the payout steps, see Payouts.
If the message with the tracking number hasn’t been recorded, the return stays under Pending as Send tracking number, even after delivery or payout. Don’t go by the deal’s status alone. Check the next task left on the return.
Troubleshooting
| What’s happening | What to check and how to fix it |
|---|---|
| The return isn’t in the list | Declining or partly accepting a preliminary quote doesn’t create one. Check that you recorded the customer’s response to the final quote (decline or partial acceptance). |
| You see 「返品対応で住所の承諾と集荷依頼を記録してから発送してください」 (Record address approval and pickup request on the return before shipping; shown in Japanese only) | The approval for the latest address and the pickup request aren’t both recorded. Record steps 5 and 6, then ship. |
| You fixed the address and the approval and pickup request disappeared | Changing the address means recording them again. Do steps 4 to 6 again with the new address. |
| Review customer message doesn’t appear for photos | You haven’t chosen at least one photo, or your shop doesn’t use LINE. You can still save the photos. |
| The return is still Pending after delivery and payout | The tracking number message (step 8) isn’t recorded. Send it and click Record shipment notice under 5. |
| You want to deduct the return shipping fee from the purchase amount | The fee isn’t deducted automatically. To deduct it, include it in the final quote amount and get the customer’s approval. |
When another person updates the return
If a conflict message appears, click Load the latest state and check which actions are already recorded. Avoid recording the same contact or shipment again while the result of the previous save is uncertain.
After the return
After recording delivery, check online purchase completion. If a partial purchase still needs payment, continue with Payouts. Goods declined in full are not put away as purchased inventory.