

Correct settled purchase amounts, quantities and linked records
Correct errors found after stock registration from the originating purchase case. The correction retains original records while updating purchase totals, inventory, unit costs, the secondhand ledger and linked records.
This workflow covers purchases settled and registered as line-level amounts. Purchases settled from individual-card appraisals are excluded, and Correct purchase amount and quantity is not shown. Have an administrator review the original case, payments and documents before taking further action.
| Situation | Route |
|---|---|
| The appraisal has not created stock yet | Use normal appraisal / quote editing |
| Correct an amount or quantity after stock registration | Use Correct purchase amount and quantity below |
| Undo an earlier appraisal operation | Check Restore an operation from history for eligible operations |
| Correct a product’s name, number or valuation | Use shop product and valuation corrections |
Purchase history correction permission and access to read/edit the affected records are required. For store transfers, your current membership and inventory editing / history correction permissions must cover every affected shop. A connection between shops alone is not enough.
1. Open the originating case’s menu
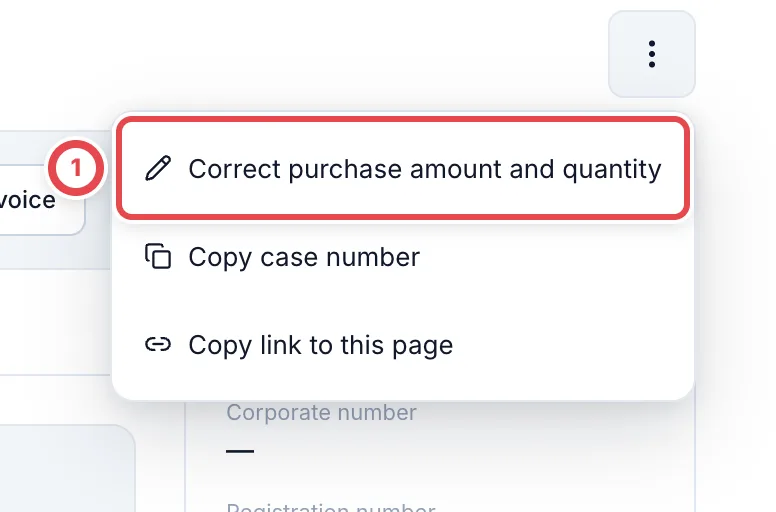
Open the case from Purchase requests or Business deals. Click … (Actions for this request) at the top and select Correct purchase amount and quantity at ①. This example shows a business deal.
2. Enter quantities and line totals
For each line, enter Quantity at ① and Line total (JPY) at ②. The amount is the total for the whole line, not a unit price. Select a correction reason and add context if needed. Other requires details.
For cards, boxes, packs and decks, reducing a quantity requires selecting the exact units to remove. Increasing it requires a receiving location. Eligible units removed by an earlier correction are restored first; additional units are then created if needed. A bulk appraisal’s bundle holds a contents quantity and does not use the same per-card removal selection.

3. Choose units to take over linked records
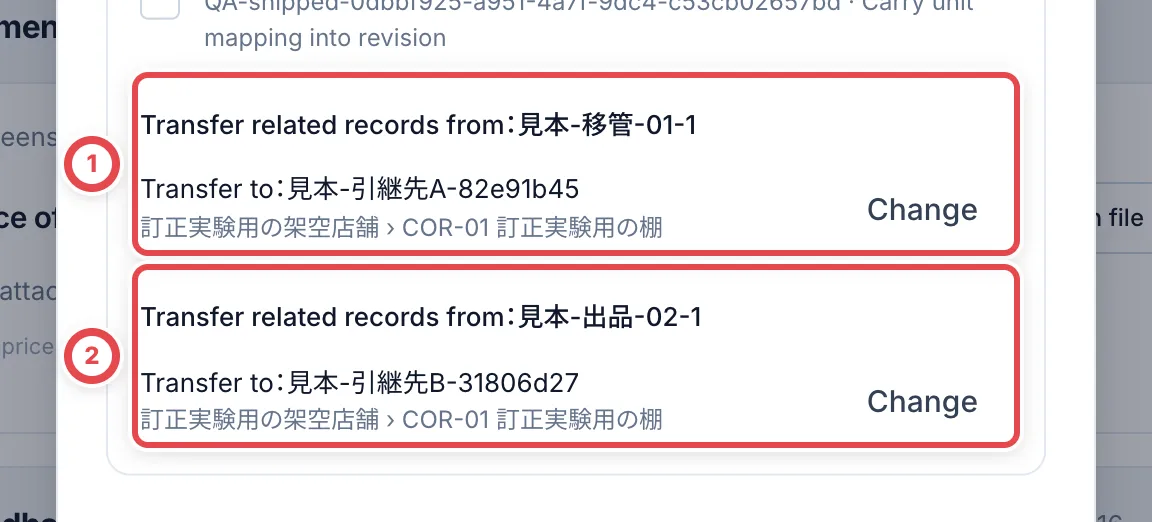
When a removed unit is reserved, sold, returned, transferred or used by a partner application, choose an available replacement of the same product, grade and packaging conditions. ① shows a transfer; ② shows a partner listing. A replacement cannot be reused for multiple removed units. Match the selected label number (or asset number if no label has been issued) and shelf to the physical item.
A previously confirmed picking scan may need checking again after relinking. Confirm the updated reservation or outbound order with its operator.
4. Review the purchase total and payment difference
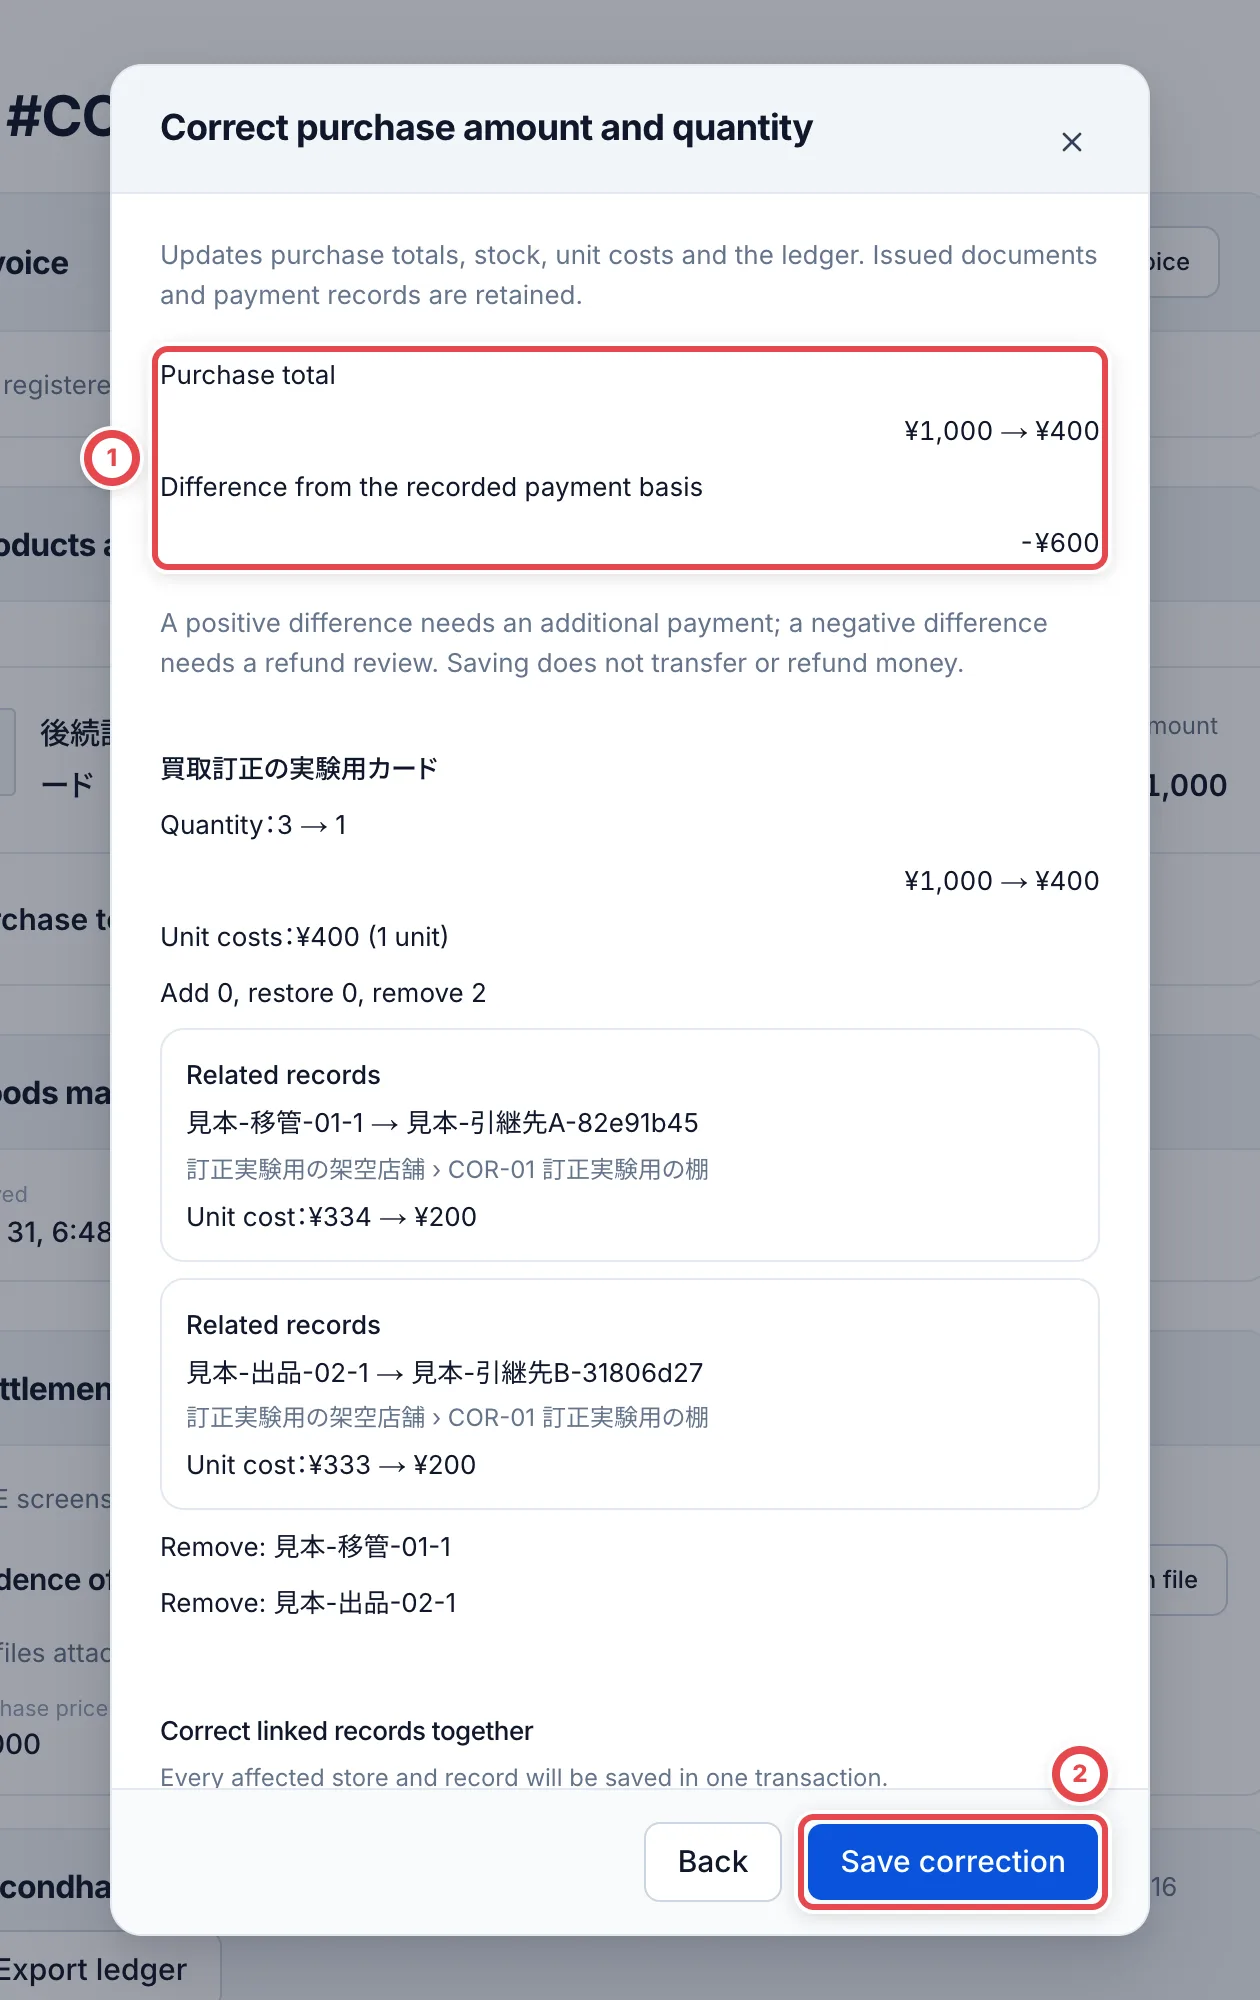
Click Review changes. Check purchase totals, quantities, costs and the difference from the recorded payment basis at ①. A positive difference needs additional payment review; a negative difference needs refund review.
Review all linked records in the following steps before using ② to save. For checks after saving, note the affected outbound / transfer numbers, external references, and the original and replacement label or asset numbers.
5. Review store transfers and partner records
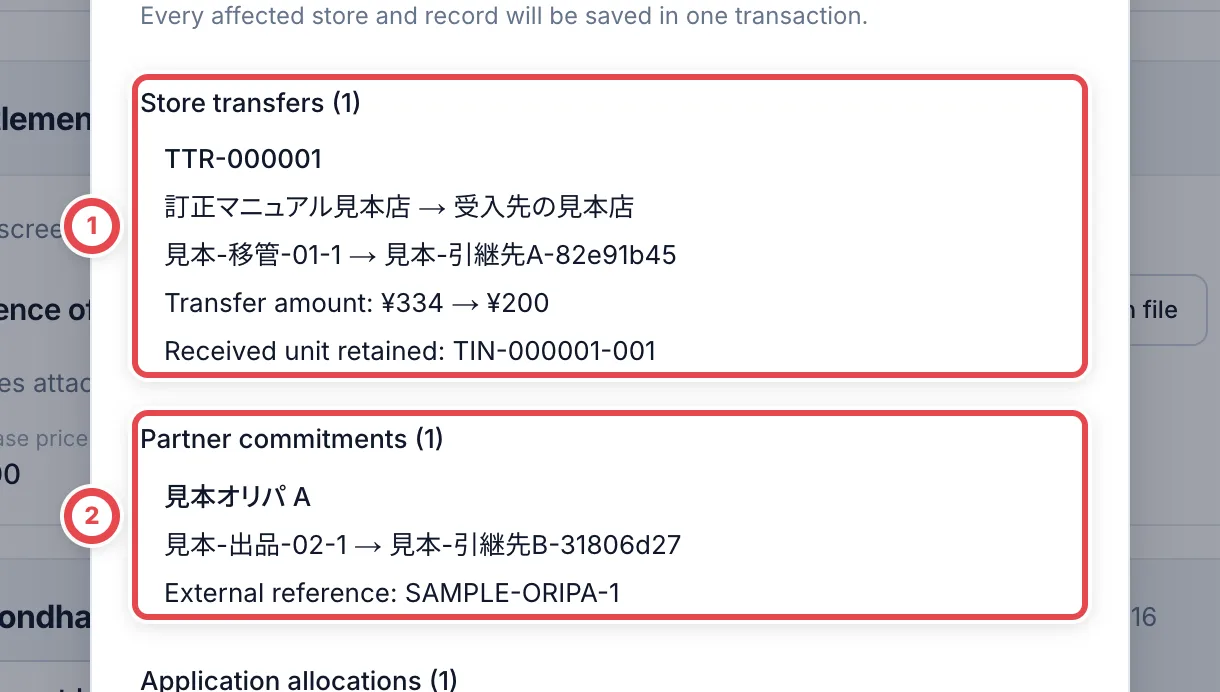
Scroll down in the same preview. At ①, check Store transfers: sending shop, receiving shop, units and amounts. A received unit keeps its identity while related costs are updated. An agreed transfer amount linked to a sale may be retained.
At ②, check Partner commitments and the application allocations below them. Match each original unit to its replacement. External references, commitment / allocation identities and expiry are retained. This purchase correction does not change sale prices or return refund amounts.
6. Review scan replacements and received costs
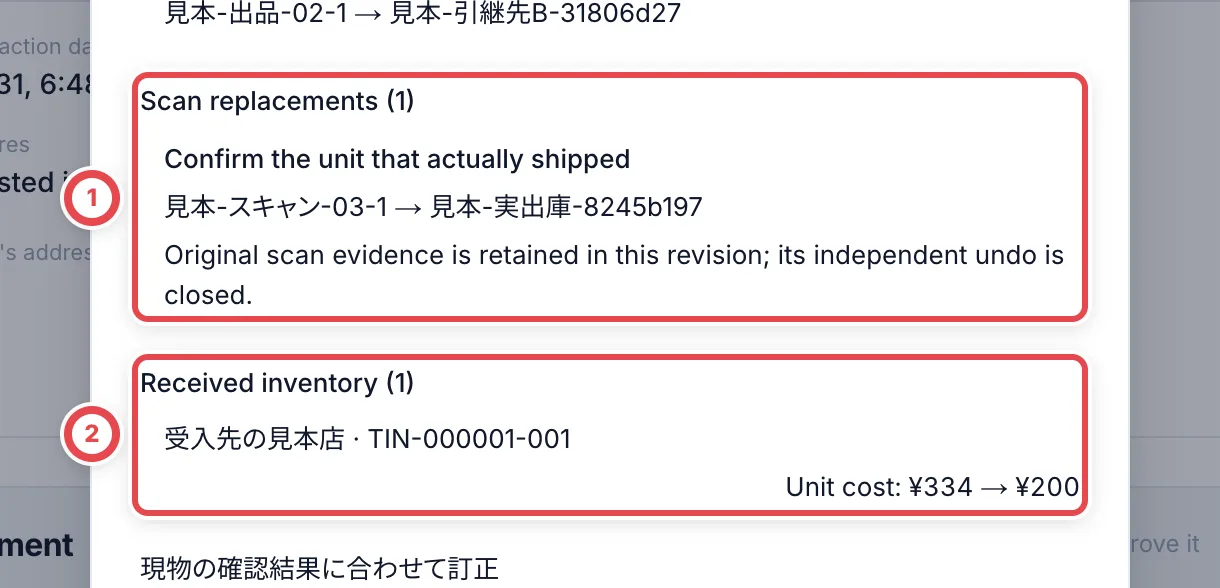
Check Scan replacements at ① against the unit that actually shipped. At ②, check Received inventory for the receiving shop’s unit and corrected cost.
After reviewing the whole preview, click Save correction. Affected shops and records are saved together. If current state or permission checks fail, reload the latest record and reconsider the correction.
7. Reopen the case and inspect revision history
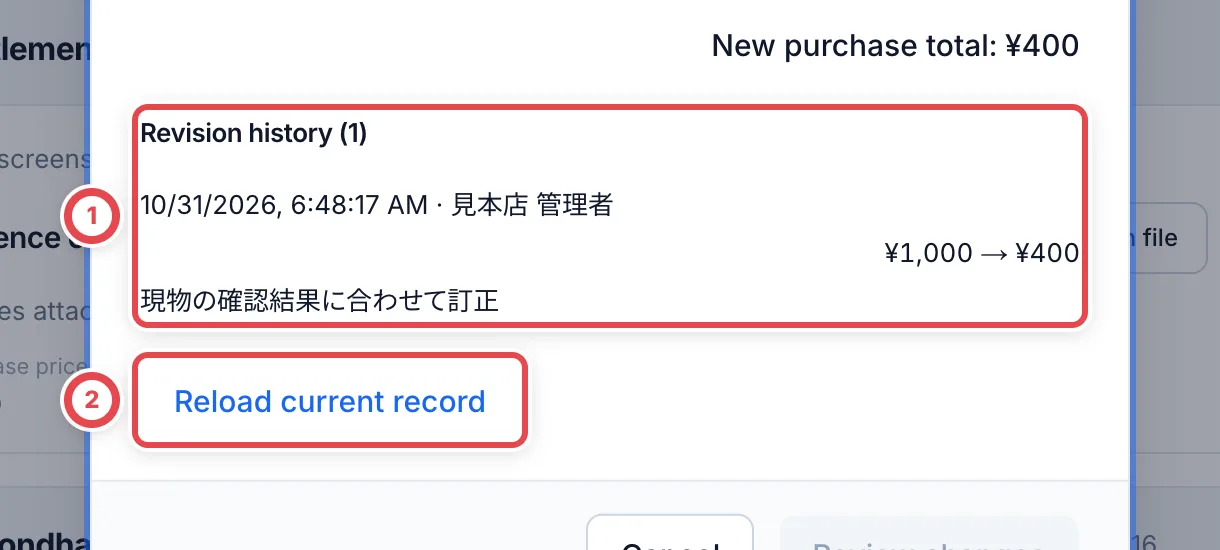
Reopen the case and check its corrected total, quantity and payment difference. Reopen the correction dialog: Revision history at ① records when, who, why and the changed amount. Use the following routes to match linked records against the identifiers you noted before saving.
| Record | Where to open it and what to check |
|---|---|
| Inventory units | Inventory → the product. Press the row to open it if needed, then open the unit. Match its asset number under Management details, status, acquisition cost and shelf. |
| Reservations, sales and scan replacements | Inventory → Outbound. Search the outbound number, open the order and press a line to open it. If labels are unissued, open the unit link and match its asset number. Removed lines remain as history; check the reserved / shipped line. Check sale price, acquisition cost and the picked count. Have the outbound operator rescan units that need confirmation. |
| Sale returns | On the same outbound order, check the return number, quantity, refund and receiving shelf under Returns. Open the line to check the returned replacement. The sales summary is net of returns; distinguish it from the original sale price on the unit line. |
| Store transfers | Inventory → Tenant transfers → Outgoing. Open the transfer number and check status, quantity, acquisition total and original asset number. If you have access to the receiving shop, switch shops in the account menu and open the same transfer under Incoming. Click Open accepted unit and check its retained asset number and corrected acquisition cost. Switch back to the original shop afterwards. |
| Partner commitments and allocations | Open the product from Inventory, then its replacement unit. Check status, partner, listing name, external reference and partner allocation. Check receipt and display in the partner application separately. |
See outbound orders and transfers, sale returns, and partner sales and shipments for each screen.
To return to an earlier purchase amount, enter the intended amount and quantity as a new correction and review current linked records again. Increasing the quantity may restore previously removed units, but it does not automatically move sales or reservations back from their replacements. Check restored units separately from the current linked replacements. If another member has changed the case, use Reload current record at ② before entering the correction again.
Troubleshooting
| What you see | What to check |
|---|---|
| No correction action | Check that stock registration is complete and that you have purchase history correction permission |
| Review is disabled | Check quantities, amounts, reason, removal count, replacement selections and receiving location for increases |
| No replacement candidates | Check available units of the same product, grade and other required conditions |
| Another shop prevents saving | Ask an administrator to verify current permissions in every affected shop |
| Record changed | Use Reload current record and reconsider inputs and selected units |
| Save outcome is uncertain | Read the case and revision history first; do not stack another correction with changed inputs |
| Payment or issued document still shows old values | Originals are retained. Match the corrected total to the payment difference and review settlement separately |