

Counter ID photos and the original-ID check
Use this guide when customers photograph their ID on their phone or a shop tablet. When staff enter the original document’s details themselves, use Record counter identity checks and add documents.
Complete the collection setting and display the quote using steps 1–4 of Start a counter purchase. The customer accepts the quote and checks or enters their details before reaching document capture. Customer screens are in Japanese.
1. Choose the document and prepare the required sides
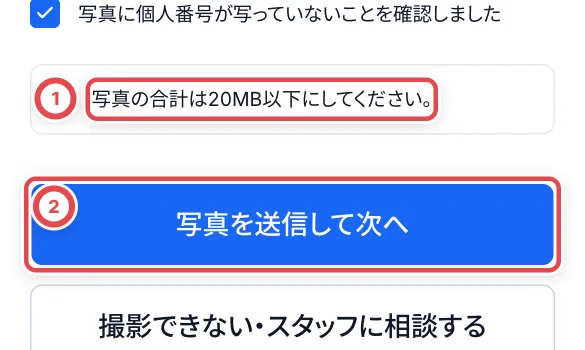
Choose the document under 「本人確認書類の種類」 (ID document type). Use still JPEG, PNG or WebP images, no more than 20MB in total for both sides. If HEIC conversion fails, take a new JPEG photo.
| Document | Required photos | What to check |
|---|---|---|
| Driver’s licence | Front and back | Both sides even if the back has no amendments; use different images |
| My Number card | Front only | Never send the back, personal number, notification card or PIN |
| Passport | Photo page | Keep all four corners, the portrait and the text visible |
| Residence card | Front and back | Prepare a separate image of each side |
2. Check and submit the photos
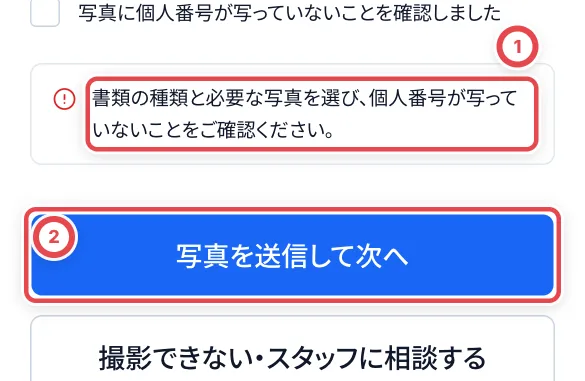
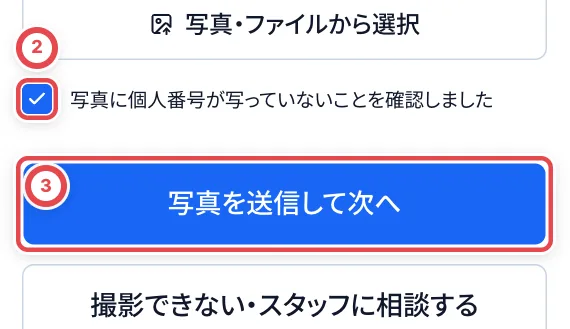
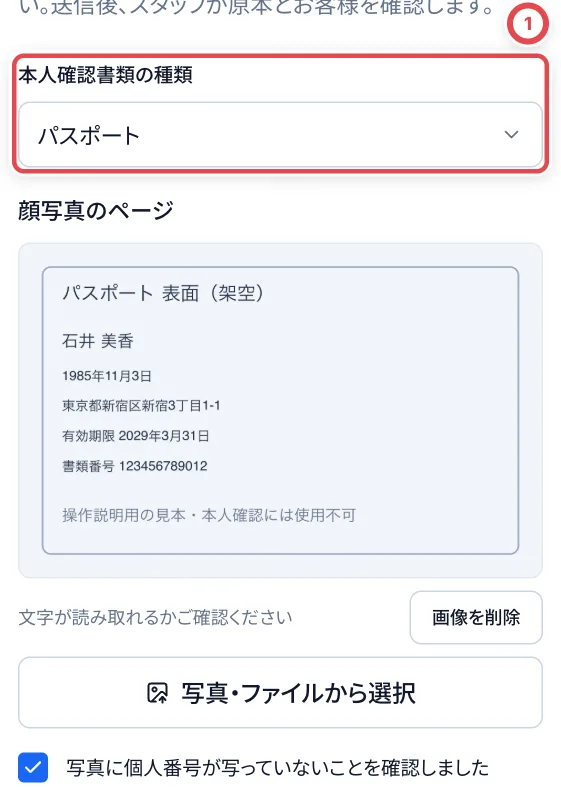
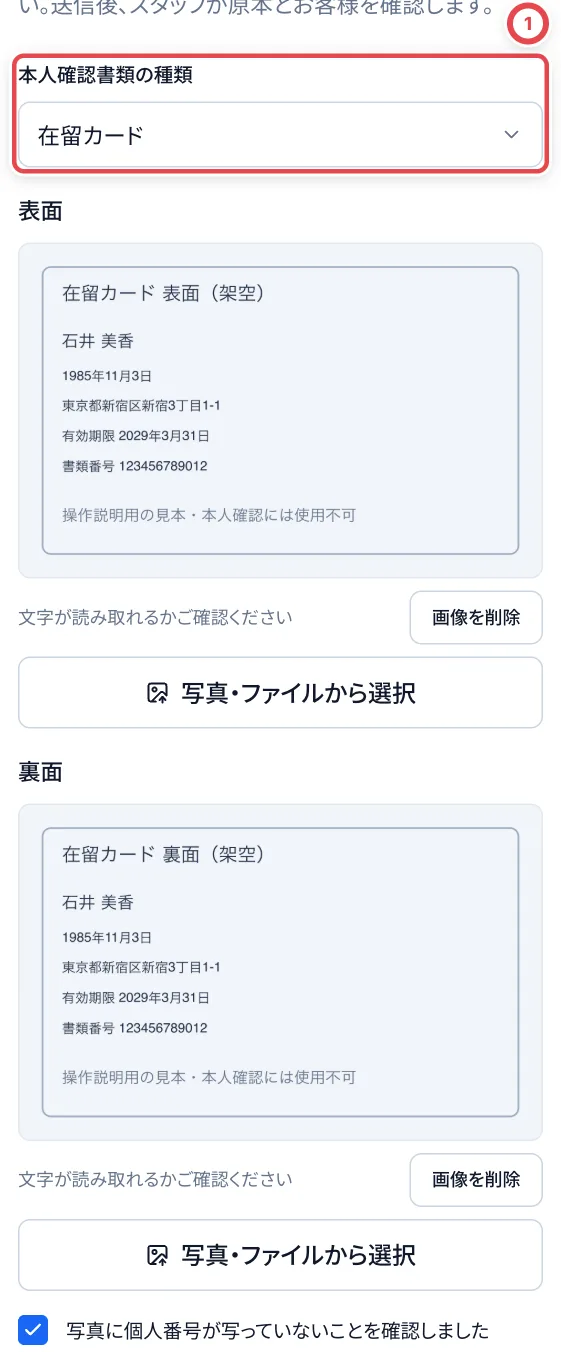
Use 「写真・ファイルから選択」 (Choose a photo or file), or the device camera. Check the corners and text in each preview. Remove an incorrect photo with 「画像を削除」 (Remove image) and choose again. At ②, confirm 「写真に個人番号が写っていないことを確認しました」 (I have checked that no personal My Number is visible). Press ③, 「写真を送信して次へ」 (Submit photos and continue).
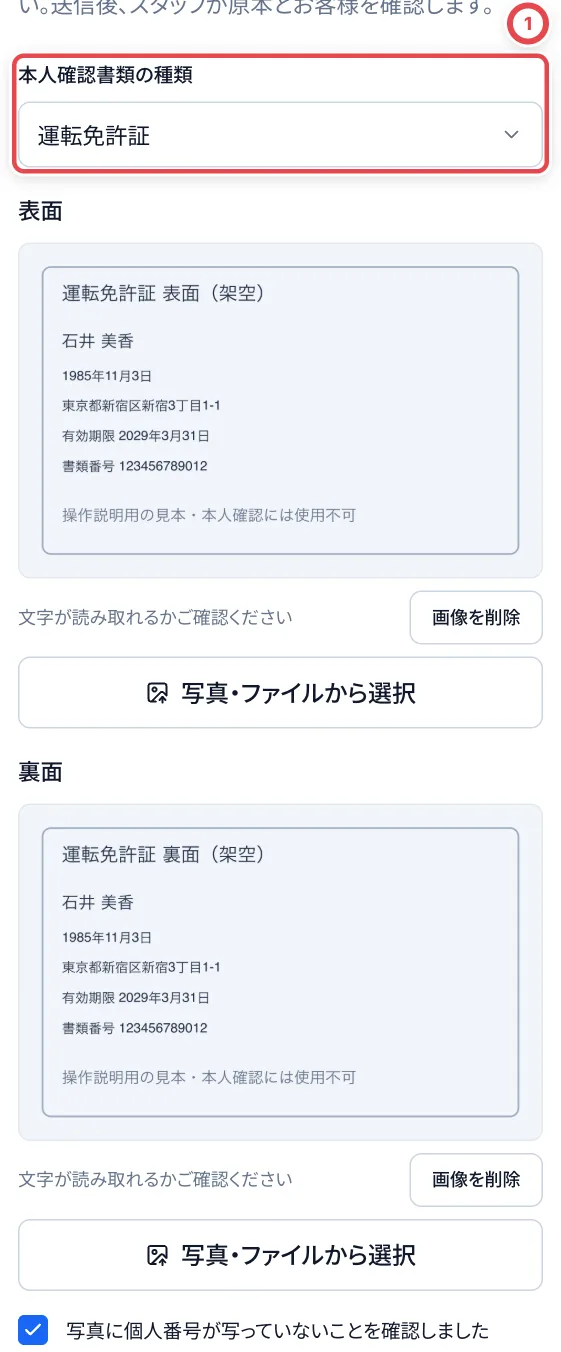
Driver’s licence
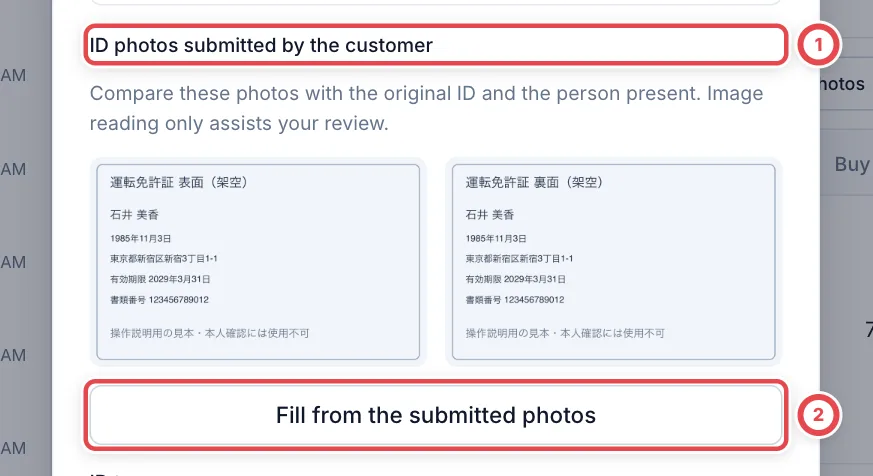
Choose 「運転免許証」 at ① and select the front and back separately. Use ② and ③ above after checking the photos.
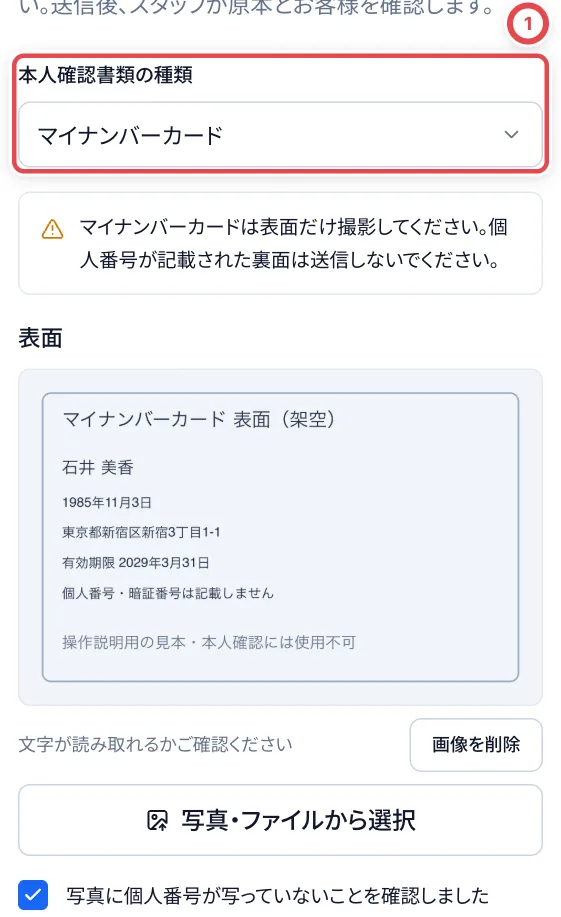
My Number card
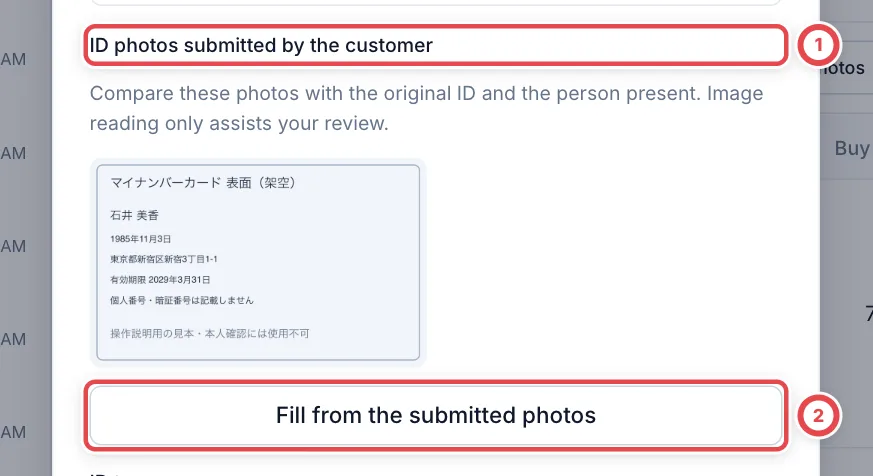
Choose 「マイナンバーカード」 at ①. Only the front photo is requested; there is no back-side input. Use ② and ③ above after checking the photos.
Passport
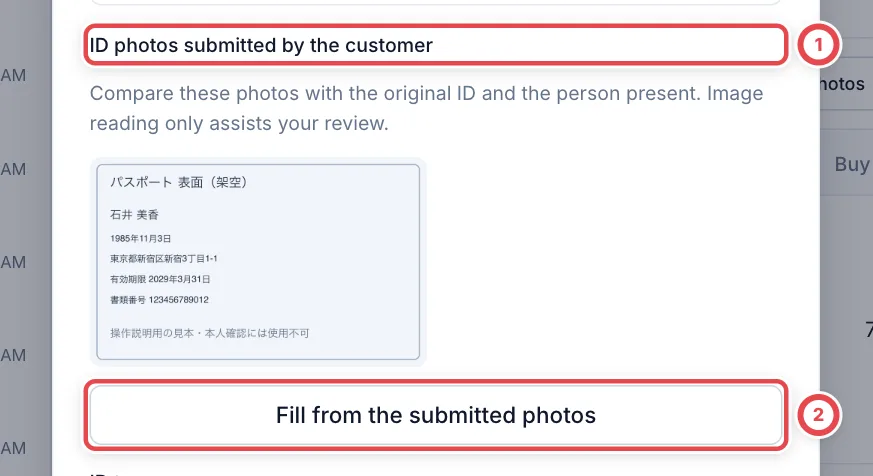
Choose 「パスポート」 at ① and select the photo under 「顔写真のページ」 (Photo page). Use ② and ③ above after checking the photos.
Residence card
Choose 「在留カード」 at ① and select separate front and back photos. Use ② and ③ above after checking the photos.
When the photos exceed 20MB in total
The error at ① means the photos have not been submitted. Remove the images, choose smaller photos, check the confirmation again and retry with ②. The 20MB limit applies to both sides together, not to each photo separately.
3. Ask the customer to agree and sign
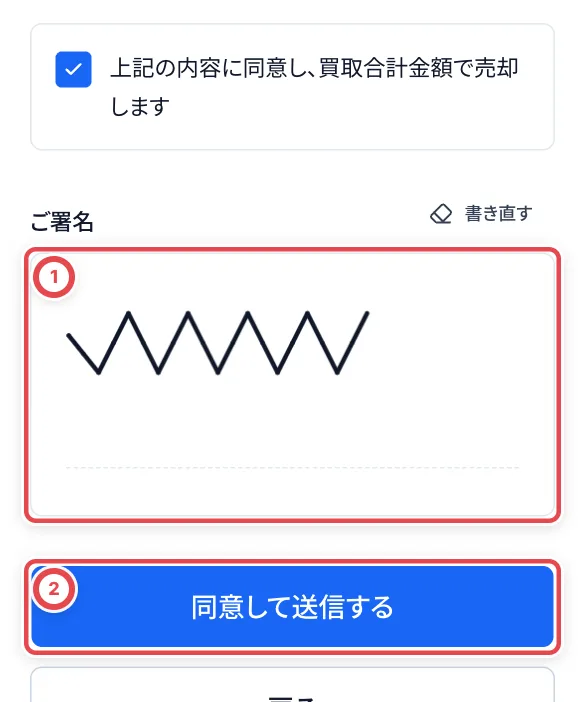
After submission, 「ご同意とご署名」 (Agreement and signature) opens. The customer reads the agreement, checks the checkbox and signs their name at ①. To start again, use 「書き直す」 (Clear and rewrite). Press ②, 「同意して送信する」 (Agree and submit).
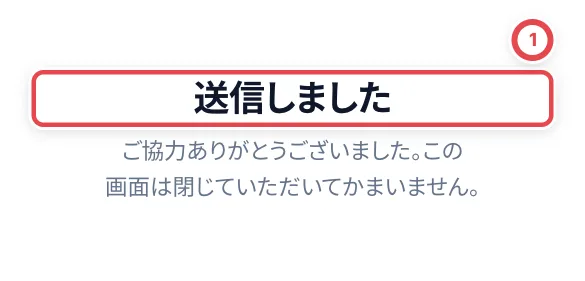
「送信しました」 (Submitted) completes the customer’s entry. Staff have not yet completed the identity check. Ask the customer to show the original document.
4. Staff compare the photos, original ID and customer
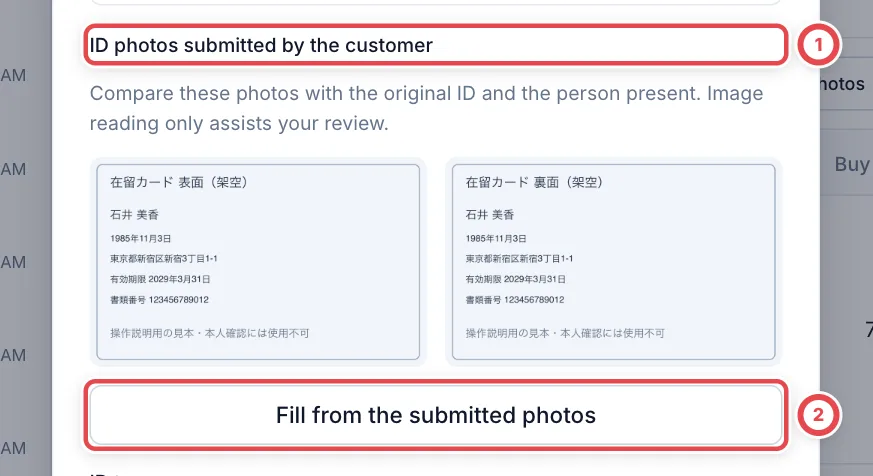
Open Check in person on the correct deal. At ①, ID photos submitted by the customer, compare the photos with the original document, the person present and their declared name and address. Button ②, Fill from the submitted photos, helps fill the document type, number and expiry date. Check and correct every reading against the original.
Check a driver’s licence
Check a My Number card
Check a passport
Check a residence card
5. Record the check and continue the purchase
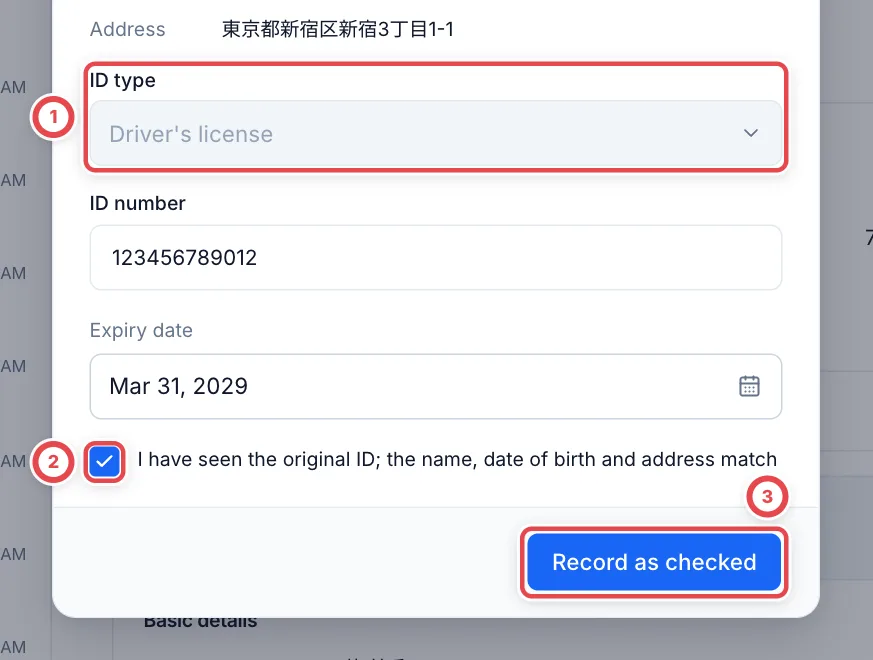
Check the type at ① and the number and expiry date below it against the original ID. For a residence card, select the no-expiry confirmation only when the card itself explicitly has indefinite validity. Once the details match, check ② and press ③, Record as checked.
If the save result cannot be confirmed, wait for the automatic retry. If Retry with the same details appears, use that button to continue. Your input and selected images are retained. See When the save result cannot be confirmed.
Reopen the deal and confirm the recorded identity check and the next step for inventory and payment. Return to step 7 of Start a counter purchase.

Troubleshooting
| What happens | What to check and how to continue |
|---|---|
| Photos cannot be submitted | Check the type, required sides, 20MB total limit and confirmation checkbox. Use different images for front and back |
| Text is unreadable | Remove the image and take another photo. Check that text remains readable when enlarged |
| Connection or reading error | Keep the input and retry with the same photos. If the page says the photos are already submitted, continue to signing without submitting them again |
| The camera cannot be used | Press 「撮影できない・スタッフに相談する」 (Unable to photograph; ask staff). Staff open See progress → Unable to photograph the ID?, record a reason and switch this session to staff entry. Follow the fallback steps |
| Staff see an incorrect reading | Correct the fields against the original. If the customer’s details are wrong, use Edit customer details (new tab), save, then reopen the identity check |
| Wrong document type | Before signing, choose the type again and retake the photos. After signing, staff start a new session so the customer can photograph the correct document and sign again |
| Photos do not open | Close and reopen the identity check. Do not mark the check complete without seeing the photos |
| Signed, but cannot record the purchase | Check the staff identity record, signature for the latest quote, customer details and required permissions |
| Image reading is busy | Wait before retrying on the same screen. Avoid repeated clicks; enter the details from the original manually when appropriate |
| The same customer’s next deal | Verification does not automatically complete another deal. Check the deal number before recording its identity check |