

Visit bookings
Visit bookings let customers book, from a booking page, the time they will bring their cards to your shop. When a booking comes in, that customer’s counter deal is created. When they arrive, you check them in and carry on with the steps in Start a counter purchase.
What you need
- Only members who manage settings (owners and admins) can change booking settings
- Checking in, marking no-shows and cancelling need permission to view and change customers and deals
- A location of type Store (create it under Settings › Locations)
The steps and booking statuses
| Step | What you do | Who | Booking status |
|---|---|---|---|
| 1 | Create a booking page | The shop | ― |
| 2 | Book from the booking page | Customer | Booked |
| 3 | (If needed) change the time or cancel | Customer | Booked, Cancelled |
| 4 | See the schedule under Visit bookings | The shop | Booked |
| 5 | Check the customer in when they arrive | The shop | Checked in |
| 6 | Mark as no-show if they don’t come | The shop | No-show |
As soon as a booking comes in, a customer record (provisional) and a counter deal (status New) are created. The deal number is the same as the booking number (R- followed by 6 digits).
1. Create a booking page
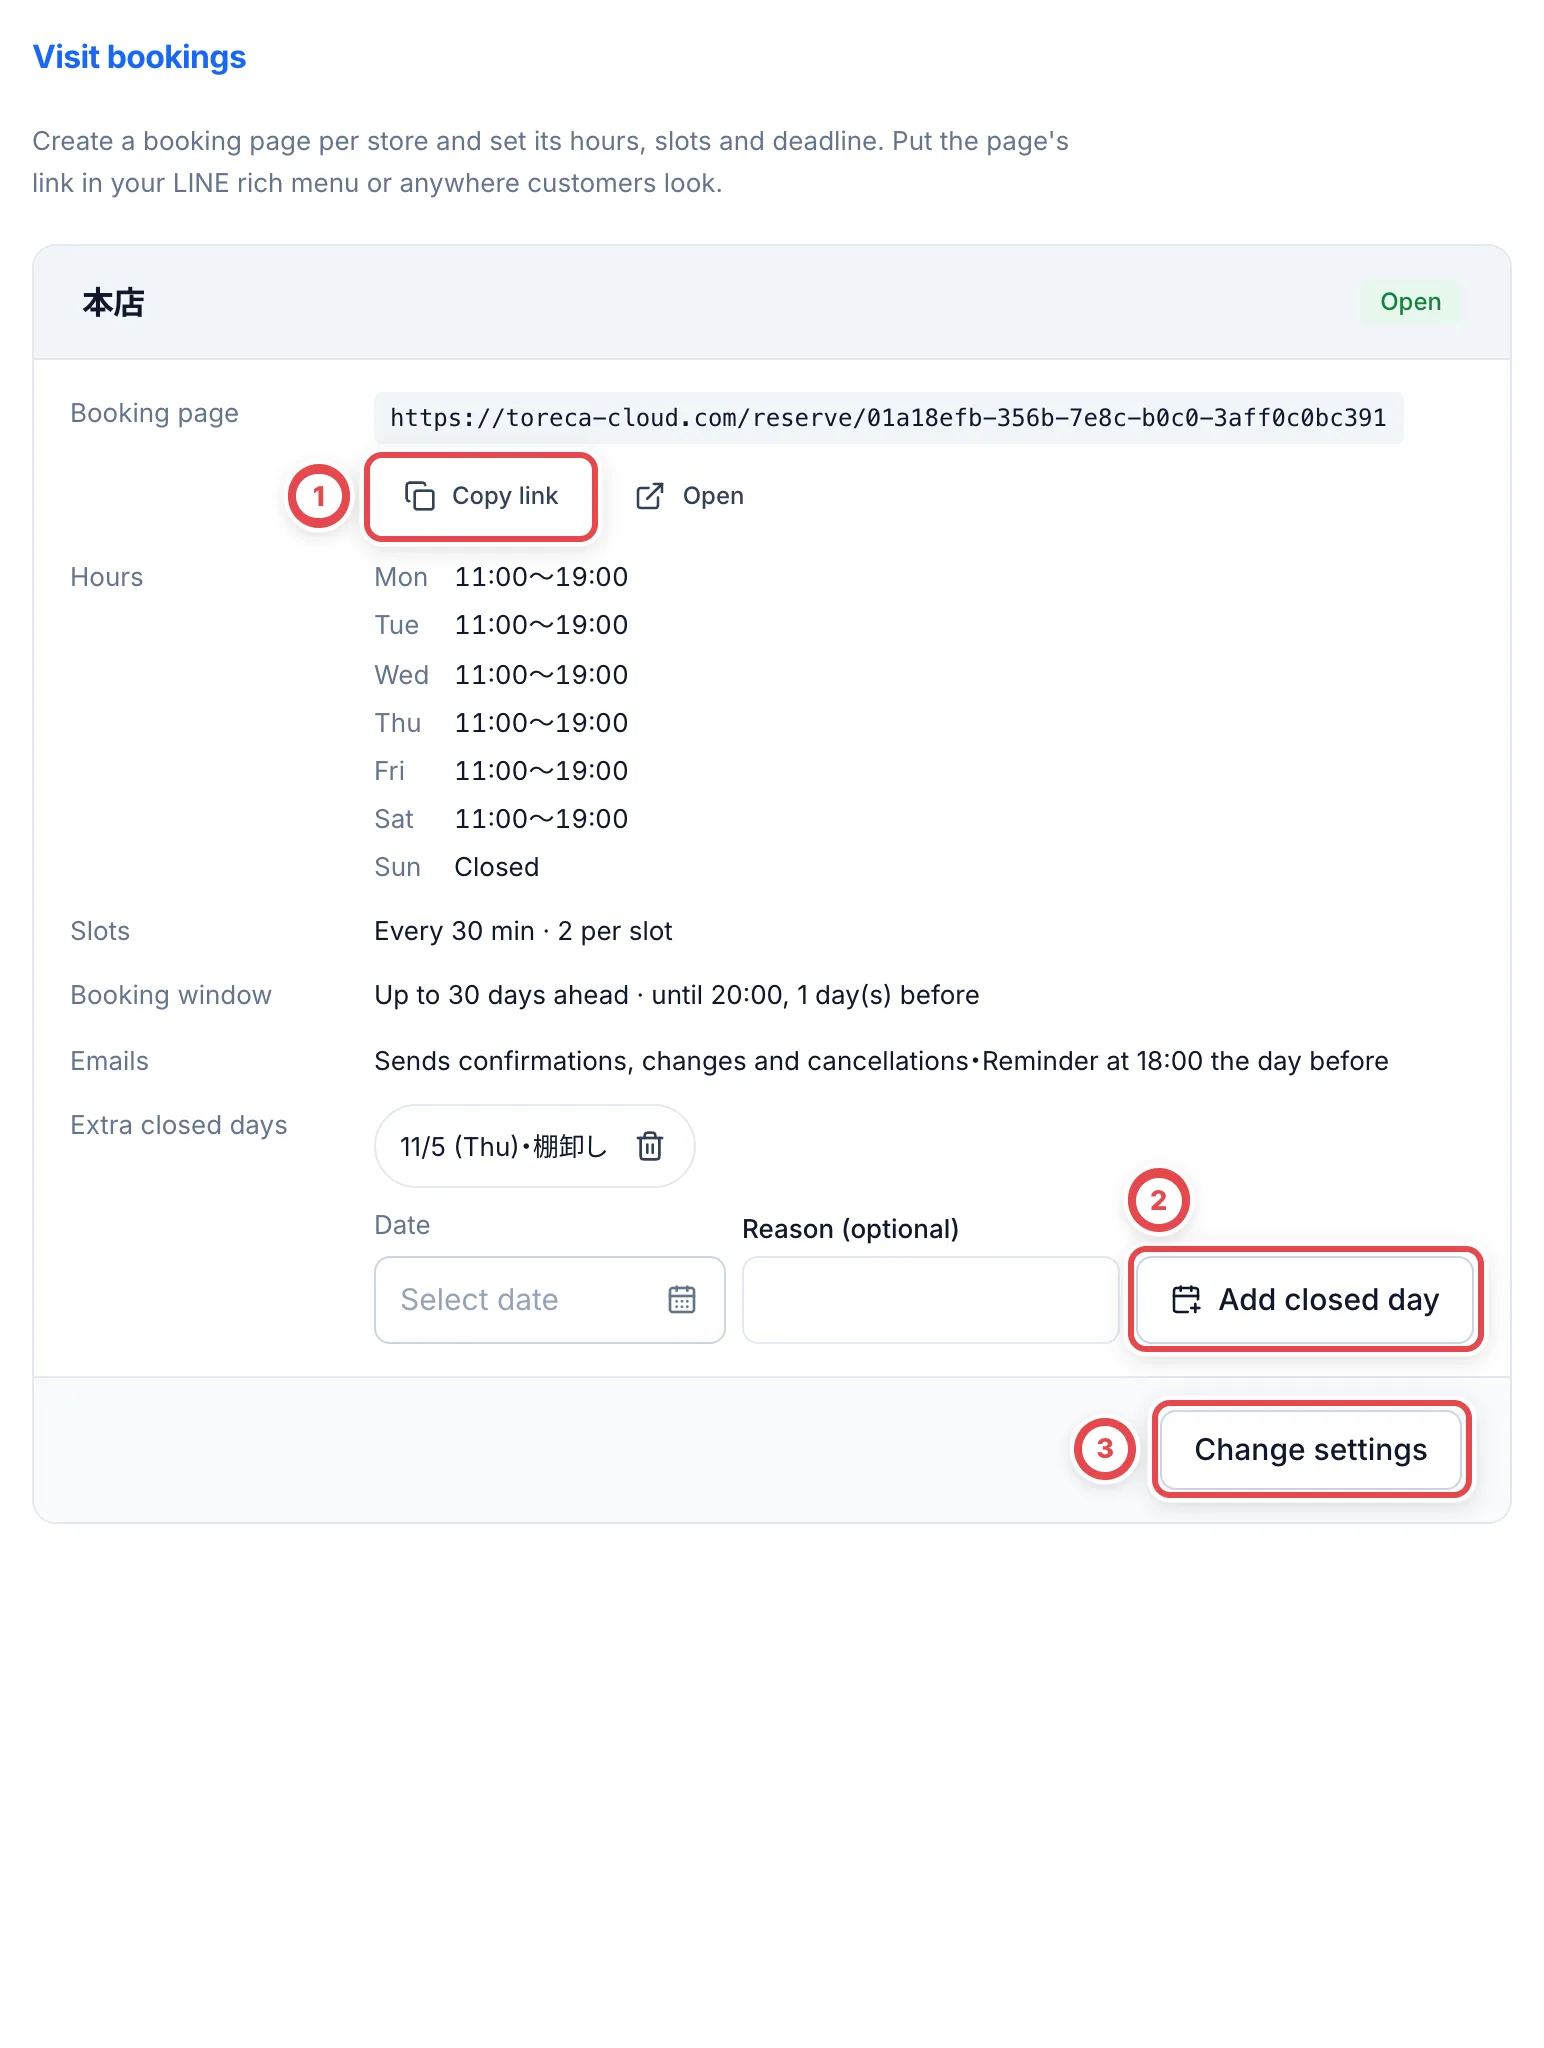
Open Settings › Visit bookings to see one card for each store. The first time, click Create booking page. After that, click Change settings (③).
In the settings dialog, decide the items below, then click Save settings (④). Saving updates the booking page right away.
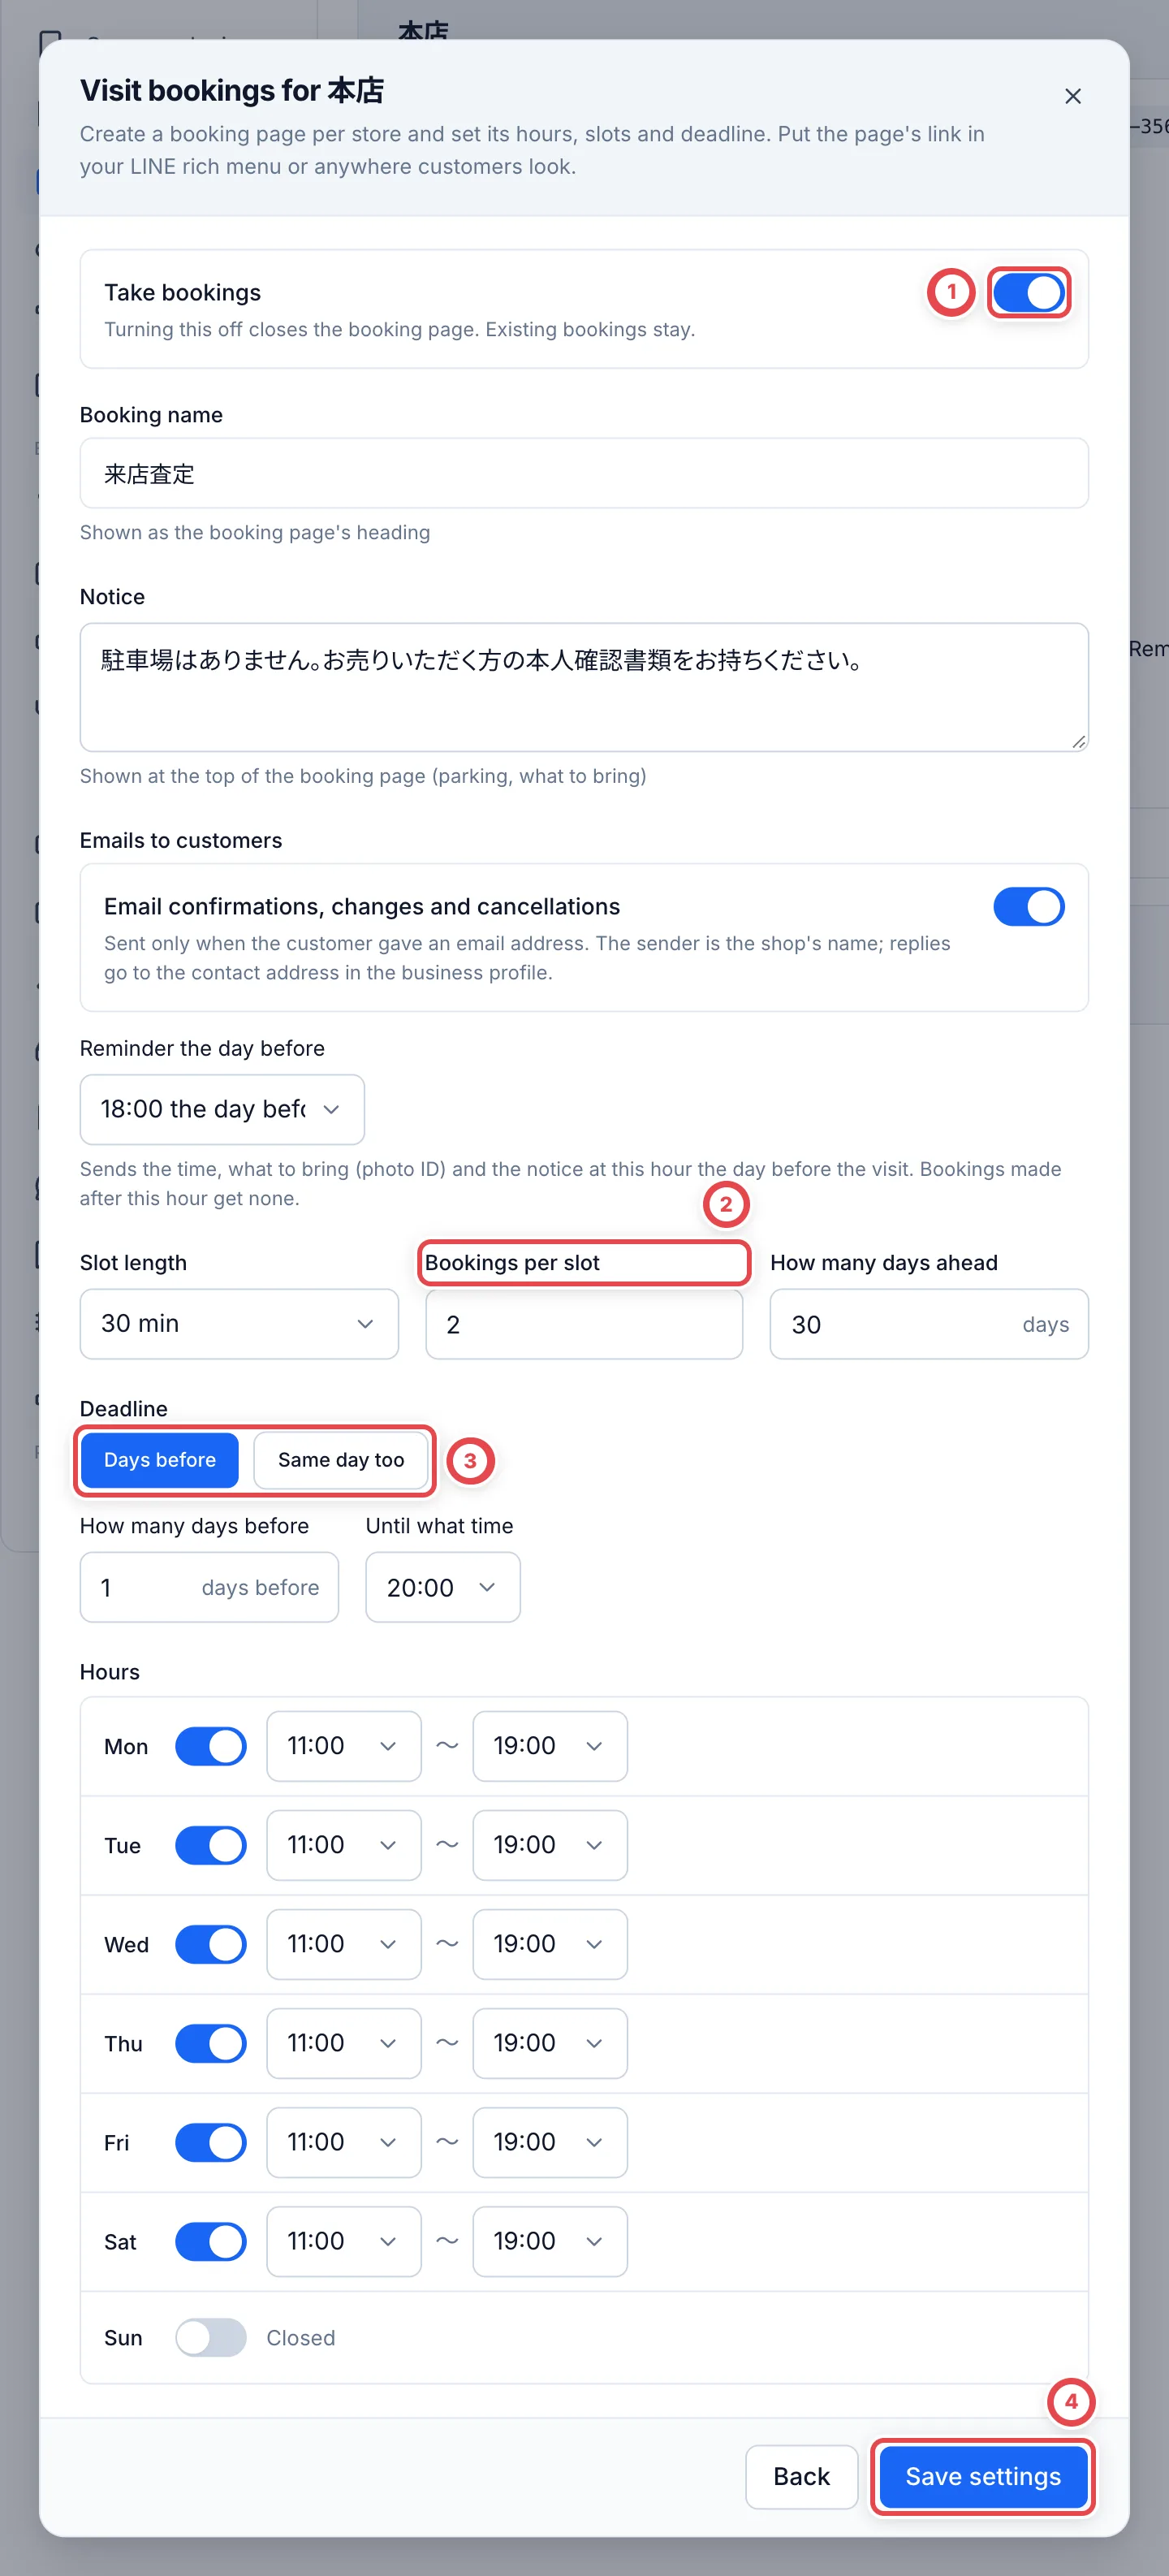
| Item | What to decide |
|---|---|
| ① Take bookings | Turning this off closes the booking page. Existing bookings stay |
| Booking name, Notice | The heading of the booking page, and the notice shown at the top (parking, what to bring) |
| Emails to customers | Whether to email confirmations, changes and cancellations, and what time to send the reminder the day before. Only customers who gave an email address receive them |
| Slot length, ② Bookings per slot | How many minutes each slot lasts, and how many bookings you take in the same slot (1 to 20) |
| How many days ahead | How many days ahead customers can book, counting today as day 1 (1 to 90 days) |
| ③ Deadline | Days before (how many days before, and until what time) or Same day too (until how many minutes before the slot starts) |
| Hours | Opening and closing times for each day of the week. Only days that are switched on take bookings |
Copy the booking page link with Copy link (①) and put it in your LINE rich menu or wherever customers will see it.
While bookings are turned off, customers cannot see the buttons to change or cancel. An issued private booking link still shows the details; the shop handles changes during that time. Looking up a booking by number and phone requires an active booking page.
To add an extra closed day, choose a date and a reason (optional) below the card, then click Add closed day (②). The day stops taking bookings right away (existing bookings stay). To remove it, click the trash icon on the closed day.
2. Book from the booking page (customer)
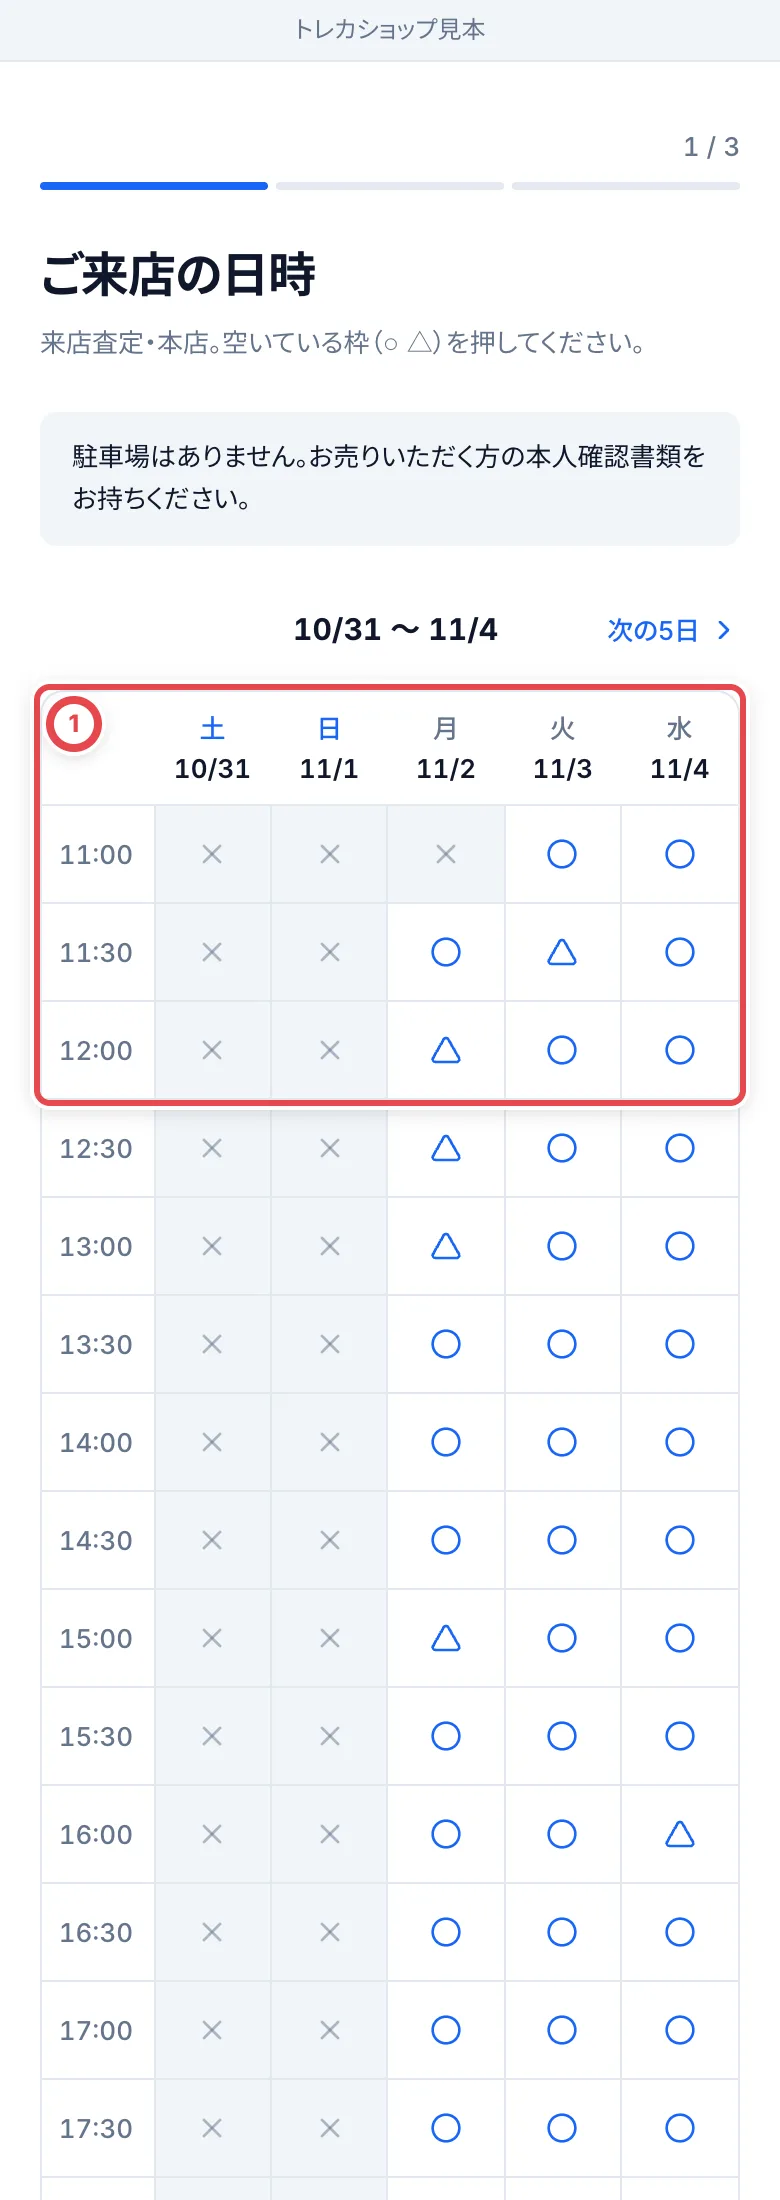
On the booking page, the customer clicks an open slot (○ or △) at ①. △ means one booking left, and × means the slot is full or past its deadline.
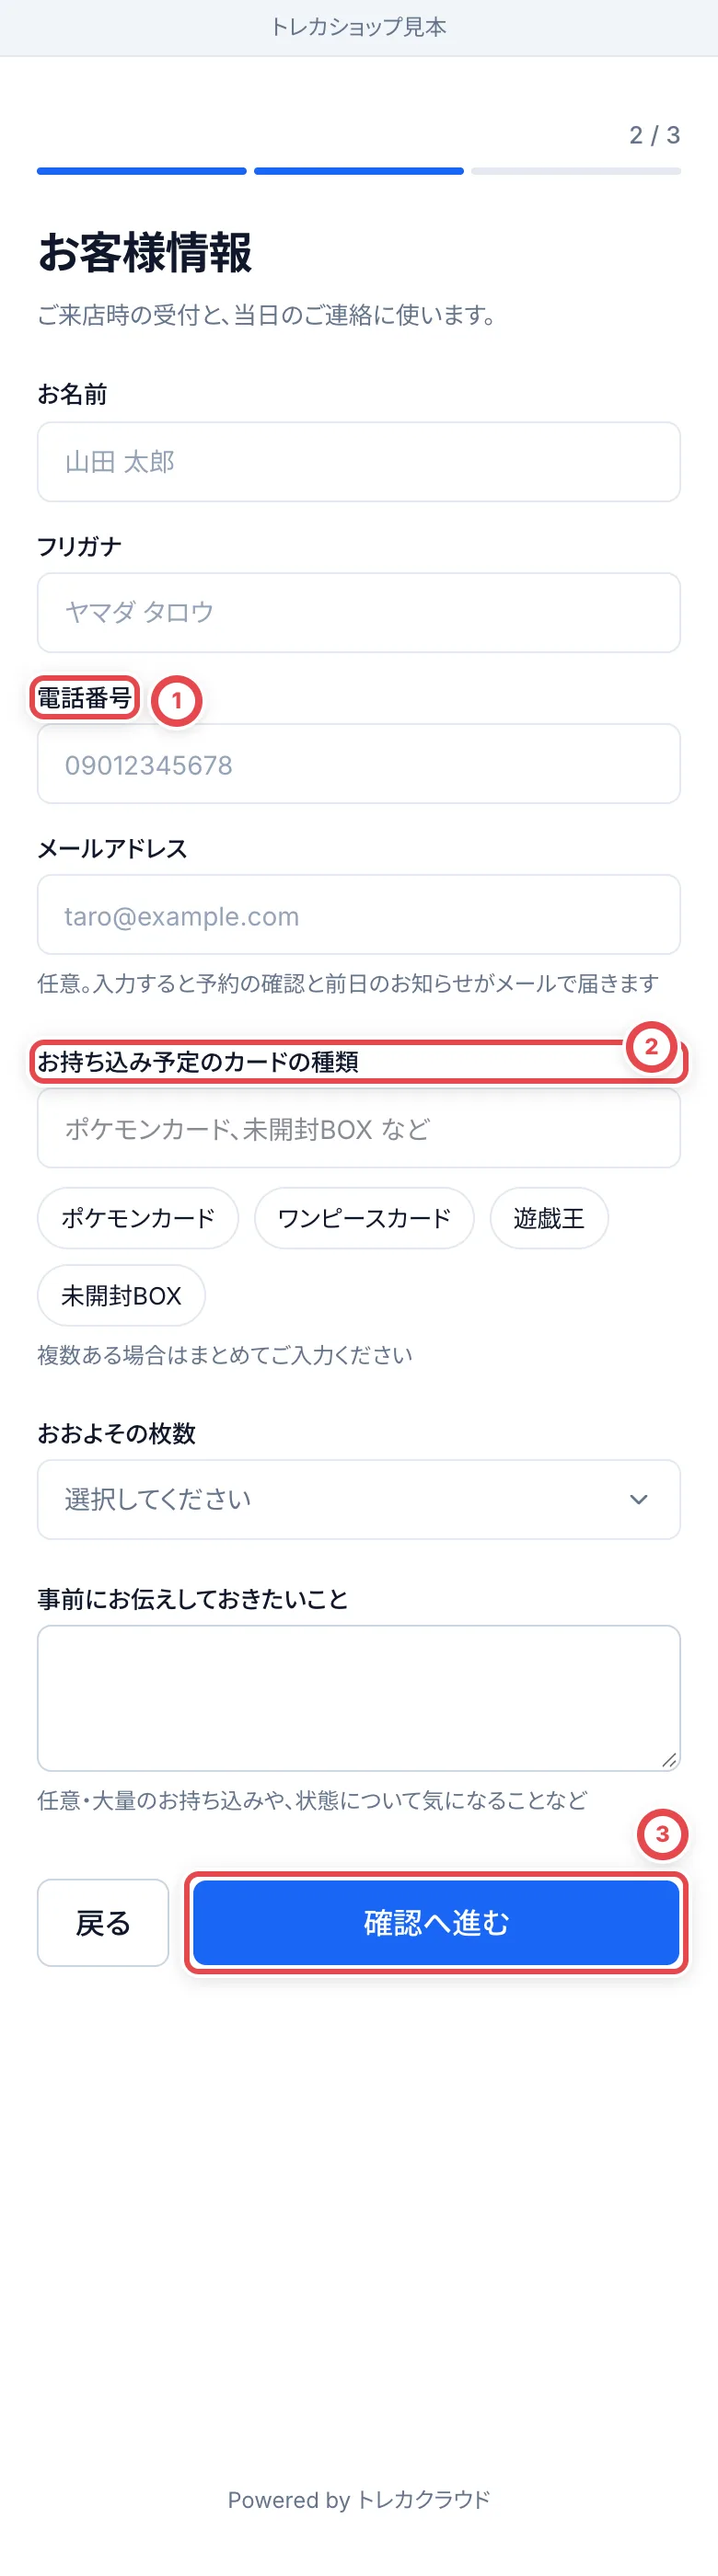
Next, the customer enters their name, the reading of their name (furigana), phone number, email address (optional), the type of cards they will bring and roughly how many. They click 「確認へ進む」 (Continue to confirmation) at ③, then 「予約する」 (Book), and a booking number appears.
On a phone, tapping 「おおよその枚数」 (Approximate quantity) opens choices at the bottom of the screen. Choose a quantity, then check the date, store and contact details before booking. Ask the customer to keep the booking number and the management link from the completion screen. Opening the booking page again in the same tab retains that completion screen; 「別の日時でもう1件予約する」 (Book another visit) starts a separate booking.
3. Change the time or cancel (customer)
Customers can open their booking with the booking number and phone number. They can use the link on the booking confirmation screen or in the email, or 「予約の確認・変更・キャンセルはこちら」 (Check, change or cancel your booking here) on the booking page. 「日時を変更する」 (Change the date and time) at ① moves the booking to an open slot. 「キャンセル」 (Cancel) at ② can’t be undone.
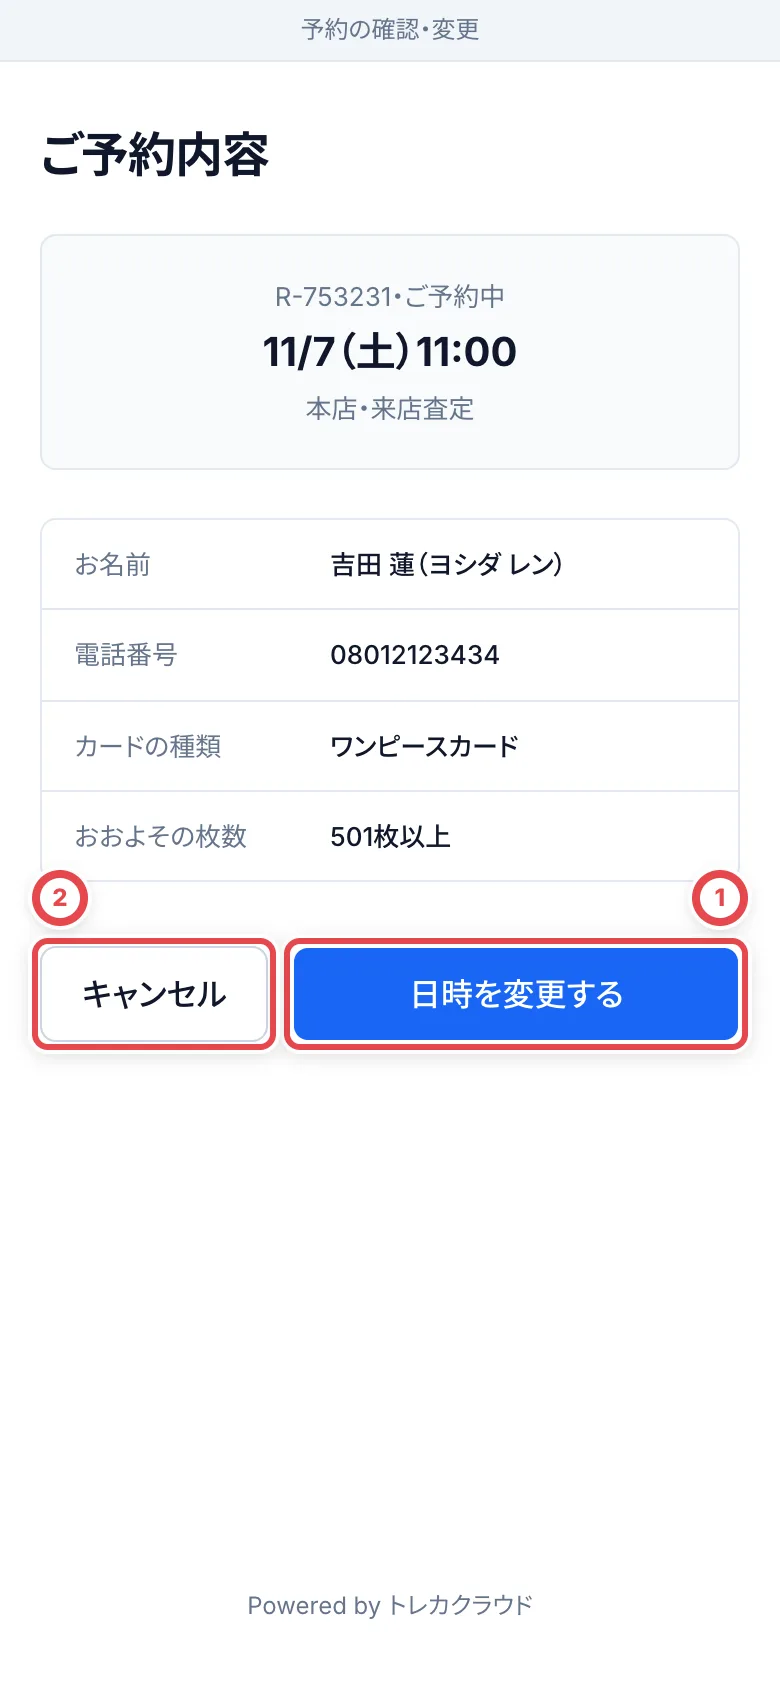
- While the booking is Booked and the booking page is active, customers can change or cancel before their visit starts. A replacement slot must still be before its booking deadline
- When a customer changes the time or cancels, your staff get a notification (notification type 「来店予約の変更・キャンセル」, Visit booking changed or cancelled). The deal of a cancelled booking is withdrawn
4. See the schedule under Visit bookings
Open Visit bookings in the sidebar to see a weekly calendar. Bookings are listed by name and rough number of cards. Click one, as at ①, to see its details. Extra closed days show Closed (②) in their column.
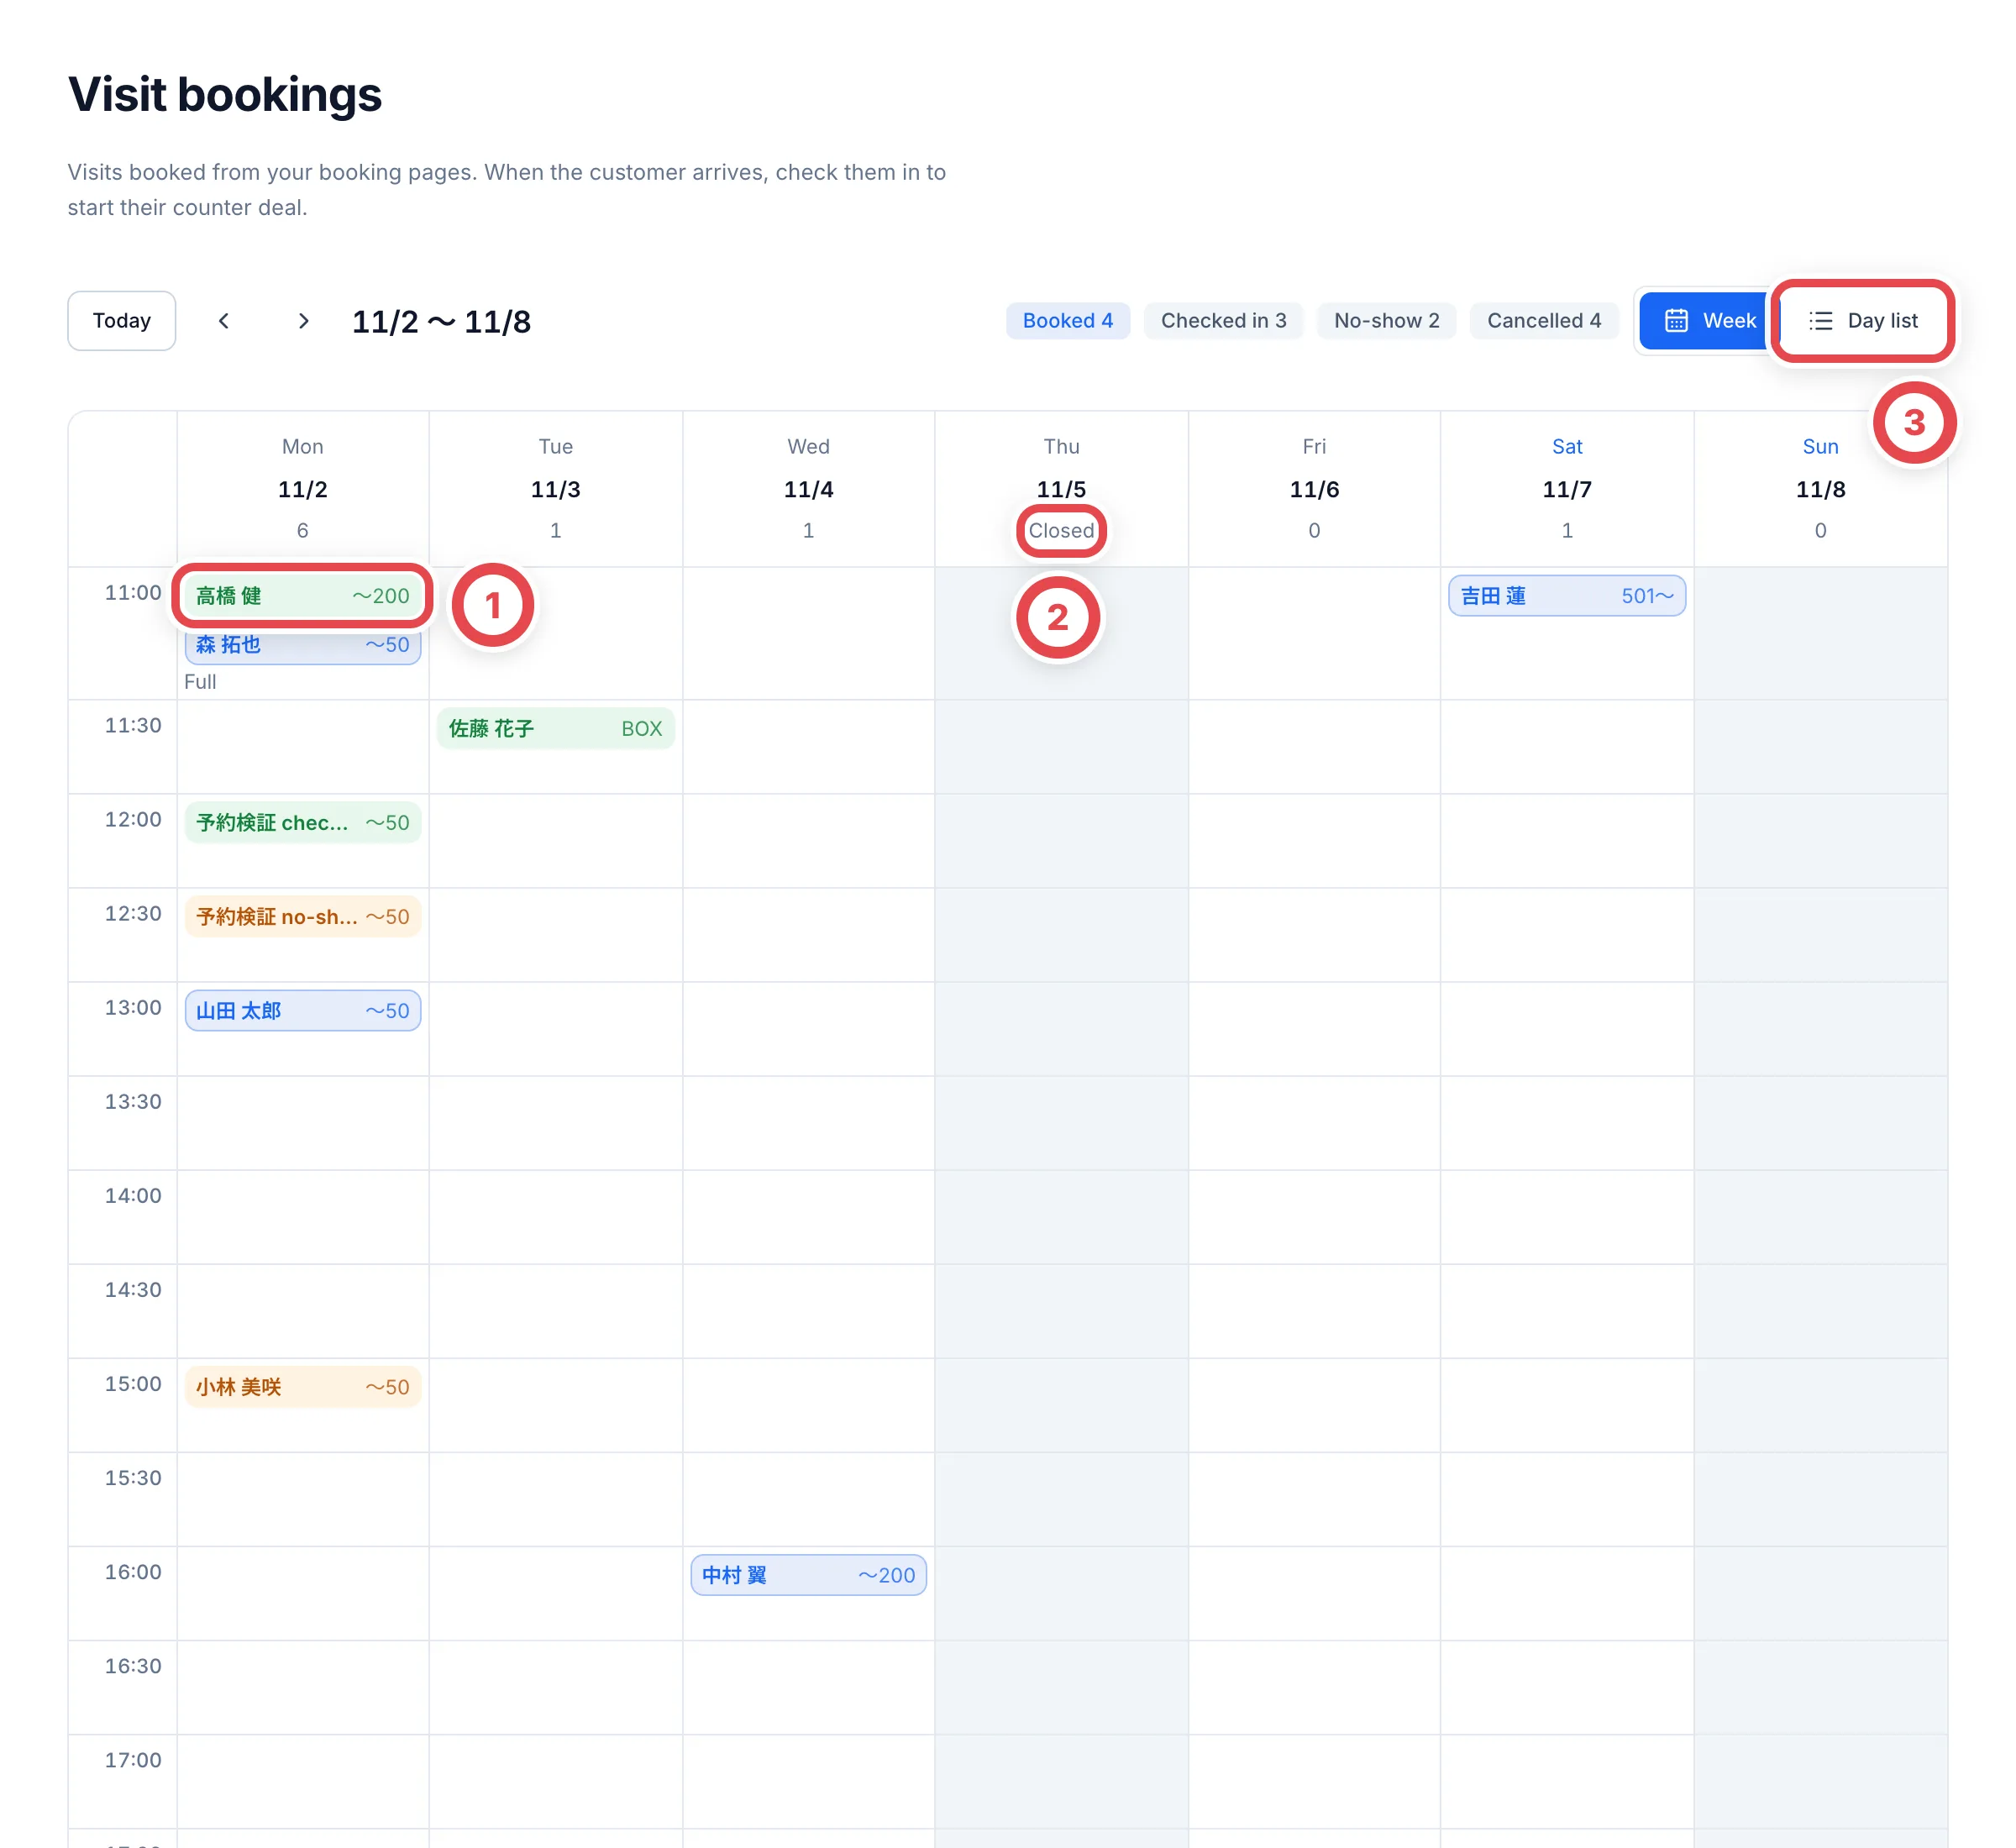
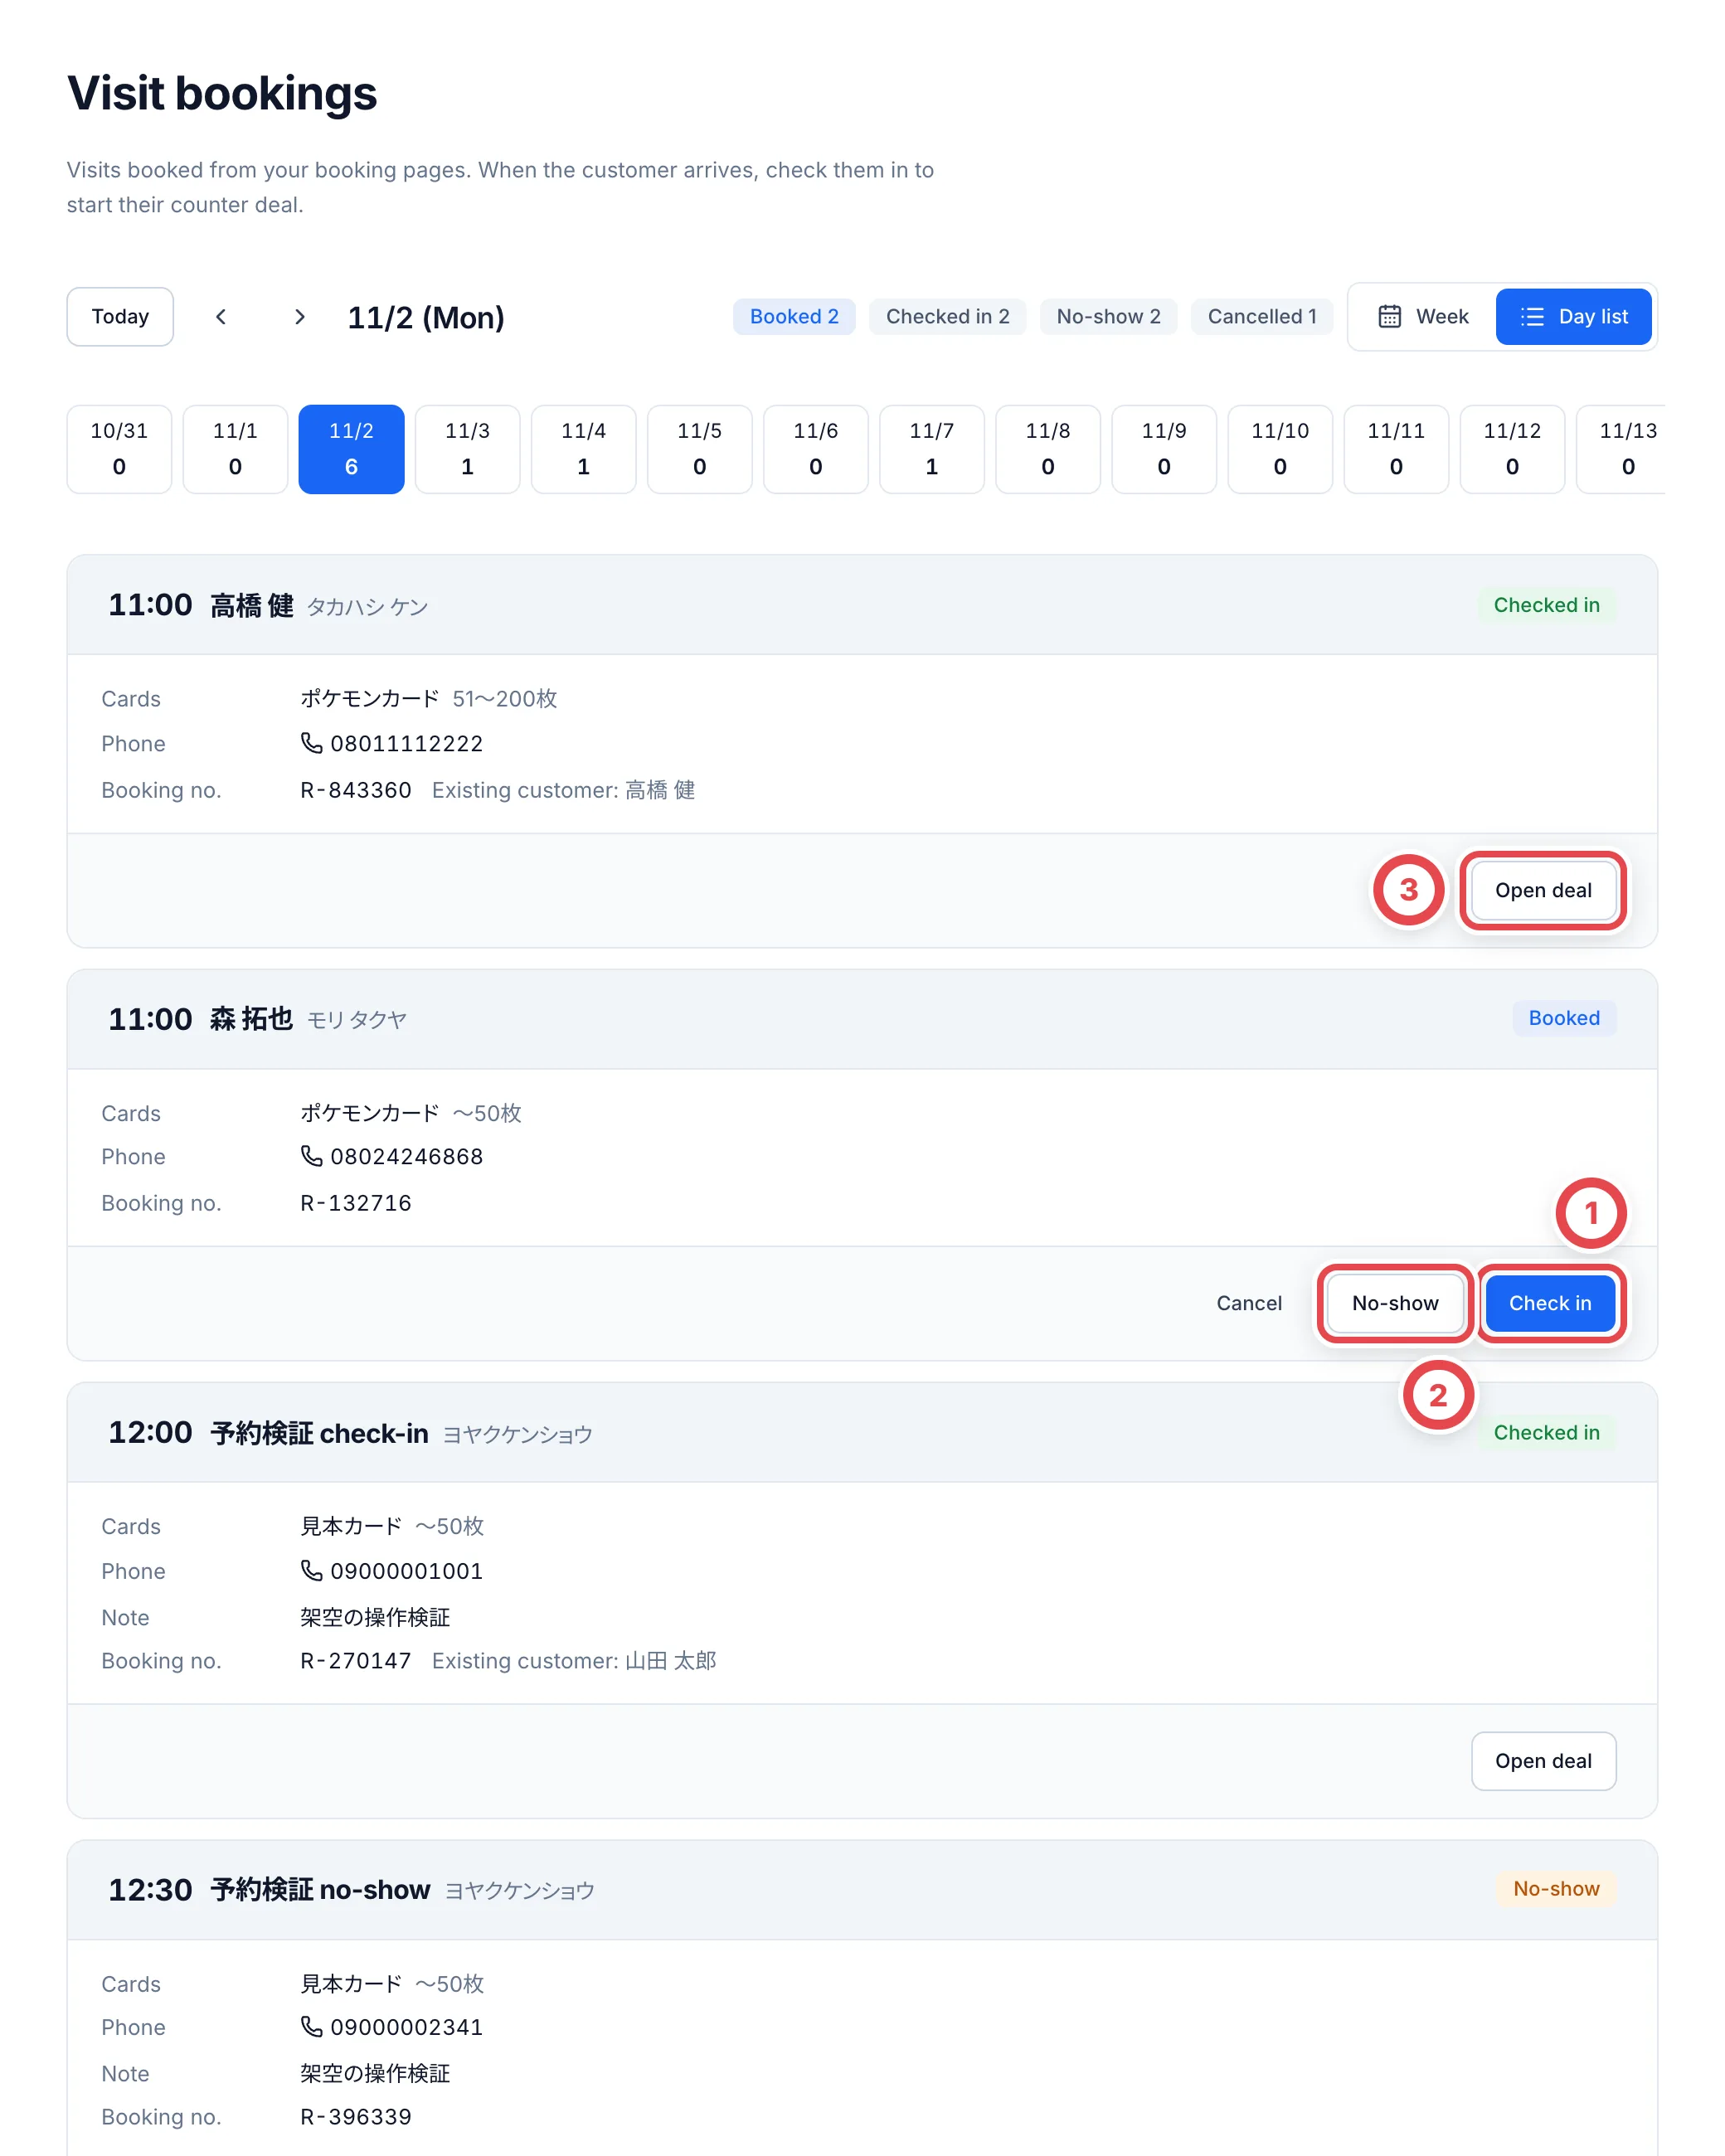
Switch to Day list (③) to see that day’s bookings as cards, with the card types, phone number, note and booking number. The bar at the top also counts bookings in the next two weeks, including checked-in visits and no-shows, and excluding cancellations. Cancelled bookings appear only in the day list.
5. Check the customer in when they arrive
When the customer arrives, click Check in (①) on their booking. A Check in dialog with their name opens, where you choose which customer this visitor is.
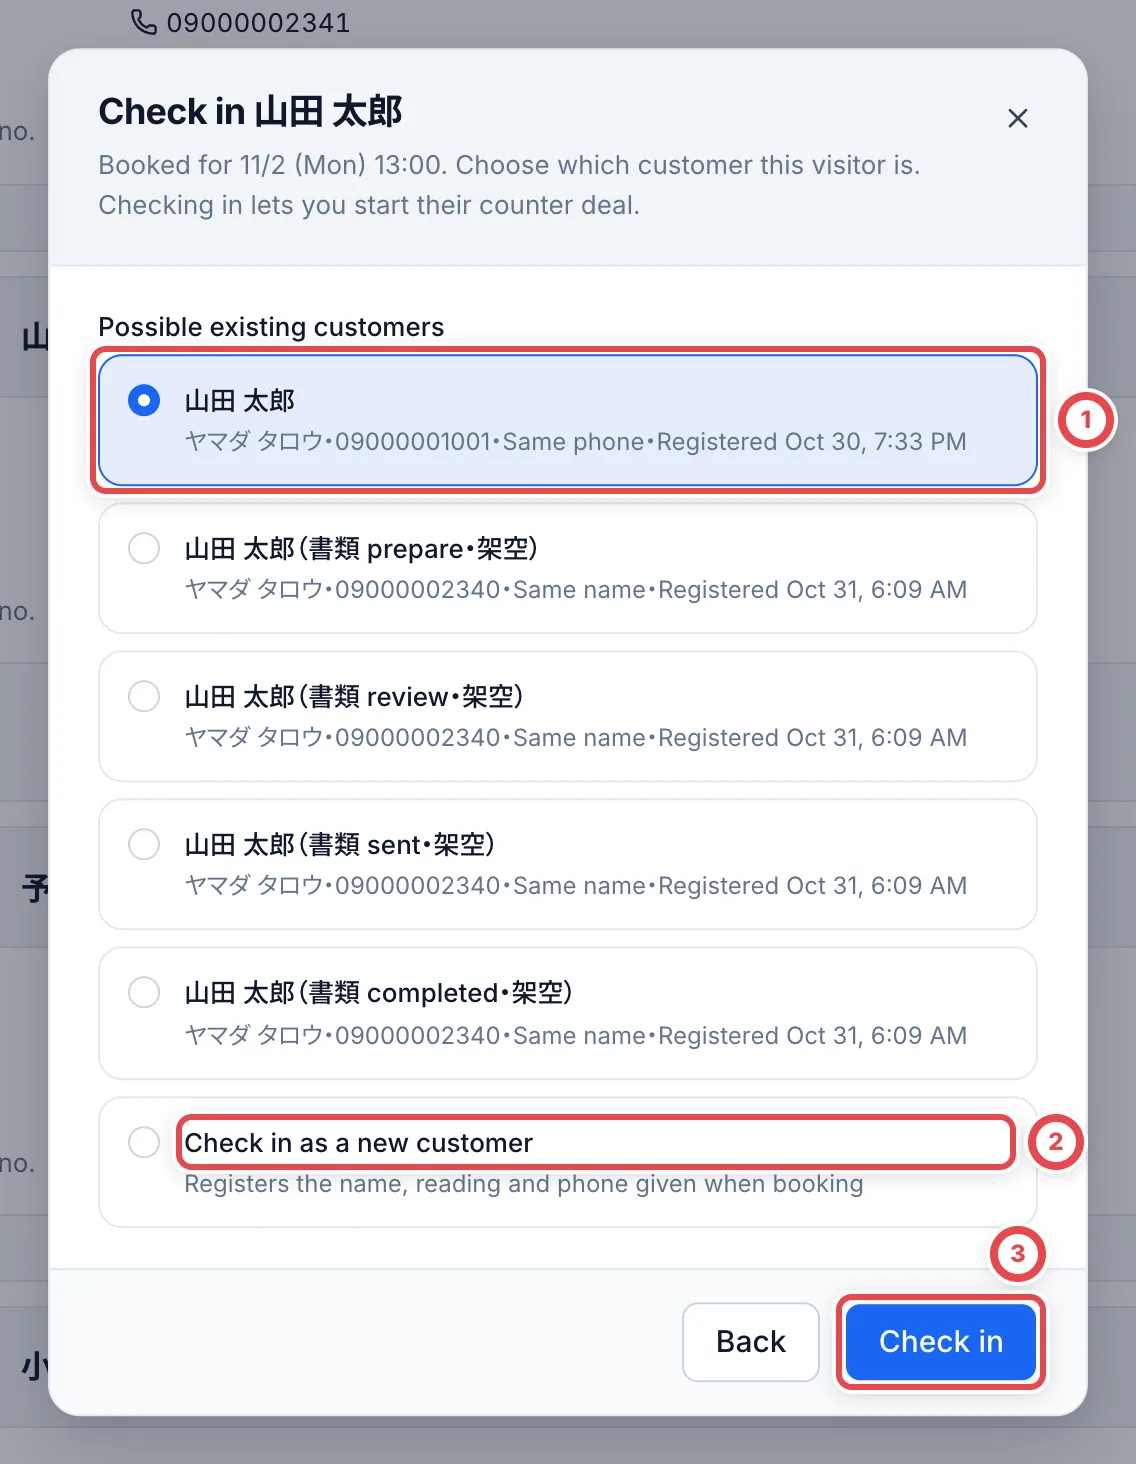
- If an existing customer has the same phone number or name, they appear as a candidate, as at ①. Choose them and the deal moves to that customer. The provisional customer created by the booking is no longer used
- For a first-time customer, choose Check in as a new customer (②). They are registered with the name, reading and phone number entered when booking
Click Check in (③) and the booking becomes Checked in, and the customer’s deal page opens. From here, follow the steps in Start a counter purchase to add cards and appraise them (you don’t need to add the purchase request again). Checking in can’t be undone.
6. Mark as no-show if they don’t come
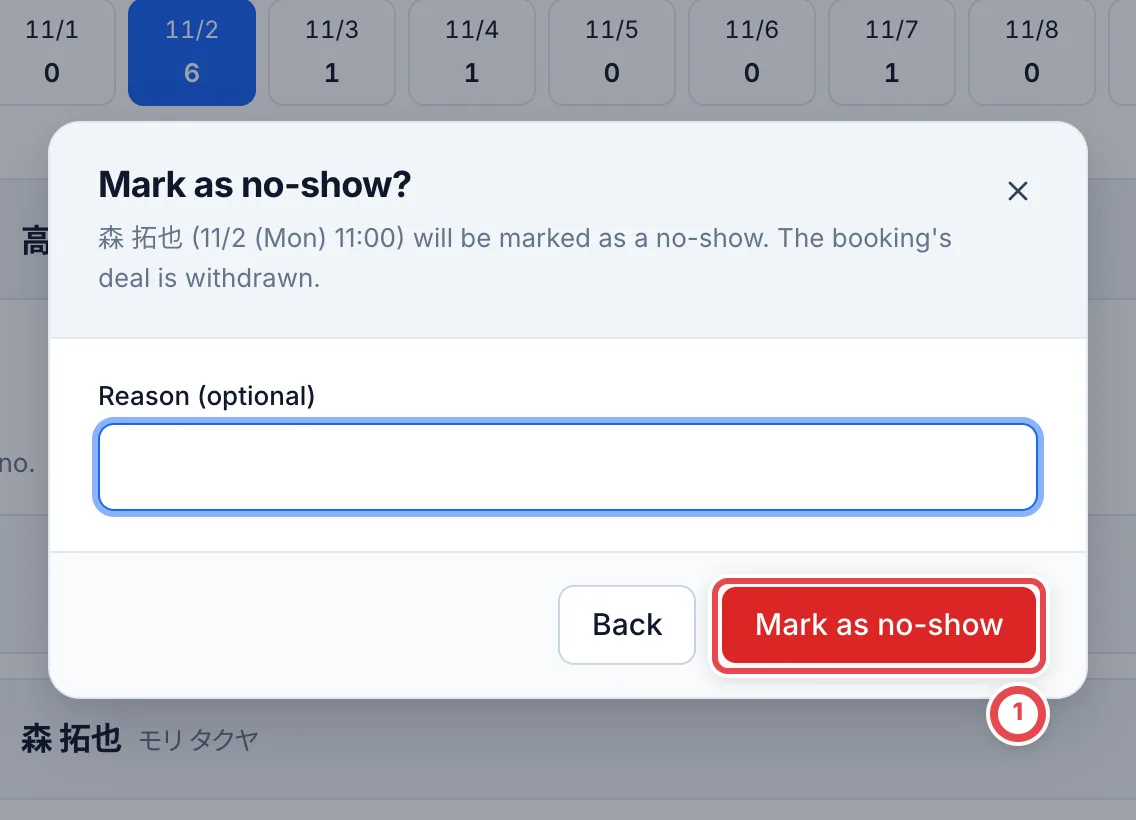
For a booking where the customer didn’t come, click No-show, enter a reason (optional), and click Mark as no-show (①). The booking’s deal is also withdrawn, and this can’t be undone. The slot of a no-show stays taken.
To cancel a booking because the shop can’t take it, click Cancel on the booking. The deal is withdrawn and the slot opens up again. If the customer gave an email address, they get a cancellation email (the reason isn’t included).
Checking in, no-show and cancel only work while the booking is Booked. A booking whose deal work has already started can’t be handled from Visit bookings, so handle it from the deal page.
When something goes wrong
| What’s happening | What to check or how to fix it |
|---|---|
| You see “There is no store location” | Under Settings › Locations, create a location of type Store. |
| The booking page shows 「この予約ページは現在利用できません」 (This booking page isn’t available right now) | Take bookings is off, or you haven’t created the booking page yet. Check the settings. |
| You can’t choose today’s slots | If the deadline is Days before, today’s slots can’t be booked. To take bookings on the same day, choose Same day too. |
| Every slot on the booking page shows × | Check the hours, closed days and how many days ahead you take bookings. |
| The customer who arrived isn’t listed as a candidate when checking in | If neither the phone number nor the name matches, they won’t appear. Choose Check in as a new customer and merge the customers later. |
| You see 「この予約の取引は作業が進んでいるため、取引の画面から扱ってください」 (This booking’s deal is already in progress, so handle it from the deal page) | Work on the deal has started. Withdraw it or handle it from the deal page. |
| You see 「予約が更新されています。画面を開き直してください」 (The booking has been updated. Reopen the screen) | Another member or the customer changed it first. Reopen the screen. |